9
STEP II - Attaching the jig
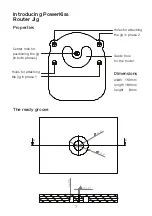
Position the jig by fastening a
countersink screw through the center
hole of the jig to the drilled 3.5mm hole.
Ensure that the jig is able to turn freely
using the screw as a center point
Attach the jig firmly to the surface with
two countersink screws from the holes
depicted in the picture
Summary of Contents for Jig
Page 1: ...PowerKiss Router Jig ...
Page 2: ...PowerKiss Router Jig User Guide Version 2 0 PowerKiss 2011 ...
Page 16: ......


