background image

3

Important information - read before proceeding

• PowerKiss Router Jig is compatible with all plunge-capable routers that 
can be fitted with a 17mm copy ring. If a 17mm ring is not available for your 
router, you can fit the following subplate and ring:  http://www.trend-uk.
com/en/FI/productlist/4/1008/Universal_Sub-base.html

• The PowerKiss Router Jig is an accessory for handheld routers. Always 
use powertools and their accessories according to manufacturer’s 
instructions; read and understand the instruction manuals before the use

• The PowerKiss Router Jig is designed to be used for milling wooden 
or wood-based surfaces and should not be used for carving metal or 
distinctly fragile surfaces (consisting or containing e.g. high amount of 
paper, cardboard or glass) 

• Use PowerKiss Router Jig for only in surfaces with thickness of 15-50mm

• PowerKiss is not responsible for third-party products and their quality 
before or after the installation; the person conducting the milling should 
always consult the manufacturer of the target surface before starting the 
work to ensure compatibility

Summary of Contents for Jig

Page 1: ...PowerKiss Router Jig ...

Page 2: ...PowerKiss Router Jig User Guide Version 2 0 PowerKiss 2011 ...

Page 3: ...manufacturer s instructions read and understand the instruction manuals before the use The PowerKiss Router Jig is designed to be used for milling wooden or wood based surfaces and should not be used for carving metal or distinctly fragile surfaces consisting or containing e g high amount of paper cardboard or glass Use PowerKiss Router Jig for only in surfaces with thickness of 15 50mm PowerKiss ...

Page 4: ...on 6 Introducing PowerKiss Router Jig 7 Properties 7 The ready groove 7 Using the PowerKiss Router Jig 8 STEP I Preparing the table 8 STEP II Attaching the jig 9 STEP III Placing the router 10 STEP IV Setting the plunge depth 11 STEP V Using the router 12 STEP VI Checking the groove 13 Additional safety instructions 14 ...

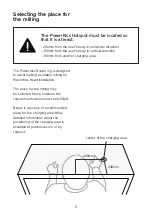
Page 5: ...d freely however the requirements above must be fulfilled Below is a picture of recommended place for the charging area More detailed information about the positioning of the charging area is available at powerkiss com or by request The PowerKiss Hotspot must be located so that it is at least 200mm from the user s body in horizontal direction 250mm from the user s body in vertical direction 300mm ...

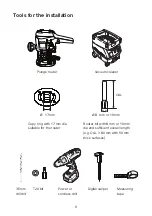
Page 6: ...er Router bit with 8 mm or 10 mm dia and sufficient overall length e g OAL 80 mm with 50 mm thick surfaces Tools for the installation Power or cordless drill Vacuum cleaner Digital caliper Measuring tape 3 5mm drill bit T20 bit 16 00 mm Ø 8 mm or 10 mm OAL Ø 17 mm ...

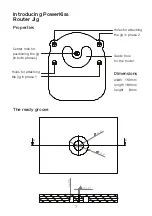
Page 7: ...68 1 A A 4 0 5 3 5 0 1 SECTION A A Guide hole for the router Holes for attaching the jig in phase 1 Holes for attaching the jig in phase 2 Center hole for positioning the jig in both phases Dimensions width 150mm length 180mm height 8mm The ready groove ...

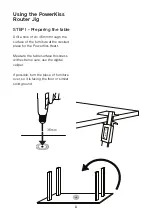
Page 8: ... 3 5mm through the surface of the furniture at the desired place for the PowerKiss Heart Measure the table surface thickness with extreme care use the digital caliper If possible turn the piece of furniture over so it is facing the floor or similar solid ground 2 0 0 0 m m 3 5mm ...

Page 9: ... countersink screw through the center hole of the jig to the drilled 3 5mm hole Ensure that the jig is able to turn freely using the screw as a center point Attach the jig firmly to the surface with two countersink screws from the holes depicted in the picture ...

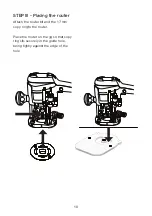
Page 10: ...EP III Placing the router Attach the router bit and the 17 mm copy ring to the router Place the router on the jig so that copy ring sits securely in the guide hole being tightly against the edge of the hole ...

Page 11: ...ly 4 mm 0 5 mm Pay special attention to the plunge depth setting of the router and re measure the furniture surface if you are not sure of its thickness 4 mm 2 0 0 0 m m 8 mm 20 mm 24 mm For example in case of 20 mm thick table top the router must be set to plunge eventually 24 mm deep 20 mm 8 mm 4 mm 24 mm in order to get 4 mm thick surface in the finished groove Notice that you should not exceed...

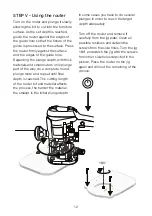
Page 12: ... of the way do a complete round plunge more and repeat until final depth is reached The cutting length of the router bit and material affects the process the harder the material the smaller is the initial plunge depth In some cases you have to do several plunges in order to reach the target depth adequately Turn off the router and remove it carefully from the jig plate Clean all possible residues ...

Page 13: ...ctly 4 mm 0 5 in the finished groove If necessary do a another round of processing Also check that the inner diameter of the hole is 34mm 1 mm and the outer diameter is 68 mm 1 mm 34 mm 1 68 mm 1 2 0 0 0 m m 4 mm 0 5 16 0 0 mm For example in case of 20 mm thick table top the ready groove should be 16 mm deep in order to have 4 mm thick surface in the finished groove 20 mm 16 mm 4 mm ...

Page 14: ...ore using the jig we recommend you practice a few joints with off cuts of worktops or other materials to familiarize yourself with the jig Always ensure that the path of the router is kept clear of any obstruction e g clamps Always ensure that the cable of the router is clear of the jig and is of sufficient length Do not switch router on with the cutter touching the work piece Do not force the rou...

Page 15: ...Use a face or dust mask if operation is likely to be dusty and ear defenders during periods of operations Don t wear loose clothing neckties or jewellery or other items which may get caught in moving parts Wear non slip footwear cover or tie back long hair and roll long sleeves above the elbow Never exceed 10mm depth cut in one cut Be sure to set plunge depth correctly plunging through the table w...

Page 16: ......

Reviews: