background image

8843773 

5/16 in. Straight Grip Air Punch and Flange Tool 

V1.0 

For technical questions call 1-800-665-8685 

5. 

Non-skid footwear is recommended to maintain footing and balance in 
the work environment. 

6.  This tool can cause hearing damage. Wear hearing protection gear with 

an appropriate Noise Reduction Rating to withstand the decibel levels. 

7. 

The tool may contain high pressure. Use safety glasses and gloves for 
protection during operation. Keep hands clear of the exposed rubber 
portions of the hose. 

PERSONAL PRECAUTIONS 

Control the tool, personal movement and the work environment to avoid 
personal injury or damage to tool. 
1. 

Do not operate any tool when tired or under the influence of drugs, 
alcohol or medications. 

2.  Avoid wearing clothes or jewelry that can become entangled with the 

moving parts of a tool. Keep long hair covered or bound. 

3. 

Do not overreach when operating a tool. Proper footing and balance 
enables better control in unexpected situations. 

4. 

Keep your fingers away from the trigger/switch while carrying the tool, 
attaching an air hose or an accessory. Lock the trigger/switch safety if 
available. 

5. 

Avoid unintentional starts. Be sure that the regulator/throttle switch is 
in the neutral or OFF position when not in use and before connecting it 
to any air source. 

6. 

Never point the air stream or tool at any point of your body, other people 
or animals. Debris and dust ejected at high speed can cause an injury. 

7. 

Serious injury or death may occur from inhaling compressed air. The air 
stream may contain carbon monoxide, toxic vapors or solid particles. 
Never inhale compressed air directly from the pump or air tool. 

8.  Securely hold this tool using both hands. Using a tool with only one 

hand can result in loss of control. 

SPECIFIC SAFETY PRECAUTIONS 

WARNING! DO NOT let comfort or familiarity with product (gained from 
repeated use) replace strict adherence to the tool safety rules. If you use 
this tool unsafely or incorrectly, you can suffer serious personal injury. 

1. 

Use the correct tool for the job. This tool was designed for a specific 
function. Do not modify or alter this tool or use it for an unintended 
purpose. 

Summary of Contents for 8843773

Page 1: ...V1 0 8843773 Please read and understand all instructions before use Retain this manual for future reference ...

Page 2: ... possibility of property damage injury or death if certain instructions are not followed DANGER This notice indicates an immediate and specific hazard that will result in severe personal injury or death if the proper precautions are not taken WARNING This notice indicates a specific hazard or unsafe practice that could result in severe personal injury or death if the proper precautions are not tak...

Page 3: ...yone not wearing the appropriate safety equipment away from the work area 3 Store unused tools properly in a safe and dry location to prevent rust or damage Lock tools away and keep out of the reach of children 4 Do not install or use in the presence of flammable gases dust or liquids PERSONAL SAFETY WARNING Wear personal protective equipment approved by the Canadian StandardsAssociation CSA or Am...

Page 4: ...ep your fingers away from the trigger switch while carrying the tool attaching an air hose or an accessory Lock the trigger switch safety if available 5 Avoid unintentional starts Be sure that the regulator throttle switch is in the neutral or OFF position when not in use and before connecting it to any air source 6 Never point the air stream or tool at any point of your body other people or anima...

Page 5: ...cause an injury to you or a bystander 10 Before using the tool on a workpiece test the tool by running it at the highest speed rating for at least 30 seconds in a safe position Stop immediately if there is any abnormal vibration or wobbling Check the tool to determine the cause 11 Never force the tool Excessive pressure could break the tool resulting in damage to your workpiece or serious personal...

Page 6: ...and bleed the air tool of any remaining compressed air before leaving the air tool unattended 9 Serious injury may occur from loose debris being propelled at high speeds from the compressed air stream Always wear OSHA approved safety glasses to protect the eyes during operation of the air compressor 10 Always turn off the air compressor and drain tank pressure completely before attempting maintena...

Page 7: ... working pressure at the tool VIBRATION PRECAUTIONS 1 This tool vibrates during use Repeated or long term exposure to vibration may cause temporary or permanent physical injury Take frequent breaks when using the tool 2 If you feel any medical symptoms related to vibrations such as tingling numbness and white or blue fingers seek medical attention as soon as possible 3 Wear suitable gloves to redu...

Page 8: ...several leading threads unwrapped for easier alignment 2 Screw the coupler plug into the tool s air inlet and tighten with a wrench until snug 3 Run the compressor at a low volume and check the connection for air leaks Do not use the tool until all air leaks are repaired or the faulty component is replaced IMPORTANT Vibration may cause failure if aquick coupler isconnected directly tothe air tool ...

Page 9: ...l the entire length you wanted to flange is finished 6 Disconnect the tool from the air supply PUNCHING The tool head can rotate 360 degrees Twist the tool head 180 degrees in either direction to match the workpiece s angle 1 Mark the desired location on the workpiece of each hole you wish to punch 2 Insert the edge of the workpiece between the punch die A and punch B Make sure that your marks are...

Page 10: ...s are not suitable and will damage the tool or cause a malfunction during use NOTICE Never use a penetrating oil to lubricate an air tool Penetrating oil acts as a solvent that will dissolve the tool s grease packing and may damage the o rings causing the tool to seize or malfunction 1 All air tools have an internal coating of grease to prevent corrosion during shipping and storage Remove this gre...

Page 11: ...uncontrolled discharge of waste oil TROUBLESHOOTING Visit a Princess Auto Ltd location for a solution if the tool does not function properly or parts are missing If unable to do so have a qualified technician service the tool Problem s Possible Cause s Suggested Solution s Tool runs at normal speed but loses power under load Motor parts worn 1 Have a qualified technician service the tool 2 Replace...

Page 12: ...ternal parts 1 Have a qualified technician service the tool 2 Replace tool or parts Tool will not shut off 1 Throttle valve o ring dislodged from inlet valve seat 2 Trigger mechanism jammed or dirty 1 Replace throttle valve o rings 2 Clean trigger mechanism and lubricate Loss of power or erratic performance 1 Excessive drain on the air hose Incorrect size or type of hose connectors 2 Moisture or r...

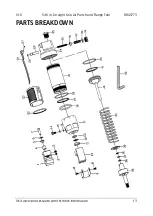
Page 13: ...V1 0 5 16 in Straight Grip Air Punch and Flange Tool 8843773 Visit www princessauto com for more information 13 PARTS BREAKDOWN ...

Page 14: ...10 Anvil 1 11 Oil seal 1 12 Bushing 1 13 O ring 1 14 Oil plug 1 15 O ring 1 16 O ring 1 17 Hydraulic cylinder 1 18 O ring 1 19 Bushing 1 20 O ring 2 21 Air cylinder 1 22 Seal ring 1 23 Soft grip 1 24 Valve body 1 25 Air inlet 1 26 Trigger 1 27 Bolt 1 28 O ring 1 29 Valve stem 1 30 Spring 1 31 Valve 1 32 Spring 1 33 O ring 1 34 Screw 1 35 Hydraulic piston 1 36 Bushing 2 37 O ring 1 38 Spring washer...

Page 15: ...V1 0 5 16 in Straight Grip Air Punch and Flange Tool 8843773 Visit www princessauto com for more information 15 ...

Page 16: ...8843773 5 16 in Straight Grip Air Punch and Flange Tool V1 0 16 For technical questions call 1 800 665 8685 ...

Page 17: ...V1 0 8843773 Vous devez lire et comprendre toutes les instructions avant d utiliser l appareil Conservez ce manuel afin de pouvoir le consulter plus tard ...

Page 18: ...age à la propriété de blessure ou de décès si on ne respecte pas certaines instructions DANGER Cet avis indique un risque immédiat et particulier qui entraînera des blessures corporelles graves ou même la mort si on omet de prendre les précautions nécessaires AVERTISSEMENT Cet avis indique un risque particulier ou une pratique non sécuritaire qui pourrait entraîner des blessures corporelles graves...

Page 19: ...propre bien éclairée et exempte de toute distraction Placez les lampes de façon à ne pas travailler dans l ombre 2 Assurez vous que les personnes qui ne portent pas l équipement de sécurité approprié ne se trouvent pas à proximité de l aire de travail 3 Rangez les outils correctement dans un lieu sécurisé et sec Gardez les outils hors de la portée des enfants 4 N installez pas et n utilisez pas d ...

Page 20: ...z de porter des vêtements ou des bijoux pouvant se prendre dans les pièces mobiles d un outil Gardez les cheveux longs recouverts ou attachés 3 N utilisez pas l outil si vous devez étirer les bras pour vous en servir Une stabilité et un équilibre appropriés sont nécessaires afin d avoir un meilleur contrôle en cas de situations inattendues 4 Gardez vos doigts à bonne distance de la gâchette commut...

Page 21: ...ualifié doit réparer l outil électrique et vérifier s il fonctionne correctement avant que vous ne puissiez l utiliser 4 N utilisez jamais un outil avec un accessoire usé ou qui présente des craquelures Remplacez l accessoire de l outil avant de l utiliser 5 Ne recouvrez pas les orifices d aération Un refroidissement approprié est requis pour éviter d endommager le moteur de l outil 6 Utilisez uni...

Page 22: ...onduite afin de permettre une commande immédiate de l alimentation en air en cas d urgence même si un tuyau se fend 3 Arrêtez d utiliser l outil s il ne fonctionne pas correctement ou s il présente des fuites d air Attachez une étiquette sur l outil indiquant qu il est défectueux ou qu il est hors service jusqu à ce qu il soit réparé 4 Consultez la pression nominale maximale du fabricant en ce qui...

Page 23: ...i recommandé consultez Spécifications PRÉCAUTIONS RELATIVES AUX TUYAUX À AIR 1 Inspectez le tuyau d air de l outil pour déceler des fissures des effilochures et tout autre défaut avant chaque utilisation Arrêtez l utilisation si le tuyau d air est endommagée ou si un sifflement se fait entendre provenant du tuyau à air Remplacez le tuyau d air ou le composant défectueux 2 Veillez à ce que personne...

Page 24: ...rolongée aux vibrations peut causer des blessures temporaires ou permanentes Prenez souvent des pauses lorsque vous utilisez cet outil 2 Si vous ressentez des symptômes reliés aux vibrations comme un fourmillement un engourdissement des doigts blancs ou bleus consultez un médecin le plus tôt possible 3 Portez des gants appropriés pour réduire les effets des vibrations 4 N utilisez PAS cet outil en...

Page 25: ...uban dans le sens horaire de façon qu il ne se déroule pas b Ne recouvrez pas tous les filets de ruban Laissez le raccord ouvert sur l avant pour y fixer l outil 2 Vissez le raccord à l entrée d air de l outil et serrez le ensuite au moyen d une clé 3 Faites fonctionner le compresseur à faible volume et vérifiez si le raccord présente des fuites d air N utilisez pas l outil avant d avoir réparé to...

Page 26: ...tte D et l enclume sera poussée contre la pince de serrage pour former une bride 4 Relâchez la gâchette Glissez l outil de bridage et de poinçonnage G le long du rebord de la pièce à travailler à l endroit où l enclume F et la pince de serrage E recouvrent une partie de la pièce à travailler que vous venez de former Reprenez l étape 3 5 Répétez les étapes 3 et 4 jusqu à ce que la formation de brid...

Page 27: ... composants endommagés ou usés Employez seulement des pièce autorisées 3 Suivez les instructions pour lubrifier et remplacer les accessoires 4 Utilisez seulement des accessoires conçus pour être utilisés avec cet outil 5 Gardez l outil propres sèches et exemptes d huile ou de graisse en tout temps 6 Veillez à ce que l étiquette et la plaque signalétique demeurent intactes sur l outil Elles comport...

Page 28: ...outil Un technicien qualifié devra démonter l outil et se débarrasser de l excès d huile 4 Appliquez une généreuse quantité d huile pour outil pneumatique avant de l entreposer durant une longue période toute une nuit une fin de semaine etc Faites fonctionner l outil pendant environ 30 secondes pour vous assurer que l huile est répartie uniformément dans l outil Rangez l outil dans un endroit prop...

Page 29: ...eté OU Le débit d air est bloqué par de la saleté 1 Vérifiez si le filtre d entrée d air est bloqué 2 Versez de l huile pour outils pneumatiques dans l entrée d air conformément aux instructions de lubrification pour enlever la graisse de garniture 3 Actionnez l outil en pulsions courtes pour enlever les débris 4 Si l outil est toujours bouché nettoyez le et lubrifiez le de la façon décrite dans l...

Page 30: ... ensuite Perte de puissance ou fonctionnement irrégulier 1 Écoulement excessif sur la conduite d air Raccords de tuyau de taille ou de type incorrects 2 Humidité ou obstruction dans la conduite d air le réservoir 3 Le débit du compresseur d air est insuffisant 1a Vérifiez la conduite d air et confirmez que le raccord de tuyau convient parfaitement à la douille d admission 1b N utilisez pas plusieu...

Page 31: ...V1 0 Outil de bridage et de poinçonnage pneumatique à prise droite de 5 16 po 8843773 Visitez www princessauto com pour plus d informations 15 RÉPARTITION DES PIÈCES ...

Page 32: ...d huile 1 12 Douille 1 13 Joint torique 1 14 Bouchon d huile 1 15 Joint torique 1 16 Joint torique 1 17 Vérin hydraulique 1 18 Joint torique 1 19 Douille 1 20 Joint torique 2 21 Cylindre pneumatique 1 22 Bague d étanchéité 1 23 Prise douce 1 24 Corps de valve 1 25 Entrée d air 1 26 Gâchette 1 27 Boulon 1 28 Joint torique 1 29 Tige de soupape 1 30 Ressort 1 31 Soupape 1 32 Ressort 1 33 Joint toriqu...

Reviews: