16
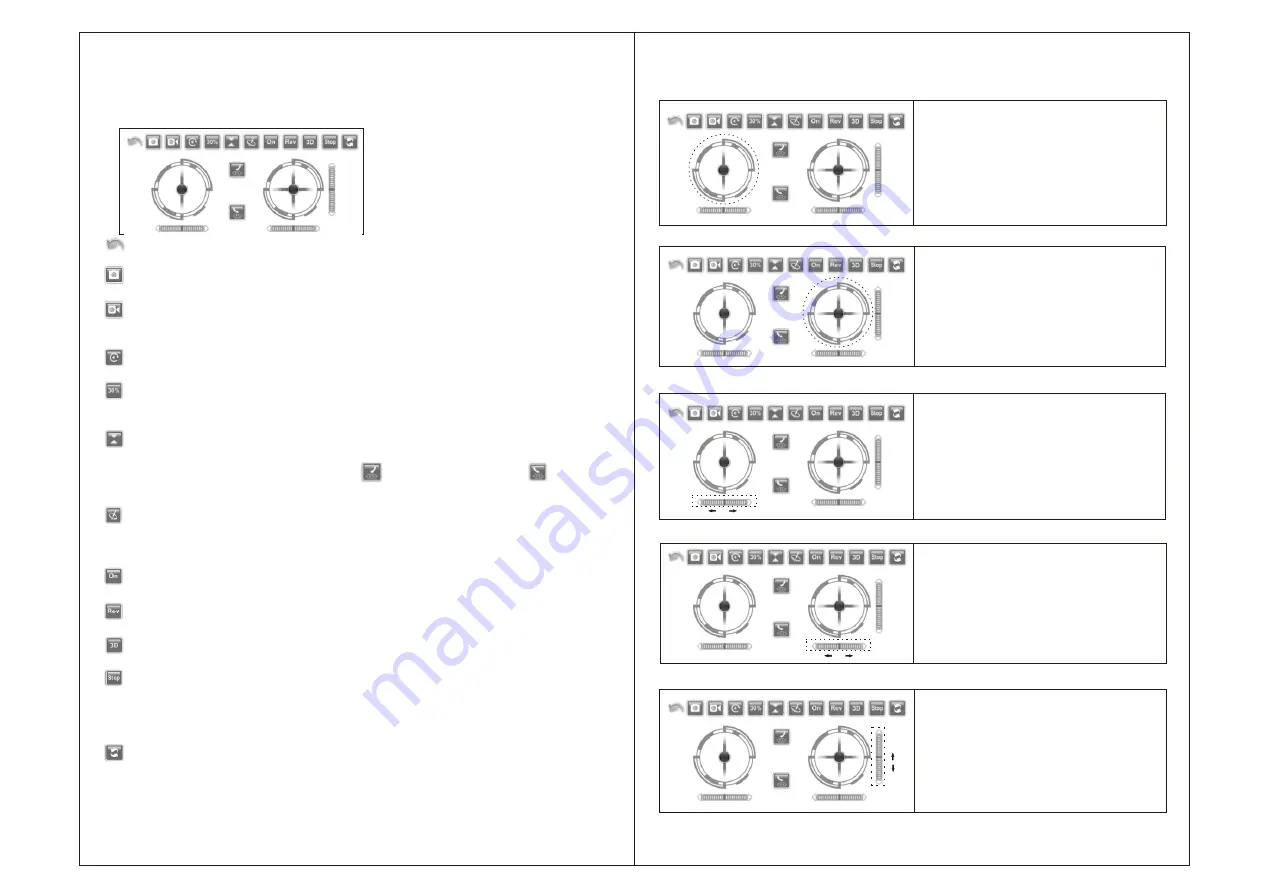
Icon Function Introduction
3.1 Phone Control Interface Icon
Reback Icon:
Record Video Icon:
This function can only be used in joystick interface. By clicking this Icon, the joystick on
the right will change into gravity induction ball. At this time, when the phone shakes
to left/right,the ball will move to left/right, and the drone will fly to left/right.
Only when using the joystick interface can you use this icon. By clicking the icon, you
will see two small icons - " one key take off " and " one key landing ". You can
control the drone via phone after clicking " one key take off ". On the contrary, by clicking
" one key landing",the drone will land slowly.
“30%, 60%, 100%" 3 rates can be selected, the greater the value,the higher sensitivity
of the drone, and the corresponding operation difficulty will be increased.
Click this Icon to enter joystick interface and control the drone by using the phone.
Click this Icon to reverse the picture received on the phone.
Click this Icon to enter 3D dual-screen mode.
By clicking this Icon, the drone will disconnect and fall down
suddenly. This function should only be used in emergency situations. Click once to
lock the joystick interface, and all other functions are unusable, click again to resume
operation.
Click this Icon to enter 3D flip mode. Push the direction Icon to any direction, then the
drone will make 3D flips to the corresponding direction. When using this function,the
flying speed rate needs to be adjusted to 100%. One click for one 3D flip. Please don't
try this function before getting the hang of the APP,otherwise the drone can be damaged
easily.
Move the center touch point to adjust
throttle response.
Move the center touch point to control
the flying direction. Turn on the gravity
induction icon, the flying direction can
be controlled by adjusting the balance
of your phone.
Click this icon to adjust the trim to right
if the drone rotates to left when taking
off, and vice versa.
Click this Icon to adjust the trim to right
if the drone drifts to the left when taking
off, and vice versa.
15
Directly return to the entering interface of the APP by clicking this Icon.
Click once to take photo, and saved directly on your phone.
Take Photo Icon:
Click once to record video, click again to end and save recording.
*Please note the recorded video is without sound.*
APP File Icon:
Click to view photo and video.
Speed Adjustment Icon:
Take off /Land Icon:
Gravity Induction Icon:
Joystick Icon:
Lens Reverse Icon:
3D Icon:
Emergency Stop Icon:
360 Flip Icon:
Throttle Control Icon:
Direction Control Icon:
Left/Right Rotation Trim:
Left/Right Flying Trim:
Forward/Backward Flying Trim:
Click this icon to adjust the trim to
backward if the drone drifts to forward
when taking off,and vice versa.


