


PB-7700 series Technical Manual 7 - 2
the CDROM drive bracket prior to installation of the slim type CDROM drive or
service operations.
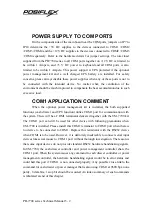
To install the CDROM drive, please take the slim type CDROM drive supplied
through Posiflex or her authorized dealer and screw it onto the bracket with the 4 tiny
screws that come along with the CDROM drive. Check that the orientation will allow
the CDROM tray to come out from the CDROM window in the front panel of PB system.
Break the opening in front panel for CDROM passage and use some metal tool to help
smoothen the passage if necessary. Connect a power outlet and an IDE ribbon cable
extended from the HDD to CDROM drive. Please check the pin 1 (red wire) orientation
of the cable against the indication on the CDROM drive. Reapply 2 screws on side of
the beam and 2 small screws on front wall of PB to fix the CDROM drive and bracket
like in the picture below.
FDD / HDD ASSEMBLY
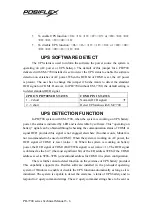
Even if the PB system is purchased without the FDD option, the FDD bracket is
assembled in the PB system as part of the structure. Please remove HDD bracket by
removing the 2 screws on the metal beam near switching power supply unit as indicated
in the picture below and getting the bracket out of the HDD bracket holding slit then
disconnecting the power and data connections. Remove FDD bracket by removing the 2
Screws to remove the bracket
Top view inside top cover
Side view of CDROM drive bracket
CDROM Bracket Screws on Front Wall
FDD Bracket Screw on Front Wall
Summary of Contents for PB-7700 Series
Page 1: ...Rev Original PB 7700 SERIES TECHNICAL MANUAL ...
Page 16: ......
Page 18: ......
Page 26: ......


