background image

FUNDAMENTAL INFORMATION

MODEL NAME:

LS-1000

CONTENT (

Besides this guide)

:

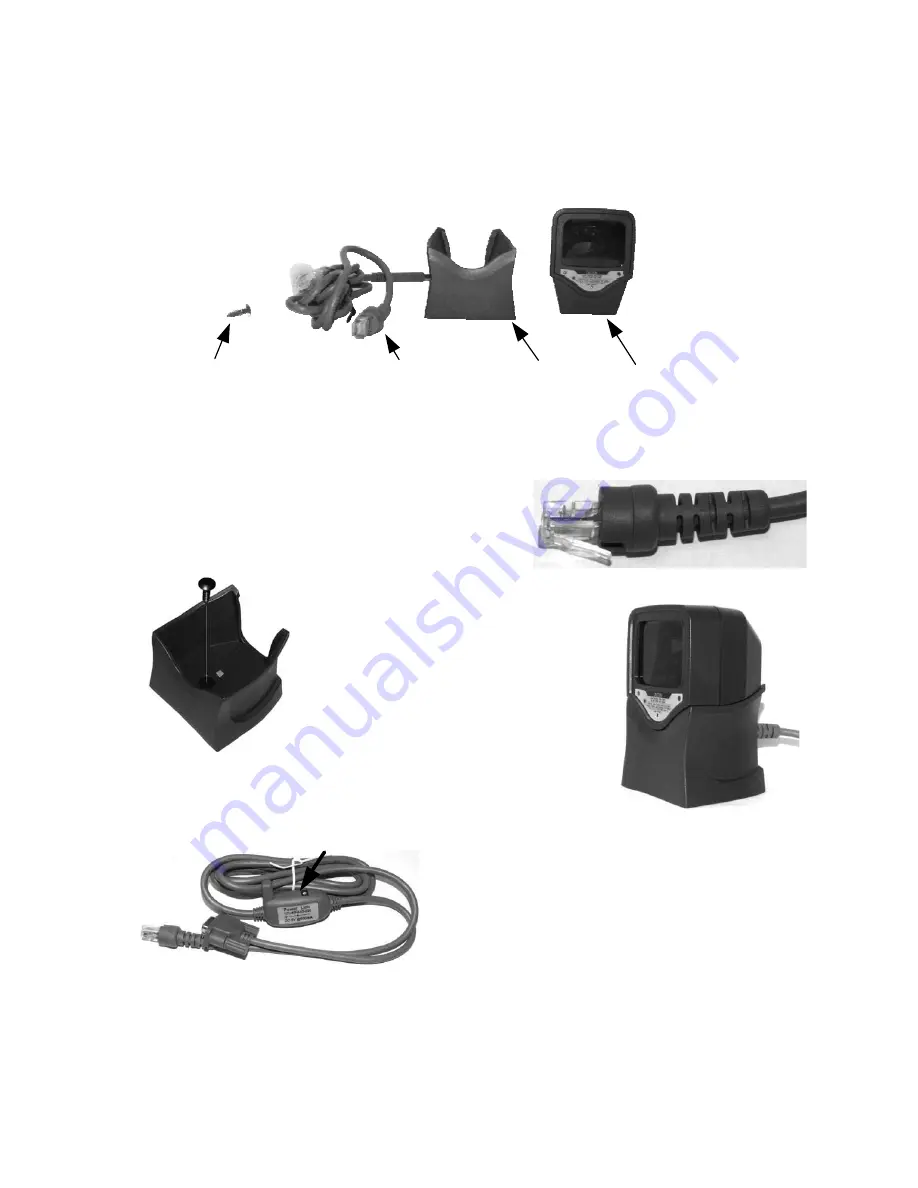
Fig. 1

Box content besides this guide

INSTALLATION GUIDES

1. Install the USB or RS232 interface cable onto 

the scanner by inserting the  8 pin RJ45 type 
modular plug (

Fig. 2

) of the cable into the

scanner until a firm click is heard.

2. Use the stand fixing 

screw to fit the stand on a
wooden desktop (

Fig. 3

).

3. Seat the scanner unit into the 

stand and connect the
interface cable to an
appropriate USB or RS232
port (

Fig. 4

). Connect the

power adaptor to the power

input connector on interface cable (

Fig. 5

) or set the

+5V power support in pin 9 of the system COM port 
for RS232 model. Set the COM port protocol to 9600, n, 

8, 1 and no handshaking for RS232
model. Peel off the protective film on
scanner for ready to use after all the
operations done. The scanner will always 
be in omni-directional scan mode when it 
is in the stand.

Scanner Unit

Stand

Interface Cable

Stand Fixing Screw

Fig. 4 LS-1000 in Stand

Fig. 2 RJ45 Type Modular Plug

Fig. 3 Fix The Stand

Fig. 5 RS232 Power Connection

Page 2

Summary of Contents for LS-1000 Series

Page 1: ... happened Warranty voids if the user does not follow the instructions in application of this merchandise The manufacturer is by no means responsible for any damage or hazard caused by improper application No part of this document may be reproduced transmitted stored in a retrieval system transcribed or translated into any language or computer language in any form or by any means electronic mechani...

Page 2: ...the interface cable to an appropriate USB or RS232 port Fig 4 Connect the power adaptor to the power input connector on interface cable Fig 5 or set the 5V power support in pin 9 of the system COM port for RS232 model Set the COM port protocol to 9600 n 8 1 and no handshaking for RS232 model Peel off the protective film on scanner for ready to use after all the operations done The scanner will alw...

Page 3: ...anning performance you could expect The scanner includes key features as z Button switch in between omni directional and single line scanning capability ideal for increasing your operating efficiency z Powerful 20 line scan pattern yields 9 1400 scans per second for omni directional scanning 9 74 scans per second for single line scanning z Implement with the proprietary real time hardware decoding...

Page 4: ...er onto the bracket of SK 200 kit Interface Cable Connector For USB interface cable connection Operation Status When the scanner powers up the buzzer gives four beeps and the LED indicator in function button glows Present a known good test barcode to the scanner The scanner should issue a short beep and the LED should flash red momentarily Note Refer to LED Indications and Beeper Indications secti...

Page 5: ...eters may be set at any time without affecting the other parameters Scan Test With the scanner running LED blue and the host system on with an active window of a text editor try to scan several known good barcodes Check the results on the system screen If the scanner is reading okay no further setup may be necessary If the POS screen does not show the expected scans go to Set Up below Reset to Def...

Page 6: ...wn good barcodes If results are good you are done setting up Otherwise return to step 1 and try again A demonstrative process flow chart is given below to illustrate the whole setup process Page 6 Read Enter Exit programming mode barcode to start configuration Change scanner setting by scanning required mode barcode Read Enter Exit programming mode barcode to save and exit Display Firmware Version...

Page 7: ...ure the scan line crosses every bar and space of the symbol code as indicated in the right Press the function button to decode and transmit the barcode the good read beeps once For consecutive single line scan present the next barcode and press the function button within 5 seconds When the function button is released it automatically switches back to omni directional scan mode in 5 seconds Press t...

Page 8: ...ow loud beeper cycle every level of setting beeps twice Release the button when you hear the right beeps The scanner beeps accordingly Note The volume setting in this way is not saved in non volatile memory In other words the change will be lost by power off and reset to the configured setting Use the advanced programming guide to set the changes if you wish to keep the changed volume setting LED ...

Page 9: ...ing the scan window The scan window may be cleaned while the scanner is running Replacing Interface Cable The standard interface cable is attached to the scanner with an 10 pin modular connector When the connector is properly seated it is secured in the scanner by a flexible retention tab The cable is designed to be field replaceable Replacement cables can be obtained from your authorized distribu...

Page 10: ...utton to wake up the scanner or present an object close to the scan window The LED remains red and blue purple Possible failure of the scanning safeguard circuit Disconnect the scanner from its power source immediately and contact your dealer There is no proper handshaking with the POS system Check connection and communication settings of the host POS system A stray barcode is sitting somewhere in...

Page 11: ...ed earlier for conceptual understanding Please cover the unwanted codes for scanning the specific code required for the programming to prevent confusion in code scanning Use the download file from our web for advanced programming Display Firmware Version Note The reading of the Display Firmware Version label will read out the firmware version and exit the programming mode Abort Exit programming mo...

Page 12: ...arameters back to default values but leaving the interface mode unchanged It is suggested to scan also the Return to USB default or Return to RS232 default label after this for LS 1000 scanners Return to USB default US Keyboard Return to RS232 default Page 12 ...

Page 13: ...Message Terminator Enter Message Terminator H tab Message terminator None International Keyboard ALT method Page 13 ...

Page 14: ...Return to customer default Note The reading of the label will recover all parameter back to customer default Codabar Enable Save as customer default Codabar Disable Page 14 ...

Page 15: ...Full ASCII CODE 39 Disable Code 39 Enable Code 39 Disable Full ASCII CODE39 Enable Page 15 ...

Page 16: ...UPC EAN JAN Disable UPC EAN JAN Enable ITF 2 OF 5 Disable ITF 2 of 5 Enable Page 16 ...

Page 17: ...UPC EAN ADD ON OFF ADD ON 5 only ADD ON 2 only ADD ON 2 or 5 Page 17 ...

Page 18: ...EAN UPC Add on none mandatory Force UPC A to EAN 13 format enable EAN UPC Add on mandatory Force UPC A to EAN 13 format disable Page 18 ...

Page 19: ...EAN 13 Convert to ISBN ISSN Enable EAN 13 Convert to ISBN ISSN Disable EAN 128 Enable EAN 128 Disable Page 19 ...

Page 20: ...Code 128 Enable Code 128 Disable Code 93 Enable Code 93 Disable Page 20 ...

Page 21: ...Chinese Post Code Enable Chinese Post Code Disable Code 32 Italian Pharmacy Code Enable Code 32 Italian Pharmacy Code Disable Page 21 ...

Page 22: ...MSI enable MSI Disable Enter Exit Programming Mode Page 22 ...

Reviews: