background image


Page 10 

MAINTENANCE GUIDE 


MAINTENANCE GUIDE LINES 

*


Always turn off and disconnect power before opening the hood or cover. 

*


The areas around the print head and motor become very hot during and just 
after printing. Do not touch them. 

*


When handling the interior of the thermal printer, please pay attention not 
to be hurt by any sharp edge of the metal parts.  

GENERAL CLEANING 

Please  use  soft  hairbrush  or  compressed  air  to  clear  away  any  dust  or  paper 
scraps  accumulation  inside  the  printer.  Check  also  the  area  of  the  auto-cutter 
regularly. 

PRINT HEAD CLEANING 

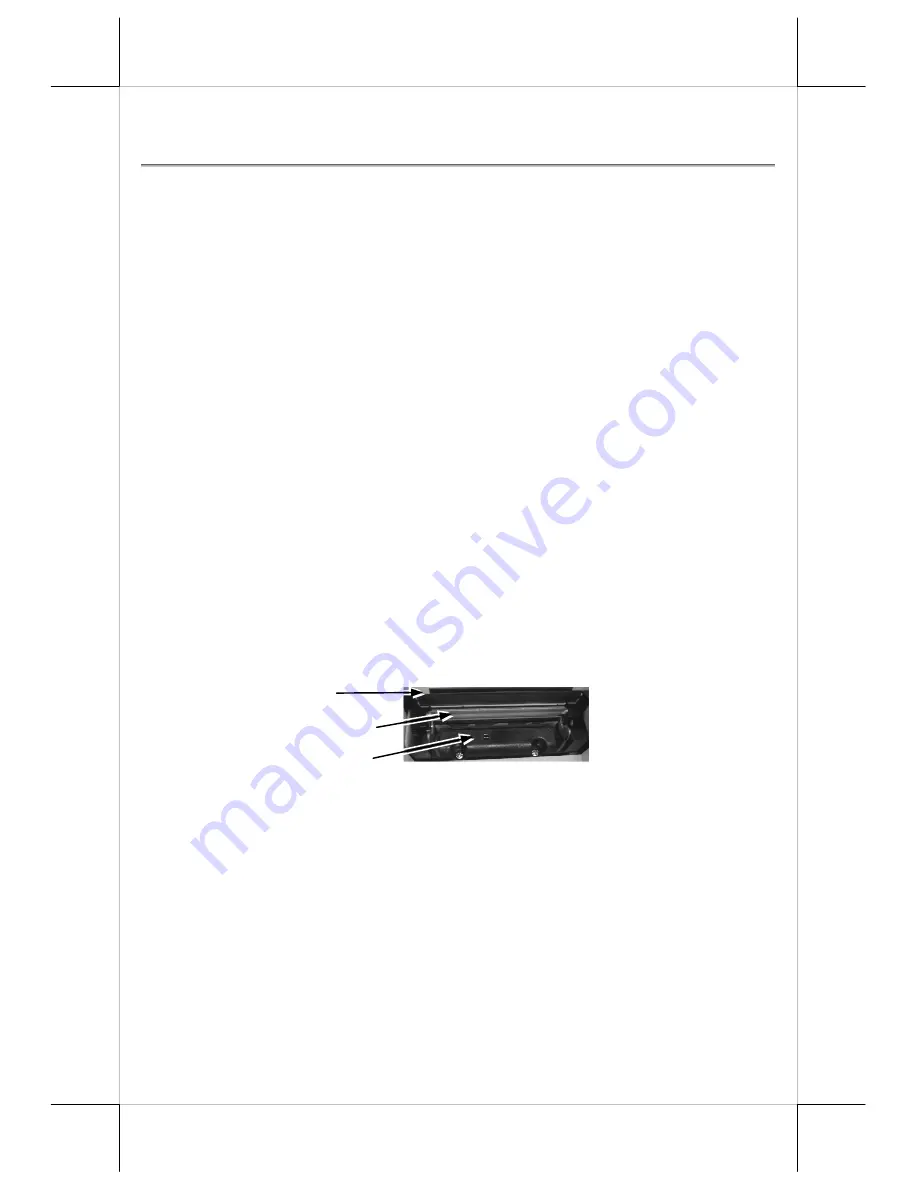
The print head is located underneath the roll paper passage at the exit as in the 
picture below. You can clean the thermal elements of the print head and paper 
sensor  gently  using  a  cotton  swab  moistened  with  isopropyl  alcohol  solvent. 
Before  putting  back  the  paper  roll  for  printing,  alcohol  solvent  must  be  dry 
completely. 


NOTE: Never do this when print head is still hot. Do not touch the print 

head thermal elements and scratch the print head 


TROUBLE SHOOTING 

This section gives solutions to some printer problems you may have. 

General Problems 

No  LED  lights  up  on  control  panel  when  switched  on

 –Make sure that the 

power supply cables are correctly plugged into the printer, the power adaptor 
and to the power outlet. Make sure that power is supplied to the power outlet. 
If the outlet is controlled by a switch or timer, try use another outlet. 

Thermal Elements 

Paper End Sensor 

Auto Cutter 

Summary of Contents for Aura-5200E

Page 1: ...ditorial or other errors or omissions contained herein nor for direct indirect incidental consequential or otherwise damages including without limitation loss of data or profits resulting from the furnishing performance or use of this material This information is provided as is and Posiflex Technology Inc expressly disclaims any warranties expressed implied or statutory including without limitatio...

Page 2: ... different model number sub codes utilizes different cabinet color and accessory cable and switch setting to accommodate the requirement of different interface The Aura 5200E series supports a guillotine type auto cutter for paper partial cut and a manual cut mechanism The Aura series also supports user s company s LOGO downloading for superior performance It even supports some enhancement capabil...

Page 3: ...er adaptor is not included in the order the interface cable is a shorter one for integrated application in Posiflex POS system 4 One of the power sources a Power adaptor power cord depend on country type ordered b Power supply cable when no power adaptor and no powered USB cable ordered This printer power supply cable is used to supply power to the printer from the Posiflex POS system 5 User s Man...

Page 4: ...PICTURES Main Parts On The Exterior Front View Case Power LED Error LED Paper Out LED FEED Switch Top Hood Hood Release Button Power Switch Cutter Cover Power Switch Screws Window Plate Screw Setup Window Bottom View ...

Page 5: ...Page 5 Rear View INDICATORS Power LED Green Error LED Red brief lit indicates printer busy Paper out LED Red USB Connector Serial Connector Peripheral Connector Power Jack ...

Page 6: ... the tail of the paper roll coming out of the opening between the hood and the top cover If the power turn on before the paper loading it will auto cut excessive paper otherwise tear off excessive paper manually When to Replace Paper Whenever the printer gives paper out signal or a red line appears on the thermal paper it is the proper timing for replacing the paper Do not wait till the print engi...

Page 7: ... in serial connection is 19 200 bps none parity 8 data bits 1 stop bit USB Connection The USB connector on Aura 5200E is a type B USB connector at lower right position below the serial port Use the normal USB Cable as in the right picture to connect the type A end to a normal USB port of host system Please visit our web site http www posiflex com or http www posiflex com tw for detailed informatio...

Page 8: ...ections are made correctly you may connect your power adaptor to the wall outlet Make sure that the type of power cord to meet the local power conditions Now the printer is ready for power on Self Test Press and hold down the feed button while turning on the power switch The printer will then perform a self test mode A sample slip of self test result is printed as in the sample at right Please not...

Page 9: ... end sensor may function abnormally and it would be a good solution to set in the setup window to have the printer to send busy only when input buffer is full and not based on every off line signal Paper Feed PP 5200E can set up automatic paper feed by DIP switch this printer default automatic paper feed 12 5 mm before cutting Wall Mount In wall mount application the option kit will include screws...

Page 10: ...e exit as in the picture below You can clean the thermal elements of the print head and paper sensor gently using a cotton swab moistened with isopropyl alcohol solvent Before putting back the paper roll for printing alcohol solvent must be dry completely NOTE Never do this when print head is still hot Do not touch the print head thermal elements and scratch the print head TROUBLE SHOOTING This se...

Page 11: ...roblem still remains contact a qualified service person Nothing can be printed with ERROR LED OFF Try to run self test according to previous chapter to check if the printer itself works properly If the self test passes check the following 1 Check the connection of the interface cable at both the printer and computer ends Also make sure that this cable meets the specification required for both the ...

Page 12: ...so clear away any contaminants accumulated in the cutter track above the thermal elements Auto Cutter Problems In case any foreign materials like a staple or paper clip or excessive paper scraps fall into the auto cutter mechanism the auto cutter may lock up and so does the print hood In such case please push the cutter cover down and forward as in the right picture to access the adjustment mechan...

Page 13: ...n be useful in finding software problems To start the dump mode Turn off printer Open print hood Hold down FEED button while turning printer on Close the hood To stop the dump mode Press the FEED button to print out the last line Turn off the printer During dump mode All commands except DLE EOT and DLE ENQ are disabled Turn the wheel downward Lift transparent protective foil till a through hole in...

Page 14: ...r outlet with only the power cord and power adaptor furnished with the printer Do not use a power outlet of a circuit shared with any equipment that uses a lot of power or causes great electrical noises such as a copier electric motors or a coffee maker Do not use thermal paper containing Sodium Na Potassium K and Chlorine Cl ions that can harm the print head thermal elements If the surface of the...

Page 15: ...x 0 125 mm Input power type DC Input voltage 24 V 5 Dimension mm 120 W x 203 D x 124 H Weight 1 15 Kg net Paper Feed Method Friction auto feed PAPER PAPER TYPE THERMAL ROLL PAPER Paper roll formation External side is heat sensitive side Paper width 58 0 1 mm Paper roll outer diameter 83 mm max Paper roll inner diameter 12 1 0 mm Paper thickness 60 80 um POWER ADAPTOR ITEM REQUIREMENT Input voltage...

Page 16: ...rmation below applies to the latest version to the date of print of this manual This 8 position DIP switch works as following Switch position ON OFF 1 2 RS232 baud rate definition ref separate table below 3 Even parity None parity 4 XON XOFF handshaking Hardware handshaking 5 Busy on buffer full Busy on off line 6 Without Paper FEED With Paper FEED 7 CR code 0Dh effective CR code 0Dh invalid 8 Fir...

Page 17: ...sure that your software will take care of enough paper feed for the paper jam prevention issue For switch position 7 when it is set to ON the printer responds to a carriage return command CR code or 0Dh with also a line feed LF code or 0Ah action Then if the text editor always express the change to a new line with both the CR and LF codes there will be an extra line advance than expected However i...

Page 18: ...ch position 2 2 it is defines Enable Auto Cutter when it is set to ON and Disable Auto Cutter when it is set to OFF Switch position 2 3 it is recommended to place at OFF In this way the printer performs an automatic paper cut each time when the top hood is closed e g after paper roll loaded with the printer in operating condition However if it placing in ON and the manual cutter can be engage when...

Page 19: ...rcode Height Reduction as in table below SW3 Pos 2 OFF ON OFF ON SW3 Pos 3 OFF OFF ON ON Barcode Height Reduce Disable Reduce 25 Reduce 50 Reduce 75 This function is to reducing the spaces between every two lines in every single paragraph For SW3 4 5 please refer to the below table before regulate the percentage of line space reduce Effect of positions 4 5 on Line Space Reduction as in table below...

Page 20: ...s below Switch 3 Position 1 2 3 4 5 6 7 8 Default setup for Aura 5200E OFF OFF OFF OFF OFF OFF OFF OFF Note Please reboot the printer after setting adjustment finished 警告使用者 警告使用者 警告使用者 警告使用者 這是甲類的資訊產品 在居住的環 境中使用時 可能會造成射頻干 擾 在這種情況下 使用者會被要 求採取某些適當的對策 T31454 ...

Reviews: