


ROBO-8122VG2R
Copyright © Portwell 2017 ROBO-8122VG2R User's Guide
78
7 Troubleshooting
This chapter provides a few useful tips to quickly get ROBO-8122VG2AR running with success. As basic hardware installation has been addressed in Chapter 2,
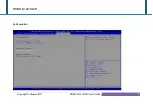
this chapter will focus on system integration issues, in terms of BIOS setting, and OS diagnostics.
7.1 Hardware Quick Installation
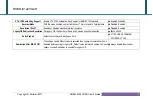
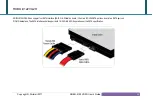
ATX Power Setting
Unlike other Single board computer, ROBO-8122VG2AR supports ATX only. Therefore, there is no other setting that really needs to be set up. However, there
are only two connectors that must be connected—J26 ATX 4 Pin Connector (4 pins CPU+12V main power connector) & 24 pins ATX Power Connector (On
PICMG Backplane).
Summary of Contents for ROBO-8122VG2R
Page 13: ...ROBO 8122VG2R Copyright Portwell 2017 ROBO 8122VG2R User s Guide 13 2 2 Mechanical Dimensions...
Page 14: ...ROBO 8122VG2R Copyright Portwell 2017 ROBO 8122VG2R User s Guide 14...
Page 17: ...ROBO 8122VG2R Copyright Portwell 2017 ROBO 8122VG2R User s Guide 17 Block Diagram...
Page 51: ...ROBO 8122VG2R Copyright Portwell 2017 ROBO 8122VG2R User s Guide 51 CPU0 1 PCIE Configuration...
Page 76: ...ROBO 8122VG2R Copyright Portwell 2017 ROBO 8122VG2R User s Guide 76 6 2 5 Save Exit...
Page 83: ...ROBO 8122VG2R Copyright Portwell 2017 ROBO 8122VG2R User s Guide 83...


