background image


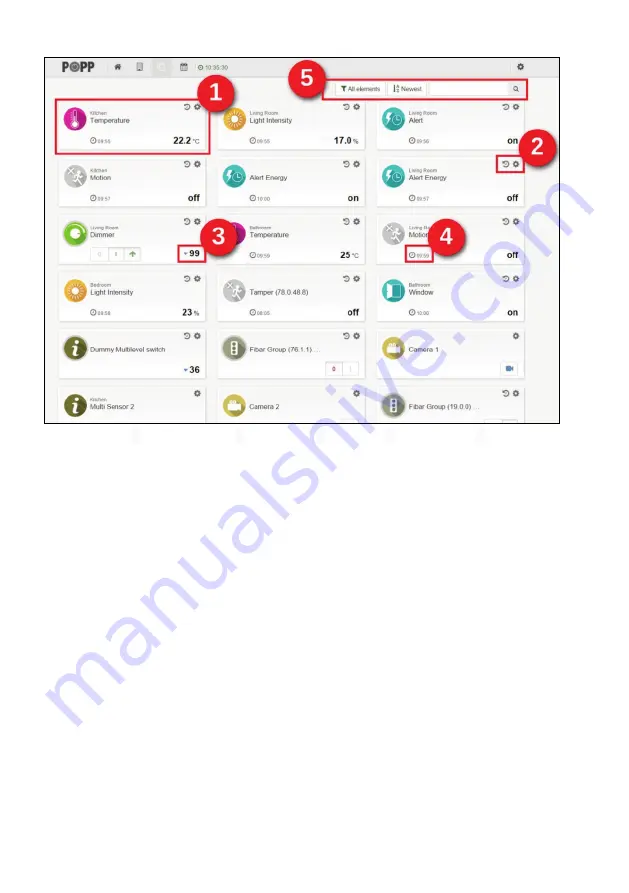
ill. 3: Basis elements (

), Device configuration (

), Device actions (

), Polling time (

), Filter and search (

Once one device is connected to the control center (see also chapter 

Configuration Menu / Devices

) its function will 

be displayed as a separate element in the 

Element View 

[ill.3]

. If the device owns multiple functions (e.g. flood sensor: 

flood alarm and temperature) every function will be displayed as a separate element 

[ill.3 (1)]

. If the device is battery 

powered, you will see the polling time (displays last communication between device and control center) bottom left 

[ill.3 

(4)]

The so-called Wake Up (data exchange between one single device and the Popp HUB) takes place automatically from 
time to time. While sensors report and display measuring values, actuator perform some actions. These actions can be 
controlled directly 

[ill.3 (3)]

, e.g. with ON/OFF switches or arrows. 

Through the gear wheel icon top right in the element’s frame 

[Abb.3 (2)] 

you will reach the device’s configuration menu 

where you can do different things


Change the automatic generated element name. 


Assign the element to one room (see also chapter 

Configuration Menu 

Rooms


Add and remove element to/from the 

Dashboard


Hide element (Element will be hidden in any view, but can be displayed again by using “Show hidden” button in 
“All elements” filter.) 


Deactivate elements (Element cannot be used for any scene, app, module and is fully deactivated.) 


Assign free definable tags to any element 

Not only devices will be displayed as elements. Plugins (apps) will be displayed as icons, too (see also chapter 

Applications

). Thus the number of elements can grow very fast. But you can reduce the number of displayed 

elements by using the filter function 

[Abb.3 (5)]

.  

The filter uses the following: 


(Device) Category 


Tag 


Free text search 

The filter function is not available on the 

Dashboard

Summary of Contents for 011801

Page 1: ...Wave home automation networks It is used to control different single devices as well as complete defined scenes and actions combining device functions within the network It needs only a few steps to get your Popp HUB up and running POPP HUB Manual 011801 ...

Page 2: ...curity reasons the initial configuration is available via WIFI only Later on you have more options 3 Point your browser to http 192 168 115 1 If you use a mobile device install and start the Popp HUB app Use the QR code on page 13 4 The welcome screen displays your unique device ID Remember it Define your access password for the default login name admin and your email for password recovery 5 In ca...

Page 3: ...etc Important elements can be placed in the Dashboard Additionally the elements can be accessed using room assignments The Rooms overview displays all existing rooms In this area you can add new rooms and open existing rooms directly Every change of a sensor value or a switching status is called an Event and is shown in the Timeline Filtering allows monitoring the changes of one single function or...

Page 4: ... Rooms with assigned elements Elements Here you can find all devices connected to the Popp HUB see also chapter Configuration Menu Devices Analogous to the Dashboard the Devices menu provides various device information and you can control the devices from here Events Timeline Here you can find a chronological list with all events so far see also chapter Event List Configuration Menu At the header ...

Page 5: ...tly ill 3 3 e g with ON OFF switches or arrows Through the gear wheel icon top right in the element s frame Abb 3 2 you will reach the device s configuration menu where you can do different things Change the automatic generated element name Assign the element to one room see also chapter Configuration Menu Rooms Add and remove element to from the Dashboard Hide element Element will be hidden in an...

Page 6: ...6 Event List ill 4 Event List Filter Event Filter Configuration Menu Setup ill 6 Configuration Menu ...

Page 7: ...preparation and inclusion of your new device If the device is not listed yet please press Add Z Wave Device and identify it automatically or ill 8 1 Perhaps you will need the device s manual to start the inclusion process Both ways lead to full range of functions because Z Wave identifies all the device s functions during the inclusion process Cameras If your camera type is listed please select an...

Page 8: ...ou can for example rename hide and unhide the device and assign to rooms After including a new device the settings will be opened automatically see also chapter Configuration Menu Add new devices Some Z Wave devices have special configuration parameters which help to adjust the device to the user s needs Use the button Hardware configuration in the configuration view These parameters refer to the ...

Page 9: ... is no remote access available Anonymous user No rights Additionally you can assign rooms to every user where he will have access then Remote access This menu item contains the ID for your remote access which can be used from outside via mobile app controlling devices and receiving information The ID is unique and generated randomly Please create an individual password for remote access in the app...

Page 10: ...erface we would be pleased about your feedback That gives us the opportunity to solve the problem in a timely manner Please note This is no support form It is dedicated to report bugs in the UI only If you need support please consult the support forums or see chapter Support Info Here you will find the firmware s and user interface s current version number My settings Use this menu item to do some...

Page 11: ...t Configuration Menu Management The Local tab displays all apps already downloaded That can be for example Scenes Common switch of various elements Associations Automatic switch of some elements by another element Automations Easy automatic control such as switching off the light after a defined time Complicated solutions such as a central heating control or an alarm system based on installed elem...

Page 12: ...the HUB This turns the device back into factory defaults and resets all passwords and settings WPS WPS function of WIFI Support for EnOcean Devices In order to use EnOcean devices please plugin the Popp EnOcean Stick POPE12204 into the USB Port Start the user interface open Configuration Apps and activate the EnOcean App Now you can add and use EnOcean devices by using Configuration Devices Please...

Page 13: ...contact us by email info popp eu The complete CE declaration can be found on www popp eu ce All questions regarding this declaration of conformity can be directed to the following address Popp Co 27 Old Gloucester Street London WC1N 3AX UK 2016 POPP Co While the information in this manual has been compiled with great care it may not be deemed an assurance of product characteristics Popp Co shall b...

Reviews: