background image

Starting Your Pump

9

Pump Maintenance / Cleaning 

YOU MUST DISCONNECT THE POWER 
SUPPLY BEFORE CARRYING OUT ANY 
MAINTENANCE WORK OR HANDLING THE 
FILTER OR PUMP IN ANY WAY. 

To maximise the life of your pump it is 
recommended to clean the pump casing and 
the impeller every 4-8 weeks or earlier if flow 
has decreased significantly.  

Prior to cleaning, disconnect the pump from the 
electrical power supply. 

The casing of the pump can be cleaned with a 
firm brush. 

DO NOT USE DETERGENTS AS 

THE USE OF THESE WILL BE POTENTIALLY 
LETHAL TO POND INHABITANTS

. Leafs, 

grass or algae should be removed.

Under normal circumstances your pump should 
start immediately. If it does not then possible 
explanations could be: 

Lack of back pressure on the pump. Place a 
hand over the end of the hose to create back 
pressure until water flows. 

Occasionally the impeller may stick from new. 
This is a result of the amount of time the pump 
has sat in a box since production and is 
perfectly normal. If this happens 

ALWAYS

switch the pump off from the mains power 
supply before handling it in any way. Turn the 
impeller with a tool like a screw driver to release 
it. Submerse back in to position and switch on.

DO NOT ATTEMPT TO TURN THE IMPELLER 
WITH YOUR FINGERS. 

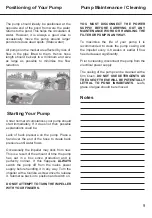
The pump should ideally be positioned at the 
opposite end of the pond from were the water 
returns to the pond. This helps the circulation of 
water. However, it is always a good idea to 
occasionally move the pump around larger 
ponds to reduce dead spots. (Static water) 

All pumps on the market are affected by loss of 
flow in the pipe fitted to them. Hence hose 
length should be kept to a minimum and size  
as large as possible to minimise the flow 
reduction.

Positioning of Your Pump

Notes

Summary of Contents for ClariTec 10000

Page 1: ...Instruction Manual ClariTec Models 3000UV 5000UV 10000UV 15000UV 3000 5000 10000 15000 ...

Page 2: ...ged in or connected to the mains power supply when there is water present on parts which are not supposed to be wet Do not operate the appliance if it has a damaged power supply cord or plug or it is malfunctioning or has been dropped or damaged in any manner If the plug or socket does get wet do not unplug or disconnect the appliance from the socket Discon nect the fuse or circuit breaker that su...

Page 3: ...ct is shipped to you in a factory sealed carton Should the product malfunction in any way or if the unit is damaged and requires replacement contact the retailer where the product was purchased for inspection The plug supplied with this product is a sealed plug and we do not recommend removing or changing it The external flexible cable or cord of this UV C cannot be replaced If the cord is damaged...

Page 4: ...i Black 15ppi Black 15ppi Black 15ppi 3000 3000UV 5000 5000UV 10000 10000UV 15000 15000UV Yellow 25ppi Green 20ppi Green 20ppi Green 20ppi Black 15ppi Black 15ppi Black 15ppi Yellow 25ppi Green 20ppi Green 20ppi Black 15ppi Black 15ppi Black 15ppi Media Setup Guide ...

Page 5: ...ass An approved earth leakage circuit breaker RCCB or otherwise known as an Residual Circuit Current Device RCCD must be fitted in the electricity supply line The appliance should be connected to the mains supply using the following colour coding Refer to Diagram 1 Red or brown wire to the live connection L Blue or black wire to the Neutral connection N Green with Yellow stripe wire to the Earth c...

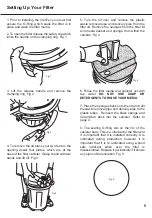
Page 6: ...filter and it is important that it is installed correctly It is lubricated during production however it is important that it is re lubricated using a pond safe lubricant when ever the filter is disassembled Replace it periodically if it shows any signs of deterioration Fig 5 1 Prior to installing the ClariTec you must first ensure the O Ring which seals the filter is in place and wash the filter m...

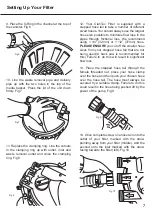
Page 7: ...h your chosen hose over the hose tail The hose must always be secured by a suitable clamp Failure to do this could result in the hose being pushed off by the power of the pump Fig 9 14 Once complete screw one hose tail onto the outlet of your filter marked with the arrow pointing away from your filter middle And the second onto the inlet marked with the arrow facing towards the filter left Fig 10 ...

Page 8: ...and back wash mode For normal operation the arrow on the control knob should be pointing to the center outlet Fig 13 You are now ready to position your filter Attach you pump and position it keep in mind the longer your hoses the slower the flow rate Keep hose lengths to a minimum and position your pump away from the outlet of your filter CAUTION a NEVER run the UV C without water passing through ...

Page 9: ...nd of the hose to create back pressure until water flows Occasionally the impeller may stick from new This is a result of the amount of time the pump has sat in a box since production and is perfectly normal If this happens ALWAYS switch the pump off from the mains power supply before handling it in any way Turn the impeller with a tool like a screw driver to release it Submerse back in to positio...

Page 10: ...vel or until the water running out of the clear hose tail is clear Disconnect the clear hose tail and replace the waste outlet cap Turn the cleaning controller back to its original position CAUTION Do not leave the pond unattended whilst the filter is being backwashed as the pump could drain the pond completely of water When ever water is added to the pond ensure a quality water conditioner is use...

Page 11: ...ols At this stage remove the quartz sleeve and clean it To do so you will need a Phillips head Replacing Cleaning the UV C screwdriver simply remove the 4 screws which surround the sleeve Carefully remove the sleeve and clean it with a soft cloth DO NOT USE DETERGENTS AS THE USE OF THESE WILL BE POTENTIALLY LETHAL TO POND INHABITANTS DO NOT USE ANY ABRASIVE SCOURING PADS OR IMPLEMENTS There is an ...

Page 12: ...first used Trouble Shooting The quartz sleeve which protects the UV globe may require cleaning see Replacing Cleaning UV C for instruction on how to remove the quartz sleeve Check pH and hardness levels of your pond water a filter can not perform correctly if the hardness is too low 4 MY FILTER IS LEAKING Check all restrictions as above Normally leaks will occur when the water is not able to pass ...

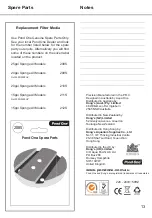
Page 13: ...ls 212S 208S Pond One Spare Parts 220 240V 50HZ Precision Manufactured in the P R C Designed in Australia by Aqua One Distributed in Australia by Kong s Aust Pty Limited 48 Williamson Rd Ingleburn 2565 NSW Australia Distributed in New Zealand by Kong s NZ Limited 52 Glenlyon Avenue Greerton Tauranga New Zealand Distributed in Hong Kong by Kong s Aquarium Supplies Co Ltd No 31 3 F Thriving Industri...

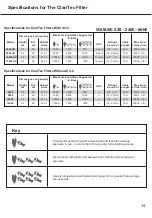
Page 14: ...L hr 5000 L hr 10m 10m Model 3000UV 5000UV Maximum Pond Sizes Suggested in litres Dimensions and Capacity Fittings in and out Cable Length Specifications for ClariTec Filters Without UV C 14 56 66 39 39 27 5L 33 5L 10000 15000 5000 7500 2500 3750 13 watt 13 watt 3 4 1 5 19 37mm 10000 L hr 15000 L hr 10m 10m 10000UV 15000UV Height cm UV C 35 46 Dia cm 39 39 Volume Litres 16 5L 21 5L 3000 5000 1500 ...

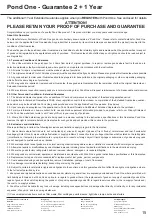
Page 15: ...ns or this Guarantee Pond One reserves the right to terminate Extended Guarantee for such goods and will provide written notice to the purchaser 3 0 Exclusions and Limitations Where permitted by local law the following exclusions and limitations apply in regard to the Guarantee 3 1 Goods claims where fault is due to but not limited by a misuse b neglect c abuse d fire or flood e normal wear and te...

Page 16: ... first fish was introduced Gravel Substrate Filtration Information Filter Type Flow Rate Filter Media Biological Mechanical Chemical Other Pond Accessories Power Heads Brand Flow rate Air Pumps Brand Output Ultra Violet Clarifier Brand Size Other Fish Information Type of Fish Size Date Added 16 Pond Log Instruction Version 21 01 08 ...

Reviews: