background image

7

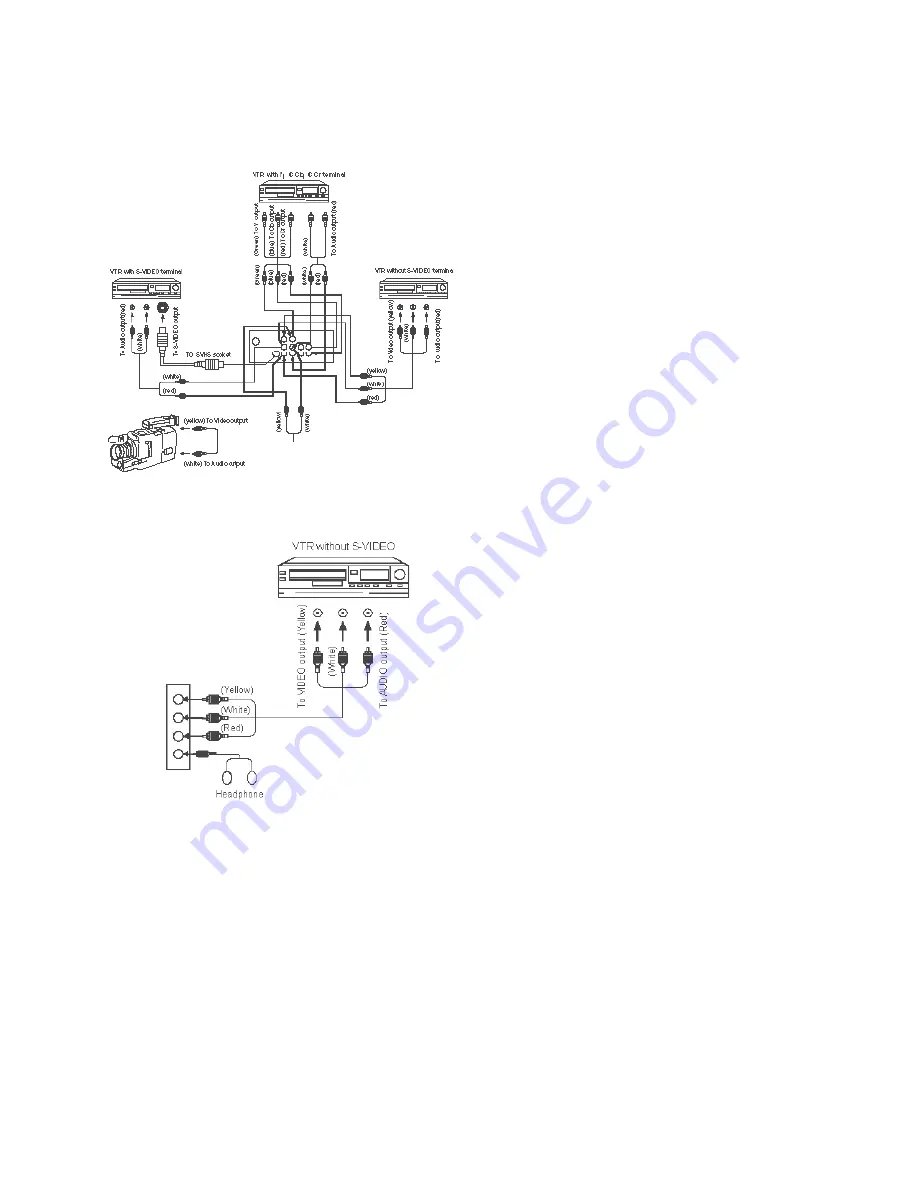
If your model has side AV jacks or headphone jack,  please connect as the  

following fi gure shown:

Connect to video equipment (VCD, DVD) and headphone jack

Connect back AV jacks as the following fi gure shown:
S-terminal has the same AUDIO IN jack as AV1, but you can not input AV signal 
from these two terminals at the same time. YUV has the same AUDIO IN jack as 
AV2, but you can not input AV signal from these two terminals at the same time.

Summary of Contents for TTM-2410

Page 1: ...24 Pure Flat Tube Stereo TV TTM 2410 20060630 ...

Page 2: ... electric shock do not expose this product to rain or moisture The apparatus shall not be exposed to dripping or splashing and that no ob jects filled with liquids such as vases shall be placed on the apparatus 4 The ventilation should not be impeded by covering the ventilation opening with items such as newspapers table cloths curtains etc NOTE 1 For your protection please read this instruction c...

Page 3: ... avoid affecting the tint 12 Use an isolated power transformer in maintenance as the chassis of the ap paratus may be electrified 4 Do not push objects of any kind into this apparatus through cabinet slots as they could touch current carrying parts or short circuit parts resulting in fire electric shock or damage to the unit Never spill liquid of any kind on the apparatus 6 Keep the apparatus away...

Page 4: ...table 21 Note Please read the carton or name plate on the TV back cabinet to sure which model you have purchased before you read this manual Polaroid Add a little color to your life Since 1937 America has turned to Polaroid for their photography needs Today families look to Polaroid for consumer electronics that define the digital age TVs plasma TVs and LCD TVs portable and standard DVD players di...

Page 5: ...4 Overview of the function keys Identify the function keys on the TV and refer to the following diagram to learn every function key Overview ...

Page 6: ...unction of every AV jack Note Different model may have different jack Please refer to SA U series color TV Functions table in page 21 for your model Side AV and Headphone jacks Make sure your TV has side AV and headphone jacks If it has side AV inputs please refer to the following diagram to learn the function of every side jack ...

Page 7: ...300 75ohm converter first then connect the converter into the antenna jack Note It is recommended to use 75ohm coaxial cable to eliminate interference and noise caused by radio wave Do not bind the antenna cable and power cord together Connect to Audio equipment Connect this unit with the audio input terminal pinhole of a stereo system then you may enjoy quality sound at the same time of enjoying ...

Page 8: ...uipment VCD DVD and headphone jack Connect back AV jacks as the following figure shown S terminal has the same AUDIO IN jack as AV1 but you can not input AV signal from these two terminals at the same time YUV has the same AUDIO IN jack as AV2 but you can not input AV signal from these two terminals at the same time ...

Page 9: ...direct channel selection Press 0 9 to select a channel inter val time of two or three pressing should be less than 1 5 seconds for example to select channel 10 press 1 and 0 the channel will change after 1 5 seconds If you input 0 firstly when input the second number the channel will change to this channel number without waiting for ex ample to select channel 8 press 0 and 8 the channel will chang...

Page 10: ...splays the TV s Main menu VOL left and right buttons Decrease or increase the TV s volume or move through the on screen menu system CH up and down buttons Scan up or down through the current channel list Press once to change the channel up or down press and hold to continue changing channels or move through the on screen menu system SOUND Four preset audio settings for you to select MEMORY STANDAR...

Page 11: ...on TV Change channels You can change channels by using the CH button in front of the TV or the CH button on the remote control Volume UP DOWN You can adjust the sound by using VOL button in front of the TV or the VOL button on the remote control Sleep function 1 Press down SLEEP button on the remote control to display the preset time 120 minutes 90 minutes 60 minutes 30 minutes the unit will be au...

Page 12: ...ear month date Press CALENDAR button to exit The date inquiry is the same steps as above GAME You and TV place black and white stones on a large ruled board alternatively If a black or white stone is put between black stones or white stones then white stones or black stones located between the same color stones will be taken away When one player gets all stones or fills in all eyes the game is end...

Page 13: ... on the remote control press MENU button in front of TV or on the remote control again to select the icon 2 Press CH button in front of TV or on the remote control to select the item you want to change 3 Use VOL button in front of TV or on the remote control to change the setting 4 To exit the menu press MENU button in front of TV or on the remote control to cycle all of icons one time in the prev...

Page 14: ...just the balance between the red and green levels Adjust range 31 31 COLOR TEMP Automatic color adjustments Provide three states NORMAL WARM COLD VOLUME Adjust left right to change small large sound Adjust range 00 63 TREBLE Adjust left right to decease increase high pitched sound Adjust range 00 63 Using the SOUND menu Using the SOUND menu ...

Page 15: ...tates OFF ON STEREO Adjust different kinds of the stereo sound effect Provide three states PASS PSEU MONO Using the SOUND Using the SOUND menu Using the PRESET menu Using the PRESET menu CHANNEL Use VOL button in front of TV or on the remote control to select channels or enter the channel number directly using the number but tons DELETE CH Select Yes to skip the channels above Select NO to go into...

Page 16: ...se a description repeat this task and press the VOL button to delete the characters SOURCE Let you select AIR or CABLE Select AIR to receive radio broadcast signal Select CABLE to receive CATV signal provide two states AIR CABLE AUTO SEARCH Press VOL button in front of TV or VOL button on the remote control to start channel searching and store automatically LANGUAGE Select from available language ...

Page 17: ...oned modes including four text modes Provide nine states OFF C1 C2 C3 C4 T1 T2 T3 T4 V CHIP Press VOL button in front of TV or VOL button on the remote control to see the figure below Figure CONFIRM PASSWORD Press four digital buttons on the remote control V CHIP menu can not be displayed without inputting the right password The initial password is 0358 Figure Note The initial password is used to ...

Page 18: ...he remote control to go to the TVPG setting V CHIP Adjust V CHIP funtion on or off Provide two states ON OFF MPAA Press VOL or VOL buttos on the remote contrel to Selert the MPAA ratings when select a movie rating the system will automatically block all other movies with higher ratings ...

Page 19: ... screen which are usu ally caused by nearby radio transmitters or short wave receiving equipment HIGH TEMPERATURE ELECTROTHERMAL INTER FERENCE Diagonal or herringbone patterns appear on the screen or part of picture is missing This is probably caused by high temperature electrothermal equipment in a nearby hospital NOTE If one of these symptoms appears on the screen when the cable from a company i...

Page 20: ...ing Guide for each problem listed below The following problems may have been caused by inappropriate adjustments rather than actual malfunction of the unit If the trouble persists visit www polaroid com for Polaroid Service and Support Troubleshooting ...

Page 21: ......

Reviews: