background image


21

2. Use 

the

Up

Down

or

Left

arrows to scroll to the channel you wish to hide. When 

you come to the channel you wish to hide, press the 

OK

button to remove the check 

mark. This channel will no longer be available for viewing.     


If you want to see this channel again you enter the channel number by using the numeric keypad or 

follow above steps to SHOW the channel.   

Favorite 

List all your favorite channels. Press

Enter

to select or cancel it. 

Channel No. 

Select the desired item to adjust, press

Left

/

Right

  to adjust the channel.   
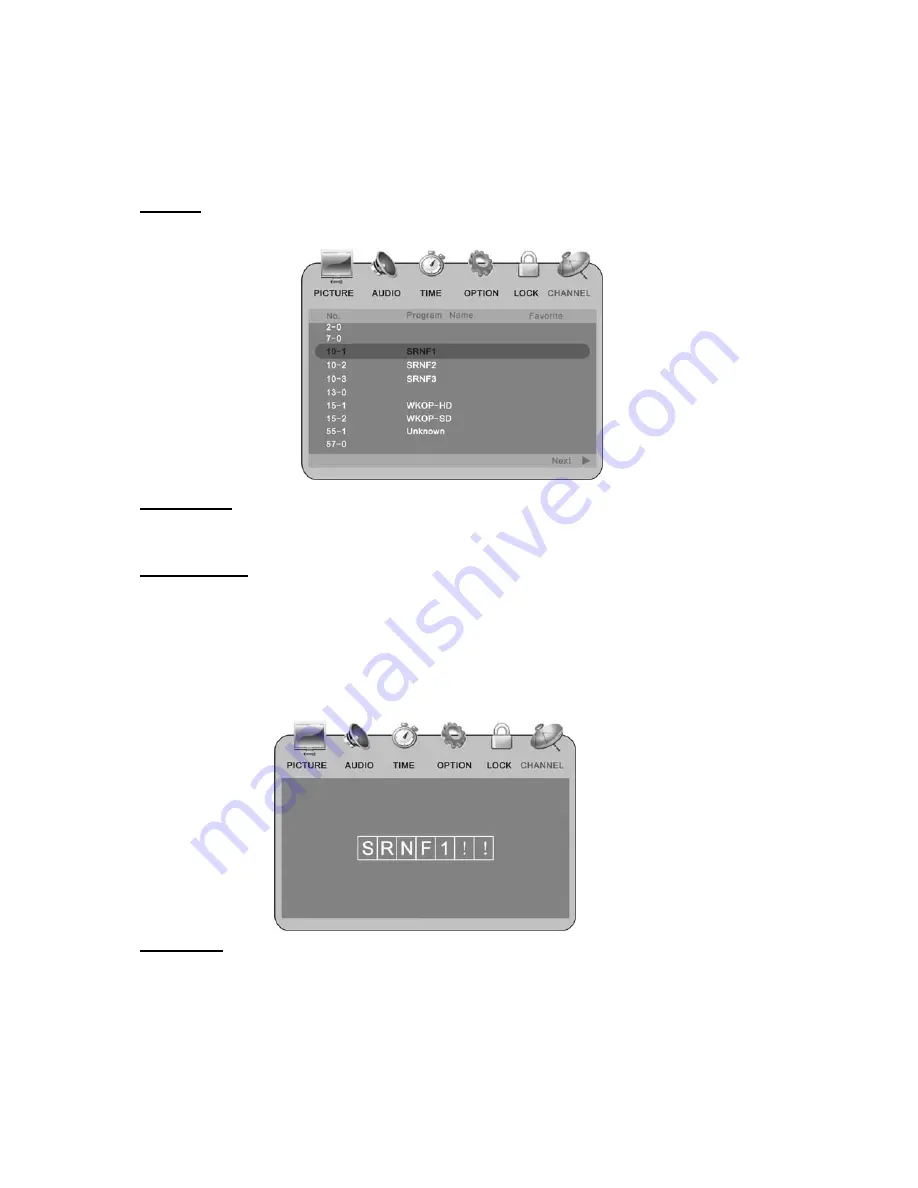
 

Channel Label 

1. Select the Channel Label to edit channels individually. 
2. Select the desired channel number then press

Right

to enter the edit mode.   

3. Select the input character with 

Up

/

Down

buttons.  

Select the desired character then press the

Left

/

Right

buttons to edit the next 

character. Continue until all editing has been completed. 

4. Press

MENU

to exit. 


DTV Signal 

Indicates the digital signal quality. (Only for digital TV signal) 

Summary of Contents for TLA-01901C - 19" LCD TV

Page 1: ...LCD Television TLA 01901C Questions Need some help This manual should help you understand your new product If you have questions call our toll free number found on the insert with this icon Or visit www polaroid com ...

Page 2: ...ructions 2 FCC Warning 5 Package Contents 5 Setting Up Your LCD TV 6 Using the Remote Control 7 Understanding Your LCD TV 8 Product Features 11 Product Notes 12 Other TV Functions 12 Using the Functions 13 Troubleshooting 21 Specifications 22 ...

Page 3: ...t the cable system 7 Power cord protection Protect the power cord from being walked on or pinched particularly at plugs convenience receptacles and the point where they exit from the apparatus 8 Overloading Do not overload wall outlets extension cords or convenience receptacles on other equipment as this can result in a risk of fire or electric shock 9 Entering of objects and liquids Never insert ...

Page 4: ...s of time unplug it from the wall outlet and disconnect the antenna This will prevent damage to the equipment due to lightning and power line surges 17 Do not use this apparatus near water for example near a bathtub washbowl kitchen sink or laundry tub in a wet basement or near a swimming pool and the like Do not use immediately after moving from a low temperature to high temperature environment a...

Page 5: ...r replacement of the obsolete outlet WARNING To reduce the risk of fire or electric shock do not expose this product to rain or moisture The apparatus shall not be exposed to dripping or splashing and that no objects filled with liquids such as vases shall be placed on the apparatus Caution To prevent electric shock match wide blade of plug to wide slot fully insert Refer to the identification rat...

Page 6: ...e equipment and unit 3 Connect the equipment into an outlet on a circuit different from that to which the unit is connected 4 Consult the dealer or an experienced radio TV technician for help and for additional suggestions The user may find the following booklet prepared by the Federal Communications Commission helpful How to Identify and Resolve Radio TV Interference Problems This booklet is avai...

Page 7: ...sary parts are in the box The package contains Stand LCD TV 2 Cover a level stable surface with a soft cloth Place the LCD TV unit facedown on the cloth 3 Fit the stand onto the bottom of the LCD TV unit as shown Then push until stand clicks into the LCD TV s stand socket SETTING UP YOUR LCD TV ...

Page 8: ...tenna 22 Exit 5 Up Down Left Right To select an adjustment or adjust the selected item in menus 4 Volume Up Down 20 Sleep Timer 23 MTS 24 PC 18 HDMI Overview Using the Remote Control 19 signal sources 15 Display ratio 8 Favorite 12 Guide 14 Menu Selection 6 OK 3 Channel Up Down 7 Display 13 Mute 11 CC 25 LOCK ...

Page 9: ... of the OSD 7 DISPLAY Press to show info of current program in dual window mode characters in red display the sub picture information 8 Favorite Press to list and select the favorite channel In analog NTSC mode edit the favorite channel in channel label menu then select the favorite menu In DTV mode the list key can list the all channels and favorite channels Select the channel you want 9 LAST Pre...

Page 10: ...al Standard Music and Movie 18 HDMI Press to select HDMI as your input 19 INPUT Press to select from the different signal sources available 20 SLEEP Press to select the length of time that you want to keep the TV turned on Once the time has elapsed the TV will shut off 21 LIST Press to display all the channel numbers and labels 22 EXIT Press to exit the menu operation 23 MTS In NTSC mode press to ...

Page 11: ...he remote control 1 Slide the remote control cover down to open the battery compartment 2 Insert two AAA size batteries 3 Slide the cover up until it clicks shut Insert the batteries with their terminals corresponding to the and indications in the battery compartment Precaution on battery use Improper use of batteries can result in a leakage of chemicals and or explosion Be sure to follow the inst...

Page 12: ...a other Disc s programs COMPONENT input Capable of receiving the high definition component signal in 480i 480p 720p and 1080i formats PC input a Connect with the host computer b Use as the display terminal c Connect the 3 5mm diameter audio cord to your computer s audio main board so you can listen to music from your host computer In PC mode the supported formats are as follow 640 480 60Hz 800 600...

Page 13: ...t In TV mode the LCD TV will automatically power off within 15 minutes and enters into Standby Mode if there is no signal input Multi Language On Screen Display menu Graphical user interface makes the menu operation more user friendly P Pr ro od du uc ct t N No ot te es s 1 The outdoor antenna should be properly installed according to its installation guide 2 The antenna cable should not be tied t...

Page 14: ...es out Unplug the power cord from the AC outlet The last TV mode will appear when power resumes Unplug the power cord from the AC outlet when the power is shuts off Sleep Press SLEEP to enable the Sleep Timer function The TV will set the period of time to shut off the TV and shut into the Standby mode When activating the Sleep Timer Off function press SLEEP to view the set sleep press again to res...

Page 15: ...tion keys is similar to the remote controls operation The only difference is that when operating on the LCD TV the CH CH will be used to choose function option and the V V to make the setting and adjustment to the chosen function option When an item in MENU is highlighted in gray it means that the item is not available or cannot be adjusted Using the PICTURE Menu Press Menu to enter PICTURE Menu P...

Page 16: ...ss Adjust the bass Treble Adjust the treble Balance Adjust the balance between the left and right speakers MTS Select the desired mode of MTS Only for analog TV signal Audio Language Select the desired audio language Only for digital TV signal Audio Channel Select the desired mode of audio input Function not available on all TVs Using the TIME Menu Select the TIME menu and make adjustments to the ...

Page 17: ...ation The digital signal will provide this information and be displayed when you press the Display button on the remote control Using the OPTION Menu Press MENU and Left Right to enter the OPTION Menu Menu Language There are three languages available on the on screen display OSD Transparency Use the Left Right buttons to alter the transparency of the OSD Color Temp There are three colors temperatu...

Page 18: ...n the background is Off the screen is black when it is On it is blue PC Set Up Setup for PC mode Closed Caption You can switch between CC display modes Off On when muted or On To select the preferences and press Right Down to enter the edit mode Restore Default All settings can be reset to the default settings NOTE When you Restore Defaults you will lose all scanned channels for both air and cable...

Page 19: ...sword Change Password In LOCK mode press Right to see the password submenu Press the number button to enter the password The default password is 0000 Press the number button on the remote control to set the new password When completed a prompt of successful change appears the TV will go back to previous menu System Lock ON OFF When System Lock is set to OFF no channels are blocked from viewing Aft...

Page 20: ...l Audience L Strong Language TV PG Parental Guidance Suggested S Sexual situation TV 14 Parents Strongly Cautioned V Violence TV MA Mature Audience only MPAA N A None G All children and General Audience General Audience PG Parental Guidance Suggested PG 13 Parental Guidance for children under 13 R Restricted viewing Parental guidance is suggested for children under 17 NC 17 and X No one 17 and und...

Page 21: ...e NTSC and ATSC TV channels automatically During the search the channels are stored When antenna set to AIR select Start to Scan when the search is finished the TV will automatically return to the first channel found When antenna is set to CABLE there are four cable selections for the OSD Select one mode and Start to Scan Channel Show Hide 1 Press the Menu button Using the Left or Right arrows sel...

Page 22: ...all your favorite channels Press Enter to select or cancel it Channel No Select the desired item to adjust press Left Right to adjust the channel Channel Label 1 Select the Channel Label to edit channels individually 2 Select the desired channel number then press Right to enter the edit mode 3 Select the input character with Up Down buttons Select the desired character then press the Left Right bu...

Page 23: ...otted or with snowy Signal source is low grade or the signal cord is in a lower quality Use the qualified signal cord Blue background in AV mode 1 No Video signal or the signal cord is improperly not connected 2 Video signal cord and S video cord are plugged in at the same time 1 Connect the signal cord properly 2 unplug one cord Picture is unclear or moves or have black stripes on horizontal posi...

Page 24: ...0V 50 60Hz Power Consumption 60W Dimension 15 94 18 11 6 30 inches HxWxD Weight About 11 lbs DESIGN AND SPECIFICATIONS ARE SUBJECT TO CHANGE WITHOUT NOTICE Polaroid and Polaroid and Pixel are trademarks of Polaroid Corporation For service support and warranty information visit www polaroid com ...

Page 25: ...0071120 20070724 Questions Need some help This manual should help you understand your new product If you have questions call our toll free number found on the insert with this icon Or visit www polaroid com ...

Reviews: