background image

65

Polaroid DVC-0075F Digital Camera User Guide
www.polaroid.com

9 Uploading Video Files to YouTube

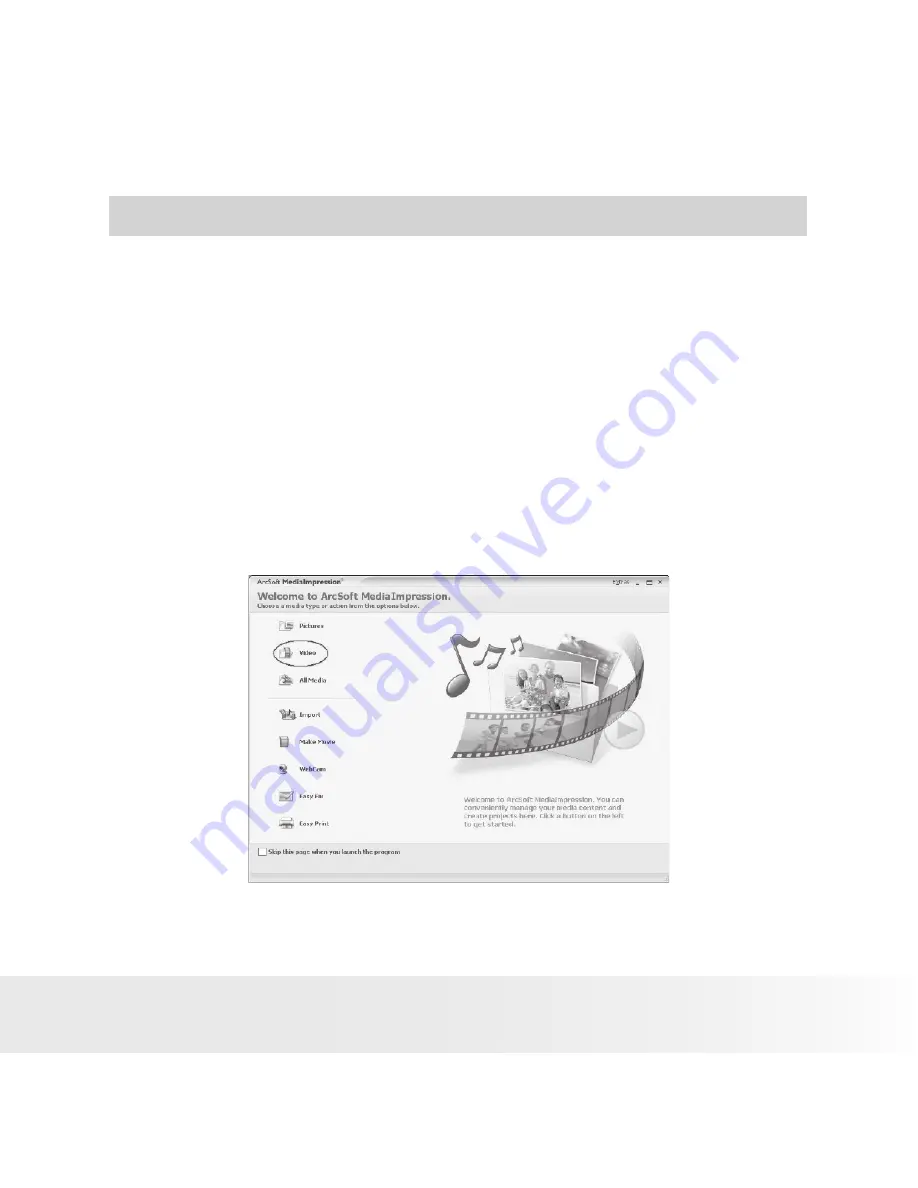
The  bundled  software  CD  contains  ArcSoft  MediaImpression  which 

features uploading the recorded  videos to YouTube. It will help you to 

share them with your family and friends on the YouTube website.

• ArcSoft MediaImpression

To upload video files to YouTube:

1.  Install  the  ArcSoft  MediaImpression  onto  your  PC  (Refer  to  Section 

10).

2.  Click  [Start]-->[ (All) Programs ]-->[ ArcSoft MediaImpression ] 

3.  ArcSoft MediaImpression main Screen will appear on your desktop.

4.  Click [ Video]  Option.

Summary of Contents for DVC-00725F

Page 1: ...ser s Manual Questions Need Some Help This manual should help you understand your new product or visit www polaroid com support If you still have questions call our help line found on the insert with...

Page 2: ...Product Overview 1 Speaker 2 Flash 3 Lens 4 Camera Shutter Button 5 Tele Wide Button 6 Microphone 6 5 3 4 1 7 Up Lighting Button 8 OK Menu Button 9 Self Timer Left Button 10 HD Down Button 11 Record B...

Page 3: ...Camera User Guide www polaroid com 14 15 16 18 19 17 14 LCD Panel 15 TV Port 16 HDMI Port 17 Mini USB Battery Charging Port 18 Ports Slide Cover 19 Power Button 20 Self timer LED 21 Tripod mount 22 B...

Page 4: ...ormation 13 Recording Videos 15 Photo Recording 15 Using the Intelligent Lighting Function 16 Using the Zoom Function 16 Setup Options in the Record Menu 17 Setup Operations in the Record Mode 17 Vide...

Page 5: ...y when there is no SD card in the camera 41 Format Card when there is an SD Card in the camera 41 TV System 42 Language 42 Information 43 Default Setting 43 3 Playback Mode 44 Button Function 44 LCD D...

Page 6: ...the SD Card 60 8 Burning the Recorded Clip into DVD 63 9 Uploading Video Files to YouTube 65 ArcSoft MediaImpression 65 10 Installing Bundled Software 69 Installing Video Codec to View Videos Correct...

Page 7: ...ur DVC 00725F HD Digital Camcoder has A high quality glass lens system for well exposed sharp pictures from 0 5m to infinity including a 5X optical zoom mode and 4X digital zoom mode Built in flash wi...

Page 8: ...ital Camcoder USB Cable AV Cable NP60 Battery HDMI Cable Quick Start Guide Quick Start Guide Guide de D marrage rapide Guida Rapida Gu a R pida de Inicio Guia de In cio R pido XX XXXX Part no XXXXXXXX...

Page 9: ...wer is adequate Battery power is low Battery power is exhausted Please recharge the battery Installing and Removing the Battery 1 Open the camera s battery SD card door by pushing it outwards as illus...

Page 10: ...m ion battery included with your camera is a high capacity battery Here are some helpful hints to extend battery life considerably by limiting the following activities Reviewing photos on the LCD Scre...

Page 11: ...is not in focus Remove your finger from the Camera Shutter button frame your subject and press the Camera Shutter button until the focus frame turns green and press all the way down to take your pictu...

Page 12: ...g ON OFF Down Button HD Recording Mode OK Enter Button Setup Menu On Tele Button Zoom In Wide Button Zoom out Power Button Hold down for one second to turn the camera on or off Playback Button functio...

Page 13: ...ay be displayed when videos and photos are recorded NOTE Icons may not be displayed if their settings are in the default mode No Icon Description 1 98 Remaining number of images that can be taken at c...

Page 14: ...de 5 continuous pictures The flash is disabled 7 Motion Detection 8 2008 05 01 Date Time YYYY MM DD HH MM 9 Self timer 10 White Balance 11 Macro 12 Intelligent Lighting On 13 Battery full power Batter...

Page 15: ...ution setting in the Setup menu For more information refer to page 18 Video Quality HD HD 1280X720 D1 D1 720X480 VGA 640X480 QVGA 320X240 Photo Recording 1 Press the Camera Shutter Button halfway down...

Page 16: ...ton to extend the dynamic range for backlit and high contrast scenes so that the objects will be brighter and clearer 2 Press Intelligent Lighting Button again to exit Using the Zoom Function The zoom...

Page 17: ...acklight Date Printing Night Mode Exit On Off Normal B W Classic Negative Exit Sound Time Setting Format Memory TV System Language Information Default Setting Exit Setup Functions in the Record Mode O...

Page 18: ...eo Resolution 1 In Video Photo Record Mode press the OK Button to switch to the record setup menu screen 2 Use Right Left Buttons to select Video Capture Menu The Video Mode submenu will pop up on the...

Page 19: ...en 2 Use the Right Left Buttons to select Video Capture Menu The submenu of the Video Mode will pop up on the screen 3 Use the Up Down Buttons to select Macro Mode then press the OK Button to switch t...

Page 20: ...utton to switch to the record setup menu screen 2 Use the Right Left Buttons to select the Video Capture Mode The submenu of Video Mode will pop up on the screen 3 Use the Up Down Buttons to move to t...

Page 21: ...ord setup menu screen 2 Use the Right Left Buttons to select the Video Capture Menu The submenu of the Video Mode will pop up on the screen 3 Use the Up Down Buttons to select the Sharpness setting th...

Page 22: ...hting To change the White Balance Setting 1 In the Video Photo Record Mode press the OK Button to switch to the record setup menu screen 2 Use the Right Left Buttons to select Video Capture Menu The V...

Page 23: ...pture Menu will pop up on the screen 3 Use the Up Down Buttons to select the Stabilization setting then press the OK Button to switch to Stabilization submenu 4 Use the Up Down Buttons to choose betwe...

Page 24: ...s You will see on the upper left corner of the LCD display Record Menu Setup Screen Night Mode Option OK Button NOTE To avoid blurry pictures place the camera on a flat steady surface or use a tripod...

Page 25: ...Buttons to select the Still Capture Menu The submenu of the Still Capture Menu will pop up on the screen 3 Use the Up Down Buttons to select the Resolution Setting then press the OK Button to switch...

Page 26: ...2 Use the Right Left Buttons to select the Still Capture Menu The submenu of the Still Capture Menu will pop up on the screen 3 Use the Up Down Buttons to select the Macro Mode then press the OK Butto...

Page 27: ...n to switch to the record setup menu screen 2 Use the Right Left Buttons to select the Still Capture Menu The submenu of the Still Capture Menu will pop up on the screen 3 Use the Up Down Buttons to m...

Page 28: ...ill Capture Menu will pop up on the screen 3 Use the Up Down Buttons to select the Two in One feature then press the OK Button to switch to the Two in One submenu 4 Use the Up Down Buttons to choose e...

Page 29: ...red electronic photo frame To enable Photo Frame Feature 1 In the Still Capture menu use the Up Down Buttons to select the Photo Frame option then press the OK Button to switch to the Photo Frame subm...

Page 30: ...e red eye effect Flash off The flash will not fire under any circumstances Use this mode when taking images in a place where flash photography is prohibited or when the subject is far away beyond 10 f...

Page 31: ...era will also blink The speed of blinking will increase just before the Photo is taken To enable the Selftimer 1 When in the Still Capture menu use the Up Down Buttons to select the Selftimer then pre...

Page 32: ...ness setting 1 When in the Still Capture Menu use the Up Down Buttons to select the Sharpness Option then press the OK Button to switch to the Sharpness submenu 2 Use the Up Down Buttons to move betwe...

Page 33: ...th fluorescent lighting Tungsten Use this setting indoors with tungsten incandescent lighting To change White Balance Setting 1 When in the Still Capture Mode use the Up Down Buttons to select the Whi...

Page 34: ...he Up Down Buttons to select the Multi snap then press OK Button to switch to the Multi snap submenu 2 Use the Up Down Buttons to choose between On or Off 3 Press the OK Button to confirm the setting...

Page 35: ...To enable the Backlight Feature 1 When in the Still Capture Menu use the Up Down Buttons to select the Backlight feature then press the OK Button to switch to the Backlight submenu 2 Use the Up Down...

Page 36: ...the Up Down Buttons to choose between On or Off 3 Press the OK Button to confirm the setting and exit You will see the date on the lower left corner of the LCD display Record Menu Setup Screen Date P...

Page 37: ...if it does not detect motion To enable the Motion Detection Feature 1 In the Video Photo Record Mode press the OK Button to switch to record menu setup screen 2 Use the Right Left Buttons to move to...

Page 38: ...To change the Effect setting 1 In the Video Photo Record Mode press the OK Button to switch to the record menu setup screen 2 Use the Right Left Buttons to move to the Effect Option The submenu of th...

Page 39: ...ss the OK Button to switch to the record menu setup screen 2 Use the Right Left Buttons to move to the Setting option then the Setting Submenu will pop up on the screen 3 Use the Up Down Buttons to mo...

Page 40: ...ime Setting Move between Date Time Set and Exit by using the Left Right buttons Adjust the date and time by using the Up Down Buttons then select the Set to confirm each change Select Exit to leave th...

Page 41: ...the camera Record Menu Setup Screen Format Memory option OK Button Format Card when there is an SD Card in the camera Record Menu Setup Screen Format Card option OK Button NOTE All the data will be e...

Page 42: ...or PAL Selecting the wrong TV system setting may cause viewing problems NTSC USA Canada Japan South Korea and Taiwan etc PAL UK Europe China Australia Singapore and Hong Kong etc Record Menu Setup Scr...

Page 43: ...On Show the indicator s on the LCD screen Off Do not show the indicator s on the LCD screen Record Menu Setup Screen Information option OK Button Default Setting To restore the default factory setting...

Page 44: ...s in the Playback Mode Videos and Photos Direction Buttons can be used to select the specific option Press OK Button to view videos or photos Button Function The Direction Buttons have the following f...

Page 45: ...tion Indicators on the LCD screen while in Playback Mode No Icon Description 1 5 10 Current Number Total number of Video or Photo 2 Magnification Indicator 3 Indicate the screen is in Playback Mode 4...

Page 46: ...o Video Playback Mode 3 Use Right Left Buttons to go to the next or last Video 4 Press Record Button to play and press it again to pause 5 While playing Video press Right Left Buttons to fast forward...

Page 47: ...delete all videos and Down Button to delete single Video 5 Before a Video is deleted a confirmation screen will appear choosing Yes will execute the operation and No to cancel the operation 6 Press O...

Page 48: ...ingle video or all videos can be locked This function can prevent the videos from being deleted accidentally Operation Display Screen 1 Use Right Left Buttons to select the Lock option 2 Press OK Butt...

Page 49: ...le Video or all videos in order Operation Display Screen 1 Use Right Left Buttons to select the Repeat One option or Repeat All option 2 Press OK Button to start repeating press it again to stop Need...

Page 50: ...o go to Photo Playback Mode 3 Use the Right Left Buttons to go to the next or last Photo 4 While the Photo is selected use Tele Wide Buttons to magnify 5 To navigate the magnified Photo use Direction...

Page 51: ...te all pictures and Down Button to delete single Photo 5 Before a Photo is deleted a confirmation screen will appear choosing Yes will execute the operation and No to cancel the operation 6 Press OK B...

Page 52: ...Locking Photos A single picture or all pictures can be locked This function can prevent the pictures from being deleted accidentally Operation Display Screen 1 Use Right Left Buttons to select the Lo...

Page 53: ...eats all pictures in order Operation Display Screen 1 Use Right Left Buttons to select the Slideshow option 2 Press the OK Button to start the slide show press it again to stop Need help with your dig...

Page 54: ...r computer at My Computer Removable Disk DCIM 100PHOTO 3 In these folders you can read delete move or copy any Video Photo you want 4 Use the bundled ArcSoft application software to edit the videos or...

Page 55: ...teps for viewing stored pictures and Video on a TV are exactly the same as for viewing them on the LCD display NOTE The camera can not capture videos or photos when it is connected to a high definitio...

Page 56: ...de or 4 3 TV 1 Connect one end of the AV cable to your camera s AV Out port 2 Connect the other end of the cable to a TV 3 The steps for viewing stored photos and Video on a TV are exactly the same as...

Page 57: ...into compatible format with your camera In this way you can convert various video files formats and playback your favorite videos on your camera Media Converter To convert a video file 1 Install the...

Page 58: ...Select the Video file you want to convert 6 You can preview your media files before converting To preview media files use the following control functions Click to start previewing Click to stop previ...

Page 59: ...completed 9 Before transferring the converted file to your camera rename the converted file to CLIPXXXX avi XXXX should be a four figures eg 0001 to 9999 10 Connect your camera to PC and copy the con...

Page 60: ...2 Electrostatic charge electrical noise and other phenomena can cause data corruption or even loss Always make sure that you always back up important data on other media MO disc computer hard drive et...

Page 61: ...o record new files onto it format it or delete its files Files contained in the SD card recorded by other cameras may conflict with the DVC 00725F camera and valuable data in your existing SD card may...

Page 62: ...d open the camera s battery SD card door Gently push the SD card inwards and then release it The SD card will eject out of the SD card slot IMPORTANT Never insert any other object into the camera s SD...

Page 63: ...sion also features burning the video clip into DVD You can preserve your precious videos on DVD to share with family and friends To create a DVD 1 Install the ArcSoft MediaImpression onto your PC Refe...

Page 64: ...ide www polaroid com 5 The operation screen will appear Select the folder that contains the file s you want to use Select the file s Click button to put the file s into slide Click Burn to Disc 1 2 3...

Page 65: ...g the recorded videos to YouTube It will help you to share them with your family and friends on the YouTube website ArcSoft MediaImpression To upload video files to YouTube 1 Install the ArcSoft Media...

Page 66: ...ra User Guide www polaroid com 5 Select the video file you want to upload and click Upload to YouTube option at the bottom menu 6 If this is your first time using of this function please follow the in...

Page 67: ...ra User Guide www polaroid com 7 Go to http www youtube com login then Log onto your YouTube account If you do not have a YouTube account sign up here first 8 After you log onto your YouTube account C...

Page 68: ...68 Polaroid DVC 00725F Digital Camera User Guide www polaroid com Click Allow Button shown on YouTube website 9 Click Save Button to upload the video...

Page 69: ...alling it Installing Bundled ArcSoft Software The CD ROM supplied with this camera contains the other 2 pieces of software ArcSoft MediaConverter can convert multiple video formats into compatible for...

Page 70: ...rt Centre Ireland Hangzhou Tel 353 0 61 702087 Tel 86 571 88210575 Fax 353 0 61 702001 E mail support arcsoft com cn E mail eurosupport arcsoft com Web http www arcsoft com cn new support For Japan Fo...

Page 71: ...20X240 30fps Shutter Electrical shutter Optical Zoom 5X White Balance Auto Manual Daylight Fluorescent Tungsten Storage Internal Memory 64MB Nand Flash External Memory Supports SD MMC card Self timer...

Page 72: ...ideo or Photo capture or until the power goes off Setting Functionality Default Factory Setting Resolution Always HD for Video Standard for Photos Stabilization Always Off Flash Always Off Date Printi...

Page 73: ...LCD screen may vary with the different shipment destinations System requirements Microsoft Windows 2000 XP Vista Intel Pentium III 800MHz or above 256 MB RAM CD ROM Drive 700 MB free HDD space Availab...

Page 74: ...east 30cm 11 8 inches away and the camera is set to Macro the subject will look out of focus on the LCD display 2 The flash is not working The camera is in Macro Mode The battery power is low 3 When r...

Page 75: ...blurry and dark In these photo capture conditions the camera s shutter time is much longer therefore you may need to turn on the flash and or use a tripod You will hear the shutter sound when the phot...

Page 76: ...remove dust or stains on the camera with a soft cloth dampened with water or neutral detergent NEVER place hot items on the surface of the camera NEVER attempt to open or disassemble the camera becaus...

Page 77: ...l not occur in a particular installation If this equipment does cause harmful interference to radio or television reception which can be determined by turning the equipment off and on the user is enco...

Page 78: ...e help This manual should help you understand your new product If you have questions call our customer service help number Look for the insert with this icon or visit www polaroid com US 1008 Part No...

Reviews: