background image

122

123

You may hear a slightly annoying sound that will disappear when the device is 

properly positioned within the ear canal. If the positioning is correct and the 

sound is still perceptible, try with a different size and repeat the operation. Slowly 

adjust the volume as needed. The Hearing aid has seven different volume inten-

sities marked each one by a “beep”. The end of the scale, both for minimum and 

maximum volume, is marked by two “beeps”. 

To increase the volume

To decrease the volume

Summary of Contents for Digital AIR 3D

Page 1: ...MANUALE USO E MANUTENZIONE USE AND MAINTENANCE MANUAL...

Page 2: ...2 IT CONTATTACI Assistenza Servizio Post Vendita Sito web www polaroid acoustic com per informazioni scrivici a info polaroid acoustic com 800 910575 Risposta entro 24 48 ore...

Page 3: ...o ne della capacit uditiva in caso di situazioni pi gravi consultare un medico CONSIGLI PER L UTILIZZO Leggere attentamente le istruzioni d uso e familiarizzare con i meccanismi dell amplificatore acu...

Page 4: ...acustico uno strumento ausiliario utilizzato per compensare e attenuare la perdita uditiva dell utente utilizzabile per ipoacusici con perdite dell udito conduttive neurosensoriali e miste ecc adatta...

Page 5: ...nuovo Il suono debole Auricolare danneggia to o sporco di cerume Pulirlo o sostituirlo con uno nuovo Abbassamento perdi ta uditiva Contatti il suo Otorino Il suono percepito a intermittenza Umidit Ap...

Page 6: ...istruzioni fornite nel foglio illustrativo L amplificatore acustico non ripristina le normali condizioni uditive e non evita n migliora i danni all apparato uditivo dovuti a condizioni organiche Le r...

Page 7: ...acqua in quanto le gocce d acqua potrebbero rimanere nel tubicino bloccan do i suoni o danneggiando i componenti elettrici dell amplificatore acustico I bambini devono indossare l amplificatore acust...

Page 8: ...manutenzione interna e o di lubrifi cazione Cura Quando non si utilizza conservarlo nell astuccio Pulire l amplificatore con un panno morbido e asciutto Non utilizzare detergenti abrasivi o volatili...

Page 9: ...dell Unione Europea e nei paesi con sistemi di differenziata II simbolo riportato sul prodotto o sulla sua documentazione indica che il prodotto conforme alla normativa sulle apparecchiature elettrich...

Page 10: ...orniti a corredo e le parti soggette a normale usura Le spese di spedizione sono a carico dell utente Le riparazioni al di fuori delle condizioni di garanzia sono a carico dell utente La garanzia deca...

Page 11: ...l periodo di inefficienza del prodotto La garanzia valida dalla data d acquisto del prodotto certificata dallo scontrino fiscale o dalla fattura d acquisto La mancanza dello scontrino fiscale d acquis...

Page 12: ...12 IT...

Page 13: ...13 INDICE Modello DIGITAL AIR 3D p 14 Modello DIGITAL SUPERIOR 3D p 40 Modello DIGITAL INVISIBLE 3D p 66...

Page 14: ...14 IT 101 Codici analoghi Digital PRO 3D 104...

Page 15: ...etroazione acustica altamente efficace L amplificatore acustico digitale DigitalAir 3D Polaroid aiuta l utente non solo ad avere un udito pulito in un ambiente silenzioso ma anche in un amblente rumor...

Page 16: ...PL 90 114 2 dB 111 5 dB Peak Gain 31 9 dB 29 3 dB HFA Full on Gain 25 5 dB 22 6 dB Total Harmonic Distortion 500Hz 0 1 0 2 800Hz 0 2 0 1 1600Hz 0 3 0 3 EQ Input Noise Level 24 2 dB 24 4 dB Frequency R...

Page 17: ...plificatore acustico costituito dal microfono dal circuito integrato e dal ricevitore Il microfono trasforma il suono ricevuto in segnale elettrico il circuito integrato riceve il segnale elettrico da...

Page 18: ...i acustici in aree con rischio di atmosfere esplosive o arricchite di ossigeno Attenzione L amplificatore acustico deve essere utilizzato solo dalla persona a cui destinato e non da altri Per amplific...

Page 19: ...a batteria viene ingerita si prega di consultare immediatamente un medico Ingerire la batteria dell amplificatore acustico pu mettervi in pericolo di vita L amplificatore acustico deve essere utilizza...

Page 20: ...o contatta il tuo otorino Nessun suono Spento Accendere La batteria non installata Installare la batteria Basso livello di batteria o scarica Sostituire la batteria con una nuova Il cerume blocca la...

Page 21: ...a Alto consumo della batteria L amplificatore acustico acceso mentre non in uso Si prega di spegnere l amplificatore acustico mentre non in uso Amplificatore acustico smorzato Asciugare l amplificator...

Page 22: ...acqua Si prega di togliere l amplificatore acustico e di conservarlo correttamente prima di andare a nuotare di fare la doccia di lavare la testa o il viso Se l amplificatore acustico cade in acqua ac...

Page 23: ...sami di risonanza magnetica TAC o trattamenti di radiazione simili Si prega di utilizzare batterie professionali specifiche per amplificatori acustici Se non si utilizza un amplificatore acustico per...

Page 24: ...iabilitazione per i primi tempi di utilizzo a Prima fase 1 3 settimane 1 a 2 ore di utilizzo al giorno si suggerisce di indossare l amplificatore acustico in un ambiente relativamente tranquillo per r...

Page 25: ...plificatore acustico e frequentare aree pubbliche E possibile avere dialoghi con amici o estranei d Quarta fase 1 3 settimane Si pu preparare un viaggio verso un altra citt andare al supermercato rist...

Page 26: ...26 IT Contenuto della confezione...

Page 27: ...trambe le orec chie utilizzando il rispettivo tubicino retroauricolare Il kit composto da Amplificatore acustico Tubicino retroauricolare destro Tubicino retroauricolare sinistro Inserti auricolari di...

Page 28: ...sinistro siglato in BLU C a seconda delle necessit ovvero su quale orecchio verr applicato l amplificatore acustico Applicare il tubicino scelto al corpo dell amplificatore l estremit del tubicino va...

Page 29: ...D della misura pi adatta al proprio orecchio tra le tre diverse misure disponibili S M L Per la prima applicazione si consiglia di provare l auricolare di taglia M Montare a pressione l auricolare D s...

Page 30: ...pingere con forza per non danneggiare il comparto Verificare che il modello della batte ria sia corretto quindi rimuovere la pellicola della batteria ed attendere circa 1 minuto prima di inserirla nel...

Page 31: ...arto rispettando la corretta polarit come riportato sul lato dell amplificatore Chiudere delicatamente il vano batteria Se la batteria non corret tamente posizionata il vano batteria non si chiude L a...

Page 32: ...tasto di regolazione volume vedi figura premere la parte inferiore per diminuirlo Verificare la funzionalit posizionando l amplificatore fra due mani chiuse l ampli ficatore funzionante e acceso prod...

Page 33: ...guetta del tubicino retroauricolare nell orecchio 3 Afferrare l auricolare con il pollice e l indice sulla parte esterna vicino al tubicino 4 Inserire delicatamente con una leggera inclinazione la pun...

Page 34: ...rretto e il suono si sente ancora necessario verificare la scelta della dimensione dell auricolare modificarla e ripetere l operazione di inserimento Regolare lentamente il volume in base alla necessi...

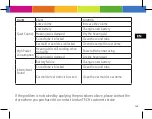
Page 35: ...35 Selezione del programma di amplificazione Premere per la selezione del programma Prog Bip Uso 1 1 Ambienti silenziosi 2 2 Ambienti pi rumorosi...

Page 36: ...con la freccia lo stabilizzatore del tubicino e va inserito nel padiglione auricolare Una volta inserito l auricolare nel cana le uditivo posizionare lo stabilizzatore all interno del padiglione auric...

Page 37: ...37 Per spegnere l amplificatore aprire il vano porta batteria A fine utilizzo rimuovere l amplificatore...

Page 38: ...tico a Cambiare gli inserti auricolari Rimozione degli inserti auricolari Tenere l auricolare con la mano sinistra e il connettore del tubicino retroauricolare con la mano destra per separarli l uno d...

Page 39: ...are danni in caso di caduta Avvertenza non utilizzare mai alcun liquido per pulire l amplificatore acustico d Prevenzione dell umidit Posizionare l amplificatore acustico nella sua confezione durante...

Page 40: ...40 IT 100...

Page 41: ...i soppressione della retroazione acustica altamente efficace L amplificatore acustico digitale Digital Superior 3D Polaroid aiuta l utente non solo ad avere un udito pulito in un ambiente silenzioso m...

Page 42: ...etri Valori MAX OSPL90 dB 110 8 HFA OSPL90 dB 104 4 Peak Gain dB 36 HFA FULL ON GAIN dB 29 Frequency Range 200Hz 6600Hz THD at 500Hz 0 4 THD at 800Hz 0 3 THD at 1600Hz 0 5 Eq Input Noise Level dB 25 C...

Page 43: ...plificatore acustico costituito dal microfono dal circuito integrato e dal ricevitore Il microfono trasforma il suono ricevuto in segnale elettrico il circuito integrato riceve il segnale elettrico da...

Page 44: ...i acustici in aree con rischio di atmosfere esplosive o arricchite di ossigeno Attenzione L amplificatore acustico deve essere utilizzato solo dalla persona a cui destinato e non da altri Per amplific...

Page 45: ...a batteria viene ingerita si prega di consultare immediatamente un medico Ingerire la batteria dell amplificatore acustico pu mettervi in pericolo di vita L amplificatore acustico deve essere utilizza...

Page 46: ...o contatta il tuo otorino Nessun suono Spento Accendere La batteria non installata Installare la batteria Basso livello di batteria o scarica Sostituire la batteria con una nuova Il cerume blocca la...

Page 47: ...a Alto consumo della batteria L amplificatore acustico acceso mentre non in uso Si prega di spegnere l amplificatore acustico mentre non in uso Amplificatore acustico smorzato Asciugare l amplificator...

Page 48: ...acqua Si prega di togliere l am plificatore acustico e di conservarlo correttamente prima di andare a nuo tare di fare la doccia di lavare la testa o il viso Se l amplificatore acustico cade in acqua...

Page 49: ...sami di risonanza magnetica TAC o trattamenti di radiazione simili Si prega di utilizzare batterie professionali specifiche per amplificatori acustici Se non si utilizza un amplificatore acustico per...

Page 50: ...iabilitazione per i primi tempi di utilizzo a Prima fase 1 3 settimane 1 a 2 ore di utilizzo al giorno si suggerisce di indossare l amplificatore acustico in un ambiente relativamente tranquillo per r...

Page 51: ...plificatore acustico e frequentare aree pubbliche E possibile avere dialoghi con amici o estranei d Quarta fase 1 3 settimane Si pu preparare un viaggio verso un altra citt andare al supermercato rist...

Page 52: ...52 IT Contenuto della confezione...

Page 53: ...mod 312 L amplificatore pu essere indossato su entrambe le orec chie utilizzando il rispettivo tubicino retroauricolare Il kit composto da Amplificatore acustico Tubicino retroauricolare destro Tubic...

Page 54: ...p 2 Esempio per auricolare destro Scegliere il tubicino retroauricolare destro siglato in ROSSO B o sinistro siglato in BLU C a seconda delle necessit ovvero su quale orecchio verr applicato l amplifi...

Page 55: ...riangolare del tubicino ruotata di un quarto nell innesto step 1 a baionetta dell amplificatore e poi ruotare in senso inverso per fissarlo step 2 Per rimuovere il tubicino agire in senso inverso step...

Page 56: ...a re il comparto Scegliere l inserto auricolare D della misura pi adatta al proprio orecchio tra le tre diverse misure disponibili S M L Per la prima applicazione si consiglia di provare l auricolare...

Page 57: ...ettando la corretta polarit come riportato sul lato dell amplificatore Verificare che il modello della batteria sia corretto quindi rimuovere la pellico la della batteria ed attendere circa 1 minuto p...

Page 58: ...58 IT Chiudere delicatamente il vano batteria Se la batteria non correttamente posizionata il vano batteria non si chiude L amplificatore ora risulta acceso...

Page 59: ...tasto di regolazione volume vedi figura premere la parte inferiore per diminuirlo Verificare la funzionalit posizionando l amplificatore fra due mani chiuse l amplificatore funzionante e acceso produr...

Page 60: ...nguetta del tubicino retroauricolare nell orecchio 3 Afferrare l auricolare con il pollice e l indice sulla parte esterna vicino al tubicino 4 Inserire delicatamente con una leggera inclinazione la pu...

Page 61: ...etto e il suono si sente ancora necessario verificare la scelta della dimensione dell auricolare modificarla e ripetere l operazione di inse rimento Regolare lentamente il volume in base alla necessit...

Page 62: ...con la freccia lo stabilizzatore del tubicino e va inserito nel padiglione auricolare Una volta inserito l auricolare nel cana le uditivo posizionare lo stabilizzatore all interno del padiglione auric...

Page 63: ...63 Per spegnere l amplificatore aprire il vano porta batteria quando si rimuove la batteria assicurarsi che il vano sia completamente aperto A fine utilizzo rimuovere l amplificatore...

Page 64: ...tico a Cambiare gli inserti auricolari Rimozione degli inserti auricolari Tenere l auricolare con la mano sinistra e il connettore del tubicino retroauricolare con la mano destra per separarli l uno d...

Page 65: ...are danni in caso di caduta Avvertenza non utilizzare mai alcun liquido per pulire l amplificatore acustico d Prevenzione dell umidit Posizionare l amplificatore acustico nella sua confezione durante...

Page 66: ...66 IT 103 102 Codici analoghi Digital Micro 3D 105 e 106 Color Digital Micro 3D 107 e 108 Color Digital Invisible 3D 109 e 110...

Page 67: ...pressione della retroazione acustica altamente efficace L amplificatore acustico Digital Invisible 3D Polaroid aiuta l utente non solo ad avere un udito pulito in un ambiente silenzioso ma anche in un...

Page 68: ...OSPL 90 111 9 dB HFA OSPL 90 107 9 dB Peak Gain 37 2 dB HFA Full on Gain 33 1 dB Total Harmonic Distortion 500Hz 0 5 800Hz 0 2 1600Hz 0 5 EQ Input Noise Level 22 9 dB Frequency Range 200 Hz 8000 Hz At...

Page 69: ...cipio di funzionamento L amplificatore acustico costituito dal microfono dal circuito integrato e dal ricevitore Il microfono trasforma il suono ricevuto in segnale elettrico il circuito integrato ric...

Page 70: ...i acustici in aree con rischio di atmosfere esplosive o arricchite di ossigeno Attenzione L amplificatore acustico deve essere utilizzato solo dalla persona a cui destinato e non da altri Per amplific...

Page 71: ...ega di consultare immediatamente un medico Ingerire la batteria dell amplificatore acustico pu mettervi in pericolo di vita L amplificatore acustico deve essere utilizzato solo per i non udenti non da...

Page 72: ...cchie o posiziona gli oggetti a una distanza sufficiente dall orecchio Troppo cerume Togli il cerume o contatta il tuo otorino Rotturadell amplificatoreacustico Contattare il punto vendita Silenzio Sp...

Page 73: ...vello massimo o minimo Ruotare la rotellina del volume in senso opposto Il tubicino o la cupola uditiva sono sporchi Pulire il tubicino e la cupola uditiva o contattare il servizio clienti Alto consum...

Page 74: ...icatore acustico Pulire l amplificatore acustico con un panno asciutto e morbido Utilizzare uno spazzolino morbido e un panno asciutto e morbido per rimuovere il cerume nel foro di uscita del suono de...

Page 75: ...catore acustico b Prevenzione dall acqua Si prega di non indossare l amplificatore acustico quando si nuota Rimuo vere l amplificatore acustico quando piove Se l amplificatore acustico cade accidental...

Page 76: ...ll interno di un campo elettrico o di un forte campo magnetico come trasformatore sottostazione centrale elettrica laboratori etc lasciando i vostri apparecchi acustici all esterno EMC Si prega di rim...

Page 77: ...per evitare perdite della batteria Le batterie esauste devono essere posizionate fuori dalla portata di neonati o bambini per evitare che vengano inghiottite In caso di ingestione accidentale da parte...

Page 78: ...iabilitazione per i primi tempi di utilizzo a Prima fase 1 3 settimane 1 a 2 ore di utilizzo al giorno si suggerisce di indossare l amplificatore acustico in un ambiente relativamente tranquillo per r...

Page 79: ...plificatore acustico e frequentare aree pubbliche E possibile avere dialoghi con amici o estranei d Quarta fase 1 3 settimane Si pu preparare un viaggio verso un altra citt andare al supermercato rist...

Page 80: ...80 IT Contenuto della confezione...

Page 81: ...S 9 mm h 10 mm h 19 mm 11 mm h 10 mm h 19 mm 14 mm h 10 mm h 19 mm M L Modello con testo in rosso per orecchio destro Modello con testo in blu per orecchio sinistro Il kit composto da Amplificatore ac...

Page 82: ...ione amplificatore D deve risultare in corrispondenza del perno di estrazione dell auricolare E questo agevoler l estrazione dell amplificatore a fine utilizzo Per la prima applicazione si consiglia d...

Page 83: ...pelli cola della batteria ed attendere circa 1 minuto prima di inserirla nel vano Batterie compatibili ZINCO ARIA modello 10 Chiudere delicatamente il vano batte ria Se la batteria non correttamente p...

Page 84: ...lizzando il dito ruotare la rotellina in senso orario per aumentare il volume e in senso antiorario per diminuirlo Verificare la funzionalit posizionando l amplificatore fra due mani chiuse l amplific...

Page 85: ...plificatore nel condotto uditivo Si potrebbe udire un lieve suono fasti dioso che deve scomparire quando si posizionato correttamente l amplifica tore all interno del condotto uditivo Se il posizionam...

Page 86: ...86 IT A fine utilizzo rimuovere l amplificatore Per spegnere l amplificatore aprire il vano porta batteria...

Page 87: ...ificatore acustico Si prega di pulire regolarmente il condotto uditivo e sostituire il filtro paracerume a Cambiare gli inserti auricolari Rimozione degli inserti auricolari Tenere l auricolare con la...

Page 88: ...ita del suono a causa del cerume Per sostituire il filtro utilizzare l apposito estrattore L estrattore ha due lati uno libero e l altro con il nuovo filtro gi inserito Per togliere il filtro sporco u...

Page 89: ...89 Ora utilizzare l altro lato dell estrattore per inserire il filtro nella cavit appena liberata Inserito il filtro rimuovere delicatamente l estrattore...

Page 90: ...tare danni in caso di caduta Avvertenza non utilizzare mai alcun liquido per pulire l amplificatore acustico d Prevenzione dell umidit Posizionare l amplificatore acustico nella sua confezione durante...

Page 91: ...usare se la confezione danneggiata Attenzione La Guida all uso deve essere letta Data di produzione Lotto Codice prodotto Numero di serie Rifiuti di apparecchiature elettriche ed elettroniche RAEE Mat...

Page 92: ...ing event in a meeting or in during a lecture or on any occasion in which your auditory function needs a little help HOW TO USE Carefully read the operating instructions manual and familiarise yoursel...

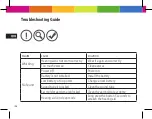
Page 93: ...e Volume is low Headset damaged or presence of earwax Clean or replace it with a new one Hearing drop loss Contact your professional hearing specialist The sound is intermittent Possible humidity Open...

Page 94: ...to the instruction manual The hearing aid will not restore normal hearing conditions and does not prevent or fix hearing loss due to physical conditions Do not use hearing aids in explosion hazardous...

Page 95: ...be rinsed or submerged in water as water droplets may remain in the tube blocking the sound or damaging the electric components of the hearing aids Children must wear the hearing aid under the supervi...

Page 96: ...or lubrication Maintenance When not in use store the device n the proper case Clean the equipment with a soft dry cloth Do not use abrasive or volatile cleaners oil solvents gasoline etc Never immerse...

Page 97: ...Union countries with recycling systems The symbol on the product or on its documentation indicates that the product complies with the electrical and electronic waste regulations and It should not be...

Page 98: ...ponents The warranty does not cover the accessories supplied with the unit or parts subject to normal wear The shipping costs are borne by the user Repairs out of warranty are borne by the user The wa...

Page 99: ...olve any compensation for direct or indirect damage toward persons or property of any kind during the inefficiency period The warranty is valid from the date of purchase certified by the possession of...

Page 100: ...100...

Page 101: ...101 INDEX DIGITAL AIR 3D Model p 102 DIGITAL SUPERIOR 3D Model p 128 DIGITAL INVISIBLE 3D Model p 154...

Page 102: ...102 101 Other codes Digital PRO 3D 104...

Page 103: ...k suppression function The DigitalAir 3D Polaroid hearing aid helps the user not only to have a clean hearing in a quiet environment but also in a noisy environment The product design meets the ergono...

Page 104: ...SPL 90 114 2 dB 111 5 dB Peak Gain 31 9 dB 29 3 dB HFA Full on Gain 25 5 dB 22 6 dB Total Harmonic Distortion 500Hz 0 1 0 2 800Hz 0 2 0 1 1600Hz 0 3 0 3 EQ Input Noise Level 24 2 dB 24 4 dB Frequency...

Page 105: ...the amplified electric signal and restore to sound to achieve the sound amplification purpose and make the compensation for the hearing loss user to help the hearing loss user working and living like...

Page 106: ...hearing aid must only be used by tended person and not by others For hearing aids with wireless transmission warning to check first before using the hearing aids in areas where electronics or wireless...

Page 107: ...is life threatening to swallow the hearing aid battery The hearing aid should be only used by the hearing impaired not by any other Special User 1 Children can t wear the hearing aid without the guida...

Page 108: ...earwax Clean earwax No Sound Power off Power on Battery is not installed Install the battery Low battery or no power Change a new battery Sound tube is blocked Clean the sound tube Ear mold or ear dom...

Page 109: ...e High Power Consumption Hearing aid is still working when not using Power off when not using Hearing aid is damped Dry the hearing aid Intermittent Sound Battery failure Change a new battery Sound tu...

Page 110: ...ater Please take off the hearing aid in advance and keep properly when swimming shower washing the head or face If hearing aid falls into the water accidentally do not use any dryer to dry it You can...

Page 111: ...ing short wave diathermy X ray MR scans CT scans or similar radiation treatments Please use professional battery for hearing aid If you not use hearing aid for long time please take out the battery to...

Page 112: ...ehabilitation plan for first time users or those using new hearing aids a The First Stage 1 3 weeks 1 to 2 hours wearing per day you are suggested to wear in a relatively quiet envi ronment to familia...

Page 113: ...hearing aids and go to public areas You may have dialogue with your friends or even strangers d The Fourth Stage 1 3 weeks You may prepare for travelling to another city go to supermarket restaurant...

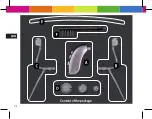
Page 114: ...114 Content of the package...

Page 115: ...mm 12 mm h 9 mm M L The unit can be worn on either ear using the respective BTE tubes The kit consists of Hearing Aid Right BTE tube Left BTE tube Earbuds in different sizes S M L Rigid wire for BTE t...

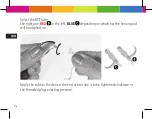
Page 116: ...tube the right one RED B or the left BLUE C depending on which ear the hearing aid will be applied on Apply the tube to the device the end of the tube is to be tightened clockwise in the threaded plug...

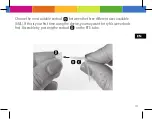
Page 117: ...he most suitable earbud D between the three different sizes available SML If this is your first time using the device you may want to try M size earbuds first Assemble by pressing the earbud D on the...

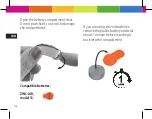
Page 118: ...t door Do not push hard so as not to damage the compartment If you are using zinc air batteries remove the plastic battery and wait about 1 minute before inserting it back into the compartment Compati...

Page 119: ...the battery into the compart ment ensuring correct polarity Close the battery compartment gently If the battery is not properly positioned the battery compartment cannot be closed The device is now s...

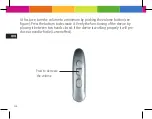
Page 120: ...hing the volume button see figure Press the bottom to decrease it Verify the functioning of the device by placing it between two hands closed if the device is working properly it will pro duce a sound...

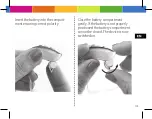
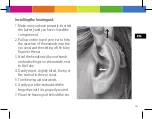
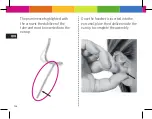
Page 121: ...f the earbuds into the ear canal and the setting of the tube flap into the ear 3 Hold the headset with your thumb and index finger on the outside next to the tube 4 Gently insert slightly tilted the t...

Page 122: ...is correct and the sound is still perceptible try with a different size and repeat the operation Slowly adjust the volume as needed The Hearing aid has seven different volume inten sities marked each...

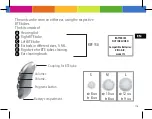
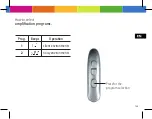
Page 123: ...123 How to select amplification programs Press for the program selection Prog Beeps Operation 1 1 silent environments 2 2 noisy environments...

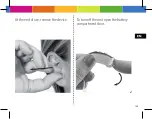
Page 124: ...inence highlighted with the arrow is the stabilizer of the tube and must be inserted into the earcup Once the headset is inserted into the ear canal place the stabilizer inside the earcup to complete...

Page 125: ...125 To turn off the unit open the battery compartment door At the end of use remove the device...

Page 126: ...the hearing aid regularly a Change the earbuds Remove the earbuds from the hearing aid Hold the device with your left hand and the tube with your right hand to separate them from each other Install th...

Page 127: ...ound like the desk with a soft towel to avoid damage when falling down Warning never use any liquid to clean the hearing aid d Humidity prevention Place the hearing aid in the box to prevent moisture...

Page 128: ...128 100...

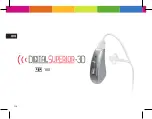
Page 129: ...em highly effective acoustic feedback suppression function The Digital Superior 3D Polaroid hearing aid helps the user not only to have a clean hearing in a quiet environment but also in a noisy envir...

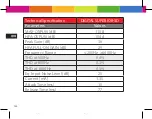
Page 130: ...ation DIGITAL SUPERIOR 3D Parameters Values MAX OSPL90 dB 110 8 HFA OSPL90 dB 104 4 Peak Gain dB 36 HFA FULL ON GAIN dB 29 Frequency Range 200Hz 6600Hz THD at 500Hz 0 4 THD at 800Hz 0 3 THD at 1600Hz...

Page 131: ...the amplified electric signal and restore to sound to achieve the sound amplification purpose and make the compensation for the hearing loss user to help the hearing loss user working and living like...

Page 132: ...hearing aid must only be used by tended person and not by others For hearing aids with wireless transmission warning to check first before using the hearing aids in areas where electronics or wireless...

Page 133: ...is life threatening to swallow the hearing aid battery The hearing aid should be only used by the hearing impaired not by any other Special User 1 Children can t wear the hearing aid without the guida...

Page 134: ...earwax Clean earwax No Sound Power off Power on Battery is not installed Install the battery Low battery or no power Change a new battery Sound tube is blocked Clean the sound tube Ear mold or ear dom...

Page 135: ...e High Power Consumption Hearing aid is still working when not using Power off when not using Hearing aid is damped Dry the hearing aid Intermittent Sound Battery failure Change a new battery Sound tu...

Page 136: ...ater Please take off the hearing aid in advance and keep properly when swimming shower washing the head or face If hearing aid falls into the water accidentally do not use any dryer to dry it You can...

Page 137: ...ing short wave diathermy X ray MR scans CT scans or similar radiation treatments Please use professional battery for hearing aid If you not use hearing aid for long time please take out the battery to...

Page 138: ...ehabilitation plan for first time users or those using new hearing aids a The First Stage 1 3 weeks 1 to 2 hours wearing per day you are suggested to wear in a relatively quiet envi ronment to familia...

Page 139: ...hearing aids and go to public areas You may have dialogue with your friends or even strangers d The Fourth Stage 1 3 weeks You may prepare for travelling to another city go to supermarket restaurant...

Page 140: ...140 Content of the package...

Page 141: ...12 mm h 8 mm M L BATTERIES NOT INCLUDED Compatible Batteries ZINC AIR model 312 The unit can be worn on either ear using the respective BTE tubes The kit consists of Hearing Aid Right BTE tube Left BT...

Page 142: ...ud Select the BTE tube the right one RED B or the left BLUE C depending on which ear the hearing aid will be applied on Apply the chosen tube to the device the end of the tube is to be tightened clock...

Page 143: ...the tube rotated by a quarter in the bayonet shaped plug step1 and rotate it in the opposite direction to secure it step 2 To remove the tube rotate in the reverse direction again step 1 step 2 Exampl...

Page 144: ...avoid damage to the compartment Choose the most suitable earbud between the three different sizes available S M L If this is your first time using the device you may want to try M size earbuds first...

Page 145: ...he unit open the battery compartment door If you are using zinc air batteries remove the plastic battery and wait about 1 minute before inserting it back into the compartment Compatible Batteries ZINC...

Page 146: ...146 Close the battery compartment gently If the battery is not properly positioned the battery compartment cannot be closed The device is now switched on...

Page 147: ...pushing the volume button see figure Press the bottom to decrease it Verify the functioning of the device by placing it between two hands closed if the device is working properly it will produce a sou...

Page 148: ...uds introduction into the ear canal and the flap of the tube in the ear 3 Hold the headset with your thumb and index finger on the outside next to the tube 4 Gently insert slightly tilted the tip of t...

Page 149: ...is correct and the sound is still perceptible try with a different size and repeat the operation Slowly adjust the volume as needed The Hearing aid has seven different volume inten sities marked each...

Page 150: ...inence highlighted with the arrow is the stabilizer of the tube and must be inserted into the earcup Once the headset is inserted into the ear canal place the stabilizer inside the earcup to complete...

Page 151: ...151 At the end of use remove the device To turn off the unit open the battery com partment door...

Page 152: ...the hearing aid regularly a Change the earbuds Remove the earbuds from the hearing aid Hold the device with your left hand and the tube with your right hand to separate them from each other Install th...

Page 153: ...ound like the desk with a soft towel to avoid damage when falling down Warning never use any liquid to clean the hearing aid d Humidity prevention Place the hearing aid in the box to prevent moisture...

Page 154: ...154 103 102 Other codes Digital Micro 3D 105 and 106 Color Digital Micro 3D 107 and 108 Color Digital Invisible 3D 109 and 110...

Page 155: ...stic feedback suppression function The Digital Invisible 3D Polaroid hearing aid helps the user not only to have a clean hearing in a quiet environment but also in a noisy environment The product desi...

Page 156: ...OSPL 90 111 9 dB HFA OSPL 90 107 9 dB Peak Gain 37 2 dB HFA Full on Gain 33 1 dB Total Harmonic Distortion 500Hz 0 5 800Hz 0 2 1600Hz 0 5 EQ Input Noise Level 22 9 dB Frequency Range 200 Hz 8000 Hz A...

Page 157: ...nal and restore to sound to achieve the sound amplification purpose and make the compensation for the hearing loss user to help the hearing loss user working and living like normal people Operating Co...

Page 158: ...hearing aid must only be used by tended person and not by others For hearing aids with wireless transmission warning to check first before using the hearing aids in areas where electronics or wireless...

Page 159: ...is life threatening to swallow the hearing aid battery The hearing aid should be only used by the hearing impaired not by any other Special User 1 Children can t wear the hearing aid without the guida...

Page 160: ...r position the objects at a sufficient distance from the ear Too much earwax Clean earwax or sales support Silence Power off Turn on Hearing aid battery is not installed Install the battery Low batter...

Page 161: ...ff when hearing aid is not in use The battery is expired Check the validity of the battery Hearing aid is damped Dry it with a cloth or sales support Poor battery quality Replace it with new battery L...

Page 162: ...ng aids earplug Cleaning hearing aid Clean your hearing aid with a dry soft cloth Use a small brush and a soft dry cloth to clean the earwax in the hearing aid sound hole Try to perform all cleaning a...

Page 163: ...is raining If hearing aid accidentally falls into the water do not use dryer to dry it You can dry it with a soft clean cotton cloth and put it ina ventilated environment c Anti high temperature Neve...

Page 164: ...s meet bystander compatibility but dont meet user compatibility Please take off your hearing aids before you get close to radio and telecommunication equipments otherwise that could damage your hearin...

Page 165: ...sted to wear in a relatively quiet envi ronment to familiarize and distinguish various sounds b The Second Stage 1 3 weeks 4 to 8 hours wearing per day you may wear your hearing aids and walk in a rel...

Page 166: ...166 Content of the package...

Page 167: ...Batteries ZINC AIR model 10 S 9 mm h 10 mm h 19 mm 11 mm h 10 mm h 19 mm 14 mm h 10 mm h 19 mm M L Model with text in RED for the right ear Model with text in BLUE for the left ear The kit consists of...

Page 168: ...The removing pin D must be in correspondence with the earbud removal pin E this will facilitate the removal of the device after use The first time you use the device you may want to try M size first O...

Page 169: ...rly positioned the battery compartment cannot be closed The device is now switched on Verify that the battery model is correct then remove the plastic battery and wait about 1 minute before inserting...

Page 170: ...nger to rotate the small wheel rotate counterclockwise to decrease the volume clockwise to increase it Verify the functioning of the device by placing it between two hands closed if the device is work...

Page 171: ...up on the top of the ear and insert the device into the ear canal You may hear a slightly annoying sound that will disappear when the device is properly positioned within the ear canal If the positio...

Page 172: ...172 To turn off the unit open the battery compartment door At the end of use remove the device...

Page 173: ...the hearing aid Please clean the ear canal and replace the wax protector regularly a Change the earbuds Remove the earbuds from the hearing aid Hold the device with your left hand and the earbud with...

Page 174: ...t hole due to the wax To replace the wax protector use the specific extractor The extractor has two sides one free and the other with the new filter already inserted To remove the dirty filter use the...

Page 175: ...175 Now use the other side of the extractor to insert the new wax protector into the newly released cavity Then gently remove the extractor...

Page 176: ...ound like the desk with a soft towel to avoid damage when falling down Warning Never use any liquid to clean the hearing aid d Humidity prevention Place the hearing aid in the box to prevent moisture...

Page 177: ...sunlight Do not use if package is damaged Caution read instructions for use Read instructions for use Date of manufacture Batch number Catalog number Serial number Waste EEE Recycled or recyclable pac...

Page 178: ......

Page 179: ......
Page 180: ...d Polaroid Polaroid Pixel Polaroid Color Spectrum and Polaroid Classic Border Logo are trademarks of PLR IP Holdings LLC used under license Trademarks of PLR IP Holdings LLC does not manufacture this...

Reviews: