Polaris RiderX PIDD Owner'S Manual Download Page 13

12

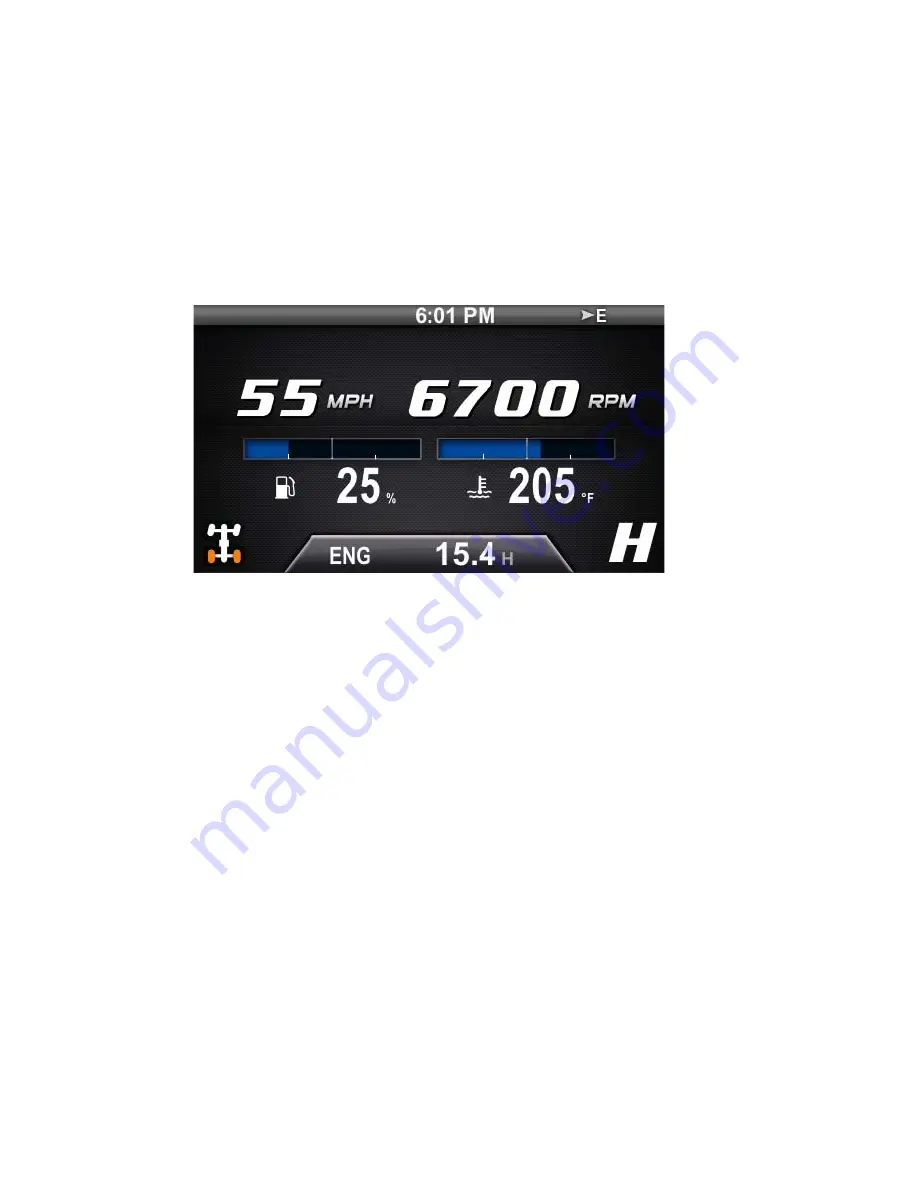
Key 2 - Odometer / Trip Meter / Engine Hours

1. Press any key to display the PIDD screen icons.
2. Press Key 2 repeatedly to display each option.

• Odometer (ODO)
• Trip  1
• Trip  2
• Trip Hours (TRIP)
• Engine Hours (ENG)

Key 3 - Main Menu

1. Press any key to display the PIDD screen icons.
2. Press Key 3 to display the main menu options.
3. Toggle through the menu.

Key 2: Toggle up
Key 4: Toggle down

4. Use the remaining keys to perform other actions in 

the main menu.
Key 1: Toggle between day and night screen 
(brightness) (See page 28 to adjust brightness levels 
for both screen options.)
Key 3: Select
Key 5: Exit menu

Key 1

Key 2

Key 3

Key 4

Key 5

Summary of Contents for RiderX PIDD

Page 1: ...Interactive Digital Display Owner s Manual ...

Page 2: ...1 ...

Page 3: ...reserves the right to make changes at any time without notice and without incurring obligation to make the same or similar changes to products previously built Any reprinting or reuse of the depictions and or procedures contained within whether whole or in part is expressly prohibited The following are trademarks of POLARIS Industries Inc The Bluetooth word mark and logos are registered trademarks...

Page 4: ...37 PIDD For Snowmobiles 38 General Snowmobile PIDD Information 38 Initialization Process 39 Left Hand Controls 40 Vehicle Settings 35 Detonation Elimination Technology 50 Engine Overheat Indicators 51 Bluetooth 52 Before Connecting 52 Connection Management 53 Phone 61 RiderX 66 Hardware 66 Connect Register and Update 68 Update Process Flow Chart 78 Frequently Asked Questions 79 Troubleshooting 81 ...

Page 5: ...al If you should need additional assistance with PIDD operation or software updates please see your Polaris dealer or visit RiderX com WARNING Do not enter information or adjust this device while operating your vehicle Distracted driving can result in loss of control collision or accident which may result in serious injury or death Avoid using any features and devices while driving that may take y...

Page 6: ...derX account page 68 4 Register your PIDD page 69 5 Update trails data or maps trails data to verify that the trails data on the PIDD is current page 69 PIDD Features NOTE Trails data expires 90 days from the file s release date Key 1 Alternate Screen Selection Key 2 ODO Trip 1 Trip 2 TRIP ENG Key 3 Main Menu Key 4 Battery Voltage Temperature Reading Key 5 Bluetooth Menu or Diagnostics if present ...

Page 7: ...sary Models With Battery Models Without Battery ON Turn the key to the ON RUN position OFF Turn the key to the OFF position REBOOT Option 1 Turn the key OFF for 5 seconds then turn the key to ON RUN Option 2 With the key ON press and hold Display Key 5 for 20 seconds then release ON Start the engine OFF Turn the key to the OFF position REBOOT Option 1 Turn the key OFF for 5 seconds then start the ...

Page 8: ...ions View the clock change display settings Bluetooth Functionality Use Bluetooth enabled communication with cell phone with notification of incoming calls and texts and ability to view battery strength and signal strength GPS Mapping Use the compass and full featured GPS when the GPS receiver is installed includes the display of latitude longitude and elevation Mark and save waypoints and tracks ...

Page 9: ...ou need assistance please see your Polaris dealer Maps Trails are supplied as an aid and should not be used for any purpose requiring precise measurement of direction distance or location Polaris makes no warranty as to the accuracy or completeness of this map data You assume all risks associated with using the maps trails function NOTE Trails data expires 90 days from the file s release date If a...

Page 10: ... soap and water may be used Do not use harsh or abrasive cleaners For best results use a microfiber towel to clean the screen Window cleaner or alcohol may be used Storage When preparing the vehicle for storage make sure the ignition switch is in the OFF position to prevent battery drain and a shortened battery life NOTE Some cell phones or operating systems will not work as shown in this manual N...

Page 11: ... lower edge of the screen With the menu icons displayed press a specific key to view menu options for that key Key 1 Alternate Screen Selection Key 2 ODO Trip 1 Trip 2 TRIP ENG Key 3 Main Menu Key 4 Battery Voltage Temperature Reading Key 5 Bluetooth Menu or Diagnostics if present PIDD Menu Icons varies by current screen displayed ...

Page 12: ...en Selection 1 Press any key to display the PIDD screen icons 2 Press Key 1 repeatedly to display each home screen option Off Road Vehicle Home Screen Options Snowmobile Home Screen Options PRIMARY SECONDARY AUXILIARY AUXILIARY 2 ...

Page 13: ...ain Menu 1 Press any key to display the PIDD screen icons 2 Press Key 3 to display the main menu options 3 Toggle through the menu Key 2 Toggle up Key 4 Toggle down 4 Use the remaining keys to perform other actions in the main menu Key 1 Toggle between day and night screen brightness See page 28 to adjust brightness levels for both screen options Key 3 Select Key 5 Exit menu Key 1 Key 2 Key 3 Key ...

Page 14: ...e 1 Press any key to display the PIDD screen icons 2 Press Key 4 repeatedly to display each option Battery Voltage Coolant Temperature NOTE The display will automatically switch to the appropriate bar graph and turn red when a fault is detected ...

Page 15: ...isplay Bluetooth features If a fault exists Key 5 enters the Diagnostics menu see page 37 3 Use the display keys to access Bluetooth features Key 1 Phone Key 2 Text Key 3 Toggle Bluetooth on off Key 4 Settings Key 5 Exit menu 4 If Audio is enabled Keys 1 and 2 change to the following Key 1 Audio Key 2 Phone Text ...

Page 16: ...o display the main menu options 3 Toggle to MAPS TRAILS Press Key 3 to select 4 Use the display keys to access the map features Key 1 Zoom out Key 2 Zoom in Key 3 Display menu Key 4 Pan disabled above 10 MPH 16 km h Key 5 Advance to next screen GPS Tracks Map Key 1 Key 2 Key 3 Key 4 Key 5 ...

Page 17: ... Once the map is centered Key 1 toggles between COURSE UP and NORTH UP COURSE UP The arrow points towards the front of the vehicle and the map rotates around the center arrow The direction the vehicle is traveling is displayed in the upper right hand corner When in this mode NORTH UP is shown for Key 1 selecting Key 1 switches display to NORTH UP mode Key 1 Key 2 Key 3 Key 4 Key 5 ...

Page 18: ...icle is stopped the keyboard will display so you can name and save the waypoint See Keyboard Operation on page 18 If your vehicle is moving the waypoint will be placed and automatically named Press and hold Key 2 to enter the Waypoint Manager menu Key 3 Displays the keyboard to name and save the track Up to 10 tracks can be saved Press and hold Key 3 to enter the Track Manager menu Key 4 Displays ...

Page 19: ...up Key 3 Select the letter or number Key 4 Move down Key 5 Move right Phone Audio Disabled if equipped 1 Press any key to display the PIDD screen icons 2 Press Key 3 to display the main menu options 3 Toggle to PHONE Press Key 3 to select Key 1 Key 2 Key 3 Key 4 Key 5 Key 1 Key 2 Key 3 Key 4 Key 5 ...

Page 20: ...if equipped Key 3 Turn Bluetooth on off Key 4 Bluetooth Settings Key 5 Exit 6 When one of the PIDD main screens is displayed press any key to display the PIDD screen icons Press Key 5 to access the phone menu The diagnostic screen displays if an active fault exists See page 37 Key 1 Key 2 Key 3 Key 4 Key 5 Key 1 Key 2 Key 3 Key 4 Key 5 ...

Page 21: ...nabled the display will go directly to the Audio Screen 5 Use the keys to control Audio Track and Volume Key 1 Toggle between Volume and Track control Key 2 Volume Down or Previous Track Key 3 Play Pause Key 4 Volume Up or Next Track Key 5 Back to Phone Menu For additional information about the Bluetooth functions see page 44 Key 1 Key 2 Key 3 Key 4 Key 5 Key 1 Key 2 Key 3 Key 4 Key 5 ...

Page 22: ...Manager Satellite Status 5 Press Key 3 to select Track Manager Waypoint Manager The Track Manager allows you to edit a track name hide or display a track and import or export a track Track Manager also displays the Track distance and Time on Track for selected tracks The Waypoint Manager allows you to edit delete import or export a waypoint or view a saved waypoint on the map Key 1 Key 2 Key 3 Key...

Page 23: ...rtest possible distance to waypoint as the crow flies This feature can be used for only one waypoint at a time 1 Press Key 5 to toggle to the selection list 2 Press Key 4 until Go To is highlighted Press Key 5 to toggle the setting ON or OFF 3 Press Key 5 to exit the map NOTE When Go To is ON the orange arrow points to the waypoint that was selected when Go To was turned ON Key 1 Key 2 Key 3 Key 4...

Page 24: ...rted into mapping software Any files you import must be available on the USB drive at the root level not in a folder and must be gpx format files 1 Enter the desired manager menu Tracks or Waypoints 2 Press Key 5 to toggle to the selection list Toggle to Import or Export Press Key 5 to select 3 Toggle to the desired track or waypoint file name Press Key 5 to select Key 1 Key 2 Key 3 Key 4 Key 5 Ke...

Page 25: ...ed tracks or waypoints Press Key 4 to export all tracks or waypoints Press Key 5 to reject 5 If exporting the file will be saved to the USB drive Key 1 Key 2 Key 3 Key 4 Key 5 Key 1 Key 2 Key 3 Key 4 Key 5 Key 1 Key 2 Key 3 Key 4 Key 5 ...

Page 26: ...he processing screen displays Possible Errors One of the following screens displays if a processing error occurs The device does not contain enough space to save the waypoint or track The USB device is not seated properly ...

Page 27: ... file or file name contains an error Satellite Status In the GPS Manager menu select Satellite Status The screen displays all available satellites in the area Press Key 3 to exit Key 1 Key 2 Key 3 Key 4 Key 5 ...

Page 28: ...gle through the menu Display Service Units Time System Info Vehicle Settings Media if equipped 5 Press Key 3 to select NOTE If demo mode is enabled you can toggle through the resulting menu to view options without the risk of changing settings This tool is useful as a tutorial or for training at your dealership See page 28 for instructions Key 1 Key 2 Key 3 Key 4 Key 5 ...

Page 29: ...to change a setting 4 Press Key 3 to exit NOTE If Day is selected changing the brightness will change the day mode brightness level If Night is selected changing the brightness will change the night mode brightness level NOTE If Auto is selected the display will automatically switch between Day and Night modes based on time of day and day of year Key 1 Key 2 Key 3 Key 4 Key 5 ...

Page 30: ...ovides a service reminder at the set interval Interval can be set to any 5 hour increment between OFF and 100 hours Hours to Service displays hours remaining to reach the set service interval 2 Press Key 5 to reset 3 Press Key 2 to increase the interval or Key 4 to decrease the interval if desired Press Key 3 to confirm a change or reset the existing interval Key 1 Key 2 Key 3 Key 4 Key 5 Key 1 Ke...

Page 31: ...Life 5 Press Key 5 to reset Oil Life A warning displays at startup if vehicle milage exceeds the Oil Life Milage NOTE Initial Oil Milage Warning is set to go off at 500 miles After first reset Oil Milage Warning will display every 1000 miles Key 1 Key 2 Key 3 Key 4 Key 5 ...

Page 32: ...nternational System of Units metric and a 12 hour clock or a 24 hour clock 1 In the System Settings menu select UNITS Speed Temperature Clock 2 Toggle to the desired setting 3 Press Key 1 or Key 5 to change the setting 4 Press Key 3 to exit Key 1 Key 2 Key 3 Key 4 Key 5 ...

Page 33: ...h Mean Time Offset DST Daylight Savings Time Enable Disable 2 Toggle to the desired setting 3 Press Key 1 or Key 5 to change setting NOTE Enabling DST adds one hour regardless of the date DST does not automatically update and must be selected by the rider Key 1 Key 2 Key 3 Key 4 Key 5 ...

Page 34: ...D Serial Number Bootloader Version Display Operating System Application Version Software Configuration and Date Map Data Version Build Date Trails Data Version and Build Date 3 To initialize an PIDD for a snowmobile when required see page 39 To update software see page 69 4 Press Key 3 to exit Key 1 Key 2 Key 3 Key 4 Key 5 ...

Page 35: ...gs menu select VEHICLE SETTINGS Clutching Clutching 2 Key 2 starts and stops recording graph data 3 Key 4 downloads recorded graph data to a USB drive inserted in the vehicle s USB port Data is saved as a csv file Key 1 Key 2 Key 3 Key 4 Key 5 ...

Page 36: ...the System Settings menu select MEDIA 2 Toggle to desired setting Audio Video Rear if equipped Video Front if equipped 3 Press Key 1 or Key 5 to change the setting 4 Press Key 3 to exit Key 1 Key 2 Key 3 Key 4 Key 5 ...

Page 37: ... if equipped Video Front if equipped 1 Press any key to display the PIDD screen icons 2 Press Key 1 repeatedly to display each home screen option 3 If enabled front camera will follow the Auxiliary 2 home screen 4 Press Key 5 to toggle to Rear Video if equipped 5 Press Key 1 4 to go to the primary riding screen Key 1 Key 2 Key 3 Key 4 Key 5 Key 1 Key 2 Key 3 Key 4 Key 5 ...

Page 38: ...Key 5 to exit 7 For a system diagnostics inspection and or service please see your authorized Polaris dealer NOTE For snowmobiles only active faults display and the engine must be running to view faults If the Malfunction Indicator Light MIL illuminates stop the snowmobile but do not stop the engine if you wish to view the faults NOTE Faults display if they were active at least once during the cur...

Page 39: ... Hand Controls Fuel Type Selection Security if enabled Average Max Speed PIDD features that are not active when installed on a snowmobile include Gear selection reverse only All Wheel Drive Indicator The PIDD initialization process must be performed on some snowmobiles in order for a new or newly installed PIDD to function properly It must also be performed every time the PIDD is updated with file...

Page 40: ...ll models require this procedure See page 38 1 Start the engine Do not allow an engine to run in an enclosed area without adequate ventilation 2 In the System Settings menu select SYSTEM INFO 3 Press and hold Key 1 until the next screen displays Key 1 Key 2 Key 3 Key 4 Key 5 Key 1 Key 2 Key 3 Key 4 Key 5 ...

Page 41: ...WARNING Do not enter information or adjust this device while operating your vehicle Distracted driving can result in loss of control collision or accident which may result in serious injury or death Avoid using any features and devices while driving that may take your attention away from the road or trail and safe driving habits even for a moment The operator assumes all risk associated with using...

Page 42: ...ach switch Switch Functions While Viewing Maps Quick Press Release Slow Hold 2 Seconds Switch Motion Speed Result SET Slow Toggle between MAPS TRAILS and MAIN screens SET Quick Zoom IN MODE Quick Zoom OUT MODE Slow Drop waypoint at current location Switch Functions While Viewing Main Screens Quick Press Release Slow Hold 2 Seconds Switch Motion Speed Result SET Slow Toggle between MAPS TRAILS scre...

Page 43: ...o System Settings Press Key 3 to select 4 In the System Settings menu toggle to VEHICLE SETTINGS specific to snowmobiles Press Key 3 to select Fuel type Lock Change Code NOTE Lock and Change Code display only if the engine is running and the PIDD has been initialized Key 1 Key 2 Key 3 Key 4 Key 5 Key 1 Key 2 Key 3 Key 4 Key 5 ...

Page 44: ... key off when the PIDD is not in use If the key remains in the RUN position after using the auxiliary engine stop switch to stop the engine the PIDD remains active drawing power from the battery NOTE The PIDD is not dependent on the battery while the engine is running but the battery supplies a constant power source when the engine is off or when the engine is transitioning between forward and rev...

Page 45: ...dly to display each option Odometer ODO Trip 1 Trip 2 Trip Hours TRIP Engine Hours ENG Average Speed AVG Maximum Speed MAX 3 Average Speed AVG displays the average speed of the vehicle since the last user reset 4 Max Speed MAX displays the fastest speed reached since the last user reset 5 To reset AVG or MAX press any key to bring up the menu icons then hold Key 2 to reset value Key 1 Key 2 Key 3 ...

Page 46: ...ill not move when throttle is applied 1 Have the security system activated by your authorized Polaris dealer 2 The factory default security code is 000 Change the default security code to a code of your own choosing See Change Security Code on page 48 Locking the Ignition 1 Start the engine Do not allow an engine to run in an enclosed area without adequate ventilation 2 Press any key to display th...

Page 47: ...ey 5 to toggle to each digit 7 If the code is not accepted a BAD CODE screen will display 8 Follow the prompts and re enter the current security code When the code is accepted the locked symbol and ENTER CODE screen displays The ignition is locked Key 1 Key 2 Key 3 Key 4 Key 5 ...

Page 48: ...t adequate ventilation 2 Press Key 2 or Key 4 to enter the current 3 digit security code Press Key 5 to toggle to each digit 3 If the code is not accepted a BAD CODE screen will display Follow the prompts and re enter the current security code 4 When the code is accepted the unlocked symbol and SECURE OFF screen displays The ignition is now unlocked ...

Page 49: ...w an engine to run in an enclosed area without adequate ventilation 2 Toggle to System Settings Vehicle Settings CHANGE CODE 3 Press Key 3 to select The ENTER CODE screen will display 4 Press Key 2 or Key 4 to enter the current 3 digit security code Press Key 5 to toggle to each digit Key 1 Key 2 Key 3 Key 4 Key 5 Key 1 Key 2 Key 3 Key 4 Key 5 ...

Page 50: ...secure location where others will not be able to access your code Code ________________ Date ______________ Code ________________ Date ______________ Code ________________ Date ______________ Code ________________ Date ______________ NOTE If you lose or forget your code please see your authorized Polaris dealer to have the code reset to the default code 000 Only authorized Polaris dealers may rese...

Page 51: ... The engine will return to its normal performance automatically If severe detonation occurs The check engine light begins to flash steadily The PIDD displays Detonation Detected MAG or PTO The engine enters DET latching limp home mode On 2015 800 AXYS models the ECU closes exhaust valves to limit engine power in DET latching mode On all other 2015 AXYS and PRO RIDE models the ECU will shut down th...

Page 52: ...n engine temperature reaches critical levels Stop the engine immediately A flashing indicator indicates continued operation could result in serious engine damage The engine management system will automatically reduce engine power and create a misfire condition Stop the engine immediately Allow the engine to cool down NOTE Please see your vehicle owner s manual for more information NOTE If engine o...

Page 53: ...one to a Bluetooth device Review the different types of connections offered by your phone manufacturer and how the connection type affects information sharing 2 Verify that your phone is equipped with Bluetooth and that Bluetooth is turned on NOTE Some of the features and functionality of the PIDD may vary due to the operations software on your phone ...

Page 54: ...s 3 Toggle to PHONE Press Key 3 to select 4 The phone main menu screen displays 5 Press Key 3 to turn Bluetooth on or off NOTE The display will remember the state of Bluetooth at the next power up It will automatically connect to a paired device following the order set in the priority list Key 1 Key 2 Key 3 Key 4 Key 5 Key 1 Key 2 Key 3 Key 4 Key 5 ...

Page 55: ... Bluetooth Settings it becomes discoverable to other Bluetooth devices After 5 seconds the display will start searching for devices NOTE Devices must be discoverable to show up in the list Your phone settings may need to be changed to allow notifications and missed calls and text messages to display Key 1 Key 2 Key 3 Key 4 Key 5 ...

Page 56: ...or connected 4 The PIDD will perform the search again every 10 seconds until the device is paired 5 The display will not search for devices again unless one of the following occurs You exit and re enter the display The device is disconnected Color Indicator Description BLUE The device is paired but not connected GREEN The device is paired and connected None The device is not paired Key 1 Key 2 Key...

Page 57: ...onnect to the PIDD See page 52 2 Toggle through the list to the desired device 3 Press Key 3 to pair 4 Accept the pairing request on your phone 5 Press Key 3 to accept the request on the display To cancel the request press Key 5 Key 1 Key 2 Key 3 Key 4 Key 5 Key 1 Key 2 Key 3 Key 4 Key 5 ...

Page 58: ...he device s instructions to pair with the display Accept the request on the display when it appears The device will automatically connect after pairing If an error occurs during pairing or if the pairing is rejected by either device the Pairing Canceled screen displays 8 Press Key 3 to exit Key 1 Key 2 Key 3 Key 4 Key 5 Key 1 Key 2 Key 3 Key 4 Key 5 ...

Page 59: ...equest the number of missed calls and update the display Disconnecting a Device To disconnect a device toggle to the device in the display Press Key 3 NOTE Phone compatibility may vary Some functions are dependent on phone settings that must be set by the user Refer to your phone s user manual for more information Key 1 Key 2 Key 3 Key 4 Key 5 Key 1 Key 2 Key 3 Key 4 Key 5 ...

Page 60: ...the device is connected disconnect the device before unpairing 2 To unpair a device toggle to the device in the display Press Key 3 to unpair 3 The confirmation screen displays Press Key 3 to confirm Key 1 Key 2 Key 3 Key 4 Key 5 ...

Page 61: ...e which device automatically connects toggle to the desired device in the display Press Key 1 to display the priority screen 2 Press Key 3 to move the selected device up the list 3 Press Key 5 to exit Key 1 Key 2 Key 3 Key 4 Key 5 Key 1 Key 2 Key 3 Key 4 Key 5 ...

Page 62: ...ess Key 5 to acknowledge and remove the notification NOTE If the text messaging symbol in the upper left corner of the display does not illuminate in white the device is either not connected or not compatible with this feature Check your phone s text notification settings to make sure this feature is enabled Key 1 Key 2 Key 3 Key 4 Key 5 ...

Page 63: ...message screen displays Press Key 3 to accept For a Data Request Timeout message press Key 3 to repeat the request For a Data Error from Phone message verify that your phone is compatible and that Bluetooth is turned on before repeating the request NOTE To switch between Missed Calls and Unread Text Messages while navigating either menu press Key 1 Key 1 Key 2 Key 3 Key 4 Key 5 Key 1 Key 2 Key 3 K...

Page 64: ...s Key 2 or Key 4 to toggle through the list 5 Press Key 3 to refresh the list View Unread Text Messages List 1 With the phone main menu screen displayed press Key 2 to request unread text messages The screen displays the text message symbol and Reading Data Key 1 Key 2 Key 3 Key 4 Key 5 Key 1 Key 2 Key 3 Key 4 Key 5 ...

Page 65: ...accept Press Key 1 to repeat the request Data Error from Phone Press Key 3 to accept Verify that your phone is compatible and that Bluetooth is turned on before repeating the request NOTE To switch between Missed Calls and Unread Text Messages while navigating either menu press Key 1 Key 1 Key 2 Key 3 Key 4 Key 5 ...

Page 66: ...Key 2 or Key 4 to toggle through the list 5 Press Key 3 to refresh Bluetooth Not Responding Press Key 3 to reboot or press Key 5 to cancel Bluetooth may not be functional until the device is rebooted NOTE Most Android phones will display ALL unread messages Other phones may display unread messages only since connection with the display Key 1 Key 2 Key 3 Key 4 Key 5 Key 1 Key 2 Key 3 Key 4 Key 5 ...

Page 67: ...G in available memory formatted using the FAT32 file system For assistance search the web for How to format FAT32 For best results remove all files from the flash drive before starting the update process USB Connection Locations RZR Models The USB connector if equipped is located behind the storage compartment glove box on the dash NOTICE The USB connection is not designed or intended to support t...

Page 68: ...love box ATV Models The USB connector if equipped is located on the front side of the right handlebar controls AXYS Snowmobile Models The USB connector if equipped is located under the hood near the rear of the hood vents Open the right side panel to access the connector ...

Page 69: ...ew the Bluetooth settings on your phone The PIDD Connect Bluetooth Adapter should appear as Polaris the last 4 digits of the adapter s address 4 When the adapter is visible select it to connect your phone to the adapter 5 Launch the PIDD and verify that the connection status bar indicates the phone is connected Register for a RiderX Account 1 If you don t already have a RiderX account go to RiderX...

Page 70: ... on your PIDD can be updated using files downloaded from your RiderX account An update involves four 4 procedures Download the data Copy files to a USB flash drive Update the PIDD Verify the update appears in SYSTEM INFO and in the MAPS TRAILS display Each procedure is outlined in detail on the following pages For future reference a condensed version of the entire update process is provided in a f...

Page 71: ...ing them to the USB drive are outlined below Your procedure may differ slightly depending on your computer s operating system MAC Computers 1 Locate the downloaded zipped file zip on your computer Double click the file to extract the contents 2 Locate the extracted files and copy them onto the USB flash drive WINDOWS Computers 1 Locate the downloaded executable file exe on your computer Double cli...

Page 72: ...icle For vehicle USB connector locations see page 66 3 Turn the ignition key to the ON RUN position If your vehicle does not have a battery start the engine and allow the idle to stabilize before continuing Do not allow an engine to run in an enclosed area without adequate ventilation 4 Press any display key to display the PIDD screen icons 5 Press Key 3 to display the main menu options 6 Toggle t...

Page 73: ...ne or all of the following actions to resolve the issue Remove and reconnect the USB flash drive securely Make sure the RiderX files are not inside a folder on the flash drive Make sure only RiderX files are on the flash drive Remove any other files if necessary Try using a different USB flash drive 12 If files are found by the device you ll be prompted to restart in bootloader mode Press Key 3 to...

Page 74: ...nt of direction distance of location Polaris makes no warranty as to the accuracy or completeness of this map data 14 Press Key 3 to accept The screen displays the files found on the USB flash drive 15 Press Key 3 or Key 4 to toggle to the desired file Press Key 5 to select 16 Press Key 5 to confirm Key 1 Key 2 Key 3 Key 4 Key 5 Key 1 Key 2 Key 3 Key 4 Key 5 ...

Page 75: ...e USB connector to its secured position if it was moved when connecting NOTE Do NOT turn the ignition key off while the file is downloading A Trails Data update will take about 5 minutes A Trails and Map Data update will take about 35 minutes NOTE If an error message displays if the update takes much longer than expected or if a black screen displays when Maps are selected after update is complete...

Page 76: ...e following steps for snowmobiles after every update 800 AXYS models Turn the ignition key off Start the engine to allow the PIDD to automatically initialize AWD indicator will disappear when completed 600 AXYS and all non AXYS models Turn the ignition key off Perform the manual initialization procedure See page 39 Key 1 Key 2 Key 3 Key 4 Key 5 2014 11 07 ...

Page 77: ...he USB connector on your vehicle 4 Press and hold any PIDD key while turning the ignition key to the ON RUN position Continue to hold the PIDD key until Booting is no longer displayed Release the PIDD key 5 Return to page 73 and perform steps 13 24 of the Update the PIDD procedure 6 For more assistance See your Polaris dealer Go to RiderX com Go to Polaris com Select your product group and click o...

Page 78: ...hould not be used for any purpose requiring precise measurement of direction distance of location Polaris makes no warranty as to the accuracy or completeness of this map data 5 Press Key 3 to accept 6 Press any key to display the PIDD screen icons 7 Press Key 1 multiple times to zoom out 8 Verify that the updated trails data is on map Toggle to System Settings SYSTEM INFO The Trails and Map dates...

Page 79: ... new IDD or Enter existing IDD Navigate to SYSTEM INFO Install USB drive to vehicle connector IDD reboots Select UPDATE Press Key 5 twice Select UPDATE Key 5 Blue Arrow Verify update in MAPS TRAILS display Verify update in SYSTEM INFO Remove USB drive Select file gci bin or tar gz Confirm update Key 5 Green Arrow Extract files and copy to USB drive Initialize Snowmobiles only Save to computer Choo...

Page 80: ...e 16 Q Why does my display not acquire satellite signal or GPS A The GPS can take a few minutes to lock from a cold start After warm up if less than 4 satellites are shown in the GPS satellite screen move the vehicle to an area free of overhead obstructions Refer to GPS Settings on page 21 Q How can I save import and export a track or waypoint A Refer to GPS Tracks Map on page 16 or Importing and ...

Page 81: ...ay Night Q How do I find what version of software my display currently has A Main Menu System Settings System Info Config File Q How do I set the clock on my display A Option 1 Make sure the time zone GMT offset and daylight savings mode is correct for your location if in GPS mode See page 32 GPS automatically sets the clock when there is a locked GPS signal Option 2 Main Menu System Settings Time...

Page 82: ...st update files from RIDER X website 3 Verify downloaded files are not in a folder on the flash drive and non PIDD files are cleared from drive 4 Turn off PIDD with key switch disconnect battery power or turn off engine if applicable and wait for at least 10 seconds 5 Plug USB drive into USB port 6 Press and hold any key on keypad and then turn on PIDD 7 Once Booting is no longer shown on the scre...

Page 83: ...Y 5 until the PIDD reboots 2 After re booting the PIDD update the PIDD with the most current software and applicable RIDER X trails and maps software Booting Screen A booting screen is displayed when the PIDD is powered on Depending on the model and version of firmware loaded on the PIDD the booting screen will appear as a circular icon shown above or the word booting will appear on the display ...

Page 84: ...ication link between antenna and display is functional but antenna has not yet acquired satellites 1 There will be no speed indication on the display This is normal during the first 30 to 90 seconds after power up if the GPS has been off for several days 2 If the antenna has been off for a few hours the signal should be acquired in a few seconds If satellites are not acquired after several minutes...

Page 85: ...s no position has been calculated If a valid lat lon number is indicated but the HDOP number is still high 5 the position will not be very accurate The speed indication on the display will jump around and the position at rest in the map screen will jump around This could be due to poor visibility of the sky electrical interference or a defective antenna Good satellite reception Typically you will ...

Page 86: ...For your nearest Polaris dealer call 1 800 POLARIS 765 2747 or visit www polaris com Polaris Industries Inc 2100 Highway 55 Medina MN 55340 Part No 9925416 Rev 04 Printed in USA ...

Reviews: