background image


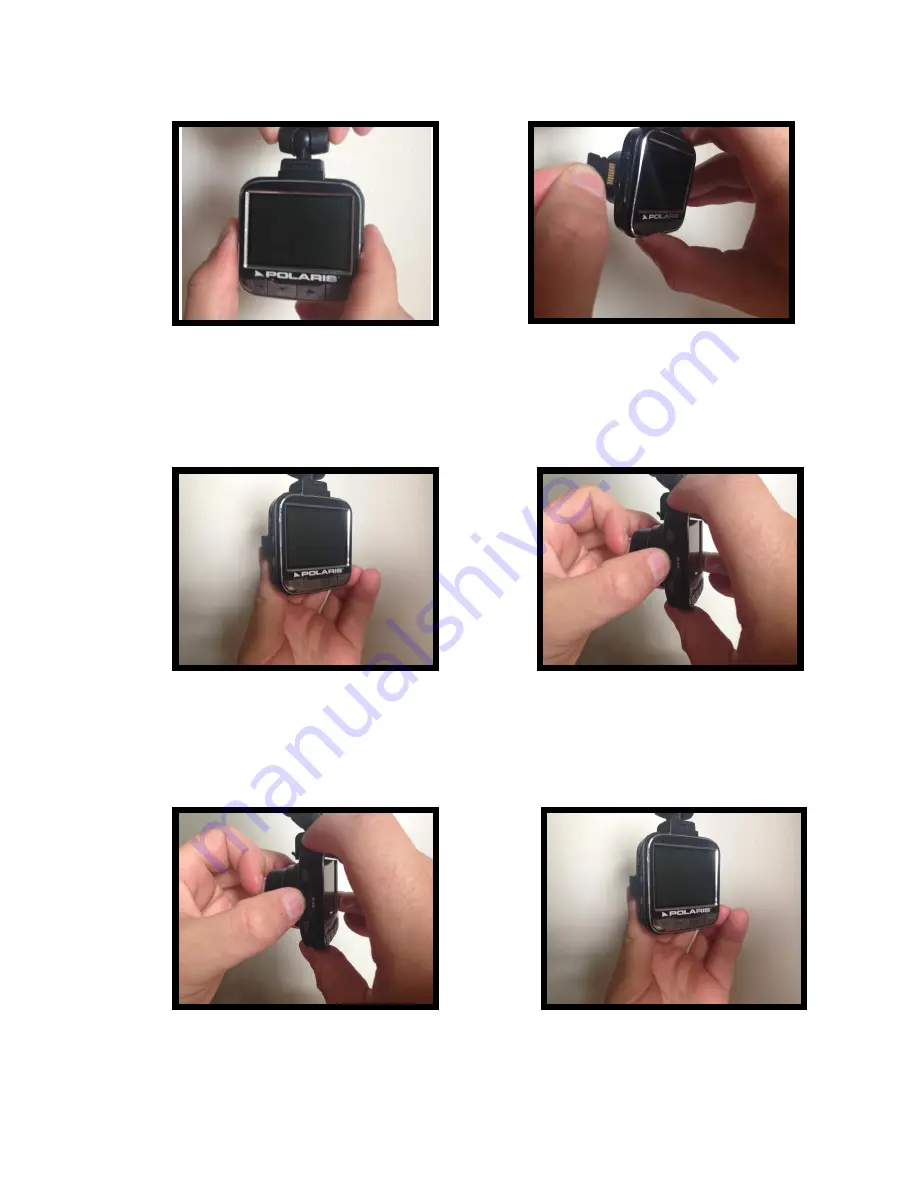
Removing the SD card 


1. Hold the unit so that the 
buttons and screen are facing 

towards you 

2. Line the SD card up with SD 
card slot on the left hand side of 

the unit. Make sure the metal 

prongs are facing towards you. 

3. Insert SD card  

4. Push the SD card in all the way 

until you hear it click into the slot 

1. Push on the SD card in the 

slot to release. 

2. Remove SD card 

Inserting your SD Card 

Summary of Contents for G50

Page 1: ...turing adventures and incidents both on and off the road This operation manual will guide you through each setting to allow you to setup the best quality videos and photos Packing List QTY Item 1 G50 DVR dash cam recorder 1 Cigarette lighter adaptor 1 16 GB Micro SD card 1 Suction cup mount 1 HDMI cable 1 USB cable 1 Operation manual Getting to know your device ...

Page 2: ...s out of menu mode 6 Indicator Lamp To show power status 7 LCD screen 2 0 LCD screen 8 Mode Button Use this button to toggle between video still and playback mode 9 Down arrow Use this button to scroll down to desired setting 10 Up arrow Use this button to scroll up to desired setting 11 Ok button Use this button to select your desired setting This button will also stop start recording 12 USB inpu...

Page 3: ... Line the SD card up with SD card slot on the left hand side of the unit Make sure the metal prongs are facing towards you 3 Insert SD card 4 Push the SD card in all the way until you hear it click into the slot 1 Push on the SD card in the slot to release 2 Remove SD card Inserting your SD Card ...

Page 4: ...To toggle between the three different modes press About the different menus The mode selected will determine which menu will be displayed on the screen when the menu button is pressed When the menu button is pressed the selected mode s menu will display on the screen To switch over to the device settings menu simply press the menu button again the device settings are the same regardless of which m...

Page 5: ... 4 A sub menu will display on the screen 5 Use the up down buttons to select your desired setting 6 Press ok once the desired setting has been chosen List of video mode settings Settings Description Comments Resolution Set your desired resolution Options 1080FHD 1920 x 1080 720P 1280 x 720 WVGA 848 x 480 VGA 640 x 480 Loop Recording This feature will allow you to set up an automatic continuous loo...

Page 6: ...ontinue to record for 30 seconds If the G sensor has detected a high amount of motion it will automatically lock the video so that it cannot be overwritten Record Audio Turn audio recording on or off G Sensor Set G Sensor to off high medium or low This setting will determine how effective the G sensor performs when detecting motion Date Stamp Turn date stamp on or off This feature is to simply tur...

Page 7: ...wish to setup is highlighted 4 A sub menu will display on the screen 5 Use the up down buttons to select your desired setting 6 Press ok once the desired setting has been chosen List of Still mode settings Settings Description Comments Capture Mode Use this setting to set up a timer or capture photos manually Options Single 2s timer 5s timer 10s timer Resolution Set your desired resolution Options...

Page 8: ... Exposure Select your desired exposure Options 2 0 5 3 4 3 1 0 2 3 1 3 0 0 2 3 1 0 4 3 5 3 2 0 Anti shaking Set Anti shake on or off If this feature is switched on it will allow you to manually take photos by hand and will compensate for any blurriness by taking them at slower shutter speeds HDR Set High Dynamic range on or off This feature is ideal for capturing photos where bright and dark condi...

Page 9: ...e ensure that you are already in playback mode please see about the different modes 1 Press the menu button once to bring up the playback mode settings 2 Use the up down buttons to choose which feature you would like to set 3 Press ok once the desired feature you wish to setup is highlighted 4 A sub menu will display on the screen 5 Use the up down buttons to select your desired setting 6 Press ok...

Page 10: ... Use this setting to automatically shut the system down if no buttons have been pressed within a certain amount of time Options Off 3 minutes 5 minutes 10 minutes Beep Sound Turn the beep sound on or off when a button is pressed Language Select your desired language TV mode Select your desired TV mode Options PAL NTSC Frequency Select your desired frequency Options 50 Hz 60 Hz Screen protection Do...

Page 11: ...The SD card should automatically open if it does not automatically open go to my computer and find the removable disk 3 Double click the DCIM folder 4 Open your desired folder 5 Once you have found your data you can simply drag and drop into a selected folder on your computer Mac 6 Simply insert the SD card into your computer or an SD card reader If you do not have a micro SD card input then pleas...

Page 12: ... 4 Double click the DCIM folder 5 Open your desired folder 6 Once you have found your data you can simply drag and drop into a selected folder on your computer 7 Make sure that you Eject NO NAME properly before removing it so that it does not damage your computer or the device HDMI You can use the HDMI cable to hook up to an external device that has a HDMI input for example a TV Simply use the HDM...

Page 13: ...tion 1080P 30FPS 720P 60FPS WVGA VGA Video codec H 264 Colour Black Automatically power on off Supports Auto ignition power on and off Motion Detection Supports Time synchronization Supports Photo mode 12M Photo format JPEG Memory Card TF max 32 GB Loudspeaker MIC Supports Built in sound Supports Video Format PAL NTSC Frequency 50Hz 60Hz Power Interface 5V 1 5A Battery Built in 3 7V polymer 300mA ...

Reviews: