0000112606/010720/A ControlPro
9
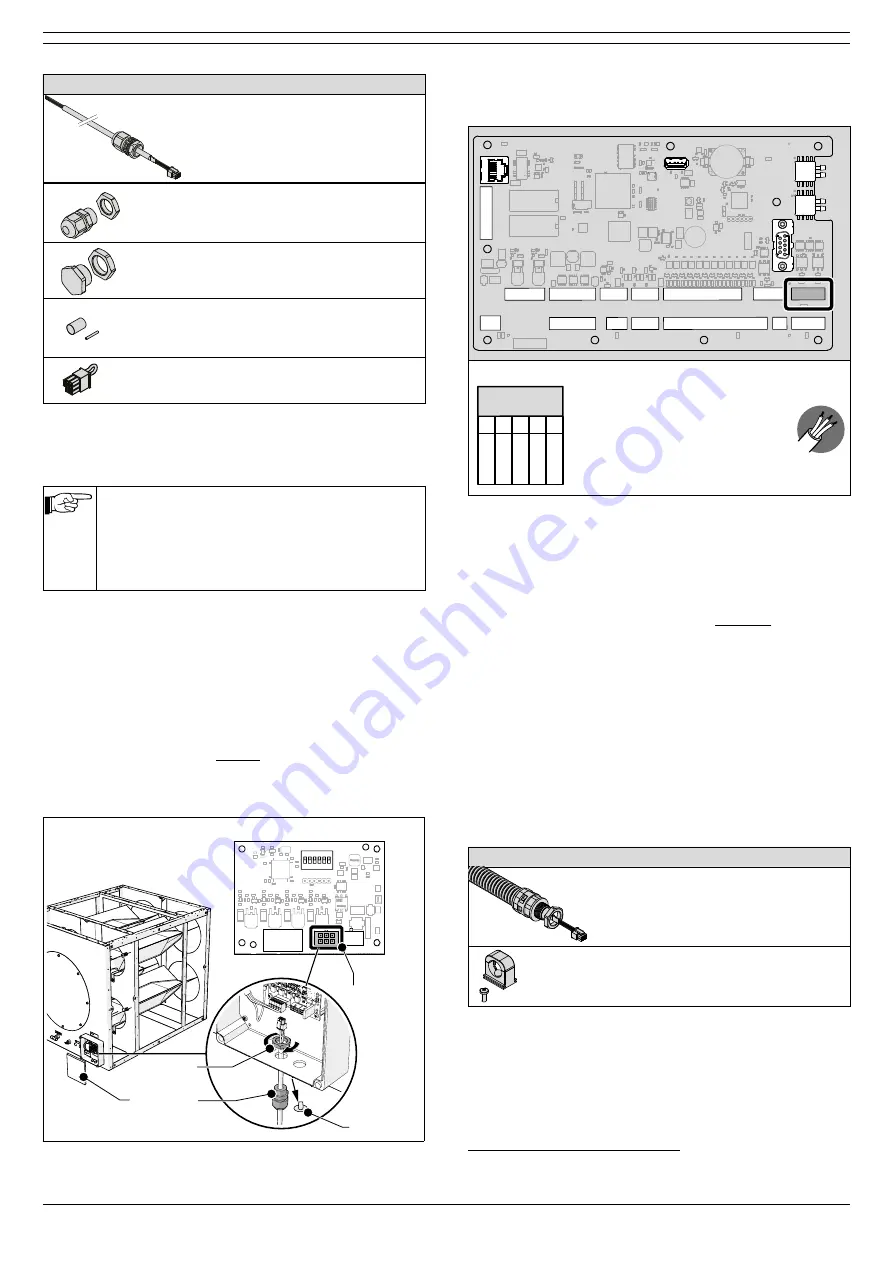
Scope of supply
Cable #2
Cable Panel
SlaveBoard, incl. cable gland
3x
Cable gland M16 + nut
For installation of the pneumatic hoses
(filter pressure sensor); refer to par. 4.5
Screw plug + nut M20
For installation on the last filter module
Heat shrink tube 50 mm + 30 mm
Refer to “Shielded cables only:” on
page 7
Termination plug
Refer to Fig. 4.16B on page 10
Each SlaveBoard box contains two blind plugs and two
disposable cover caps on the sides. The final position of the
blind plugs depends on the connection sequence of the
SlaveBoards.
-
Connect the cable to the SlaveBoard first. Then
cut the cable to the necessary length.
-
Start to connect the filter module that is closest to
the Panel.
- Refer to Fig. IV on page 19 for an example of
the correct connection sequence.
• Remove the lid (A) of the SlaveBoard box.
• Remove the two cover caps (E).
• If necessary, change the position of the blind plug(s).
• Loosen the cable gland (C) from the cable and remove the
nut.
• Put the cable into the SlaveBoard and put the nut (B) back
over the cable.
• Connect the cable to the CAN IN connector (D) on the PC
board.
• Tighten the cable gland.
Cable #2
A
D
(CAN IN)
E
C
B
Fig. 4.14 Connection of SlaveBoard
• Cut the cable to the necessary length for connection to the
Panel.
Indicator LED’s
Valves
Dustbin
sensor
Fan Pressure
sensor
Digital input 1-5
RS485 VFD
CAN Slave
CAN HMI
Digital input 6-12
Filter Pressure
sensor
Analog
output
Light tower
Power
Rel
ay
s
Cable #2
Indicator LED’s
Valves
Dustbin
sensor
Fan Pressure
sensor
Digital input 1-5
CAN Slave
CAN HMI
Digital input 6-12
Filter Pressure
sensor
Analog
output
Light tower
Power
Rela
y 1
R
ela
y 2
Ethernet
(for service only)
USB
(firmware updates)
RS-232
(for service only)
Filter pressure
(internal sensor)
Fan pressure
(internal sensor)
+
-
+
-
Valves
1
+ 24V
2
OUT 1
3
GND
4
+ 24V
5
OUT 2
6
GND
Indicator LED’s
1
+ 24V
2
PWR
3
RUN
4
ALA
5
WRN
6
+ 24V
7
BUZ
Dustbin
sensor
1
+ 24V
2
IN 1
3
GND
4
SHD
Fan Pressure
sensor
1
+ 24V
2
IN 2
3
GND
4
SHD
Analog
output
1
OUT
2
GND
3
SHD
1
+ 24V
2
IN 1
3
+ 24V
4
IN 2
5
+ 24V
6
IN 3
7
+ 24V
8
IN 4
9
+ 24V
10
IN 5
11
COM1
12
GND
Digital input 6-12
1
+ 24V
2
IN 6
3
+ 24V
4
IN 7
5
+ 24V
6
IN 8
7
+ 24V
8
IN 9
9
+ 24V
10
IN 10
11
+ 24V
12
IN 11
13
+ 24V
14
IN 12
15
COM2
16
GND
CAN Slave
1 2
CAN_H
3
CAN_L
4
GND
5
SHD
+ 24V
Power
+ 24V
2
GND
1
1 2
A
3
B
4
GND
5
SHD
RS485 VFD
8
1
NO 1
2
NC 1
3
COM 1
4
5
NO 2
6
NC 2
7
COM 2
Light tower
1
+ 24V
2
PWR
3
RUN
4
ALA
5
WRN
6
+ 24V
7
BUZ
Filter Pressure
sensor
1
+ 24V
2
IN 3
3
GND
4
SHD
CAN HMI
1 2
CAN_H
3
CAN_L
4
GND
5
SHD
+ 24V
8
Rela
y 1
R
ela
y 2
IN 5 External start/stop signal
IN 6 Fire alarm (ShieldControl)
IN 7 Sliding valve feedback 1
IN 8 Sliding valve feedback 2
IN 9 Fan alarm
IN 10 Compressed air switch
IN 11 External alert
IN 12 Dustbin level switch
SCS
:
cleaning v
alv
es (1 or 2)
MDB
: (only f
or ShieldC
on
tr
ol)
- out1
sliding v
alv
es
- out2
c
onpr
essed air r
elease
IN 1 BTN start/stop fan
IN 2 BTN filter cleaning
IN 3 Service mode switch
IN 4 Spare
Wiring colours
+24V
red
CAN_H
white
CAN_L
blue
GND
black
SHD
drain wire (with
shrink tube)
Fig. 4.15 Connection of SlaveBoard
Panel
In case of multiple filter modules
• Proceed with paragraph 4.4.5
In case of one (1) filter module
• Put the termination plug
22
(B) on the CAN OUT connector
on the PC board.
• Make sure that the DIP switches are correctly set.
• Close the lid.
4.4.5
SlaveBoard
SlaveBoard
In case of multiple filter modules, you must make a serial
connection of the cables.
The number of cables (cable #3) supplied is equal to the
number of filter modules, minus 1 (one). Each filter module
contains four screw holes for connection of the tube clamps.
Scope of supply
Cable #3
Cable SlaveBoard
SlaveBoard, including:
- conduit
- conduit connectors M20 + nuts
2x
Tube clamp + screw
22. Supplied with the Panel
SlaveBoard cable (#2)
23.
Address configuration pos. 1-4: according to number
1


