background image


• 

Do 

UNPLUG

 the AC power adapter from the electrical outlet. 

Do place the base stand and the scanner on 

STAB

• 

LE

 surfaces to prevent 

When you want to use the scanner again,  

• 

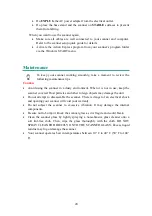
Make sure all cables are well connected to your scanner and computer.  
Refer to the scanner setup quick guide for details. 

e Action Express program from your scanner’s program folder 

dows START menu. 


e ance 

them from falling. 

• 

Activate th
via the Win

Maint n

To keep your scanner working smoothly, take a moment to review the 

• 

• 

r


lint-free cloth. Then, wipe the glass thoroughly with the cloth. DO NOT 

SPRAY CLEANER DIRECTLY ONTO THE SCANNER GLASS. Excess liquid 
residue may fog or damage the scanner. 

• 

Your scanner operates best in temperatures between 10

°

 C to 40

°

 C (50

°

 F to 104

°


F). 

following maintenance tips. 


ution 

Ca

• 

Avoid using the scanner in a dusty environment. When it is not in use, keep the 
scanner covered. Dust particles and other foreign objects may damage the unit.  

• 

Do not attempt to disassemble the scanner. There is danger of an electrical shock 
and opening your scanner will void your warranty.  
Do not subject the scanner to excessive vibration. It may damage the internal 
components. 
Be sure not to bump or knock the scanner glass as it is f agile and could break. 

• 

Clean the scanner glass by lightly spraying a non-abrasive glass cleaner onto a 
soft 


20

Summary of Contents for OPTICPRO ST64

Page 1: ...Installation Usage Maintenance Troubleshooting ...

Page 2: ...All trademarks and brand names mentioned in this publication are property of their respective owners 2004 All rights are reserved No portion of this document may be reproduced without permission ...

Page 3: ...TER WINDOWS XP UPGRADE 8 CHAPTER II USAGE AND MAINTENANCE 9 OPERATING THE SCANNER 9 Testing the Scanner 9 Using the Scanner Buttons 10 Defining Custom Button 11 SCANNING THE FILMS 12 Installing the Transparency Adapter 12 Film Holders 12 Scanning Negative and Positive Films 13 Important Notes about Scanning Film 16 THE SCANNER UTILITY PROGRAM 17 Connection Status 17 Aligning the Scanner 18 LAMP CO...

Page 4: ......

Page 5: ...our scanner supplier We hope you will continue to turn to us for additional quality products as your computing needs and interests grow How to Use This Guide This User s Guide provides instructions and illustrations on how to install and operate your scanner This guide assumes the user is familiar with Microsoft Windows XP 98 Me and 2000 Professional If this is not the case we suggest you learn mo...

Page 6: ...ner installation Appendix A contains the Specifications of the scanner you purchased Appendix B contains our limited warranty agreement and FCC statement concerning the product A Note about Icons This guide uses the following icons to point out information that deserves special attention Danger Danger A procedure that must be followed carefully to prevent injury or accidents Caution Caution Inform...

Page 7: ...USB Cable 3 Power Adapter 4 Setup Application CD ROM 5 Quick Guide 6 Reflective Document Mat 7 Film Holders 8 Base Stand 1 Higher requirements might be needed when you scan or edit a large quantity of image data The system requirements here are only a guideline as in general the better the computer motherboard processor hard disk RAM video graphic card the better the results 2 Save the box and pac...

Page 8: ... saving images a minimum of 260 megabytes of hard disk space is recommended The USB scanner can only operate under the Microsoft Windows 98 Me 2000 Professional or XP operating system Hardware Requirements This scanner connects to your computer through the Universal Serial Bus USB which supports hot Plug and Play To determine whether your computer is USB capable you must check the rear of your PC ...

Page 9: ... ch ha an ni is sm m This scanner has an automatic locking mechanism to hold the scanning head in place during transportation When the locking switch located on the scanner s underside is pressed it automatically unlocks the scanning head when not pressed it automatically locks up the scanning head again Attention Always place your scanner on a flat and smooth surface before proceeding the scanner...

Page 10: ...te ep p 3 3 I In ns st ta al ll li in ng g t th he e S So of ft tw wa ar re e 1 If the USB components on your computer are functioning correctly they will automatically detect the scanner causing the Add New Hardware Wizard or Found New Hardware Wizard to be launched Note If your computer was off when you connected the scanner the Add New Hardware Wizard message will be displayed when you turn the...

Page 11: ...k on the Finish button 5 Follow the on screen instructions to install all software that your new USB scanner requires 6 After the software is installed close all open applications and click on the Finish button to restart your computer Attention If the scanner installation is not started and displayed automatically on the screen click Start select Run and type in d setup where d is the drive lette...

Page 12: ...scanner please make sure that it conforms to the TWAIN standard Scanner Setup After Windows XP Upgrade If you plan to upgrade your operating system from Windows 98 or Me to Windows XP after having installed the scanner software please follow the instructions below 1 Unplug the scanner s AC power adapter from the electrical outlet 2 Unplug the scanner s USB cable from the rear of the computer 3 Fro...

Page 13: ...using a variety of filters tools and effects What about scanning text documents and editing them in a word processor This is the role of Optical Character Recognition OCR software OCR software converts the image files that are created from scanning text documents into text files that can be viewed edited and saved by word processors An OCR program has also been bundled on the included Setup Applic...

Page 14: ...more than one scanner or other imaging device installed on your computer Click Select TWAIN Source from the File menu of Presto Image Folio and then choose this scanner as the default scanning source 5 Within Presto Image Folio click on File Acquire Acquire 6 The TWAIN interface will open 7 Click on the Scan button 8 If an image appears on your screen your scanner is working properly Attention If ...

Page 15: ...left hand side of Button Configuration window select the button you want to set up 4 Choose EZ mode or Advanced Mode 5 Click OK or Apply Attention For further information about using Action Express please refer to the on line help by either way 1 clicking the Help button when you are using the program 2 Pointing to Program your scanner model name from Windows Start menu and selecting Action Expres...

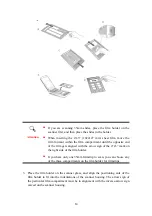
Page 16: ...e following instructions carefully to learn how to scan the films I In ns st ta al ll li in ng g t th he e T Tr ra an ns sp pa ar re en nc cy y A Ad da ap pt te er r The transparency adapter is located on the underside of the scanner lid and is a necessary tool for scanning slides filmstrips or sheet films Ensure the transparency adapter cable is plugged in as illustrated before you start scanning...

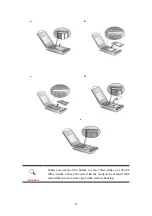
Page 17: ...it upward until it is separated from the document cover 2 Insert the film face down into the proper compartment on the film holder Adjust the position of the inserted film so that the desired image appears in the view window Caption a Filmstrip b Sheet Film 4 x5 10 2x12 7 cm c Sheet Film 5 x7 13x18 cm d 35mm Slides e 120 220 Film 6x4 5 cm 6x6 cm 6x7 cm 6x8 cm 6x9 cm 6x12 cm 13 ...

Page 18: ...th the arrow sign of the 4 x5 mark on the right side of the film holder If you have only one 35mm filmstrip to scan you can choose any of the three compartments on the film holder for filmstrips 3 Place the film holder on the scanner glass and align the positioning aids of the film holder to fit into the indentations of the scanner housing The arrow sign of the particular film compartment must be ...

Page 19: ...b a c d e Attention When you use the film holder to scan 35mm slides or 120 220 films ensure to keep the side with the ready to be scanned film toward the inverse arrow sign on the scanner housing 15 ...

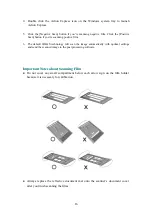
Page 20: ...r any small compartment below each arrow sign on the film holder Action Express 5 Click the Negative Scan button if you re scanning negative film Click the Positive Scan button if you re scanning positive film 6 p po or rt ta an nt t N No ot te es s a ab bo ou ut t S Sc ca an nn ni in ng g F F because it is necessary for calibration Always replace the reflective document mat onto the scanner s doc...

Page 21: ...or the scanning lamp to automatically turn itself off Also it allows you to define the exact position on the scanning glass where scanning will begin The scanner lock was designed to hold the in place during shipping but some refinement of the initial scanning ti scanning lamp position may s ll be necessary Attention s NOT affect the quality of scanned images It is only used to establish a connect...

Page 22: ...e missing from the top edge after the document has been scanned 1 Place a photograph on the top right side of the scanner glass near the back of the scanner scanned Right click the Action Express icon on the Windows system tray and sele Scanner Utility Once the Scanner Utility window is open click the Start Alignmen Part of the photograph will be displayed in the ALIGNEM photograph ali Lamp Contro...

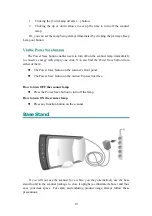
Page 23: ...n button V Vi ia a t th he e P Po ow we e The Power Save button enables users to turn off on the sc onserve energy with simply one click You can find the Pow The Power Save button on the The Power Save button on the Action Express inte w to turn OFF the scanner lamp How to turn ON the s Press any function button on the scanner Base Stand If u se the base stand f save your desk space For safety and...

Page 24: ...NOT SPRAY CLEANER DIRECTLY ONTO THE SCANNER GLASS Excess liquid residue may fog or damage the scanner Your scanner operates best in temperatures between 10 C to 40 C 50 F to 104 F following maintenance tips ution Ca Avoid using the scanner in a dusty environment When it is not in use keep the scanner covered Dust particles and other foreign objects may damage the unit Do not attempt to disassemble...

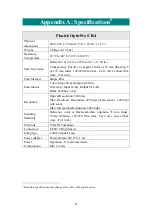
Page 25: ...48 it Output 24 48 bit Grayscale Input 16 bit Output 8 16 bit Black White 1 bit Resolution Optical Resolution 3200 dpi Max Hardware Resolution 3200 dpi main scan x 3200 dpi sub scan Max Interpolated Resolution 24000 dpi Scanning Materials Reflective color or black and white originals 35 mm slides 35mm filmstrip 120 220 film max 6x12 cm sheet films max 13x18 cm Protocols TWAIN Compliant Connection ...

Page 26: ...stalled Statement of Limited Warranty This Statement of Limited Warranty applies only to the options you originally purchase for your use and not for resale from an authorized reseller The manufacturer warranty includes all parts and labor and is not valid without the receipt of original purchase To obtain warranty service you may contact the authorized dealer or distributor or visit our website t...

Page 27: ...n may not apply Under no circumstances are we liable for any of the following 1 Third party claims against you for losses or damages 2 Loss of or damage to your records or data or 3 Economic consequential damages including lost profits or savings or incidental damages even if we are informed of their possibility Some jurisdictions do not allow the exclusion or limitations of incidental or conseque...

Page 28: ...ipment and receiver Connect the equipment to an outlet on a circuit different from that which the receiver is connected Shielded interconnect cables and shielded power cord which are supplied with this equipment must be employed with this equipment to ensure compliance with the pertinent RF emission limits governing this device Consult the dealer or an experienced radio TV technician for help if t...

Page 29: ...tedt Germany Tel 49 0 40 523 03 130 Fax 49 0 40 523 03 500 E mail support plustek de Website www plustek de USA CANADA ASIA PACIFIC AFRICA Plustek Inc 13F 1 No 3 Building F Yuan Qu St 115 Nankang Taipei Taiwan R O C Tel 886 2 2655 7866 Fax 886 2 2655 7833 Website www plustek com 25 ...

Reviews: