


21
DIGITAL AUDIO PLAYER
Remember to consult the manufacturer’s documentation for any
questions you have about the digital media server, mobile digital
media controller, control point App or network connectivity of the
products you are using with the Plinius Toko.
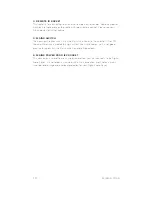
Amplifier
Network Wi-Fi Router
NAS with Server
1
2
3
4
Arataki Controller
COMPONENT SET UP
The component set up involves letting the components establish a connection and then
navigating and controlling the files on the server using the Arataki app.
Plinius Toko
CONNECT ARATAKI TO NETWORK
• Take the iPad and establish a
connection to the network Wi-Fi
router of the Toko system.
• Launch the Arataki app to control
playback through the Toko.
• Check the Plinius Toko is connecting
to the Arataki on the network.
• Select the Toko as the ‘active’ player.
• Check the server is seeing the
Arataki on the network.
• Select the server as the ‘active’
server device.
USE YOUR PLINIUS TOKO
Use the Arataki to browse the library of
songs, select songs for playback, and
control the songs as they play.
CONNECT TOKO TO AUDIO SYSTEM
Connect the Plinius Toko audio outputs
to your audio system line inputs.
CONNECT TOKO TO NETWORK
• Connect the Toko to the network with
one of the following:
- CAT5 or CAT6 LAN Cable
- LAN Wireless bridge.
• Power the Toko ON now.
CONNECT SERVER TO NETWORK
• Connect the server to the network
with one of the following:
- CAT5 or CAT6 LAN Cable
- Wireless LAN bridge.
• Power the network components ON.
• Power the server ON.
1
4
5
2
3