background image

Pleiger Elektronik

GmbH & Co. KG

Edition: 6/2007 Subject to modifications

Manual for 362MC

Page: 15

Parameter

Value (min

Meaning

Comment

         max)


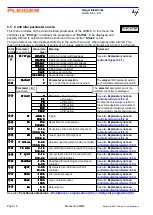
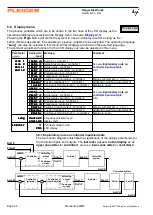
  DsplCtr

DsplCtr

DsplCtr

DsplCtr

DsplCtr


 only 1

only 1

only 1

only 1

only 1

Display controller = only controller 1 activ

Entry point marked

 1 of 2

 1 of 2

 1 of 2

 1 of 2

 1 of 2

Display controller = displ. controller 1 of 2

Entry point marked

 2 of 2

 2 of 2

 2 of 2

 2 of 2

 2 of 2

Display controller = displ. controller 2 of 2

Entry point marked
The parameters which are stored


  Prof-No

Prof-No

Prof-No

Prof-No

Prof-No

      1

      1

      1

      1

      1

Select

 controller profile for operation

in a controller profile and are thus

     50

     50

     50

     50

     50

Value = 

profile no. 1 

to no.

 50

available for subsequent selection
are indicated as follows


 Save as

Save as

Save as

Save as

Save as

      1

      1

      1

      1

      1

Save current controller profile

 as

for controller 1 and

     50

     50

     50

     50

     50

value = 

profile no. 1 

to no.

 50

for controller 2.

5.4

Controller profile menu

On the 362MC, all the necessary settings for a controller are grouped together in
so-called profiles. Each profile thus contains all the parameters for a specific application.
The parameter memory of the 362MC contains 50 memory locations for different profiles, enabling
previously tested commissioning values to be stored as profiles for a large number of applications. The
commissioning procedure is then started by selecting the appropriate profile for the control task
concerned.

To this end, one of the controllers are first of all selected in the Profile menu via the parameter 

“DsplCtr”

,

this controller´s profile is selected via 

“Prof-No”

 and its parameters are subsequently displayed and

altered in the following menus. Selection and entry points are marked accordingly on the display of the
362MC. The tables belonging to this description state which parameters are stored in which control menu.

5.4.1 Entering parameters for two controllers

It is to be noted here that

- only 

the parameters

 of one profile and thus 

of


one controller are displayed;

- the 

two controllers must 

always be assigned 

different 

profiles via 

“Prof-No”

.

During commissioning, the display should thus be set specifically to the controller which is to be put into
operation; e.g. from 

DsplCtr = 1 of 2

 for the 1

st

 controller to 

DsplCtr = 2 of 2

 for the 2

nd

 controller and

vice-versa. It is not necessary to enter the profile no. assigned to the controller under 

“Prof-No”

 again

for this purpose.

5.4.2 Entering parameters for one controller only

When the 362MC is 

used for one controller only

“DsplCtr”

 should be switched to 

“1 only”

.

This precludes any switching. The parameters for the 2

nd

 controller will no longer be displayed.

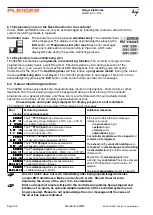
If you save the selected profile to an available “Prof-No” via the “Save as” function
before commissioning, the parameters which have been altered in the course of
commissioning will be stored for you in this new profile. If possible, do not alter the
profile memory locations containing the factory presets, so as to ensure that you will
be able to access these profiles if necessary.

With regard to the entry of parameters for the 2

nd

 controller, the selection and entry

point is displayed as *

to indicate controller 2 instead

    of ->

to indicate controller 1.

Summary of Contents for 362MC

Page 1: ... 63 Telephon 49 0 23 24 3 98 0 Telefax 49 0 23 24 3 98 3 89 www pleiger elektronik de info pleiger elektronik de PLEIGER ELECTRONICS 362MC Operation Installation Connection Technical data Hardware extensions Functional extensions Commissioning help Edition 6 2007 Subject to modifications ...

Page 2: ... note on controller structure 19 5 5 3 Explanatory note on controller output parameters 20 5 6 Input menu 21 5 6 1 Explanatory note on calibration 22 5 6 2 Explanatory note on scaling 22 5 7 Output menu 23 5 8 Display menu 24 5 8 1 Explanatory note on controller inputs outputs 24 6 Monitoring functions and error messages 25 6 1 System monitoring functions 25 6 1 1 Explanatory note on Param error 2...

Page 3: ...ages from A to Z 37 AppendixA5 Symbols employed in this manual 37 Appendix B Hardware extensions for the 362MC Appendix B1 Hardware extension 2nd relay set 38 Appendix B2 Hardware extension Analogue outputs 39 Appendix B3 Hardware extension RS485 RS422 communication interface 40 Appendix C Functional extensions for the 362MC Appendix C1 Special function Trend compensation 41 Appendix C2 Functional...

Page 4: ...in this manual and the available imprint on the component Intervention into the component If malfunctions occur or something is dubious please contact the manufacturer Intervention into the com ponent could heavily affect the safety of person and plant and will lead to termination of liability and caveat emptor Intended use To use the equipment is approved only if the instructions of this manual a...

Page 5: ... interface which is accessible via the front panel of the controller to enable connection of a terminal or a PC to the Pleiger service programme 362McDiag In addition to the user friendly operating and display functions the 362MC does of course also provide additional control functions to enable the safe and reliable control of complex systems such as differential trend compensation via the second...

Page 6: ... three groups A practical replaceable labelling field is provided under the foil for identification of the measuring point After removing the front frame and lifting the lower part of the foil the fuse for switching outputs and the connector for the service interface are also accessible after installation of the controller The labelling field is simple to replace Fuse F2 Connector for service inte...

Page 7: ... on the LCD display The desired menu is selected via the and buttons The menu name is now shown in the 1st line of the LCD display instead of the process data Each menu groups together entry items and parameters which are closely linked The Prgm button can be used to branch to the desired menu and the parameter selection function The desired parameter is selected here in the same manner using the ...

Page 8: ...A and the second setpoint B that becomes active in the case of external setpoint switching The value for the lower alarm limit of each controller is indicated by and the value for the upper alarm limit is indicated by See also Explanatory note on limit alarm 5 3 3 This presentation of the setpoint entry procedure is based on the assumption that both controllers have been configured as fixed setpoi...

Page 9: ...tor is operated in OPEN direction When the button is pressed the output is switched to as a result of which the actuator is operated in CLOSED direction This Emergency manual mode for the 1st controller operates irrespective of whether the micro controller is operational The 2 digit actual value LED display of the 1st controller is also available for Emergency manual mode independently of the micr...

Page 10: ...tly valid password To this end digits 1 to 4 have to be set to the stored value for the password in each case beginning from a value of 0 After input of the 4th digit shown in the example here as password 1234 the value is compared against the stored password If the entered value corresponds to the stored password the password lock will be deactivated PW lock Off if the entered value does not corr...

Page 11: ...t status password lock OFF or password lock ON is shown in the 2nd line of the display On activation of the password lock the system exits the commissioningmenu again Changing the password A new password is selected and entered as already described in detail under Password entry Any number 0000 and 9999 is permissible as the value for the password Display menu Activation of the password lock Passw...

Page 12: ...for parameters The desired parameter is selected using the and buttons the Prgm button must be pressed to branch to the parameter entry function and here the value can be altered with the and buttons The value is entered and saved via the Prgm button If the Exit button is pressed the current selection will be aborted See also 2 1 Display and 2 2 Operation In the following table the inputs and para...

Page 13: ...may overburden the actuator Parameter Value min Meaning Comment max see Details 1Setp A 0 0 C Setpoint input if Setp type A fixed value 200 0 C see Setpoint menu 5 3 Parameter each controller Kr 999 0 P gain see also Commissioning D1 999 0 see Controller parameters 5 5 Parameter each contr parameter set Tn 10s Reset time for I component see also Commissioning D1 10000s see Controller parameters 5 ...

Page 14: ...so Functional extension extern extern extern extern extern external input Setpoint programme Appendix C3 2Setp A 2Setp A 2Setp A 2Setp A 2Setp A 0 0 C 0 0 C 0 0 C 0 0 C 0 0 C Setpoint A for typeA fixed Setpoint here e g 0 200 C see also 200 0 C 200 0 C 200 0 C 200 0 C 200 0 C extern for typeA extern Explan note on setpoints 5 3 1 2SpTypB 2SpTypB 2SpTypB 2SpTypB 2SpTypB fixed fixed fixed fixed fixe...

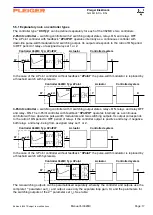
Page 15: ...r to avoid discontinuous transient conditions and overshoot during setpoint switching a switching low pass filter of the 2nd order can be parameterised on the 362MC The time for the switching filter is set via the parameter Tf T Lowp 5 3 3 Explanatory note on the limit value alarm Alarm limits can be parameterised to monitor the actual values and a permissible system deviation These impose a lower...

Page 16: ...rofile menu via the parameter DsplCtr this controller s profile is selected via Prof No and its parameters are subsequently displayed and altered in the following menus Selection and entry points are marked accordingly on the display of the 362MC The tables belonging to this description state which parameters are stored in which control menu 5 4 1 Entering parameters for two controllers It is to b...

Page 17: ...00 0s 1000 0s controller structure 5 5 2 Vd Vd Vd Vd Vd 1 0 1 0 1 0 1 0 1 0 max D gain for D component See also Explanatory note on 1000 0 1000 0 1000 0 1000 0 1000 0 controller structure 5 5 2 T drive T drive T drive T drive T drive 5 0s 5 0s 5 0s 5 0s 5 0s Actuator operating time for step controller See also Explanatory note on 1000 0s 1000 0s 1000 0s 1000 0s 1000 0s controlleroutputparameters 5...

Page 18: ...f assigned relay set 1 or 2 In the case of the 2 Point controller without feedback 2Point the pulse width modulator is replaced by a threshold switch with hysteresis 3 Point controller switching controller with 3 switching output states relay ON relay and relay OFF and relay ON The 3 Point controller with feedback 3PntPW operates internally as a continuous controller with two down line pulse width...

Page 19: ...s a 3 Point output with feedback It is thus only suitable for use in combination with integrating actuators such as motor actuators The operational characteristics of Step correspond to those of Pleiger controller 362 D Continuous controller controller with continuous output The controller output of the continuous controller Cont is supplied to the assigned analogue output The required hardware co...

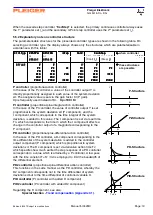
Page 20: ...with this table P controller proportional action controller In the case of the P controller a value of the controller output Y is directly proportionally assigned to each value of the system deviation xd The assigned value is set via the gain factor Kr P gain Xp is frequently used instead of Kr Xp 100 Kr PI controller proportional plus integral action controller In the case of the PI controller th...

Page 21: ...ure is PD2 PD2 PD2 PD2 PD2 PID2 PID2 PID2 PID2 PID2 Parameter Kr Parameter Kr Parameter Kr Parameter Kr Parameter Kr Kr Kr Kr Kr Kr Kr Kr Kr Kr Kr Kr Kr Kr Kr Kr these parameters Tn Tn Tn Tn Tn Tn Tn Tn Tn Tn are to be defined Tv Tv Tv Tv Tv Tv Tv Tv Tv Tv Vd Vd Vd Vd Vd Vd Vd Vd Vd Vd PI step controller proportional plus integral action step controller PID step controller PI step controller with ...

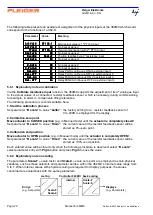
Page 22: ...US continuous ON Rel On Rel On Rel On Rel On Rel On E2 E2 E2 E2 E2 External input 2 Relay PLUS continuous OFF Rel Off Rel Off Rel Off Rel Off Rel Off E3 E3 E3 E3 E3 External input 3 Relay MINUS continuous ON Rel On Rel On Rel On Rel On Rel On E4 E4 E4 E4 E4 External input 4 Relay MINUS continuous OFF Rel Off Rel Off Rel Off Rel Off Rel Off E5 E5 E5 E5 E5 External input 5 E6 E6 E6 E6 E6 External in...

Page 23: ...e physical inputs of the 362MC which would correspond to the functions of a 362 D 5 6 1 Explanatory note on calibration Via the Calibrate resistance input function the 362MC supports the adjustment of its 4th analogue input to the actual values of a connected resistor feedback sensor which is necessary during commissioning for example in order to compensate fitting tolerances The following procedu...

Page 24: ... 361 D or 362 D in the Parameter Value min Meaning Comment profile each controller max OutputY OutputY OutputY OutputY OutputY NC NC NC NC NC No output assigned 1Relay 1Relay 1Relay 1Relay 1Relay 1st relay set Rel and Rel 2nd relay set only when 2Relay 2Relay 2Relay 2Relay 2Relay 2nd relay set Rel and Rel hardware extension installed 1Lin 0 1Lin 0 1Lin 0 1Lin 0 1Lin 0 1st analogue output 0 20mA 0 ...

Page 25: ...n 2nd L1 2nd L1 2nd L1 2nd L1 2nd L1 1ActV X 1ActV X 1ActV X 1ActV X 1ActV X Actual value controller 1 controller inputs outputs 2nd L2 2nd L2 2nd L2 2nd L2 2nd L2 1ActV U 1ActV U 1ActV U 1ActV U 1ActV U Actual value secondary controller 1 5 8 1 1Dist Z 1Dist Z 1Dist Z 1Dist Z 1Dist Z Disturbance input controller 1 1Tren D 1Tren D 1Tren D 1Tren D 1Tren D Trend input controller 1 1Out Y 1Out Y 1Out...

Page 26: ...tly in the following order the profiles of both controllers incorrect profiles will be reloaded after entering the correct profile no the parameters in each profile and each parameter set errors are corrected by entering the correct data repeat the check by resetting the controller 6 1 2 Explanatory note on ROM error and RAM error When the programme is started the checksum of the ROM programme mem...

Page 27: ... Resist 1 Resist 1 Resist 1 ERROR ERROR ERROR ERROR ERROR Resist 0 Resist 0 Resist 0 Resist 0 Resist 0 Monitoring function for analogue inputs The 1st PT100 input has a measured value measuring range standard 200 C opt 500 C or 20mA optional 100 The 1st PT100 input has a measured value measuring range standard 0 C or 4mA optional 0 The 2nd PT100 input has a measured value measuring range standard ...

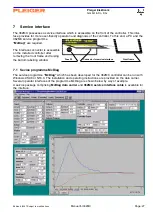
Page 28: ...programme McDiag are required The interface connector is accessible on the installed controller after removing the front frame and raising the bottom labelling window 7 1 Sevice programme McDiag The service programme McDiag which has been developed for the 362MC controller can be run with Windows 95 98 or NT4 0 The installation and operating instructions are provided on the data carrier Several op...

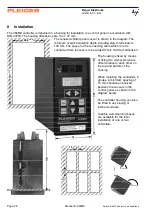
Page 29: ...minals is 140 mm The space for the connecting cable which is to be connected from the rear is to be added to this minimum dimension The housing is fixed by means of fixing two clamps which are offset relative to each other on the top and bottom of the housing When installing the controllers in groups a minimum spacing of 15 mm should be observed between the cut outs in the control panel as shown i...

Page 30: ...ection table 362MC standard configuration Terminal Signal name 1 L1 Voltage supply connection 2 N Standard 230V AC or 115V AC 3 SL Protective earth conductor or cabinet earth 4 N Output 1st relay set 5 Open Connection for 1st switching output 6 Closed 7 N Output 2nd relay set 8 Connection for 2nd switching output 9 See Hardware extension in appendix B1 10 Common 11 Make contact Alarm relay 12 Brea...

Page 31: ...use F2 for the power supply to the switching outputs is fitted under the front cover and can be replaced from the front 9 3 Connection of the switching outputs In standard configuration controller 362MC has one relay set consisting of relay and relay as its switching output A 2nd relay set is available as a hardware extension Two variants apply for connection of the switching voltage 9 3 1 Connect...

Page 32: ... floating contacts The contact voltage is provided by the controller As a special variant the 362MC can be supplied with an input circuit for DC contacts for a nominal voltage of 24V DC These inputs are to be connected to 24V and the reference potential 0V is to be connected to terminal 20 9 6 Connection of the resistor feedback sensor The remote resistor feedback sensor is connected to the 362MC ...

Page 33: ... main sensor however external compensation is possible with a resistor between terminal 36 and 37 The resistance value for RL must correspond to the resistance of one connecting wire 9 9 Connection of a I value transmitter at the 1st analogue input In the special configuration of the 362MC the 1st analogue input serves as a linear current input for currents from 4 20mA The current input is configu...

Page 34: ...put Measuring range 0 4 20mA 0 5V 0 10V Resolution 20µA 5 10mV Measuring accuracy 0 5 Internal resistance 250 Ohm 4th input resistance input Measuring range 0 200 Ohm Resolution 0 2 Ohm Measuring accuracy 0 5 Binary inputs Type 6 x optocoupler inputs for floating contacts for 24V DC nominal inputs electrically isolated switching switching voltage external voltage supplied Operating threshold 12V 4...

Page 35: ...SollwA 1SollwA 1SollwA 1SollwA 1SollwA Kr Kr Kr Kr Kr Tn Tn Tn Tn Tn Ts min Ts min Ts min Ts min Ts min Prof Nr Prof Nr Prof Nr Prof Nr Prof Nr Zeile 2 Zeile 2 Zeile 2 Zeile 2 Zeile 2 Output1 Output1 Output1 Output1 Output1 Output2 Output2 Output2 Output2 Output2 1SpTypA 1SpTypA 1SpTypA 1SpTypA 1SpTypA 1Setp A 1Setp A 1Setp A 1Setp A 1Setp A 1SpTypB 1SpTypB 1SpTypB 1SpTypB 1SpTypB 1Setp B 1Setp B ...

Page 36: ...ycl T cycl T cycl T cycl T cycl T drive T drive T drive T drive T drive Tn Tn Tn Tn Tn Trend Trend Trend Trend Trend Ts min Ts min Ts min Ts min Ts min Tv Tv Tv Tv Tv Vd Vd Vd Vd Vd Ymax Ymax Ymax Ymax Ymax Ymin Ymin Ymin Ymin Ymin Meaning Lower alarm limit 1st controller Upper alarm limit 1st controller 1st setpoint 1st controller 2nd setpoint 1st controller Setpoint type 1st controller 1st setp ...

Page 37: ... Input 5 6 Input 5 6 Input 5 6 Input 5 6 Profile 5 4 Display 5 8 Display 5 8 Display 5 8 Display 5 8 Output 5 7 Output 5 7 Output 5 7 Output 5 7 Display 5 8 Display 5 8 Output 5 7 Display 5 8 Display 5 8 Display 5 8 Profile 5 4 Display 5 8 Display 5 8 Display 5 8 Display 5 8 Output 5 7 Output 5 7 Output 5 7 Output 5 7 Display 5 8 Display 5 8 CtrlPar 5 5 CtrlPar 5 5 Output 5 7 Display 5 8 Display 5...

Page 38: ...T 0 2 PT 0 2 PT 0 2 PT 0 2 PT 1 2 PT 1 2 PT 1 2 PT 1 2 PT 1 362MC 362MC 362MC 362MC 362MC ERROR ERROR ERROR ERROR ERROR HW reset HW reset HW reset HW reset HW reset Lin 0 Lin 0 Lin 0 Lin 0 Lin 0 Lin 1 Lin 1 Lin 1 Lin 1 Lin 1 PAR ERR PAR ERR PAR ERR PAR ERR PAR ERR Param Param Param Param Param RAM RAM RAM RAM RAM RAM ERR RAM ERR RAM ERR RAM ERR RAM ERR Resist 0 Resist 0 Resist 0 Resist 0 Resist 0 ...

Page 39: ... again enables control with voltages other than the supply voltage e g for DC actuators The maximum permissible contact load as specified on the data sheet is to be observed The control switching voltage is to be provided with external fusing The use of shielded cabling is recommended See also Connection of switching outputs 9 3 and Connecting cable 9 10 Parameterisation The outputs are parameteri...

Page 40: ...ange 0 20mA 4 20mA or with opposite effective direction 20 0mA 20 4mA is assigned by the user as required The same applies to the voltage outputs The outputs are defined as unipolar or bipolar outputs via appropriate parameterisation of the controller output limiting parameters Ymin and Ymax The following table shows several examples of definitions for the output range See also Controller paramete...

Page 41: ...n wire cross section of 0 22mm 120 ohm is recommended as the terminating impedance for the RS485 interface Parameterisation The transmission speed Baudr and the user address Slave no of the controller are set via two additional parameters in the Profile commissioning menu Connection table 362MC hardware extension excerpt RS485 RS422 communication interface Terminal Signal name 25 d Rx Tx transmitt...

Page 42: ...g menu Input 5 6 When the value NC is assigned to the Trend parameter the special trend compensation function is passive D component without trend compensation The normal D component of the standard controller without trend compensation is generated in accordance with the diagrams shown here when controller structure with D or D2 component is selected in the Struct controller parameter When an inp...

Page 43: ...Here an inlet temperature sensor TIN has been added to the outlet temperature control TOUT of a main engine The effects of the dead time between the outlet temperature sensor and the mixing valve are reduced substantially by means of the special trend compensation function parameter Trend PT100 2 Cooler Main engine TOUT PT100 Tend D 3 Point step controller TIN PT100 PT100 1 PT100 2 TT TT ActV X Ou...

Page 44: ...erisable controller types The following notes on application of the disturbance signal thus relate to the controller types of the 362MC which are selectable under CtrlTyp in the Controller parameters menu CtrlTyp 2 Point and 3 Point Disturbance compensation is not expedient for these switching controllers without feedback and is thus not installed in the 362MC Selecting this function when these co...

Page 45: ...troller output Y setpoint Setp V of the secondary controller It thus has a direct effect on the control process of the secondary controller In the case of the cascade step controller the primary continuous PID controller always uses the 1st parameter set 1 and the secondary 3 Point step controller always uses the 2nd parameter set 2 External changeover to the 2nd parameter set is thus not possible...

Page 46: ...ctV U PT100 1 Characteristic The characteristic to weight the influence of the disturbance is defined via 5 interpolation points distributed evenly over the value range The values between the interpolation points are determined via linear interpolation Example of the values of a characteristic Graph of the characteristic arbitrary values used for purpose of illustration Kz 0 10 0 Kz 25 40 0 Kz 50 ...

Page 47: ... of a main engine is controlled using a cascade step controller CtrlTyp CscStep whereby the secondary control circuit reduces the turbo charger s disturbing effects on the inlet temperature TIN By means of the special disturbance compensation function parameter Disturb Lin 4 a measured value for engine output TS is weighted via the characteristic and delayed by means of the low pass and then added...

Page 48: ...cture of a setpoint programme is illustrated below by reference to an example In this example a temperature is to be transformed via the setpoint programme into a fixed value for control The scaling for the controller has been set at Scale 0 0 and Scale F 200 for PT100 input and the dimension has been defined as Dim C See also explanatory note on Scaling 5 6 2 The following setpoint programme has ...

Page 49: ...xtern extern extern external input programme can also be assigned to StpPrg1 StpPrg1 StpPrg1 StpPrg1 StpPrg1 setpoint to the 2nd controller programme no 1 See 1SpTypA above StpPrg5 StpPrg5 StpPrg5 StpPrg5 StpPrg5 to programme no 5 2SpTypB 2SpTypB 2SpTypB 2SpTypB 2SpTypB fixed fixed fixed fixed fixed Setpoint type B fixed value extern extern extern extern extern external input StpPrg1 StpPrg1 StpPr...

Page 50: ...etpoint to a setpoint programme StpPrg 1 5 This selection should be carried out in Manual operating mode MANUAL controller stop after which the programme is started in Automatic mode by pressing the Auto button Programme stop If the controller is switched to Manual mode by pressing the Man and Exit buttons simultaneously the setpoint programme will be stopped at the last time setpoint It will subs...

Page 51: ...ment general max Line 1 Line 1 Line 1 Line 1 Line 1 1Setp W 1Setp W 1Setp W 1Setp W 1Setp W Setpoint controller 1 Line 2 Line 2 Line 2 Line 2 Line 2 1SpPrg 1SpPrg 1SpPrg 1SpPrg 1SpPrg Setpoint programme controller 1 2nd L1 2nd L1 2nd L1 2nd L1 2nd L1 1Setp V 1Setp V 1Setp V 1Setp V 1Setp V Setpoint secondary controller 1 See also Explanatory note on 2nd L2 2nd L2 2nd L2 2nd L2 2nd L2 1ActV X 1ActV...

Page 52: ...his leaflet is installed in controllers with Mat Nr 936203xxxx and allows controlling the difference of two actual values for example in the case of differential pressure control of pumps Parameterisation The difference of the actual values is calculated in two different ways In addition to the standard inputs PT100 1 or 4 20mA PT100 2 Lin 4 Lin 0 or Lin 4 and Resist for the parameters ActValX Act...

Page 53: ...s if appropriate Adjusting the parameters In most applications only minor adaptations of the factory set up is necessary The most important adaptations concern the controller parameters Kr and Tn The aim is to make the controlled system stable and reduce control deviations as fast as required and possible We recommend the following steps starting with the factory set up 1 To test the behaviour of ...

Page 54: ...ature whereby a signal proportional to the machine output is applied as the disturbance variable Functional extension Disturbance compensation required Profile no 5 Differential pressure control with difference sensor 4 20mA motor valve and controller 1 e g control of throttle valve position downstream of a pump according to pressure difference Hardware modification 1st analogue input as 4 20mA re...

Page 55: ...0 0 0 0 0 0 0 0 0 0 0 0 0 0 0 0 0 0 0 0 0 0 0 0 0 0 0 0 0 0 0 0 0 0 0 0 0 0 0 0 0 0 0 0 0 0 0 0 Factory presets Changes Profile 1st controller 1SpTypA 1SpTypA 1SpTypA 1SpTypA 1SpTypA 1Setp A 1Setp A 1Setp A 1Setp A 1Setp A 1SpTypB 1SpTypB 1SpTypB 1SpTypB 1SpTypB 1Setp B 1Setp B 1Setp B 1Setp B 1Setp B 1T Lowp 1T Lowp 1T Lowp 1T Lowp 1T Lowp 1Alarm 1Alarm 1Alarm 1Alarm 1Alarm 1Alarm 1Alarm 1Alarm 1...

Page 56: ...Time7 Time7 Setp8 Setp8 Setp8 Setp8 Setp8 Time8 Time8 Time8 Time8 Time8 Setp9 Setp9 Setp9 Setp9 Setp9 Time9 Time9 Time9 Time9 Time9 Setp10 Setp10 Setp10 Setp10 Setp10 Time10 Time10 Time10 Time10 Time10 Setp11 Setp11 Setp11 Setp11 Setp11 Time11 Time11 Time11 Time11 Time11 Setp12 Setp12 Setp12 Setp12 Setp12 Time12 Time12 Time12 Time12 Time12 Setp13 Setp13 Setp13 Setp13 Setp13 Time13 Time13 Time13 Ti...

Page 57: ...Pleiger Elektronik GmbH Co KG Page 56 Manual for 362MC Edition 6 2007 Subject to modifications Note ...

Page 58: ...Pleiger Elektronik GmbH Co KG Edition 6 2007 Subject to modifications Manual for 362MC Page 57 Note ...

Page 59: ...V 6 x Binary inputs as logical inputs for floating contacts 4th Analogue input resistance input Measuring range 0 200R Special version 3rd Analogue input 0 10V Measuring range 0 100 3rd Analogue input 0 4 20mA Measuring range 0 100 2nd Analogue input PT100 Measuring range 0 200 C Special version 1st Analogue input 4 20mA Measuring range 0 100 Special version 1st Analogue input PT100 Measuring rang...

Reviews: