background image

the infrared remote control so you will need to keep in mind the listener position in the room when you 
locate the hub. After you have decided the best location for the hub in your component stack, plug the 
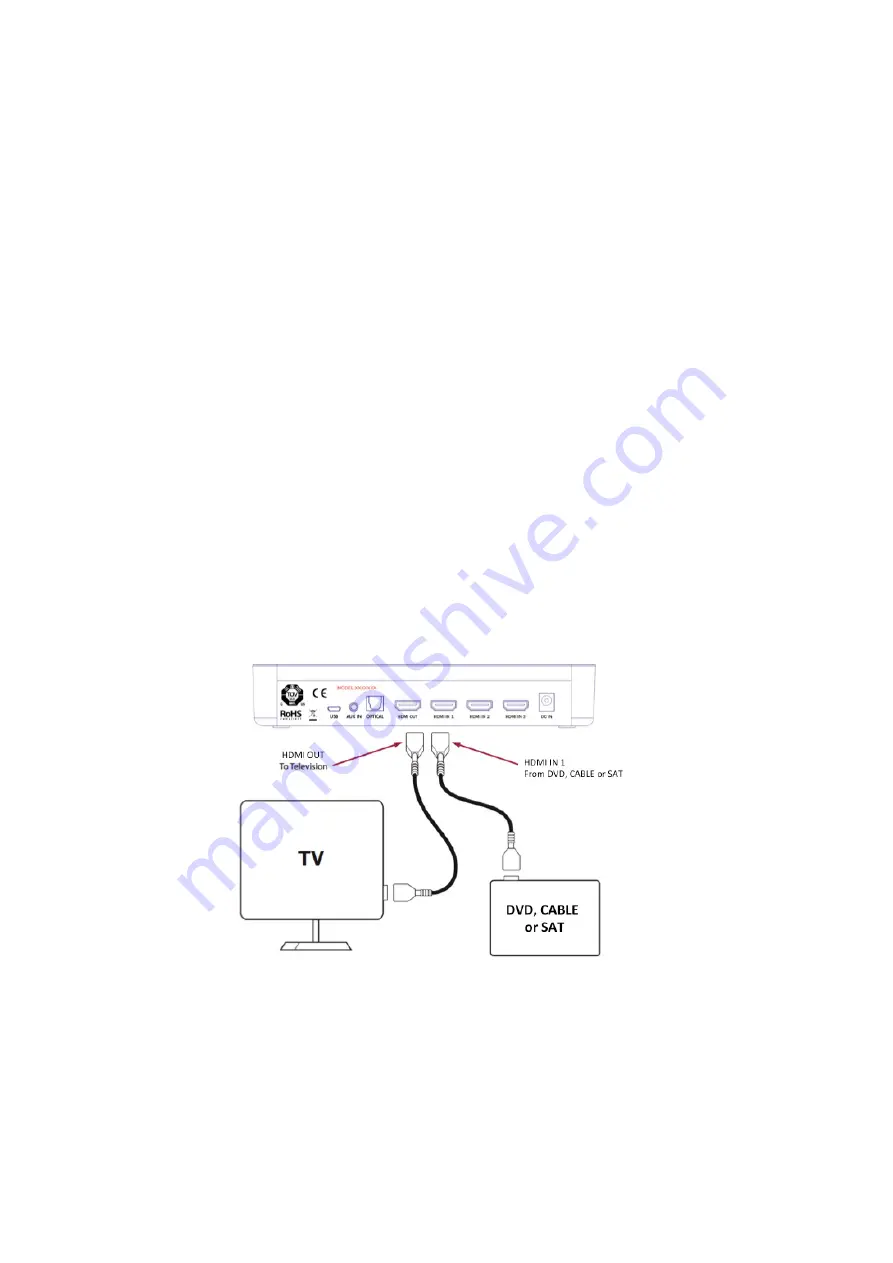
A/V cables in first per Figure 1.   
 
Connect the HDMI “outputs” of your DVD player, Cable or Satellite box or game player to the input(s) 
on the audio hub using a quality HDMI cable. Then connect the HDMI output of the audio hub to an 
available HDMI input on the TV or monitor.  The video content of the DVD player or cable box will be 
passed through the Audio Hub to the TV and the audio will be broadcast to the HD wireless speakers in 
the room.   
 
Make sure the TV is tuned to the same input that the Audio Hub is connected to – there is usually more 
than one HDMI input.  If your hub is connected to HDMI 1 on the TV but your TV is tuned to HDMI 2, 
there will be no picture to go with the sound.  Please refer to your TV owners manual if necessary.  
Also, make sure the volume on your internal TV speakers is muted or turned all the way down. 
 
If you want to connect an analog source (CD, VCR or iPod/MP3 player, etc.), use the 3.5mm mini jack 
input labeled “AUX”. We will set up the Bluetooth input at a later time when the unit is powered up.   
 
If your source component doesn’t have HDMI, but has a digital audio output compatible with an optical 
(TOSLINK) connection, use the “OPTICAL” input on the Audio hub. 
 
 
Figure 1.  Typical installation hookup:  


Summary of Contents for W-30C

Page 1: ...Platin High Definition 5 1 Wireless Home Theater System W 30D W 30M W 30C W 30W Owners Manual...

Page 2: ...ltages other than those indicated might cause irreversible damage to the product and void the product s warranty The use of AC plug adapters is cautioned because it can allow the product to be plugged...

Page 3: ...gy and if not installed and used in accordance with the instructions may cause harmful interference to radio communications However there is no guarantee that interference will not occur in a particul...

Page 4: ...Canada regulations this radio transmitter may only operate using an antenna of a type and maximum or lesser gain approved for the transmitter by Industry Canada To reduce potential radio interference...

Page 5: ...iii le gain d antenne maximal autoris pour les appareils dans la bande 5725 5825 MHz doivent respecter le pire limites sp cifi es pour le point point et l exploitation non point point le cas ch ant Us...

Page 6: ...quency spectrum wireless broadcast features a latency of less than 6 ms ensuring accurate and robust wireless performance The hub provides multi connectivity HDMI SPDIF Bluetooth and audio decoding fo...

Page 7: ...und speaker 1 Center channel speaker 1 Remote control with 2 AAA batteries 1 Power adapter for the Audio Hub 6 Power cords for the speakers Items required to complete the set up HDMI cable s sold sepa...

Page 8: ...audio input This 3 5mm input can also be connected to iPods or other hand held devices with a headphone output The Front panel of the Audio Hub looks like this The rear panel of the Audio Hub looks li...

Page 9: ...e HD wireless speakers in the room Make sure the TV is tuned to the same input that the Audio Hub is connected to there is usually more than one HDMI input If your hub is connected to HDMI 1 on the TV...

Page 10: ...content they still need AC power to play and run the amplifiers inside You will need to make sure that you have access to 110V 60 Hz AC power near the location of the speakers Surge protection is reco...

Page 11: ...Figure 4 Speaker and Subwoofer back plates...

Page 12: ...V 60 Hz AC wall outlet You need press the Associate button on back panel of the speaker until you hear the test tone The Subwoofer is different there is no test tone Also you should see the Network Li...

Page 13: ...hub you can put in your favorite movie or turn on your satellite box and enjoy your favorite show in 5 1 surround sound Note The system will automatically save the configuration when started successfu...

Page 14: ...n restarting the system after the initial set up the system will do a quick check to make sure all of the speakers are located The OSD will alert you if there are any problems found with the speakers...

Page 15: ...menu you can choose to view the status of the system or of the speakers From this menu you can see the status of the system It Includes the current input source input signal type speaker map and surr...

Page 16: ...From this menu you can see the status of the speakers From this menu you can adjust the level of the bass and treble...

Page 17: ...und mode for stereo audio Lip Sync Delay Is used to synchronize the audio and video signal from the source You can delay the audio to match the video Enable ARC When set it to on the TV will be active...

Page 18: ...ne from the selected speaker to verify correct operation and assist in placement System Info Displays the firmware version Factory Reset To reset the system back to factory defaults Adv Spkr Tool See...

Page 19: ...peakers OSD Timeout Duration the OSD will remain on screen after the last user initiated operation Display Level It is used to adjust the brightness of the front LED display Display Timeout Duration t...

Page 20: ...outlets require a wall switch to be on 4 The speaker count displayed on the OSD is not correct for your set up Check to make sure that all speakers are plugged in and powered correctly Check the netwo...

Page 21: ......

Reviews: