background image

Copyright Planika Sp. z o.o.  

www.planikafires.com 


READY

Automatic fuel pump will start working once the fuel reaches the sensor inside the black box. Pump will cease 

the refuelling process once: 

a)


FLA 2 model E’s fuel tank will be full.                  LED diode will start to blink and you will hear the intermediate 

sound.  

b)


the external fuel container will be empty. In this case you can switch the stiff tube to another, full container 

and  start  again  from  point  2.4.  or  finish  the  refuelling  and  detach  the  fuel  pump  (please  forward  to  point 

2.5.). 

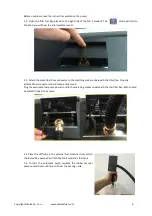
2.5. Automatic fuel pump can be detached by removing the pump’s power cord from the socket and pressing  

down the metal ring to release the fuel hose (please see the illustration below).  


After closing down the fuel filler flap the LED lights on FLA 2 model E will indicate:: 

-                        - FLA 2 model E is ready to use, 


-                        - fuel level is too low. Please refuel starting from point 2.1. 


While refueling please take the following precautions: 


During pouring be careful not to spill out the fuel. If the fuel is spilled error message 

READY

FUEL

HOT


may be displayed. Go to step F, and follow the guidance provided in the table. 

If the spillage is excessive 

the source of power needs to be disconnected. 


3.


Starting the device. The green indicator                    flashes on the control panel .  

3.1. Press the 

START/STOP

 button on the control panel and hold it until you hear the sound signal. 

3.2. The green indicator will blink    

to indicate start-up of the device, it takes a few moments for the 

appliance to ignite the flame. 

3.3.  While  the  appliance  is  in  work  mode,  the  green  indicator  goes  off  and  the  flame  starts  to  appear.  The 
device works automatically until they run out of fuel or disable the device by the user. 


READY

READY

FUE L

Summary of Contents for FLA 2 E#4

Page 1: ...USER S MANUAL FLA 2 model E 4 PF 0855 0017 000 PF 0855 0018 000 Manufactured by Planika Sp z o o ul Bydgoska 38 86 061 Brzoza Poland Edition i1108 00 as of 25 04 2016 Serial number greater than P4024 16 ...

Page 2: ... NS ST TR RU UC CT TI IO ON N M MA AN NU UA AL L TABLE OF CONTENTS I General information 3 II Fuel 3 III Safety 3 IV Operation 4 Operating elements 5 Initial start up of the device 5 Flame size regulation 8 Device extinguishing 8 Subsequent start up 8 Information and warning alert 8 V Cleaning and maintenance 10 VI Disposal and recycling 10 VII Service 10 ...

Page 3: ...ess dizziness Warning markings R 11 Highly flammable liquid Operational notes S 2 Store beyond children s reach S 7 Keep container tightly closed S 16 Keep away from sources of ignition No smoking S 46 In case of ingestion immediately seek medical advice show the package or label This mark stands for information which one needs to acquaint with This mark stands for warnings which one needs to acqu...

Page 4: ...e device while it is switched on Do not operate near the fuel filler while the device is switched on Do not operate with the components contained within the flame tray under the threat of burns or damage to the device Do not move the device while it is switched on The device can be moved only after the complete combustion of the fuel when it is disconnected from power supply and when all its eleme...

Page 5: ...nel v START STOP READY FUEL Planika HOT ERROR N E W S E N S O F F I R E PAT PEND ECO B Initial start up of the device 1 On the control panel the blue light flashes it indicates the lack of fuel in the tank Please refuel 2 Refuelling For refuelling please use the automatic fuel pump provided with the FLA 2 model E Service USB input hidden under a cap Starts the device from standby mode or switches ...

Page 6: ...tor to the matching socket underneath the filler flap Properly attached fuel connector should make a click sound Plug the automatic fuel pump power cord to the matching socket underneath the fuel filler flap Both should be placed firmly in their place 2 3 Place the stiff tube in the external fuel container from which the fuel will be pumped out into the FLA 2 model E s fuel tank 2 4 To start the a...

Page 7: ...the LED lights on FLA 2 model E will indicate FLA 2 model E is ready to use fuel level is too low Please refuel starting from point 2 1 While refueling please take the following precautions During pouring be careful not to spill out the fuel If the fuel is spilled error message READY FUEL HOT may be displayed Go to step F and follow the guidance provided in the table If the spillage is excessive t...

Page 8: ...e device cools the message will disappear and depending on the amount of the fuel in the tank either the green indicator will flash and indicate the readiness for operation or the blue indicator will indicate the lack of the fuel E Subsequent start up If on the control panel flashes the blue FUEL indicator start to run the product from the point B 2 If on the control panel flashes the green READY ...

Page 9: ...ill cease automatically Disconnect the automatic pump Wait at least 1 hour to evaporate the remaining moisture and then close the fuel filler bolt Hold the ECO button for about 5 seconds If the alarm message reappears wait a little bit longer until the rest of the moisture evaporates If the message reappears contact your service provider the acceptable device operation temperature has been exceede...

Page 10: ...uation where it will be necessary to clean elements not normally available The manufacturer is not liable for damage resulting from improper operation non manual self dismantling attempts to modify using other liquids than those recommended in point II Fuel VI Disposal and recycling The product is equipped with parts made of aluminium steel plastics and electronics If you need to dispose of the de...

Reviews: