background image

12

13

4.  Press [

p

] or [

q

] key to select the setting you want.

CIF – Common Intermediate Format, also known as Full CIF (FCIF).  The   

video resolution is 352 x 288 pixels.

QCIF – Quarter CIF.  The video resolution is 176 x 144 pixels.

SQCIF – Sub-Quarter CIF.  The video resolution is 128 x 96 pixels.

Auto switch –The system automatically switches to a suitable quality. 

5.  Press [Enter] key to confirm the setting.

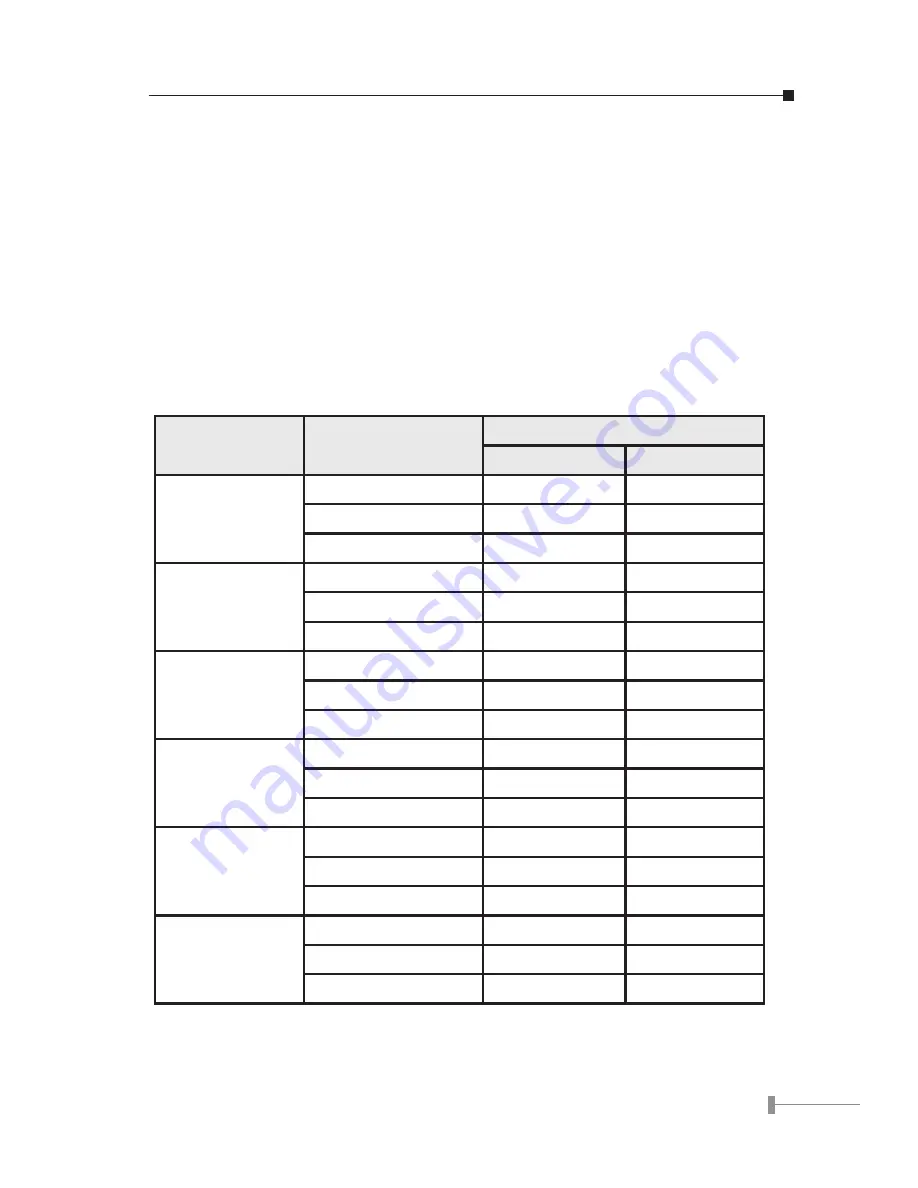
NOTE: While bandwidth is low, low-resolution image format (QCIF or SQCIF) 

is suggested for getting real-time image.  The following table shows 
the  maximum  frame  rate  for  each  picture  format  on  different  band-
width settings.

Bandwidth(Kbps)

Picture Format

Maximum frame rate (fps)

NTSC

PAL

No Limit

CIF

30

25

QCIF

30

25

SQCIF

30

25

768

CIF

30

25

QCIF

30

25

SQCIF

30

25

512

CIF

25

25

QCIF

30

25

SQCIF

30

25

384

CIF

20

20

QCIF

30

25

SQCIF

30

25

256

CIF

15

15

QCIF

15

15

SQCIF

20

20

128

CIF

10

10

QCIF

15

15

SQCIF

20

20

Summary of Contents for ICF-1000P

Page 1: ...ght to make improvements to this User s Manual and or to the products described in this User s Manual at any time without notice If you find information in this manual that is incorrect mislead ing or...

Page 2: ...rester will function and reduce the chance of being shocked Do not connect the grounding wire to a gas or water pipe If possible switch power off and unplug the machine during a thunder storm Do not t...

Page 3: ...1 3 2 General Settings 12 3 3 Network 16 3 4 H 323 20 3 5 Exit the System Configuration 23 3 6 Phone Book Setup 23 Chapter 4 Getting Started 25 4 1 Making Video Calls 25 4 2 Using the Hand free functi...

Page 4: ...artners quick and cost effective The ICF 1000P has two video inputs which can be used to connect to external cameras for group meetings and or a document camera for showing detailed documents or photo...

Page 5: ...CA Audio Video Output for TV connection 1 2 Specification Product Internet Video Conferencing Phone Model ICF 1000P Hardware LAN 1 x 10 100Mbps RJ 45 port Camera Built in High quality CCD Camera adjus...

Page 6: ...eway Microsoft NetMeeting Multipoint Control Unit MCU LAN standard IEEE 802 3 Ethernet IEEE 802 3u Fast Ethernet Network and Configuration Connection Type ADSL Cable VPN LAN Access Mode Static IP PPPo...

Page 7: ...4...

Page 8: ...x1 2 Power Adapter AC Cord x1 3 RCA Cable x1 4 Mini din cable x 2 5 User Manual x1 If any of these pieces are missing or damaged please contact your dealer immediately if possible retain the carton i...

Page 9: ...6 2 2 Front Panel introduction The following show the front panel of ICF 1000P and its button definition...

Page 10: ...7...

Page 11: ...nnect to external cameras for group meetings and or a document camera for showing detailed documents or photographs It also provides 1 set of RCA AV output connector for connecting to TV projector or...

Page 12: ...or PAL M model the Video out connector can only supply black white image 2 The device is a power required device it means the device will not work until it is powered If you need to use it all the tim...

Page 13: ...lied cable to connect the ICF 1000P Con nect the network cable to your switch hub cable modem xDSL modem or the wall socket which connect to switch hub 3 The LCD panel can be tilted up or down to obta...

Page 14: ...blished The conferencing phone should take about 50 seconds to make power on self test and system start up In this period the screen is still blank Please do not press any button on this period After...

Page 15: ...or q key to select the setting you want Enable ICF 1000P automatically answers any incoming calls Disable Incoming calls can be answered only when receiver picks up the handset or presses the Spk key...

Page 16: ...ress Enter key to confirm the setting NOTE While bandwidth is low low resolution image format QCIF or SQCIF is suggested for getting real time image The following table shows the maximum frame rate fo...

Page 17: ...Menu key to enter the Main Menu of System Configuration 2 Press p or q key to select the System Sleep 3 Press Enter key and use number key to input sleep time Up to 99 min utes NOTE To disable the Sys...

Page 18: ...to enter the Main Menu of System Configuration 2 Press p or q key to select the Security 3 Press Enter key to show the choice list 4 Press p or q key to select the setting you want Yes Security funct...

Page 19: ...Press p or q key to select the bandwidth you need ICF 1000P supports the following bandwidth settings No Limit 768k 512k 384k 256k and 128k 5 Press Enter key to confirm the setting 3 3 2 Network Mode...

Page 20: ...y to enter the Main Menu of System Configuration 2 Press t or u key to go to the Network page 3 Press p or q key to select the Subnet Mask 4 Press Enter key and use the number key to input your Subnet...

Page 21: ...dynamic DNS service from DynDNS org It allows Internet users to connect to your ICF 1000P using a URL rather than an IP Address This also solves the problem of having a dynamic IP address With a dyna...

Page 22: ...Configuration 2 Press t or u key to go to the Network page 3 Press p or q key to select the DDNS User Name 4 Press Enter key to enter the on screen keyboard to input your DDNS User Name Select the an...

Page 23: ...r key to show the choice list 5 Press p or q key to select the setting you want Disable not to register a gatekeeper Auto Automatically search for gatekeeper IP Manual User must input gatekeeper IP ad...

Page 24: ...when dialing H 323 calls 1 Press Menu key to enter the Main Menu of System Configuration 2 Press t or u key to come to the H 323 sheet 3 Press p or q key to select the Alias Name 4 Press Enter key to...

Page 25: ...q key to select the setting you need Auto The system automatically switch Default G 711 64kbps G 723 6 3kbps 6 Press Enter key to confirm the setting 3 4 7 Software Keyboard Software Keyboard allow y...

Page 26: ...hone Book page 2 Press p or q key to select the entries 3 Press t u to switch between Name column and Address column 4 Press Enter key to input the Name or Address 5 Press Phone Book key again to save...

Page 27: ...to input the Dot 5 Press q key to select Exit and press Enter to return to the previous page 6 Press Phone Book key again to save and exit the Phone Book sheet NOTE If software keyboard is enabled 3...

Page 28: ...l the IP Address of the re mote site 2 Press Enter key to establish a connection 3 When the connection is set up successfully the video communication starts and the remote site video will be shown on...

Page 29: ...ress Spk key to end the connection 4 3 Using the Phone Book This Phone Book provides user with a convenient way for retrieving the IP ad dresses of some regularly called parties 1 From the main screen...

Page 30: ...creen 5 Press Spk key to end the connection 4 4 Receiving Video Calls 4 4 1 Auto Answer Mode When a video call comes in the videophone rings and answers it automatically The connection will be establi...

Page 31: ...28...

Page 32: ...unction captures the remote image This function allows the two parties to see more details of the pictures 1 Press Snapshot key once to take a snapshot of the remote site image 2 Press Snapshot key ag...

Page 33: ...er external devices 5 2 1 Video channel 1 Press Channel key to enter the channel selecting function 2 Use t or u to switch to other cameras Main Built in g Channel 1 from A V In 1 g Channel 2 from A V...

Page 34: ...dio 5 3 1 Activate Video Mute 1 Press Privacy key to enter Privacy function 2 Use t or u key to control video On Off Press Privacy key again to exit the privacy setting mode 5 3 2 Activate Audio Mute...

Page 35: ...ting for example connecting time TX RX Bit Rate as well as TX RX Frame Rate and so on For getting better quality you can adjust the settings below under online mode Press Menu key to show the connecti...

Page 36: ...speaker volume 5 Press Menu key again to exit on line adjustment 5 6 2 Adjust Camera Hue This function can adjust video color from camera input 1 Press Menu key to enter on line adjustment 2 Use p or...

Page 37: ...ey to decrease the video saturation from camera input 5 Press Menu key again to exit on line adjustment 5 6 4 Adjust Camera Contrast The function is to adjust the video contrast from camera input 1 Pr...

Page 38: ...ess from camera input 4 Use t key to decrease the video brightness from camera input 5 Press Menu key again to exit on line adjustment 5 6 6 Adjust Display Hue The function is to adjust display video...

Page 39: ...tion 4 Use t key to decrease the display video saturation 5 Press Menu key again to exit on line adjustment 5 6 8 Adjust Display Contrast The function is to adjust display video contrast 1 Press Menu...

Page 40: ...lay video brightness 1 Press Menu key to enter on line adjustment 2 Use p or q to locate Display Brightness 3 Use u key to increase t the display video brightness 4 Use t key to decrease the display v...

Page 41: ...38...

Page 42: ...and H 323 is correct Please reconfirm the remote IP address or DNS name 3 ICF 1000P can t receive an incoming call automatically Press the Menu key and switch the setting page to General and check whe...

Page 43: ...set the bandwidth of the remote site and local site to the same level 7 The video quality is low The image is blocking or freezing Please check if your bandwidth is broad enough The minimum bandwidth...

Page 44: ...41...

Page 45: ...42...

Page 46: ......

Page 47: ...Part No EM ICF1KP...

Reviews: