background image

ICA-151 User Guide


20 

4. Click on 

“View Video”


Note: 

If the Administrator has restricted access to known users, you will then be prompted for a username 

and password. 


5. The first time you view the camera, you will be prompted to install an ActiveX component 

as below. 

You must install this ActiveX component in order to view the video stream 

in Internet Explorer.

 Click on 

"Install"

 to install. 


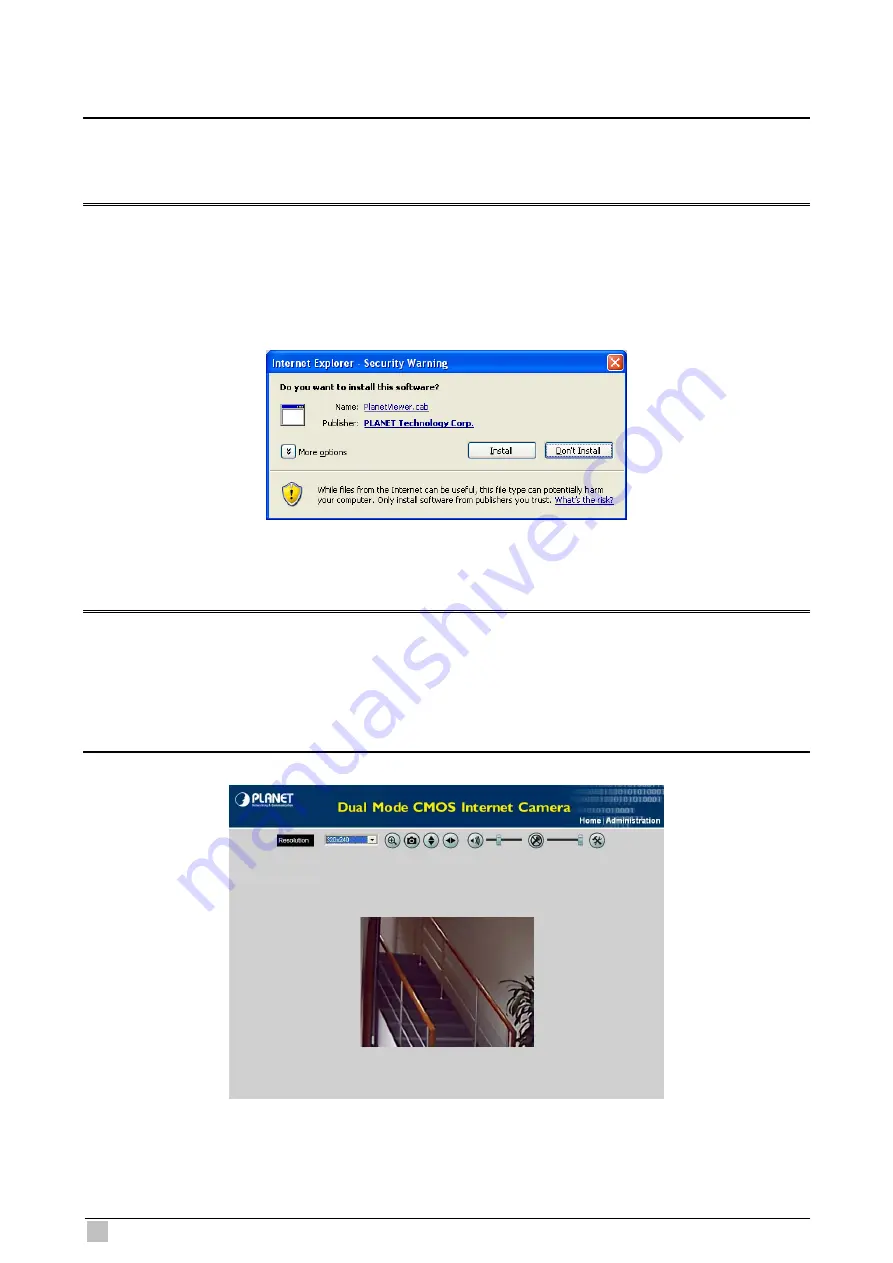
6. After installing, you will be able to view the live video stream in its own window as below. 


Note: 

1. Video will start playing automatically. There may be a delay of a few seconds while the video 

stream is buffered. 

2. There are a number of options available on this screen, accessed by select list, button or icon. 

The details are described in 

Chapter 3.3 – General Options


Summary of Contents for ICA-151

Page 1: ...Dual Mode CMOS Internet Camera ICA 151 User s Manual ...

Page 2: ...scribed in this User s Manual at any time without notice If you find information in this manual that is incorrect misleading or incomplete we would appreciate your comments and suggestions FCC Warning This equipment has been tested and found to comply with the limits for a Class A digital device pursuant to Part 15 of the FCC Rules These limits are designed to provide reasonable protection against...

Page 3: ...g ICA 151 on your LAN 17 3 2 Connecting ICA 151 via Internet 19 3 3 General Options 21 4 Web Management 22 4 1 Setup 24 4 1 1 System 24 4 1 2 Network 26 4 1 3 DDNS 28 4 2 Video Audio 29 4 2 1 Video Audio 29 4 2 2 Video Access 31 4 2 3 User Database 33 4 3 Event 34 4 3 1 Motion Detection 34 4 3 2 E Mail 35 4 3 3 FTP 37 4 3 4 HTTP 38 4 3 5 Event Trigger 39 4 4 Administration 41 4 4 1 Maintenance 41 ...

Page 4: ...ne user The 3GPP feature lets the administrator watch the video just by clicking on a few buttons on his cell phone ICA 151 could work with Cam Viewer a multi camera video surveillance application that enables you to set up a comprehensive and effective surveillance system quickly and easily The Cam Viewer works with PLANET network cameras and video server to provide video monitoring recording and...

Page 5: ...on Detection E mail Alerts User may set up 4 motion detection regions each with adjustable size and sensitivity When motion is detected at the specified regions the system can send an E mail alert or FTP upload with a video image or files attached z Support most Popular Internet Services DDNS Dynamic DNS makes Internet connection easier when your Internet Gateway uses a dynamic IP address NTP Netw...

Page 6: ...ICA 151 User Guide 6 1 4 Application Remote Monitoring applications 1 5 Outlook ...

Page 7: ...iption Off No power On Power on PWR Blinking The Power LED will blink during start up 15 20 sec Off Camera is not capturing video ACT Blinking Camera is capturing video Off LAN is not connected or camera is not sending receiving data LAN Blinking Data is being transmitted or received via the LAN connection Microphone PWR ACT LAN ...

Page 8: ...n be plugged in PWR nnect the supplied power adapter LAN nnect your Camera to a 10 100Base TX hub or switch Reset set to manufacturer default valued and reboot When pressed and held over 10 seconds the settings of IP Camera will be set to the default values Upon completion the PWE LED will blink three times Bottom Panel of ICA 151 AUDIO OUT LAN PWR ...

Page 9: ... Contrast Brightness 3GPP 160x120 15fs MPEG 4 for mobile phone viewing Audio Audio Codec G 726 ADPCM Microphone Speaker Two Way Audio built in Microphone and external Speaker Network and Configuration LAN RJ 45 Ethernet 10 100 Base T Supported Protocols TCP IP SMTP HTTP DHCP NTP RTSP RTP UPnP E mail Notification Triggered by motion detection Motion Detection Area 4 Area definable Hardware Power Ad...

Page 10: ...ed PWR on the rear panel 3 Check the LEDs a The Power LED will turn on briefly and then start blinking during startup After startup is completed the Power LED will remain ON b The LAN LED will be ON 2 2 Software Quick Configuration Initial setup should be performed by using the supplied Windows based Setup Wizard as follows 1 Insert the bundled product CD into CD Rom drive to launch the autorun pr...

Page 11: ...OS Internet Camera 11 3 The welcome screen appears Click on Setup Camera button to start the wizard 4 After clicking the setup camera button it will auto search for the cameras on your network Click on to continue ...

Page 12: ...urrent settings table will be displayed on the right side Click on to continue 6 The administrator login window will pop up If the Administrator Name and Administrator Password have been set you will be prompted to enter them If using the default values please enter admin for both the name and the password Click on OK to continue ...

Page 13: ...gure the Device Name Description Time Zone Local Date and time here Click on to continue 8 You can choose Fixed IP Address or Dynamic IP Address here Click on to continue Note 1 Fixed IP Address is recommended and can always be used 2 Dynamic IP Address can only be used if your LAN has a DCHP Server ...

Page 14: ...creen will be displayed You can configure the IP Address Subnet Mask Default Gateway Primary and secondary DNS Click on to continue 10 The next screen below will display all details of the camera Click on to continue if those settings are correct or click on back to modify any incorrect values ...

Page 15: ... In this confirmation window below click on OK to confirm that you want to save the new settings If you want to cancel your changes please click on Cancel 12 After confirming the wizard will start to save the new settings as below screen ...

Page 16: ...completed the prompt window will be displayed as below screen Click on OK to finish 14 The setup wizard now is completed Click on Exit to close the setup wizard After modifications you may now connect the camera with the new configuration via web browser ...

Page 17: ...on your LAN 1 Start the Web browser 2 In the Address box please enter http address The address is the LAN IP address which up to your new configuration from Setup Wizard Note The LAN IP address of factory default setting is 192 168 0 20 3 When you connect the following home page will be displayed 4 Click on View Video Note If the Administrator has restricted access to known users you will then be ...

Page 18: ...net Explorer Click on Install to install 6 After installing you will be able to view the live video stream in its own window as below Note 1 Video will start playing automatically There may be a delay of a few seconds while the video stream is buffered 2 There are a number of options available on this screen accessed by select list button or icon The details are described in Chapter 3 3 General Op...

Page 19: ...ogin username password if required Note You can NOT connect to a camera via the Internet unless the camera Administrator has configured the camera and the Internet Gateway Router used by the camera Dial up connections are NOT supported The following has details of viewing live video via Internet 1 Start the Web browser 2 In the Address box please enter http address port The address is public IP ad...

Page 20: ...all this ActiveX component in order to view the video stream in Internet Explorer Click on Install to install 6 After installing you will be able to view the live video stream in its own window as below Note 1 Video will start playing automatically There may be a delay of a few seconds while the video stream is buffered 2 There are a number of options available on this screen accessed by select li...

Page 21: ...tion you want to magnify Click the icon again to disable the zoom feature Snapshot Click this to take a single JPEG snapshot image of the current video Flip Click this to have the image swapped top to bottom Mirror Click this to have the image swapped left to right Audio On This icon is displayed if audio is On Click on the icon to turn audio Off Audio Upload This icon is displayed when the Speake...

Page 22: ...etwork Note The recommended method to ensure this to use the supplied Windows based Setup Wizard is described in Chapter 2 2 Software Quick Configuration 1 After connecting to the camera click on Administration of the home page 2 You will then be prompted for a username and password Note 1 If using the default values enter admin for the name and admin for the password 2 The Administrator s ID Pass...

Page 23: ...tration page will be displayed as below 4 The administration menu contains following options Setup System Network DDNS Video Audio Video Audio Video Access User Database Event Motion Detection E Mail FTP HTTP Event Trigger Administration Maintenance Status Log ...

Page 24: ... location Date Time Date Format Select the desired date format it will also be used to display the date and time as an overlay on the video image The date formats are list as follows 1 YYYY MM DD Year Month Day e g 2007 10 10 2 MM DD YYYY Month Day Year e g 10 10 2007 3 DD MM YYYY Day Month Year e g 10 10 2007 Current Date Time This displays the current date and time on the camera Change Button Th...

Page 25: ... Daylight Saving finishes Network Time Protocol Enable or disable the Time Server feature as required If Enabled the camera will contact a Network Time Server at regular intervals and update its internal timer NTP Server Address Enter the address for the desired NTP server Update The Schedule determines how often the camera contacts the NTP Server You can select the desired options LED Operation E...

Page 26: ... following data to the camera IP Address Enter an unused IP address from the range used on your LAN Subnet Mask Use the same value as PCs on your LAN Default Gateway Use the same value as PCs on your LAN DNS Server Address Obtain DNS server address automatically If selected the camera will use the DNS address or addresses provided by the DHPC server This option is only available if the IP address ...

Page 27: ...users limit the size of the file Enter the desired value between 400 and 1400 Multicast RTP RTSP Video Address Enter the address of video Video Port Enter the desired value 1024 65534 in the field provided The number you entered must be even values Audio Address Enter the address of the audio Audio Port Enter the desired value 1024 65534 in the field provided The number you entered must be even va...

Page 28: ...en a new window and connect to the Web site for the selected DDNS service provider Domain Host Name Enter the Domain Name Host Name allocated to you by the DDNS server provider Account E Mail Enter the login name for the DDNS account Password Key Enter the password for the DDNS account Check WAN IP Address Set the schedule for checking if the Internet IP address has changed If the IP address has c...

Page 29: ...resolution format Video Quality Control Constant Bit Rate Select the desired bit rate Fixed Quality Select the desired option Max Frame Rate Select the desired Maximum bandwidth for the video stream Note that you can specify EITHER the Bandwidth OR the Frame Rate not both If the Bandwidth is defined the frame rate will be adjusted as necessary to achieve the specified frame rate The default value ...

Page 30: ...ugh mobile phone connection Video Adjustments Power Line Frequency Select the power line frequency 50Hz or 60Hz used in your region to improve the picture quality under florescent lighting White Balance Select the desired option to match the current environment and lighting Brightness If necessary you can adjust the brightness to obtain a better image For example if the camera is facing a bright l...

Page 31: ...e and password when they connect to the camera to view video Video Access Enable Scheduled Video Access If enabled Camera is available during the scheduled periods and unavailable at other times If this option is selected you need to define a schedule If no schedule is defined this option is always disabled If disabled The option will remain disabled until you enable it Note that regardless of whi...

Page 32: ...hoose the desired option for the period Start Time Enter the start time using a 24 hr clock End Time Enter the end time using a 24 hr clock Add Button Click this button to add a new period Clear Button Click this button to clear the adjust values ...

Page 33: ...e these buttons to manage the user database Delete All Button Use these buttons to manage the user database User Properties User Name Enter the name for the user here Spaces punctuation and special characters must NOT be used in the name The name is case insensitive case is ignored so you can not have 2 names which differ only by case User Password Enter the password for the user Confirm Password ...

Page 34: ... allows you to set detection areas Set Detection Areas Area Screen You can set the full screen or areas of the video image to be examined Note that Motion detection can be triggered by rapid changes in lighting condition as well as by moving objects For this reason it should only be used indoors Threshold Adjust the threshold of detection for each area ...

Page 35: ...ogin name for the SMTP Server SMTP Password Enter your password for the SMTP Server POP server name Enter the name for the POP Server Show From as Enter the E Mail address to be shown in the From field when the E Mail is received Secondary SMTP Server Secondary SMTP Check the box to upload to the Secondary SMTP if the camera can not connect to the primary SMTP SMTP Server Address Enter the address...

Page 36: ... E Mail address to be shown in the From field when the E Mail is received E Mail Setup E mail Address Enter at least one E Mail address the 2nd and 3rd addresses are optional The alert will be sent to the addresses specified here Subject Enter the desired text to be shown as the Subject for the E Mail when it is received Subject up to 20 characters ...

Page 37: ...e Passive Mode Check the box to enable the Passive mode feature of the FTP File Path Name Enter the file path name of the FTP Secondary FTP Secondary FTP Check the box to upload to the Secondary FTP if the camera can not connect to the primary FTP FTP Server Enter the address of the FTP Server Port Enter the Port of the FTP Server to be connected Login name Enter your login name for the FTP Server...

Page 38: ...ver name in the provided field if the camera needs to pass through a Proxy Server to do the HTTP notification Port Number Enter the port number for the proxy server Method Select the desired method of form data encoding Get It should be used if and only if the form processing is independent which typically means a pure query form Generally it is advisable to do so Post If there are problems relate...

Page 39: ...24 hr clock End Time Choose the desired end time using a 24 hr clock Trigger Event Motion Detection If enabled movement in a motion detection window can be used to trigger events Interval Select the desired option for the events interval 0 No Delay Actions E Mail If checked an E Mail with Attachment will be delivered to the SMTP server SMTP Server must be configured on the E Mail page FTP If check...

Page 40: ...re Select the desired length The snapshot of the JPEG image depends on this setting and also the file size and degree of compression Video type Video Format Select the desired type for the video file Pre Post Capture Select the desired length The size of the file depends on this setting and also the Video size and degree of compression ...

Page 41: ...mware Upgrade Upgrade File Click on Browse button and browse to the location on your PC where you stored the firmware file Select this file Start Button Click on this button to start the firmware When the upgrade is finished the camera will restart and this management connection will be unavailable during the restart Clear File Name Button This does NOT stop the Upgrade process if it has started I...

Page 42: ...Do this after loading the upgrade file Clear File Name This does NOT stop the Restore process if it has started It only clears the input for the Restore Configuration File field Restore Factory Defaults Click on Defaults button to reloads all default settings on the camera Restart Camera Click on Restart button to restarts the camera ...

Page 43: ... The version of the current firmware installed Network MAC Address The current IP address of the camera IP Address The IP Address of the camera Network Mask The network mask associated with the IP address above Gateway The IP Address of the remote Gateway associated with the IP Address above MPEG 4 MJPEG Resolution The image size of the video stream Video Quality This displays the image quality of...

Page 44: ...ICA 151 User Guide 44 Buttons Help Click on this button will call the help window Refresh Update the log and any other data on screen ...

Page 45: ... administration menu Log System Log This is a log of system activity Refresh Button Click on this to update the data shown on screen Clear Log Click this button to restart the log Enable Syslog Service Check the box to enable the System Log Server feature Syslog Server Address Enter the address of the Syslog Server ...

Page 46: ...is played as it arrives To snapshot a JPEG image from the camera with specified resolution and quality http ip img snapshot cgi size value quality value Size 1 160 120 2 320 240 3 640 480 Quality 5 Very low 4 Low 3 Normal 2 High 1 Very high To stream M JPEG video from the camera M JPEG mode only http ip img mjpeg htm To stream video through the RTP RTSP protocol from camera MPEG 4 mode only rtsp i...

Page 47: ... user must setup his IE browser as follows From your IE browser Î Tools Î Internet Options Î Security Î Custom Level please setup your Settings as follow Enable the 3 options as below Download the signed ActiveX controls Download the unsigned ActiveX controls Initialize and script the ActiveX controls not masked as safe to Prompt By now you have finished your entire PC configuration ...

Page 48: ... the ICA 151 may be varying Quality 640 x 480 VGA 320 x 240 QVGA 160 x 120 QQVGA Very Good 4000 Kbps 30fps 1000 Kbps 30fps 800 Kbps 30fps Good 3200 Kbps 30fps 800 Kbps 30fps 400 Kbps 30fps Normal 1200 Kbps 30fps 300 Kbps 30fps 200 Kbps 30fps Low 480 Kbps 30fps 120 Kbps 30fps 100 Kbps 30fps Very Low 160 Kbps 30fps 40 Kbps 30fps 40 Kbps 30fps Note Audio streaming also takes bandwidth around 5 kbps t...

Reviews: