Planet Audio PI9764B User Manual Download Page 7

     When the AF switching mode is selected, the radio checks the signal strength of the
      AF all the time. The interval of checking time of each AFs depends on the signal 
     strength of the current station, from a few minute for the strong station to a few 
     seconds for the weak station. Every time that a new AF is stronger than the current 
     station, it switches over to that frequency for very short time, and the 
     NEW FREQUENCY is displayed for 1-2 second. 
     Because the mute time of the AF switching or the checking time is very short, it is 
     almost inaudible in case of normal program. (When AF flash on LCD, it will search
     for the stronger RDS station. If AF and TP flash on LCD,  it can only search for the
      traffic announcement station).     

     In FM mode, when AF is on, SEEK, (SCAN), AUTO-MEMORY function can only
     receive and save the RDS program.      

10.  TA [TRAFFIC ANNOUNCEMENT] BUTTON
     Press the TA button shortly to turn on TA search mode.

     When traffic announcement is transmitted:

 1) If the unit is in Disc Play mode, it will switch to radio mode temporarily.
 2) Temporarily switch over to an EON linked station when EON detects a traffic 
      announcement on that other program, and TA, TP will be displayed on LCD

 *   TA interruption function:
     The current traffic announcement is cancelled by pressing TA button shortly. 
 *   When TA is on, SEEK, (SCAN), AUTO MEMORY function can be received or saved
     only when traffic program identification code has been received.     

4.   Media Device Operation

1.  Enter Media mode
     When inserting the plug into your device , it will
     automatically switch modes and display the  menu on
     touch screen as right.

     You can also use MODE button or Mode Menu to enter  
     the model.

2.  Play audio files

               : Tap it can pause playback:
               : Tap it can stop playback.
                   : Tap one of  them can switch on between the speed
                     levels of fast backward or forward.
                   : Tap one of them can select next or previous track.
               : Tap it to turn volume up and down.
               : Tap it to change the audio and video playback. 
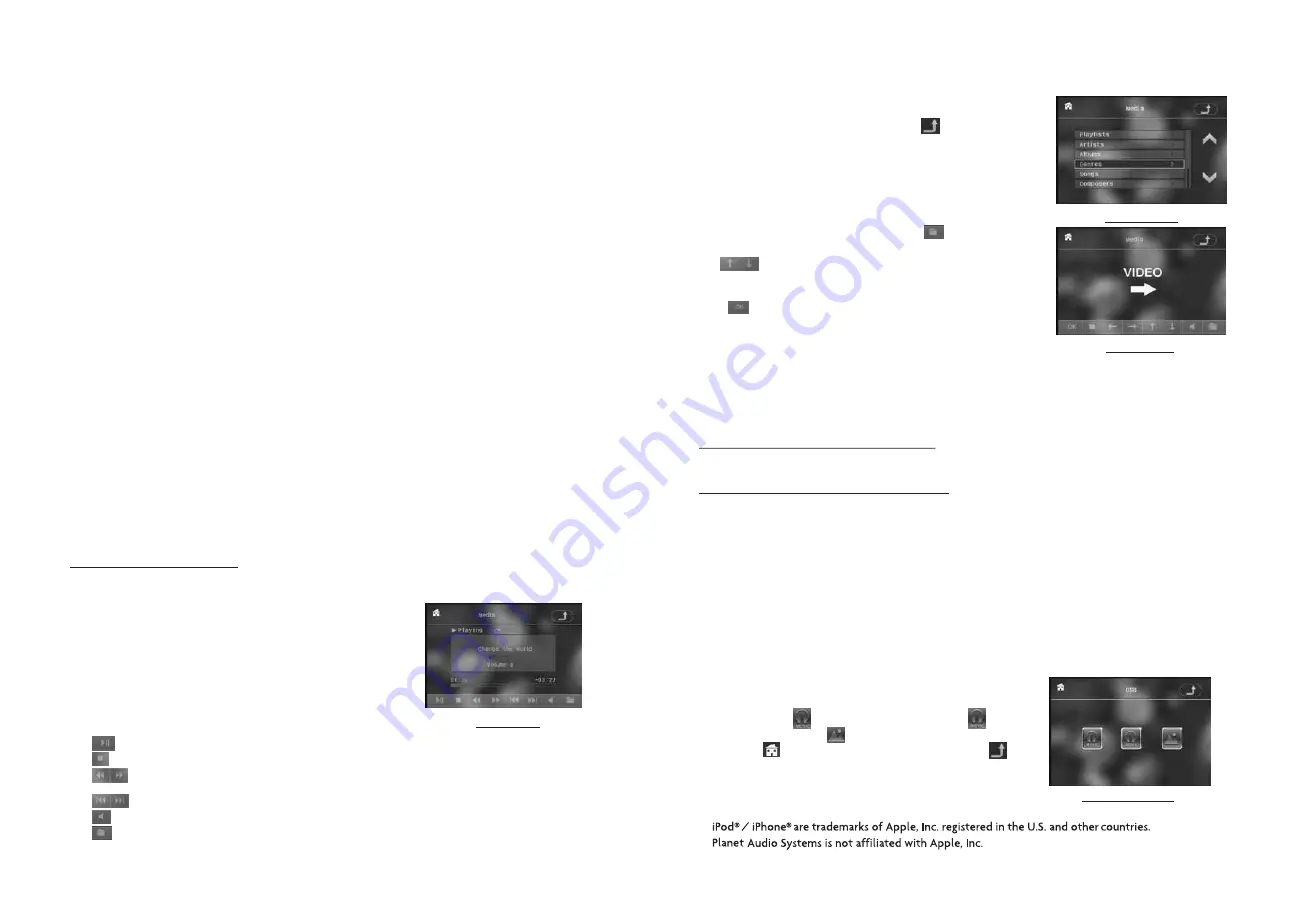
Media  menu

USB/CARD INTERFACE

3.  Display control icons 
      When displaying playback, tap       icon to turn
      to control icons as right.
      Tapping the direction icon to select the play 
      function such as : PLAYLISTS, ARTISTS,
      ALBUMS, GENRES, SONGS,
      COMPOSERS, REPEAT and so on.
4.  Play video files
     During audio playback, tap this        icon to turn to
     video playback.
                 : Tap one of them to select the track or
                   chapter in your library, after that, tap the
                   OK to confirm and play your selection.
              : After selecting, tap it to play your selection.

   
    Note: This device only support video files from 
    certain device due to the software limitation on your  device.
    This unit may support certain video files from iPod, but can not 
    support videos from iPhone.

5.  Disc, USB and CARD Operation

5.1  Load/unload disc, USB or CARD 

     To play files in a disc or card, press the EJECT button to slide down the monitor . 
     Then insert the disc or card into the disc slot or SD/MMC Card slot. 

     To unload the disc or card, press the STOP button twice to stop playback, then 
     press the EJECT button to slide down the monitor and eject disc in the disc slot
     and then remove the disc; or push the card firstly and pull it out of the card slot.

     To play files in an USB, insert the USB into the USB jack connecting to the Rear
     cabinet. 

     To unload the USB, press the STOP button twice and then remove the USB .

     In USB or CARD mode, select your desired as right.
  
     Remark: the      icon is for audio files; the       icon is
     for video files; the      icon is for image files.
     Tap the      icon to turn to main menu, tap the       icon
     to turn to previous setting.


VIDEO mode

Control icons

*

Summary of Contents for PI9764B

Page 1: ......

Page 2: ...The chapter contain a unit at least Track It is the biggest component of VCD Generally every song of the disc is a track 1 2 Precautions Safety 1 Power Source The unit should be connected to power su...

Page 3: ...in a car parked in direct sunlight where there can be a considerable rise in temperature 4 Put the disc inside disc case to keep temperature after finishing playback Disc Cleaning 1 Before playing wip...

Page 4: ...brake Parking brake switch inside the car Parking brake wire Green To metallic body or chassis of the car NOTE after connecting the Parking Line the video on the small monitor of the front panel will...

Page 5: ...into the chassis 3 To select an optimal angle of the monitor of the Car Audio System To select an up down optimal angle of the monitor of the Car Audio System press the DOWN UP button on the monitor o...

Page 6: ...station for 5 seconds in FM or AM band from M1 After finishing a circle of scanning it will resume broadcasting on the M1 NOTE In FM band FM1 FM2 FM3 is checked one at a time In AM band AM1 AM2 is che...

Page 7: ...Play audio files Tap it can pause playback Tap it can stop playback Tap one of them can switch on between the speed levels of fast backward or forward Tap one of them can select next or previous trac...

Page 8: ...e the playback press the PLAY button to resume normal playback 5 3 Stop Playback When playing DVD VCD MP3 WMA CD press the STOP button once to pause the playback then press the PLAY button to resume t...

Page 9: ...e and then press the OK or PLAY button to open the root menu of the selected title 3 Press the direction buttons to select your desired chapter finally press the OK or PLAY button to play the selected...

Page 10: ...in Zoom Mode In DVD VCD mode during playback press the ZOOM button continuously to enlarge a certain area of the images on the screen with these multiples ZOOMx2 ZOOMx3 ZOOMx4 ZOOMx1 2 ZOOMx1 3 ZOOMx...

Page 11: ...ined above will be scrolling on the LCD display otherwise they will not 5 23 The DVD System Menu Setup Operation 1 Press the SETUP button on the remote control to access the DVD System Menu on the mon...

Page 12: ...en connecting a TV set with 4 3 screen When playing the pictures with 16 9 size the left and right parts of the video will be cut out and display in full screen 4 3 LB Choose the item when connecting...

Page 13: ...3 There are 4 modes in all as follows STEREO MONO L MONO R MIX MONO Parental Control Q Why after inserting DVD disc in the disc slot a dialogue window appears that asks to input a 4 digits password A...

Page 14: ...0 and then enter it Then it will tell you pair OK 3 For some mobile phones they can automatically connect with the BT device of the car audio system after pairing is ok for some mobile phones they nee...

Page 15: ...disc compartment REMOTE CONTROL IS INSENSITIVE OR DOES NOT WORK Check the batteries of remote control and make sure that they are powerful and have good conductivity Direct the remote control to the...

Page 16: ...Video Type 16 9 and 4 3 Video Output level Composite 1 0 0 2Vp p Load impedance 75 ohms Horizontal Resolution 500 Audio Specification Audio Output Analog audio 2 0 0 1 0Vrms Frequency Response 20Hz 20...

Reviews: