Planet Audio PI9764B User Manual Download Page 3

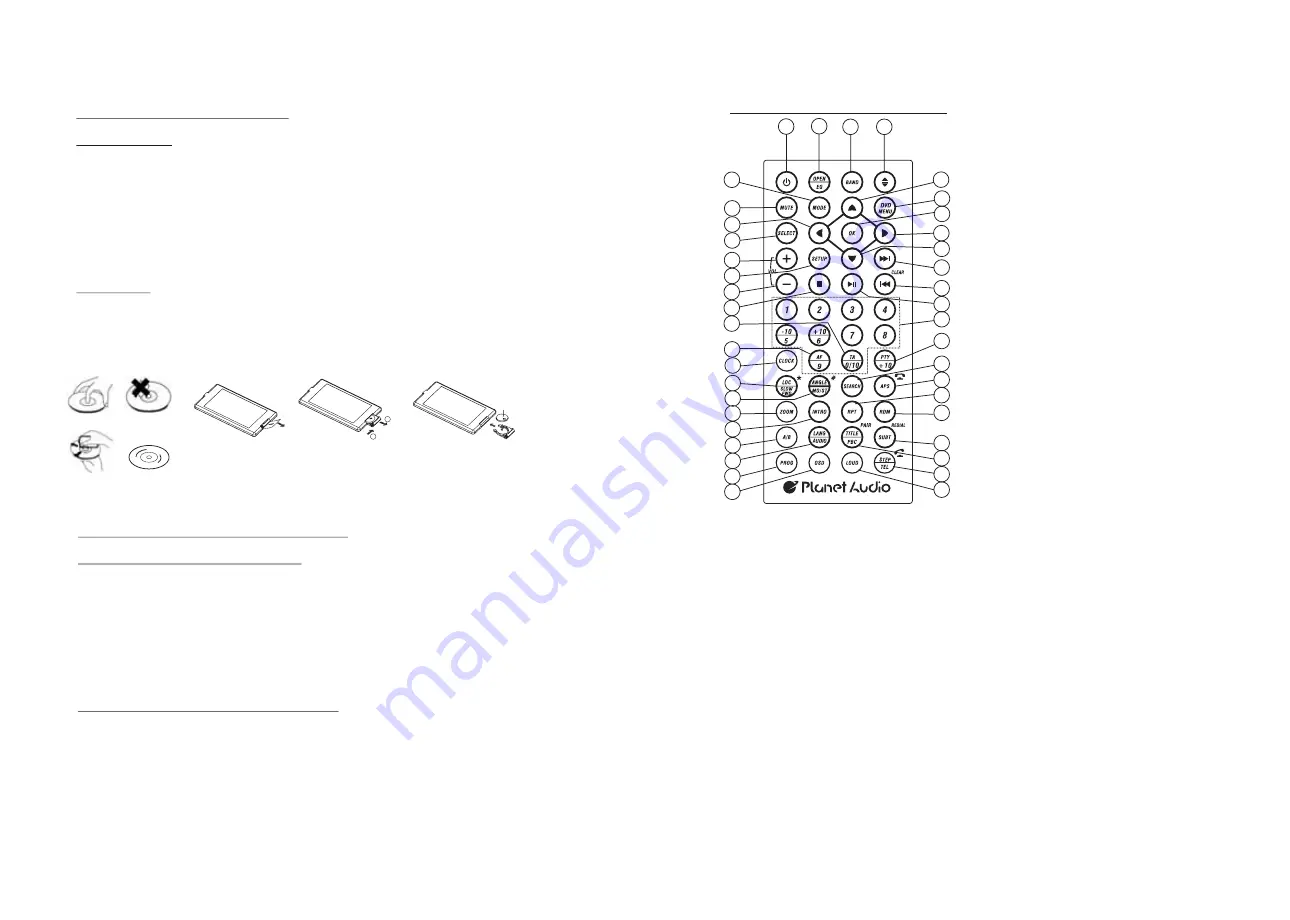
1.5    Remote Control Description

16. SEARCH BUTTON

17. RDM BUTTON

18. RPT BUTTON

19. SUBTITLE/REDIAL BUTTON

20. TITLE/PBC/PAIR BUTTON

21. VIEW-ANGLE/ST/# BUTTON

22. ZOOM BUTTON

23. AUDIO BUTTON

24. CLK BUTTON

25. A-B BUTTON

26. INT BUTTON

27. EQ/OPEN BUTTON

28. LOC/SLOW-FWD/* BUTTON

29. MUTE BUTTON

30. STOP BUTTON

31. VOLUME- BUTTON

32. < BUTTON

33. OK BUTTON

34. BUTTON

35. BAND BUTTON

36. PROG BUTTON

37. OSD BUTTON

38. LOUD BUTTON

39. TEL BUTTON

40. TA BUTTON

41. AF BUTTON

1. ANG BUTTON

2. DVD MENU BUTTON

3. POWER BUTTON

4. ^ BUTTON

5. >>| BUTTON

6. > BUTTON

7.  |<< BUTTON

8. v BUTTON

9. SEL BUTTON

10. PLAY/PAUSE BUTTON

11. NUMBER(0~10,+10 
       -10) BUTTONS
12. 10+/PTY BUTTON

13.  SETUP BUTTON

14. MODE BUTTON

15. APS/Hang Up BUTTON 

1

2

3

4

5

6

7

9

8

10

11

12

13

14

15

16

17

18

19

20

21
22

23

24

25

26

27

28

29

30

31

32

33

34

35

40

41

39

36

37

38

1.3  Maintenance and Cleaning of Discs

Disc Maintenance

1. To keep the disc clean, handle the disc by its edge, do not touch the disc 
    surface of the play side.
2. Do not stick paper or tape on the disc. If there is anything on the disc surface, 
    wipe it up with a soft cloth before using.
3. Do not expose the disc to direct sunlight, or nearby heat sources such as 
    caliduct, or leave it in a car parked in direct sunlight where there can be a
    considerable rise  in temperature. 
4. Put the disc inside disc case to keep temperature after finishing playback.

Disc Cleaning

1. Before playing, wipe the disc with a clean cloth.  wipe the disc outwards from
    the disc center.
2. Do not use petrol, thinner. Commercial cleaner or anti-static spray to wipe
    disc. 
  

1.4  Battery Information of  the Remote Control

Replace Battery in the Remote Control:
1.Before using the remote control for the first time, pull the insulating
    sheet out of the remote control as the direction indicated by the  
    arrow.(see fig.1)
2.Press the movable block hold as the direction indicated by the A arrow
   (See fig.2), then pull the battery holder out of the remote control as 
    the direction indicated by the B arrow(see fig.2).
3.Replace the old battery by a new battery with (+) polarity side upward.
   (See fig.3).
4.Insert the battery holder to the original position in remote control.
   (See fig.3).
Note about the Battery of the Remote Control:
1.Improper use of battery may cause overheating or explosion.
2.Battery leakage may cause damage to the remote control(Battery 
   Life: 6 months with normal use in normal room temperature).
3.Do not short the battery. 
4.Do not throw the battery into the fire.
5.To avoid the risk of accident, keep the battery out of reach of children.

Fig.1

Fig.2

Fig.3

A

B

+ side up

correct

correct

wrong

Summary of Contents for PI9764B

Page 1: ......

Page 2: ...The chapter contain a unit at least Track It is the biggest component of VCD Generally every song of the disc is a track 1 2 Precautions Safety 1 Power Source The unit should be connected to power su...

Page 3: ...in a car parked in direct sunlight where there can be a considerable rise in temperature 4 Put the disc inside disc case to keep temperature after finishing playback Disc Cleaning 1 Before playing wip...

Page 4: ...brake Parking brake switch inside the car Parking brake wire Green To metallic body or chassis of the car NOTE after connecting the Parking Line the video on the small monitor of the front panel will...

Page 5: ...into the chassis 3 To select an optimal angle of the monitor of the Car Audio System To select an up down optimal angle of the monitor of the Car Audio System press the DOWN UP button on the monitor o...

Page 6: ...station for 5 seconds in FM or AM band from M1 After finishing a circle of scanning it will resume broadcasting on the M1 NOTE In FM band FM1 FM2 FM3 is checked one at a time In AM band AM1 AM2 is che...

Page 7: ...Play audio files Tap it can pause playback Tap it can stop playback Tap one of them can switch on between the speed levels of fast backward or forward Tap one of them can select next or previous trac...

Page 8: ...e the playback press the PLAY button to resume normal playback 5 3 Stop Playback When playing DVD VCD MP3 WMA CD press the STOP button once to pause the playback then press the PLAY button to resume t...

Page 9: ...e and then press the OK or PLAY button to open the root menu of the selected title 3 Press the direction buttons to select your desired chapter finally press the OK or PLAY button to play the selected...

Page 10: ...in Zoom Mode In DVD VCD mode during playback press the ZOOM button continuously to enlarge a certain area of the images on the screen with these multiples ZOOMx2 ZOOMx3 ZOOMx4 ZOOMx1 2 ZOOMx1 3 ZOOMx...

Page 11: ...ined above will be scrolling on the LCD display otherwise they will not 5 23 The DVD System Menu Setup Operation 1 Press the SETUP button on the remote control to access the DVD System Menu on the mon...

Page 12: ...en connecting a TV set with 4 3 screen When playing the pictures with 16 9 size the left and right parts of the video will be cut out and display in full screen 4 3 LB Choose the item when connecting...

Page 13: ...3 There are 4 modes in all as follows STEREO MONO L MONO R MIX MONO Parental Control Q Why after inserting DVD disc in the disc slot a dialogue window appears that asks to input a 4 digits password A...

Page 14: ...0 and then enter it Then it will tell you pair OK 3 For some mobile phones they can automatically connect with the BT device of the car audio system after pairing is ok for some mobile phones they nee...

Page 15: ...disc compartment REMOTE CONTROL IS INSENSITIVE OR DOES NOT WORK Check the batteries of remote control and make sure that they are powerful and have good conductivity Direct the remote control to the...

Page 16: ...Video Type 16 9 and 4 3 Video Output level Composite 1 0 0 2Vp p Load impedance 75 ohms Horizontal Resolution 500 Audio Specification Audio Output Analog audio 2 0 0 1 0Vrms Frequency Response 20Hz 20...

Reviews: