


Step 1:
Press the mode button in the unit to switch to DVD mode.
Please follow the below instructions to calibrate when there is no touch or
touch is not accurate.
Step 2:
Insert a DVD disc, after DVD is loaded, press the stop button “ ” as show in
picture (1). in the remote short, the unit will display as show in picture (2).
Picture ( 1 )
Picture ( 2 )
Step 3:
Press “ ” in the remote as show in picture (3), the unit will display as show in
picture (4).
Picture ( 3 )
Picture ( 4 )
Step 4:
Press “ ” button in the remote and then quickly press “ ” button as show in
picture (5) and you will enter the touch calibration interface as show in picture (6).
Picture ( 5 )
Picture ( 6 )
Step 5:
Use the touch pen to touch top left corner, top right corner, down right corner,
down left corner, when the cross cursor stop at each corner, touch the center of the
cursor. Then the panel will display OK and leave the calibration interface and the unit
regained touch as show in picture (7).
Picture ( 7 )
Touch screen Calibration
●
Violet/White-Reverse Gear Signal (+)
●
Light Green-Parking Brake (-)
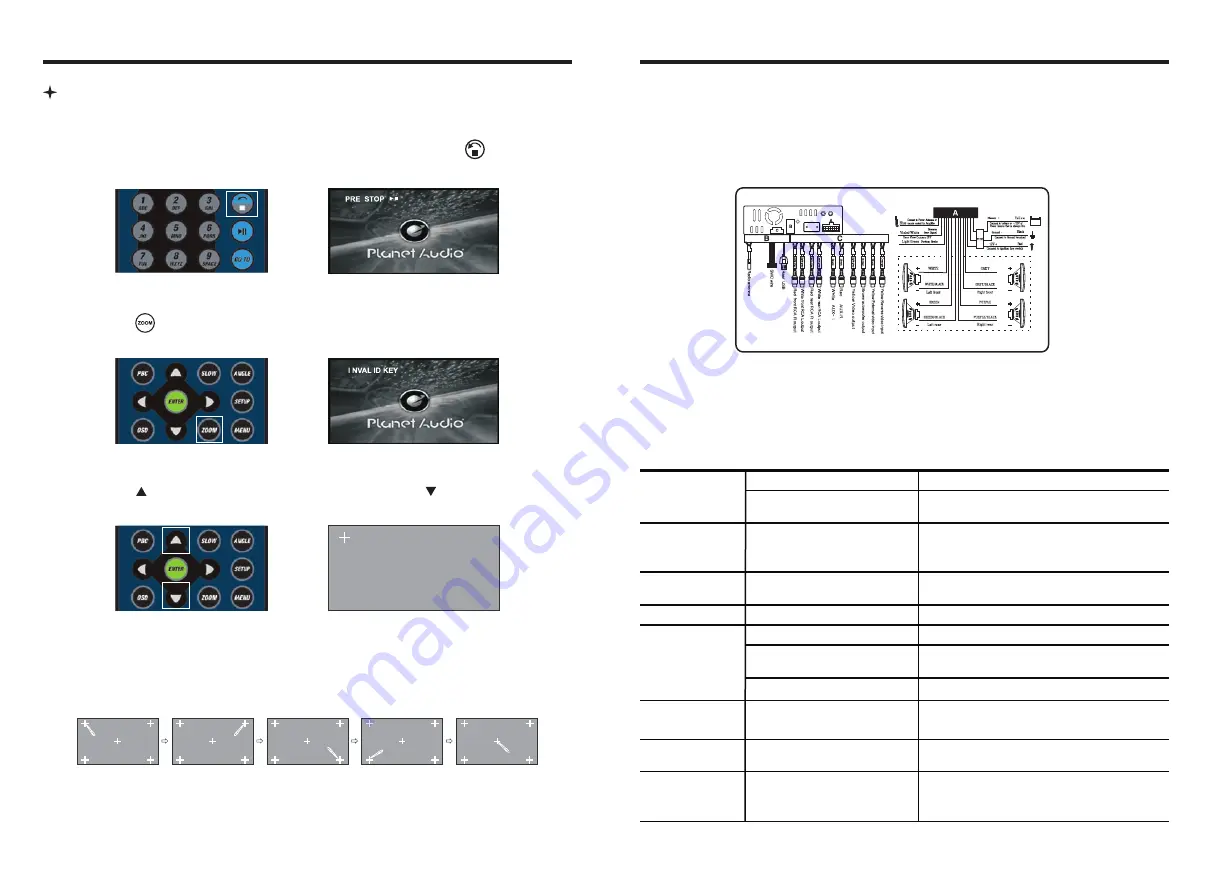
WIRING DIAGRAM
This player is equipped with ISO standard connector, please follow below instruction:
●
Yellow – 12 V Constant
●
Black – Ground wire
●
Blue - Power Antenna / Remote Amp Turn On
●
White/White black - Left front speaker (+/-)
●
Purple/Purple black - Right rear speaker (+/-)
●
Green/Green black - Left rear speaker (+/-)
●
Red - ACC ON (+12V)
●
Grey/Grey black - Right front speaker (+/-)
TROUBLE SHOOTING
PROBLEM
CAUSE
SOLUTION
After ignition switch
off, setting
information all lose
Reset information and save
Change battery or fuse
Cannot power on
Change fuse same as the old one
Some factors cause MPU
wrong operation
Press RES button on the panel by penpoint,
then, power on
Poor performance
of radio station
Cannot load disk
There is a disk inside
Remove disc before inserting another one
Weak signal
Move the car to another place, then research
Cannot play disc
Disc is scratched
Change new disc
Put wrong side of disc into
the unit
Insert in the disk with sign side up
Clean lens by lens clean disc
Lens is dirty
Cannot switch
language/subtitle
There is only one language/
subtitle in disc
If disc is not with multi-language/subtitle, it
cannot switch language/subtitle
No image
Other factors cause MPU
wrong operation
Press RES button on the panel by penpoint,
then, power on
Cannot watch
image during
driving
It’s not allowed to watch image
during driving
Park the car in a safe place, put the car stall
in “ P ” postion, pull up the hand brake,
parking brake wire must be grounded
Check fuse


