


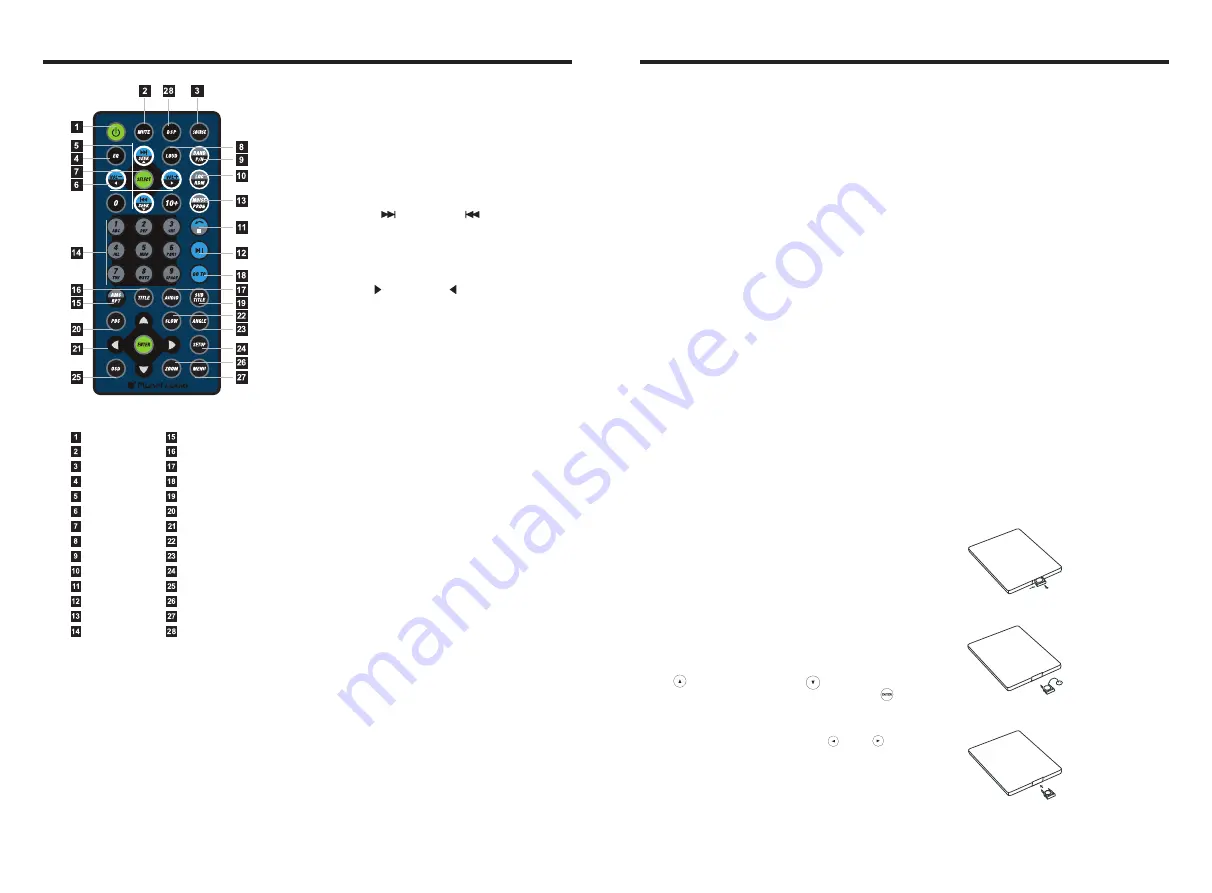
Remote
Control
Operation
1. POWER
Press once to switch on, press again to
switch off.
2. MUTE Button
Press once to turn off audio output,
press again to resume volume level.
Button
POWER ON/OFF
MUTE
SOURCE
EQ
SEEK+ / SEEK-
VOL+ / VOL-
SEL
LOUD
BAND / P / N
LOC / RDM
STOP
PLAY / PAUSE
ST / PROG
0-10+
DSP
AMS / RPT
TITLE
AUDIO
GO TO
SUBTITLE
PBC
UP / DOWN / L / R ENTER
SLOW
ANGLE
SETUP
OSD
ZOOM
MENU
3. SOURCE Button
Press this button to change mode.
4. EQ Button
Press this button to choose POP
、
ROCK
、
CLASSIC
、
EQ off.
5. SEEK+ ( ) / SEEK- ( ) Button
In normal playback MP3
、
USB
、
SD songs,
Press this button to previous song or next
song.
6. VOL+ ( ) / VOL- ( )
Press this button to increase or decrease
volume level.
7. SEL Button
Press this button to choose sound feature.
8. LOUD Button
Press this button to startup LOUD function.
9. BAND-P/N Button
In radio mode, press this button to choose
band.
In VCD
、
DVD mode, press this button to
choose
、
or NTSC system.
10. LOC / RDM Button
In radio mode, press this button to switch
between local and direction.
In VCD
、
CD mode, press this key to
randomly play.
11. STOP Button
Press this button to stop playing.
12. PLAY / PAUSE Button
Press this button to switch between play
and pause.
In stop mode, press this button to play.
13. ST / PROG Button
In radio mode, press this button to choose
stereo or mono station.
In audio mode, it can help STOP button to
programmed play.
PAL
AUTO
23. ANGLE Button
In DVD mode, press this button to change
play angle.
24. SETUP Button
In audio mode, press this button to choose
different set items.
25. OSD Display
Press this button to display the title chapter
and the left time.
26. ZOOM Button
In DVD/VCD mode, press this button to
ZOOM in.
27. MENU Button
Press button to back to the main menu.
28. DSP
Press this button to show the time.
BATTERY CHANGE
When control distance of remote control
becomes shorter or no function, please
change battery. Please confirm polarity
before change.
14. 0-10+ Button
Press this button to choose desired song
section
、
preset stations.
Decimal numbers, for example the 19th
song, press 10+ and 9 button.
15. AMS / RPT Button
In radio mode, press this button to browse
stored stations.
In audio mode, press this button to play
repeatedly.
16. TITLE Button
In DVD mode, press this button to play
back to the top menu of disc.
17. AUDIO Button
In DVD mode, press this button to switch
language of dialogue.
In VCD mode, press this button to choose
left track
、
right track and stereo.
18. GO TO Button
In DVD mode, press this button, you can
define playing time.
19. SUBTITLE Button
In DVD mode, press this button to switch
language of subtitle.
20. PBC Button
In VCD mode, press this button to display
all song menus, work with number button
to choose songs.
21. UP
、
DOWN
、
LEFT
、
RIGHT
、
ENTER
Button
When playing MP3
、
USB
、
SD returns to
song menu, up
、
down selections can be
up / " " button or down / " " key to
select up and down, select and press " "
key to confirm.
The selected tracks can be played. Press
the left or right arrow keys to " " or " "
key, can be on the next page function
operation.
、
22. SLOW Button
In audio mode, press this button to slow
backward and slow forward.
One hand press stopper, then pull out
battery.
Put battery into controller.
Insert battery holder into controller.
INSTRUCTIONS


