


R1224 Regulator
Installation Instruction
24-30-01
12-1001
Page: 6-8
Rev. M
: 01 Dec. 2021
© 2021 - Hartzell Engine Technologies - All rights reserved
(8)
For R1224 Rev B and earlier: Insulate the end of the A (Sense) wire and stow it safely.
For R1224 Rev C and later: Remove jumper between #8 (SENSE) and #3 (ENABLE). Connect the
Orange (Sense) wire to R1224 #8 (SENSE)
(9)
Adjust voltage as necessary with engine running and alternator enabled.
6.8 Regulator Installation Guide-E
A. General
There is a round connector on these Beechcraft regulators. A round plug on a cable is plugged into the con-
nector on the regulator.
Use R1224B with the Plane-Power 12-1016 Installation Aid (Fig. 6-2. Purchase the 12-1016 connector from
Plane-Power).
(1) Remove old regulator.
(2)
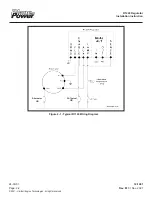
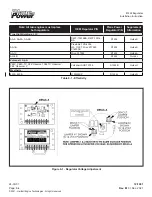
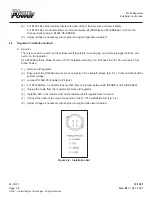
Ensure that the R1224B jumpers are set properly for the aircraft voltage (Fig. 6-1). Verify aircraft electical
system voltage.
(3) Jumper R1224B #3 (Enable) to #4 (Aux).
(4) For R1224B Rev. C and later: Ensure that there is a jumper between #8 (SENSE) and #3 (ENABLE).
(5) Unplug the cable from the regulator. Remove old regulator.
(6) Install R1224 in the location from which the Beechcraft regulator was removed.
(7) Connect the cable to the round connector on the 12-1016 Installation Aid (Fig. 6-2).
(8)
Adjust voltage as necessary with engine running and alternator enabled.
Figure 6-2 - Installation Aid