background image

First Setup   

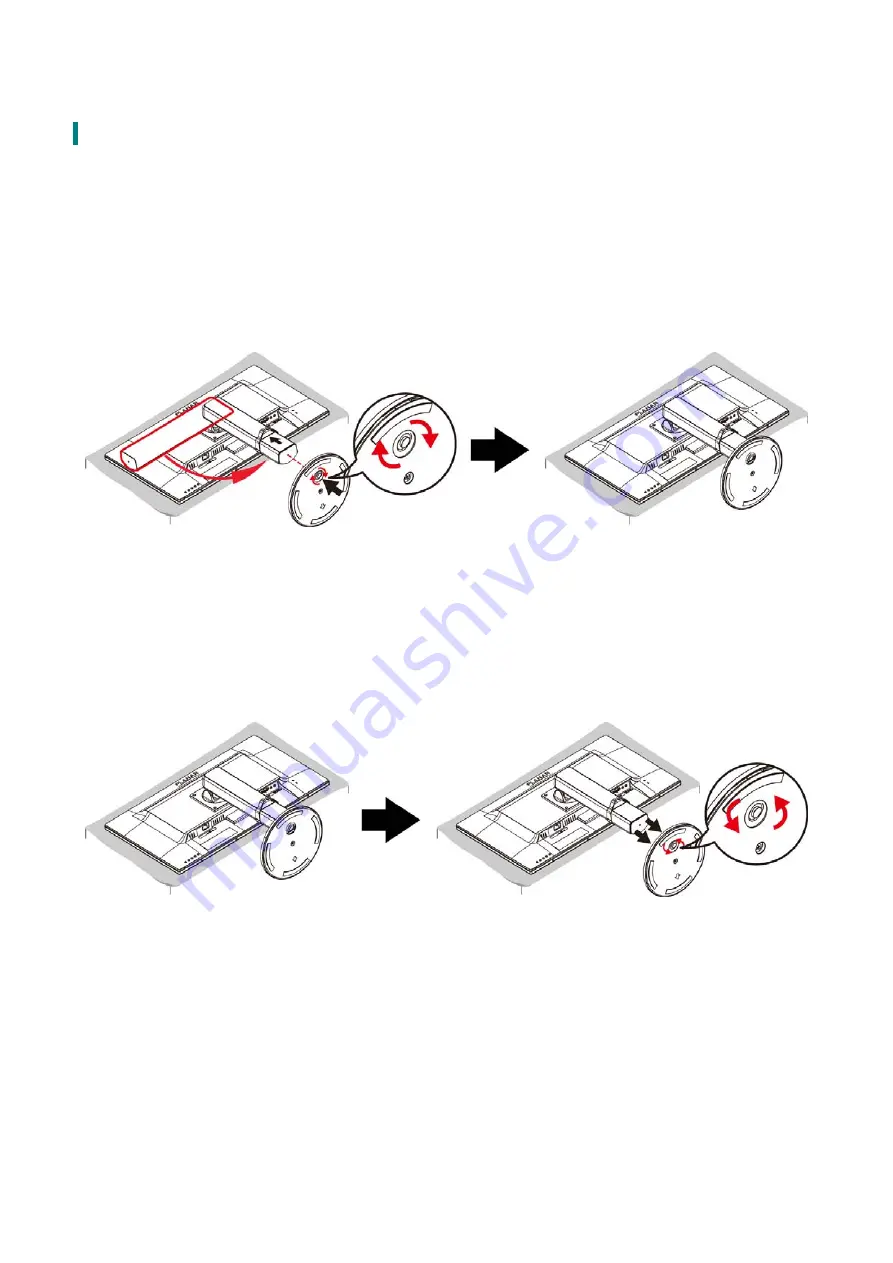
Install the stand base 

1. Lay the LED LCD Monitor flat on a table with the LED screen face down. To prevent the LED 

LCD Monitor from being scratched, put a piece of soft cloth on the table on which the screen 
will be set. 

2. Unpack the base, one hand hold the monitor, the other hand to pivot the stand. 
3. Install Cable holder on the stand. 
4. Turn the screw clockwise to attach the base to the monitor. 
5. Stand the LED LCD Monitor up. 


Disconnecting the stand base 

1. Lay the LED LCD Monitor flat on a table with the LED screen face down. To prevent the LED 

LCD Monitor from being scratched, put a piece of soft cloth on the table on which the screen 
will be set. 

2. Hold the monitor down with one hand. With the other hand, turn the screw counterclockwise 

to remove the screw that holding your monitor to the base. 

3. Remove the base from the stand. 


6

Summary of Contents for PXN2771MW

Page 1: ...www planar com USER S GUIDE LED LCD Monitor PXN2771MW...

Page 2: ...irst Setup 6 Front View of the Product 7 Rear View of the Product 8 Quick Installation 9 Basic Operation and Calibration Reset Instructions 10 Advanced Operation OSD Menu 12 About the Stand 15 Support...

Page 3: ...to which the receiver is connected Consult your local dealer or a qualified technician FCC Warning To assure a continued FCC compliance a user must use a grounded power supply cord and the provided sh...

Page 4: ...ption de signaux radios ou t l vis es une possibilit est de r initialiser le moniteur Les usagers sont aussi encourag s corriger les interf rences en appliquant une ou plusieurs des d marches suivante...

Page 5: ...Do not touch the LED display screen surface with sharp or hard objects Do not use abrasive cleaners waxes or solvents for your cleaning Do not operate the product under the following conditions o Ove...

Page 6: ...fs de la cire ou des solvants pour le nettoyage N utilisez pas le produit dans les conditions suivantes o Plus de 16 heures par jour o Environnement extr mement chaud froid ou humide o Endroits poussi...

Page 7: ...Package Overview LED LCD Monitor Base Power Cord VGA Cable Display Port Cable Audio Cable Cable Holder User s Guide 5...

Page 8: ...le holder on the stand 4 Turn the screw clockwise to attach the base to the monitor 5 Stand the LED LCD Monitor up Disconnecting the stand base 1 Lay the LED LCD Monitor flat on a table with the LED s...

Page 9: ...SD Turn On Off Scroll Down Adjust Decrease Brightness Auto Scroll UP Adjust Increase Blue Light Reducer Input select Confirm Selection Power On Off LED Indicator Hot keys Instructions please see Using...

Page 10: ...Rear View of the Product Power Input Cable Management DisplayPort Input DisplayPort 20 pin HDMI input HDMI 19 pin VGA Input D Sub 15 pin Audio Input Headphone Jack 8...

Page 11: ...io cable from audio output of computer to the audio input of the monitor 3 Connect the earphone to the earphone output terminal of the monitor Earphone not supplied 4 Connect power cord to a properly...

Page 12: ...MI DISPLAYPORT or AUTO mode Select the desired item when in OSD menu When not in OSD menu directly enters BRIGHTNESS Menu press 3 seconds enters AUTO IMAGE ADJUST Select the desired item when in OSD m...

Page 13: ...the POWER button are locked Press and hold the 1 button and the button for 3 seconds to lock all 5 buttons The LED LCD Monitor will show a Power Button Locked message for 3 seconds and the message wil...

Page 14: ...the screen CONTRAST BRIGHTNESS To manually adjust the Contrast Brightness ECO Mode and Over Drive of screen image CONTRAST To adjust the foreground white level of screen image increase contrast decre...

Page 15: ...on the contents displayed It contains 5 user selectable presets STANDARD is for general windows environment and monitor default setting GAME optimized for PC game environment CINEMA optimized for movi...

Page 16: ...e from FULL SCREEN or ASPECT RATIO SETUP MENU To set up Language Select OSD Position OSD Time Out and OSD Background LANGUAGE SELECT To allow users to choose from available languages OSD POSITION Pres...

Page 17: ...Stand The stand allows you to easily adjust the height swivel tilt and portrait mode of your monitor to provide maximum ergonomic comfort 1 Height adjustment 2 Swivel 160 160 130mm 3 Tilt 4 Pivot 5 23...

Page 18: ...SA 1680 x 1050 60Hz VESA 1920 x 1080 60Hz Note 1 HDMI and DisplayPort supports 480i 480p 576i 576p 720p 1080i and 1080p 2 Simultaneously press 1 and 2 keys on monitor panel to switch between similar P...

Page 19: ...ypical Power Management Standby Mode 0 5 Watt Off 0 5 Watt Displayable Resolution Full HD 1920 x 1080 max Vertical Frequency 60Hz max Pixel Dimension 0 3114 x 0 3114 mm Display Color 16 7M Tilt 5 23 A...

Page 20: ...e stand base Attaching The Optional Wall Mount Arm not supplied 4mm 0 7 pitch threaded holes x 4 100mm x 100mm Screw Mounting Options Follow these steps to finish installing the wall mounting arm 1 Pl...

Page 21: ...nal cables are installed Power on but no screen image Make sure the video cable supplied with the LED LCD Monitor is tightly secured to the video output port on back of the computer If not tightly sec...

Page 22: ...http www planar com support for operations manuals touchscreen drivers warranty information and access to Planar s Technical Library for online trouble shooting To speak with Planar Customer Support...

Page 23: ...rd company Planar is a registered trademark of Planar a Leyard company Other brands and names are the property of their respective owners Technical information in this document is subject to change wi...

Reviews: