


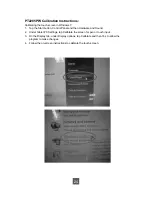


If you are using a PC running Windows
®
CE, follow the instructions
below (PT2275SW only):
1. Power on the computer.
2. Make sure that the RS232 or USB cable is connected to the computer.
3. Using Platform Builder, build an image
fi
le by following the step-by-step instructions
found in the zipped
fi
le on the CD-ROM.
If you are using a PC running Linux or Apple
®
Mac OS, follow the
instructions below:
1. Power on the computer.
2. Make sure that the RS232 or USB cable is connected to the computer.
3. Follow the step-by-step instructions found in the zipped
fi
le on the CD-ROM.
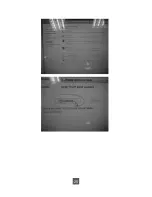
When changing the Touch Interface (RS-232 or USB), please follow
instructions below.
1. Uninstall the touch driver.
2. Re-start the computer.
3. Remove the original Touch Interface (RS-232 or USB).
4. Connect the computer to the Touch Interface (RS-232 or USB) that you would like to use.
5. Load the Touch Driver CD, then follow the step-by-step instructions as show on monitor.
PLEASE NOTE!
Don’t plug in both the RS-232 and USB cables!
Doing so may cause a driver confl ict, making your touch screen inoperable.
27
Summary of Contents for PT2275SW
Page 1: ...PT2275SW PT2285PW Touch Screen LCD Monitor USER S GUIDE www planartouch com ...
Page 12: ...9 Figure 9 1 PT2275SW PT2285PW ...
Page 15: ...12 Remove the Deskstand Remove 4 screws and then remove hinge ...
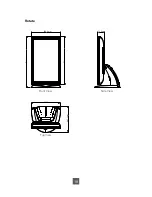
Page 22: ...Rotate 330 0 mm 73 2 mm 573 1 mm 538 5 mm 287 1 mm 327 7 mm Top View Front View Side View 19 ...
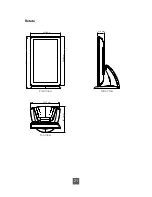
Page 24: ...Rotate 330 6 mm 71 9 mm 573 4 mm 539 2 mm 287 1 mm 327 7 mm Top View Front View Side View 21 ...
Page 28: ...25 ...