background image

2


Mise en garde- 

Pour prévenir les risques d’incendie ou d’électrocution, 


ne pas exposer le produit à l’humidité.


Mise en garde-  

Prière de ne pas ouvrir ou démonter le produit, car cela    


pourrait entraîner l’électrocution.


Mise en garde- 

Le cordon d’alimentation doit être branché à une prise pourvue  


d’une mise à la terre.


Mise en garde- 

La gaine du câble ne doit pas être retirée en conditions    


  normales 

d’utilisation.


Mise en garde- 

Risque de renversement. Le moniteur tactile peut se 


renverser et causer de graves blessures corporelles, voire la  


mort.  Pour prévenir les blessures, ce moniteur tactile doit être 


solidement fixé au mur selon les instructions d’installation.

Consignes de sécurité

Respectez tous les avertissements, les précautions et conseils d’entretien recommandés 

dans ce


manuel de l’utilisateur pour maximiser la durée de vie de votre appareil.

A faire :

• Éteindre le produit avant de le nettoyer.

• La surface de l'écran tactile peut être nettoyée avec un chiffon doux et propre imprégné d’un

  nettoyant doux du commerce pour vitres ou d'un mélange à 50/50 d'alcool isopropylique et

 d'eau.

• Utilisez un chiffon doux imprégné d'un détergeant doux pour nettoyer le carter de  


  l'affichage.

• Débranchez la fiche d’alimentation de la prise de courant secteur si le produit ne doit pas  

 être


utilisé pendant une période prolongée.

A ne pas faire :

• Ne touchez pas la surface de l’écran LED avec des objets coupants ou durs.

• N'utilisez pas des produits de nettoyage abrasifs, de la cire ou des solvants pour le 


nettoyage.

• N’utilisez pas le produit dans les conditions suivantes :


• Environnement extrêmement chaud, froid ou humide.


• Endroits poussiéreux ou sales.


• Près d’appareils générant un fort champ magnétique.


• Sous la lumière directe du soleil.


• Plus de 16 heures par jour

• Si de la fumée, un bruit anormal ou une odeur s'échappait de votre moniteur LCD LED,


débranchez immédiatement le cordon d'alimentation et appelez votre centre de réparation.

• Ne retirez jamais le couvercle arrière de votre moniteur LCD LED. L’unité d’affichage 


contient


des éléments où circule un voltage élevé et présentant un risque d'électrocution.

• N’essayez jamais de réparer vous-même votre moniteur LCD LED. Faites toujours appel à 


votre


centre de service ou à un technicien qualifié pour toute réparation.

• Pour des raisons de sécurité, si vous achetez séparément le kit de fixation VESA,


assurez-vous que celui-ci est certifié UL, et qu’il peut être remplacé uniquement par


un 


technicien qualifié.

Summary of Contents for PT1545P

Page 1: ...PT1545R PT1545P Touch Screen Monitor USER S GUIDE www planar com...

Page 2: ...ay be reproduced translated to another language or stored in a retrieval system or transmitted by any means electronic mechanical photocopying recording or otherwise without prior written permission W...

Page 3: ...interference to radio or television reception resetting may correct it Moreover users are encouraged to reduce interference by doing one or more of the following Reorient or relocate the receiving ant...

Page 4: ...eption de signaux radios ou t l vis es une possibilit est de r initialiser le moniteur Les usagers sont aussi encourag s corriger les interf rences en appliquant une ou plusieurs des d marches suivant...

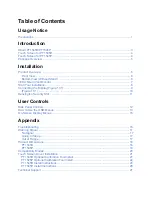
Page 5: ...0 1 9 Figure 10 1 10 Kensington Security Slot 11 User Controls Side Panel Controls 12 How to Use the OSD Menus 13 On Screen Display Menus 15 Appendix Troubleshooting 16 Warning Signal 17 No Signal 17...

Page 6: ...cloth moistened with mild detergent to clean the display housing Disconnect the power plug from AC outlet if the product is not going to be used for an extended period of time Don t Do not touch the...

Page 7: ...d un d tergeant doux pour nettoyer le carter de l affichage D branchez la fiche d alimentation de la prise de courant secteur si le produit ne doit pas tre utilis pendant une p riode prolong e A ne pa...

Page 8: ...signal inputs HDMI DP Active matrix TFT LCD technology 1024 x 768 XGA resolution 15 viewable display area 31 5 60 KHz horizontal scan 56 75 Hz high refresh rate 0 297mm x 0 297mm pixel pitch Auto adju...

Page 9: ...0 CE XP Embedded Linux kernel 2 x x 3 x x 4 x x 5 x x 32 bit 64 bit Apple Mac OS Android 2 3 X Upwards Touch Screen for PT1545P Number of Touch Points 10 Projected Capactive touch screen for finger in...

Page 10: ...Package Overview LCD Display Power Cord VGA Signal Cable HDMI Cable USB Cable A to B Audio in Cable Landing Strip User s Guide xxxxxxxxx xxxxxxxxx xxxxxxxxx USER S GUIDE www planar com Cable Cover Scr...

Page 11: ...Installation Product Overview Front View Bottom View Without Stand 6 VGA AC IN USB POWER SWITCH AUDIO HDMI DP...

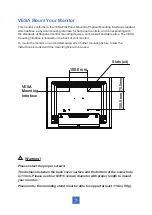
Page 12: ...ocated on the back of your monitor To mount the monitor on an UL listed swing arm or other mounting fixture follow the instructions included with the mounting fixture to be used VESA Mounting Interfac...

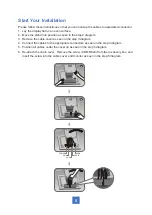
Page 13: ...ep 2 diagram 3 Remove the cable cover as seen in the step 3 diagram 4 Connect the cables to the appropriate connectors as seen in the step 4 diagram 5 Position all cables under the cover lip as seen i...

Page 14: ...io input port of your display to the audio out port of your computer 10 1 5 Connect the USB cable from the USB port of your display to the USB port 10 1 of your computer 6 Configure the touch screen R...

Page 15: ...Figure 10 1 10...

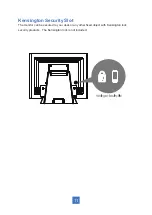
Page 16: ...Kensington Security Slot The monitor can be secured to your desk or any other fixed object with Kensington lock security products The Kensington lock is not included 11...

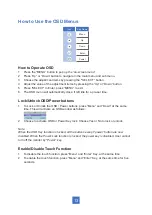
Page 17: ...n Enter OSD Key Menu off status Menu on status Menu appear Exit Returns to previous menu or exits OSD Brightness Main item select up Adjust up Mute Main item select down Adjust down Source Select or E...

Page 18: ...re set time Lock Unlock OSD Power buttons 1 To Lock or Unlock the OSD Power buttons press Menu and Down at the same time This will activate an OSD window as follows 2 Choose to activate OSD or Power K...

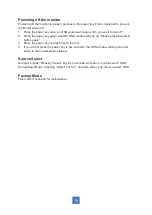
Page 19: ...SD window will pop up Please press the power button again 3 Press the power key one last time to turn off 4 If you do not press the power key in five seconds the OSD window will be gone and return to...

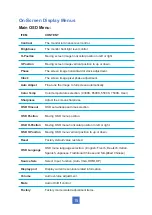
Page 20: ...ection 9300K 6500K 5500K 7500K User Sharpness Adjust the screen sharpness OSD Timeout OSD auto disappear time selection OSD Positon Moving OSD menu position OSD H Positon Moving OSD menu horizontal po...

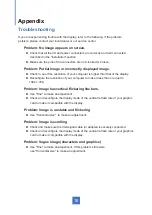
Page 21: ...resolution of your computer to make it less than or equal to 1024 x 768 Problem Image has vertical flickering line bars Use Fine to make an adjustment Check and reconfigure the display mode of the ver...

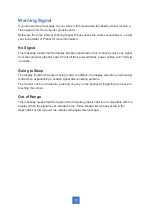
Page 22: ...graphics card Check all the power switches power cables and VGA sig nal cable Going to Sleep The display is under the power saving mode In addition the display will enter power saving mode when experi...

Page 23: ...Product Dimensions PT1545R 18 202 0 mm 222 5 mm 350 8 mm 306 5 mm 275 9 mm 196 1 mm 67 0 mm Side View Top View Front View...

Page 24: ...PT1545P Side View Top View Front View 350 8 mm 306 5 mm 275 9 mm 196 1 mm 62 5 mm 222 5 mm 202 0 mm 19...

Page 25: ...ESA VGA 640 x 480 37 86 72 VESA VGA 640 x 480 37 50 75 VESA SVGA 800 x 600 35 16 56 VESA SVGA 800 x 600 37 88 60 VESA SVGA 800 x 600 48 08 72 VESA SVGA 800 x 600 46 88 75 VESA XGA 1024 x 768 48 36 60...

Page 26: ...8 to process the touch program while turning power on off or plugging unplugging USB cable PT1545R Optional Calibration Tool Install If you would like to use the Optional Calibration Tool follow the...

Page 27: ...button Control Panel and then Hardware and Sound 2 Under Tablet PC Settings tap Calibrate the screen for pen or touch input 3 On the Display tab under Display options tap Calibrate and then Yes to al...

Page 28: ...23...
Page 29: ...e that your EWF is disabled If your EWF is enabled please disable the EWF by using the EWF Manager command 4 Once the EWF is disabled click on the XP driver at www planar com support and follow the st...

Page 30: ...below 1 Uninstall the touch driver 2 Re start the computer 3 Remove the original Touch Interface 4 Connect the computer to the Touch Interface that you would like to use 5 Install the Touch driver the...

Page 31: ...ur EWF is disabled If your EWF is enabled please disable the EWF by using the EWF Manager command 4 Once the EWF is disabled click on the XP driver at www planar com support and follow the step by ste...

Page 32: ...en drivers warranty information and access to Planar s Technical Library for online troubleshooting To speak with Planar Customer Support please have you model and serial number available and dial Pla...

Page 33: ...USA Tel 1 866 PLANAR1 866 752 6271 or 1 503 748 5799 outside the United States Hours 24 hours a day 7 days a week 06 2021 Planar Systems Inc Planar is a registered trademark of Planar Systems Inc Othe...

Reviews: