8
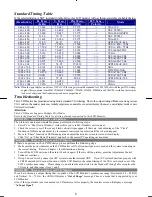
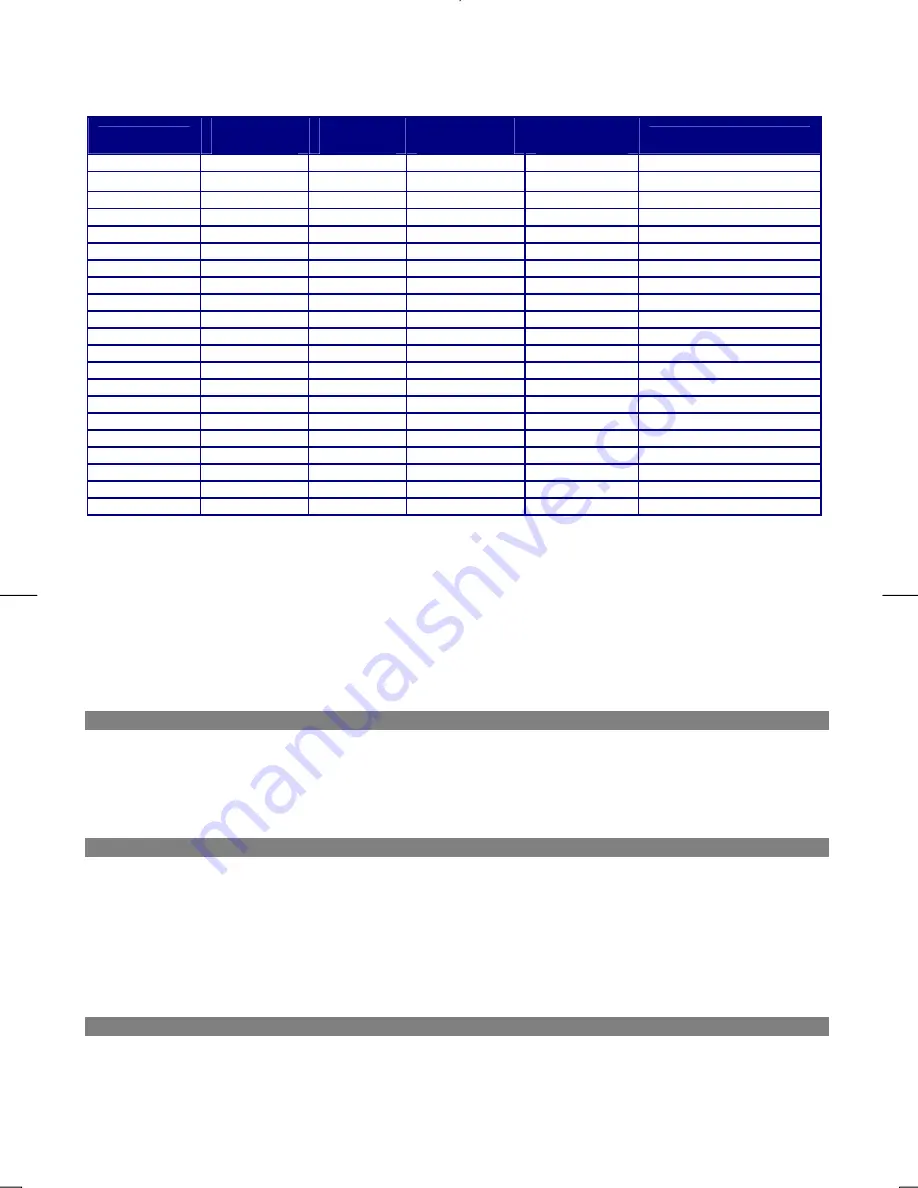
Standard Timing Table
If the selected timing is NOT included in table below, this LCD monitor will use the most suitable available timing.
Resolution
H. Freq.
(KHz)
V. Freq.
(Hz)
Pixel Freq.
(MHz)
H/V Sync.
Polarity
Mode
640 x 350
31.469
70.087
25.175
+/-
VGA-350
640 x 400
24.830
56.420
21.050
-/-
NEC PC9801
640 x 400
31.469
70.087
25.175
-/+
VGA-400-GRAPH
640 x 400
31.50
70.15
25.197
-/-
NEC PC9821
640 x 480
31.469
59.940
25.175
-/-
VGA-480
640 x 480
35.00
66.67
30.24
-/-
APPLE MAC-480
640 x 480
37.861
72.809
31.500
-/-
VESA - 480 - 72Hz
640 x 480
37.500
75.000
31.500
-/-
VESA - 480 - 75Hz
720 x 400
31.469
70.087
28.322
-/+
VESA-400-TEXT
800 x 600
35.156
56.250
36.000
+/+
SVGA
800 x 600
37.879
60.317
40.000
+/+
VESA-600-60 Hz
800 x 600
48.077
72.188
50.000
+/+
VESA-600-72 Hz
800 x 600
46.875
75.000
49.500
+/+
VESA-600-75 Hz
832 x 624
49.725
74.55
57.2832
-/-
APPLE MAC-800
1024 x 768
48.363
60.004
65.000
-/-
XGA
1024 x 768
53.964
66.132
71.664
+/+
COMPAQ-XGA
1024 x 768
56.476
70.069
75.000
-/-
VESA-768-70 Hz
1024 x 768
60.023
75.029
78.750
+/+
VESA-768-75 Hz
1024 x 768
60.04
75.02
80.00
-/-
APPLE MAC-768
1280 x 1024
63.981
60.020
108
+/+
SXGA
1280 x 1024
79.976
75.025
135
+/+
SXGA
Note:
.
When the in put display mode is not 1280 x 1024, the image is smoothly expanded to 1280 x 1024 dots with the gm2120 scaling
engine. After expansion from 650x350, 640x400, 640x480, 720x400, 832x624, 800x600, and 1024x768 resolution, the text may
look not so sharp, and the Graphics may look not so proportional.
Troubleshooting
This LCD Monitor has pre-adjusted using factory standard VGA timings. Due to the output timing differences among various
VGA cards in the market, users may initially experience an unstable or unclear display whenever a new display mode or new
VGA card is selected.
Attention
This LCD Monitor Supports Multiple VGA Modes.
Refer to the Standard Timing Table for a listing of modes supported by this LCD Monitor.
PROBLEM Picture is unclear and unstable
The picture is unclear and unstable, please perform the following steps :
1. Enter PC to “Shut Down Windows” status while you’re in MS-Windows environment.
2. Check the screen to see if there’s any black vertical stripes appear. If there are, take advantage of the “Clock”
function in OSD menu and adjust (by increment or decrement numbers) until those bars disappear.
3. Move to “Phase” function in OSD menu again and adjust the monitor screen to its most clear display.
4. Click “No” on “Shut Down Windows” and back to the normal PC operating environment.
PROBLEM There is no picture on LCD Monitor
If there’s no picture on the LCD Monitor, please perform the following steps:
1. Make sure the power indicator on the LCD Monitor is ON, all connections are secured, and the system is running on
the correct timing. Refer to Chapter 3 for information on timing.
2. Turn off the LCD Monitor and then turn it back on again. If there is still no picture, press the Adjustment Control
button several times.
3. If step 2 doesn’t work, connect your PC system to another external CRT. If your PC system Functions properly with
a CRT Monitor but it does not function with the LCD Monitor, the output timing of the VGA card may be out of the
LCD’s synchronous range. Please change to an alternative mode listed in the Standard Timing Table or replace the
VGA card, and then repeat steps 1 and 2.
PROBLEM There is no picture on LCD Monitor
If you have chosen an output timing that is outside of the LCD Monitor’s synchronous range (Horizontal: 24 ~ 80 KHz
and Vertical: 56 ~ 75 Hz), the OSD will display a “
Out of Range
” message. Choose a mode that is supported by your
LCD Monitor.
Also, if the signal cable is not connected to LCD monitor at all or properly, the monitor screen will display a message
“
No Input Signal
”.
Summary of Contents for PE190
Page 1: ......


