pitsco Banty Roaster User Manual Download Page 7

Banty Roaster User Guide 59755 V0210 

7

Cooking with the Banty Roaster

Preparation for Use

Wipe dust and fingerprints from the mirrored surface with a small amount of 
glass cleaner and a soft cloth.

What to Cook

Banty Roaster is designed to cook one cocktail sausage wrapped in foil. 
Although more than one will fit in the tube, we do not recommend that you 
try this as steam buildup will cause the additional sausages to be expelled.

Items Needed (not included)

•  Cocktail sausages 

•   Wooden dowel, 3/8" or 1/2" diameter

•  Aluminum foil 

•  Oven mitts

Cooking Instructions*

1.  Roll a cocktail sausage in a 3” x  3” piece of foil and twist the ends closed. 
2.  Slide the foil-wrapped sausage into the cooking tube. Use the wooden 

dowel to push the sausage to the center of the tube. Place the cooking 
tube on the tube holders and take the Banty Roaster outside.

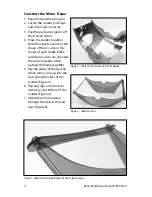
3.  Position the Roaster so it faces the Sun. Adjust the angle of the Roaster so 

the sunlight shines through the big hole in the forward solar angle gauge 
and is projected onto the smaller hole in the rear gauge. This ensures the 
cooker is positioned to optimize the Sun’s heat energy. As the Sun moves, 
the angle may need to be adjusted.  


Caution: The cooking tube will become very hot during the cooking 
process. Do not touch it with bare hands.  


4.  After five to seven minutes, put on the oven mitts and remove the 

sausage by pushing it out of the tube with the wooden dowel. Unwrap 
and enjoy!

Always use safe food-preparation and food-handling practices. 

Summary of Contents for Banty Roaster

Page 1: ...BantyRoaster User Guide 59755 V0210...

Page 2: ...p R 4 nylon flat washers I Metal cooking tube S 2 nylon spacers J Wooden dowel not shown Tools Required not included Phillips screwdriver Cool melt glue and glue gun Scissors Small needle nose pliers...

Page 3: ...ith a hex nut loosely tightened 3 Attach the braces to the legs Locate the legs the remaining 6 32 x 3 8 PHP screws and the assembled braces Note that the notches on the ends of the braces are of two...

Page 4: ...f each cradle Make sure these curves are oriented the same direction when putting the frame together 5 Slip the edges of the styrene sheet mirror side up into the slots along the sides of the cradles...

Page 5: ...nylon washers nylon spacers 6 32 x 1 PHP screws and nylock nuts 2 Slide a nylon washer onto the screw Slide this assembly through the hole at the top of the base Slide a nylon spacer onto the screw a...

Page 6: ...htly toward the top of the unit Attach with screws and secure with the nuts Figure 9 Figure 9 Attach the tube holders Screw heads on inside of unit Hex nuts on outside of unit Prepare the Cooking Tube...

Page 7: ...e the foil wrapped sausage into the cooking tube Use the wooden dowel to push the sausage to the center of the tube Place the cooking tube on the tube holders and take the Banty Roaster outside 3 Posi...

Page 8: ...8 Banty Roaster User Guide 59755 V0210 P O Box 1708 Pittsburg KS 66762 shop pitsco com Toll Free Orders 800 835 0686...

Reviews: