background image

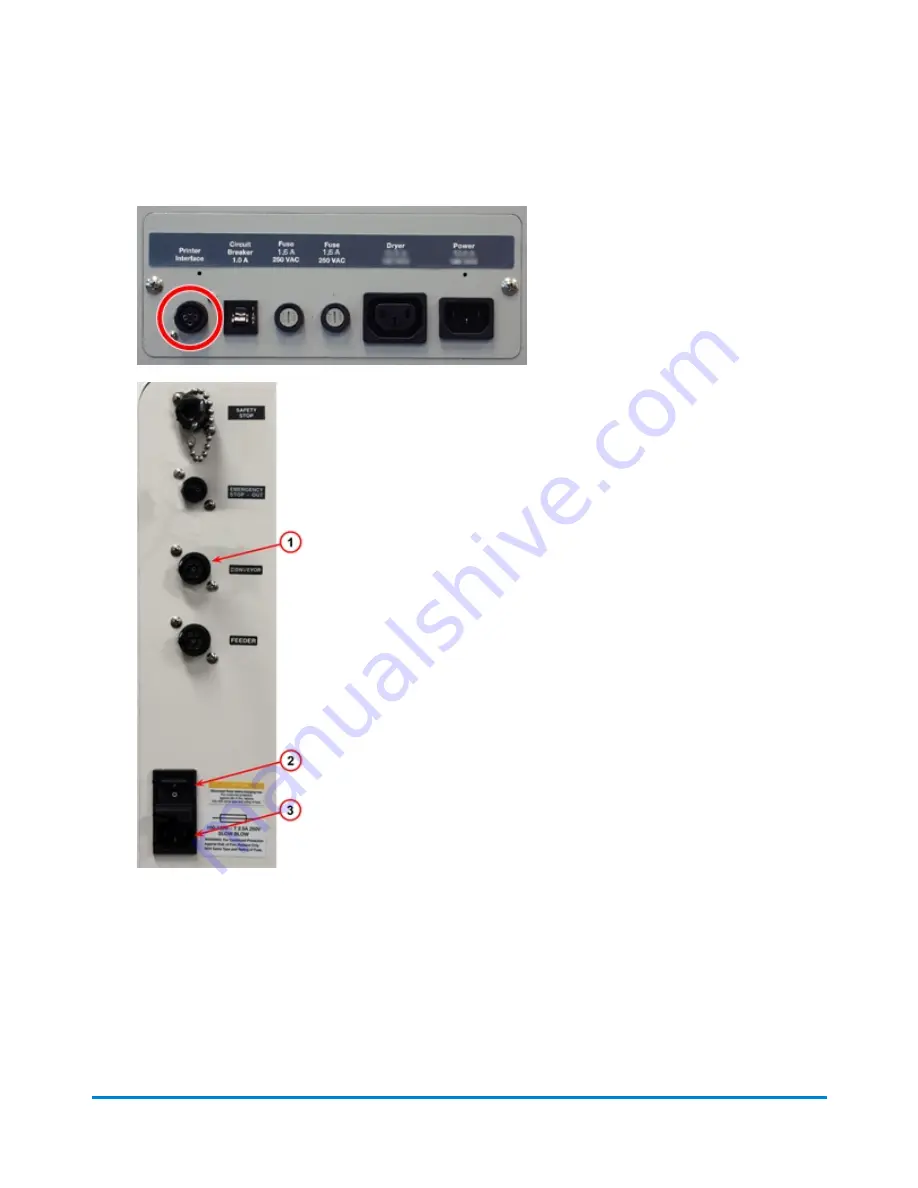
 2.  Connect communications interface cable at Printer Interface port on Stacker and the other end 

to the Conveyor port on the Tabber.

 1.  Conveyor Port on Tabber (circled)

 2.  Power Switch

 3.  AC Inlet for Power Cord

 3.  Connect AC power cord at the Tabber (see photo at left for AC inlet) and turn on power to the 

Tabber. Refer to the Tabber Quick Start Guide (SV62479A) for information on running the 
Tabber.

Attachment of Stacker to a W360 Tabber

Pitney Bowes

User Guide

September 2021

54

Summary of Contents for W863

Page 1: ...Shipping Mailing Printing W985 W986 Stacker with W863 W864 or W85F W86F Dryer for use with AddressRight Printers and W360 Tabber User Guide US English Edition SV62019 Rev D September 29 2021 ...

Page 2: ...itute an infringement of intellectual property rights of Pitney Bowes and Pitney Bowes assumes no responsibility for any such use of the information We have made every reasonable effort to ensure the accuracy and usefulness of this manual However we cannot assume responsibility for errors or omissions or liability for the misuse or misapplication of our products Except as provided in writing duly ...

Page 3: ...r Power Stacker 16 3 Stacker Specifications Technical Specifications 18 Materials Specifications 18 4 Stacker Adjustments Adjust Stacker Height and Printer Distance 20 Adjust Input Media Stop 23 Adjust Material Hold Downs 25 Adjust Stack Full Sensor 26 Adjust Material Ramp 28 5 Stacker Maintenance Stacker Cleaning 32 Table of Contents Pitney Bowes User Guide September 2021 3 ...

Page 4: ...tion 37 Job Setup 38 Cleaning 40 Jams 40 Fuse Replacement 40 Troubleshooting 41 8 Optional W85F W86F Ink Dryer Controls and Indicators 45 Operation 46 Job Setup 47 Jams 48 Cleaning 49 Troubleshooting 49 9 Attaching Stacker to a W360 Tabber Attaching the Stacker to a W360 Tabber 52 10 Adjustment Charts Adjust Material Ramp Angle 56 Pitney Bowes User Guide September 2021 4 ...

Page 5: ...aterial Ramp 58 Adjust Stacker Height and Distance Super Draft and Draft Mode 60 Adjust Stacker Height and Distance Letter Mode 62 Adjust Stacker Height and Distance Executive Mode 64 Pitney Bowes User Guide September 2021 5 ...

Page 6: ...1 Safety In this section Safety Information 7 Other Informational Cautions 9 ...

Page 7: ...from the AC power supply l DO NOT use an adapter plug on the line cord or wall outlet l DO NOT use a wall outlet controlled by a wall switch or one that is shared with other equipment l DO NOT remove the ground pin from the line cord l Always unplug the printer and discharge static electricity before using aerosol dusters l Improper storage and use of aerosol dusters or flammable aerosol dusters c...

Page 8: ...trained service personnel l DO NOT run printer with top cover open l Running the printer with top cover open increases the risk of entanglement with moving parts l To prevent overheating do not cover vent openings l DO NOT place lighted candles cigarettes cigars etc on the system l Contact Your System Supplier for l Supplies l Material Safety Data Sheets l If you should damage the unit l Required ...

Page 9: ... by wall switches or shared with other equipment If a wall outlet controlled by a wall switch is used mail could be interrupted if the printer is plugged in when the wall switch is used to turn power off Warning THIS EQUIPMENT MUST BE EARTHED The socket outlet should be near to the equipment and should be easily accessible Safety Pitney Bowes User Guide September 2021 9 ...

Page 10: ...2 Stacker Controls and Indicators In this section Operator Panel 11 Conveyor Deck 12 Connector and Side Panels 14 Optional Stand for Power Stacker 16 ...

Page 11: ...witch is up Stacker operation is controlled by the printer In this mode the Stacker belts move when the printer is feeding mail pieces If the printer is out of paper has a jam or tray break it stops the Stacker If the Stacker is full the printer and Stacker both stop NOTE When power is switched to the On position and Auto mode is selected the Stacker will not run until the printer operation begins...

Page 12: ...Conveyor Deck Stacker Controls and Indicators Pitney Bowes User Guide September 2021 12 ...

Page 13: ...contact with the conveyor belts 3 Material Ramp Media Stop This stop is adjusted to retain media at the end of the Stacker 4 Material Ramp The angle of this ramp can be adjusted to accommodate various widths of material when stacking 5 Stack Full Sensor This sensor is adjusted so that the mail pieces stack in an orderly sequence for retaining presort order and it stops the printer when the Stacker...

Page 14: ... Sensor connector This is where the cable from the stack full sensor is connected This activates when the Stacker is full 2 Printer Interface connector This is where the interface cable coming from the printer is connected Stacker Controls and Indicators Pitney Bowes User Guide September 2021 14 ...

Page 15: ...This is a convenience outlet to be used with the optional Ink Dryer 6 Power Inlet This is where the input power cord is connected for the Stacker Warning The Dryer with Stacker combination draws a substantial amount of power Note the wattages of other appliances you plug into the same outlet or branch circuit and compare that with the rating of the outlet or branch circuit to avoid overloading you...

Page 16: ...Adjustment Knob used to adjust the height of the Stacker so it can be aligned with your printer or to operator level 2 Casters in circles above allows for easier movement of Stacker Two are locking casters for holding the Stacker in place Stacker Controls and Indicators Pitney Bowes User Guide September 2021 16 ...

Page 17: ...3 Stacker Specifications In this section Technical Specifications 18 Materials Specifications 18 ...

Page 18: ...mance requirements of the Stacker These specifications apply to all styles of media flats envelopes catalogs etc All media may be stuffed unstuffed sealed or unsealed as long as the dimensional limits are within specified ranges Papers White Wove Bond Paper Tyvek Recycled Paper Newsprint Coated Paper Card Stock Brown Kraft Manila and Perforations Cannot be used in Executive print mode without fast...

Page 19: ...4 Stacker Adjustments In this section Adjust Stacker Height and Printer Distance 20 Adjust Input Media Stop 23 Adjust Material Hold Downs 25 Adjust Stack Full Sensor 26 Adjust Material Ramp 28 ...

Page 20: ...Adjust Stacker Height and Printer Distance Operation To adjust the height 1 Hold the Stacker steady with upright pressure and loosen the adjustment knob 1 Caution The Stacker deck may rapidly drop to its lowest height when you loosen the Stacker height adjustment knob Stacker Adjustments Pitney Bowes User Guide September 2021 20 ...

Page 21: ...he Appendix to help you determine this value if necessary To adjust the distance 1 Unlock wheels if they are locked 2 Move the Stacker to the proper distance from the printer output roller and lock the wheels Refer to the Appendix to help you determine this value if necessary Stacker Adjustments Pitney Bowes User Guide September 2021 21 ...

Page 22: ...t rollers of the printer If the mail piece contacts the conveyor belt too soon skewing will occur The general rule is that at slower speeds and the longer the mail piece you need to position the Stacker lower and farther away from the printer output At higher speeds and with shorter mail pieces you position the Stacker higher and closer to the printer output Stacker Adjustments Pitney Bowes User G...

Page 23: ...r the media stop to the point of contact and then lock For over 1 16 1 6mm thickness set the media stop low enough so that mail piece cannot get below the edge of the media stop and then lock To adjust the depth l There is a scale on the input media stop that is used to set up for different size mail pieces Loosen the two knobs and set the knobs to the desired value on the scale Tighten the knobs ...

Page 24: ...dia stop is adjusted so that mail pieces from the printer hit the stop and drop flat onto the conveyor belt The media stop is set closer to the printer for short mail pieces and farther away for longer mail pieces Stacker Adjustments Pitney Bowes User Guide September 2021 24 ...

Page 25: ...ovide drive and control of the mail piece as it transitions to the stacking conveyor The rollers should be positioned in such a way that they retain the mail piece but do not come in contact with the address zones If positioned in the address zones the rollers will cause smudging The function of the springs retainers is to control the mail piece as it lands on the stacking conveyor The general rul...

Page 26: ...position l Loosen the horizontal position knob on the operator side of the sensor assembly Move the sensor assembly to the desired value on the horizontal scale Tighten the knob when finished 1 Stack Full Sensor 2 Horizontal Adjustment Knob 3 Horizontal Position Scale 4 Vertical Adjustment Knob 5 Vertical Position Scale The stacker full sensor should remain at the 0 position in both height vertica...

Page 27: ...e stacker towards the 11 end on the horizontal scale l For extremely thick pieces you may need to move the stack sensor up in height vertically to allow for maximum capacity towards the 0 end on the vertical scale Theory These adjustments are made so that the stack full indicator switch functions correctly while allowing the maximum number of mail pieces to be stacked Stacker Adjustments Pitney Bo...

Page 28: ...edia stop To adjust the angle of the ramp l Loosen the ramp angle knob on the side of the ramp Move the ramp to the desired value on the scale Tighten the knob when you are finished Refer to the Appendix to help you determine the ramp angle if necessary Stacker Adjustments Pitney Bowes User Guide September 2021 28 ...

Page 29: ...l ramp Slide the media stop to the desired value up or down on the ramp Tighten the knob when you are finished Refer to the Appendix to help you determine the media stop position if necessary 1 Material Ramp 2 Media Stop 3 Media Stop Position Scale 4 Adjustment Knob for Media Stop Stacker Adjustments Pitney Bowes User Guide September 2021 29 ...

Page 30: ...er and thicker the mail piece the flatter the ramp angle The position of the media stop on the material ramp is dependent on the width of the mail piece The media stop is set closer to the printer for shorter mail pieces and farther away for longer mail pieces The wider the mail piece the farther up the ramp the media stop needs to be set Stacker Adjustments Pitney Bowes User Guide September 2021 ...

Page 31: ...5 Stacker Maintenance In this section Stacker Cleaning 32 Stacker Fuse Replacement 32 ...

Page 32: ...he power switch Off and unplug the power cord from the AC power receptacle For continued protection against risk of fire replace only with same type and rating of fuse If fuse replacement is required turn the Stacker off unplug the AC power cord from the outlet and replace the defective fuse with another amp fuse Fuse locations are shown in the illustration below If the blown fuse condition occurs...

Page 33: ...6 Stacker Troubleshooting In this section Stacker Troubleshooting 34 ...

Page 34: ...ck up automatically when you press the circuit breaker switch Smudged Addresses You can lift or slide any of the hold down rollers or springs where heavily printed areas of your envelopes may be smudged by running under the rollers springs Lift the roller spring slightly and turn knob to lock in place away from the conveyor belt NOTE To assure the envelopes travel properly through the Stacker they...

Page 35: ...7 Optional W863 W864 Ink Dryer In this section Controls and Indicators 36 Technical Specifications 37 Operation 37 Job Setup 38 Cleaning 40 Jams 40 Fuse Replacement 40 Troubleshooting 41 ...

Page 36: ...or off Dryer 2 Power Cord where the input power cord is connected 3 Height Handle adjusts the height of the Dryer over the material six position settings 4 Power Outlet the other end of the power cord is attached to the Stacker AC outlet labeled Dryer Optional W863 W864 Ink Dryer Pitney Bowes User Guide September 2021 36 ...

Page 37: ...on only when the power switch on the Stacker is switched on Therefore when the power switch on the Dryer is left in the ON position the Dryer will activate only when the conveyor belts start to move This effectively causes the Dryer to operate only when needed when mail pieces are conveyed under it to be dried When the conveyor stops the Dryer will automatically switch off Warning Dryer will ignit...

Page 38: ...y with same type and rating of fuse Job Setup You will be required to check and make the following adjustments when you change from one job to another job Adjust Dryer Height You will have to adjust the height of the Dryer whenever the following changes drastically from the previous job l speed of the conveyor on the Stacker l the size of the material being dried l how much ink is used The height ...

Page 39: ...1 Height Adjustment Handle 2 Release Lever under handle top 3 Five Positions Optional W863 W864 Ink Dryer Pitney Bowes User Guide September 2021 39 ...

Page 40: ...o original position If mail pieces jam in the Stacker the circuit breaker switch will automatically shut the Stacker and Dryer off DO NOT press the power switch on the Stacker or Dryer With the Stacker off clear the jam and any remaining mail pieces Wait 1 to 2 minutes before pressing the circuit breaker switch on the Stacker The Stacker and Dryer will power back up automatically when you press th...

Page 41: ...in the Dryer AC power cord back into the Stacker and turn the power on If the blown fuse condition occurs again call Pitney Bowes for service Troubleshooting Symptom Possible Cause Remedy Does not run No power Check Plug Connections and Power Switch Ink not drying Wrong Stacker speed Adjust stacker speed control for a slower speed to allow more time for the mail piece to travel under the dryer Inc...

Page 42: ...unning No power Call for service No air from fan Fan inoperative Call for service Only cold air from fan Heater inoperative Call for service Optional W863 W864 Ink Dryer Pitney Bowes User Guide September 2021 42 ...

Page 43: ...8 Optional W85F W86F Ink Dryer Optional W85F W86F Ink Dryer Pitney Bowes User Guide September 2021 43 ...

Page 44: ...In this section Controls and Indicators 45 Operation 46 Job Setup 47 Jams 48 Cleaning 49 Troubleshooting 49 Optional W85F W86F Ink Dryer Pitney Bowes User Guide September 2021 44 ...

Page 45: ...or off Dryer 2 Power Cord where the input power cord is connected 3 Height Handle adjusts the height of the Dryer over the material six position settings 4 Power Outlet the other end of the power cord is attached to the Stacker AC outlet labeled Dryer Optional W85F W86F Ink Dryer Pitney Bowes User Guide September 2021 45 ...

Page 46: ...will automatically switch off Warning Dryer will ignite combustible materials Keep all items clear of this machine except envelopes specified for use with this machine The Dryer Stacker combination draws a substantial amount of power Note the wattages of other appliances you plug into the same outlet or branch circuit and compare that with the rating of the outlet or branch circuit to avoid overlo...

Page 47: ... have to adjust the height of the Dryer whenever the following changes drastically from the previous job l speed of the conveyor on the Stacker l the size of the material being dried l how much ink is used The height handle is used to raise or lower the Dryer It has 5 positions Optional W85F W86F Ink Dryer Pitney Bowes User Guide September 2021 47 ...

Page 48: ...the material accessible After clearing jam move handle back to original position If mail pieces jam in the Stacker the circuit breaker switch will automatically shut the Stacker and Dryer off DO NOT press the power switch on the Stacker or Dryer With the Stacker off clear the jam and any remaining mail pieces Wait 1 to 2 minutes before pressing the circuit breaker switch on the Stacker The Stacker...

Page 49: ...es not run No power Check Plug Connections and Power Switch Ink not drying Wrong Stacker speed Adjust stacker speed control for a slower speed to allow more time for the mail piece to travel under the dryer Incorrect height Reposition the dryer height for best drying position Stopped running No power Call for service No air from fan Fan inoperative Call for service Only cold air from fan Heater in...

Page 50: ...This page intentionally left blank ...

Page 51: ...9 Attaching Stacker to a W360 Tabber In this section Attaching the Stacker to a W360 Tabber 52 ...

Page 52: ...ngle used for the printers 1 Move Stacker into position so it is inline with the Tabber output end see figure below Hold the Stacker steady with upright pressure and loosen the height adjustment knob Set the height so the Stacker is even with output of the Tabber and tighten the adjustment knob 1 Tabber 2 Stacker 3 Stacker Height Adjustment Knob Attachment of Stacker to a W360 Tabber Pitney Bowes ...

Page 53: ...Caution The Stacker deck may rapidly drop to its lowest height when you loosen the Stacker height adjustment knob Attachment of Stacker to a W360 Tabber Pitney Bowes User Guide September 2021 53 ...

Page 54: ...nveyor Port on Tabber circled 2 Power Switch 3 AC Inlet for Power Cord 3 Connect AC power cord at the Tabber see photo at left for AC inlet and turn on power to the Tabber Refer to the Tabber Quick Start Guide SV62479A for information on running the Tabber Attachment of Stacker to a W360 Tabber Pitney Bowes User Guide September 2021 54 ...

Page 55: ...n Adjust Material Ramp Angle 56 Adjust Media Stop on Material Ramp 58 Adjust Stacker Height and Distance Super Draft and Draft Mode 60 Adjust Stacker Height and Distance Letter Mode 62 Adjust Stacker Height and Distance Executive Mode 64 ...

Page 56: ...l ramp is dependent on the width and thickness of the mail piece The general rule is that the shorter and thinner the mail piece the steeper the ramp angle while the longer and thicker the mail piece the flatter the ramp angle See chart below for guidance Adjustment Charts and Tables Pitney Bowes User Guide September 2021 56 ...

Page 57: ...Adjustment Charts and Tables Pitney Bowes User Guide September 2021 57 ...

Page 58: ...op on the material ramp is dependent on the width of the mail piece The media stop is set closer to the printer for shorter mail pieces and farther away for longer mail pieces The wider the mail piece the farther up the ramp the media stop needs to be set See chart below for guidance Adjustment Charts and Tables Pitney Bowes User Guide September 2021 58 ...

Page 59: ...Adjustment Charts and Tables Pitney Bowes User Guide September 2021 59 ...

Page 60: ...cker deck and the printer output roller This is done by adjusting the height of the stand The bottom chart is used to determine the distance from the stacker to the output roller This is done by moving the stacker closer or farther from the printer output roller Adjustment Charts and Tables Pitney Bowes User Guide September 2021 60 ...

Page 61: ...epresents 3 8 9 5mm between the min thickness and max thickness 3 Follow a straight line to the left side of the chart That is the distance in inches for that setting For example If the material is 11 inches 279mm long and 1 8 inch 3 2mm thick the reading on the top chart would be approximately 2 inches 51mm and on the bottom chart approximately 1 75 inches 44mm Adjustment Charts and Tables Pitney...

Page 62: ...nter output roller This is done by adjusting the height of the stand The bottom chart is used to determine the distance from the stacker to the output roller This is done by moving the stacker closer or farther from the printer output roller In order to use the charts Adjustment Charts and Tables Pitney Bowes User Guide September 2021 62 ...

Page 63: ...8 9 5mm between the min thickness and max thickness 3 Follow a straight line to the left side of the chart That is the distance in inches for that setting For example If the material is 11 inches 279mm long and 1 8 inch 3 2mm the reading on the top chart would be approximately 2 5 inches 64mm and on the bottom chart approximately 1 75 inches 44mm Adjustment Charts and Tables Pitney Bowes User Guid...

Page 64: ...rinter output roller This is done by adjusting the height of the stand The bottom chart is used to determine the distance from the stacker to the output roller This is done by moving the stacker closer or farther from the printer output roller In order to use the charts Adjustment Charts and Tables Pitney Bowes User Guide September 2021 64 ...

Page 65: ... 8 9 5mm between the min thickness and max thickness 3 Follow a straight line to the left side of the chart That is the distance in inches for that setting For example If the material is 11 inches 279mm long and 1 8 inch 3 2mm the reading on the top chart would be approximately 4 inches 102mm and on the bottom chart approximately 1 25 inches 32mm Adjustment Charts and Tables Pitney Bowes User Guid...

Page 66: ...For Service or Supplies SV62019 Rev D 2021 Pitney Bowes Inc All Rights Reserved 3001 Summer Street Stamford Connecticut 06926 www pitneybowes com ...

Reviews: