background image

18

Top Panel

   Front Panel

   Rear Panel

Contents 

  Preparations 


Playback


  Voice Functions 

  Setup 

play, the volume on the other unit changes in 

conjunction.

•  Stereo pair will not be canceled even after you 

turn the power on again after turning it off. Stereo 

pair is canceled when you either press and hold 

the STEREO PAIR button or change the INPUT 

selector on the main unit or sub unit.

•  If a call is received during stereo pair connection, 

only the main unit emits the ringtone. ( 

p28

)

Change the playback mode

•  This feature is available after firmware update 

and on devices with new firmware installed 

during manufacture. If operation is not possible, 

refer to Firmware Update ( 

p31

) to update 

the firmware.

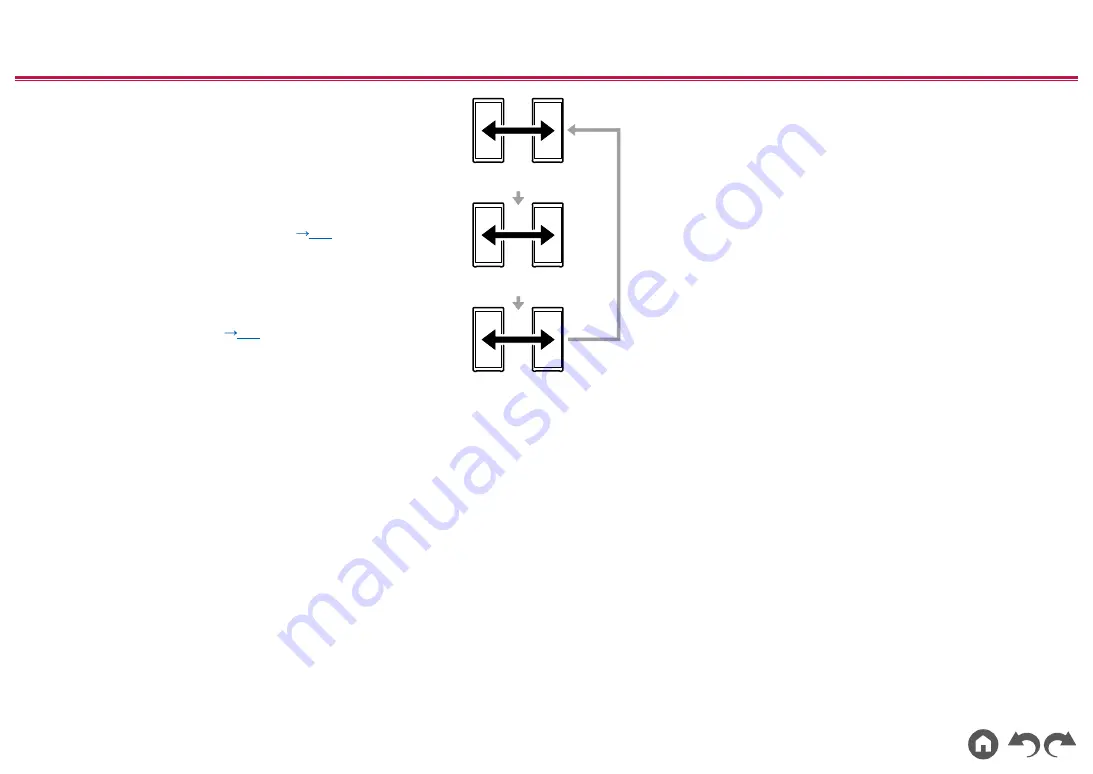
1.  Change the audio output mode. The front 

illumination LED lights for about 2 seconds 

when you press the STEREO PAIR button to 

enable you to see the setting status. The output 

mode switches when you repeatedly press the 

STEREO PAIR button while the front illumination 

LED is on, and the color of the LED also 

changes.

Stereo

(Light Blue&Red)

L ch

(Light Blue)

R ch

(Red)

Stereo

(Light Blue&Red)

R ch

(Red)

L ch

(Light Blue)

Summary of Contents for XW-SX50

Page 1: ... Panel Front Panel Rear Panel WIRELESS SPEAKER SYSTEM Instruction Manual XW SX70 XW SX50 En Table of contents Preparations Playback Voice Functions Setup Troubleshooting Appendix Supplementary Information ...

Page 2: ...nnecting with an analog audio cable 15 Analog Chain 16 Basic Operations 16 Stereo Pair 17 Basic Operations 17 Convenience functions 19 Illumination LED 19 Locking this unit 20 Canceling Volume Limit 21 Emphasizing the low range 22 Adjusting the bass and treble 23 Pioneer Club Sound App 24 Voice Functions Voice Assistant 27 Basic Operations 27 Hands Free Calling 28 Basic Operations 28 Setup Various...

Page 3: ...Guide 1 This document is an online instruction manual It is not included as an accessory We will not accept any responsibility for damage arising from the connection with equipment manufactured by other companies Details on the firmware update will be posted on our website and through other means at a later date Specifications and appearance are subject to change without prior notice ...

Page 4: ...4 S BASS button p22 5 LIGHT button p19 20 6 button A short press turns the power on or off 7 Microphone Use when the voice assistant is running and when making handsfree calls p27 28 8 VOICE button Use to start the voice assistant and to receive and end handsfree calls p27 28 9 BASS Knob p23 10 TREBLE Knob p23 11 VOLUME Knob Use to adjust the volume Adjust between 0 and 50 when playing music and b...

Page 5: ... Setup Top Panel Front Panel Rear Panel Front Panel 1 Illumination LED The LED on the unit blinks rapidly Turning the blinking off if it causes you to feel ill The LED also shines very brightly so do not look directly at it 2 Woofer 3 Duct 4 Tweeter ...

Page 6: ...log chain mode p15 16 3 STEREO PAIR button Use for stereo pair connection p17 4 CHAIN jack Connect a commercially available analog audio cable p15 16 5 Illumination LED The LED on the unit blinks rapidly Turning the blinking off if it causes you to feel ill The LED also shines very brightly so do not look directly at it The illumination LED on the rear panel has been designed with the intention th...

Page 7: ...7 Top Panel Front Panel Rear Panel Contents Preparations Playback Voice Functions Setup Preparations Installation and connection 8 ...

Page 8: ...ion When installing this unit on its side attach the feet for horizontal installation to the surface that will become the base Be sure to connect the power cord to the AC IN of the unit first and then connect it to the outlet Always disconnect the outlet side first when disconnecting the power cord a a Power cord ...

Page 9: ...ont Panel Rear Panel Contents Preparations Playback Voice Functions Setup Playback BLUETOOTH Playback 10 USB Memory Device 12 Connecting other Audio devices 14 Analog Chain 16 Stereo Pair 17 Convenience functions 19 ...

Page 10: ...e pairing mode 3 Enable turn on the BLUETOOTH function of the BLUETOOTH enabled device and then select this unit from among the devices displayed If a password is requested enter 0000 When connection is complete the LED changes from blinking to lighting This unit is displayed as Pioneer XW SX70 XXXXXX or Pioneer XW SX50 XXXXXX To connect another BLUETOOTH wireless technology enabled device do step...

Page 11: ... input on this unit automatically switches to BLUETOOTH 2 Playing the music file Turn up the volume of the BLUETOOTH enabled device to an appropriate level Due to the characteristics of BLUETOOTH wireless technology the sound produced on this unit may slightly be behind the sound played on the BLUETOOTH enabled device ...

Page 12: ... starts automatically The USB LED blinks slowly if there are no files that can be played on the USB memory device It is not possible to specify a folder or music file to play The order of playback is normally the order in which the music files were written to the USB memory device However specifications differ between USB memory devices so it may be different to the writing order Using the Pioneer...

Page 13: ...with hub functions are not supported Do not connect these devices to the unit USB memory devices with security functions are not supported on this unit In use of a USB memory device our company accepts no responsibility whatsoever for the loss or modification of data stored on a USB memory device or malfunction of the USB memory device We recommend that you back up the data stored on a USB memory ...

Page 14: ... 5 mm to the AUX IN jack on this unit and the audio device turn on the power of this unit and the connected device 2 Repeatedly press the INPUT button until the AUX LED lights and change the input source to AUX 3 Start play on the connected audio device Increase the volume of the audio device to an appropriate level When connecting this unit to an audio device with a LINE OUT jack such as a CD pla...

Page 15: ... the CHAIN IN jack on the rear panel of this unit using an analog audio cable turn on the power of this unit and the connected device 2 Press the CHAIN button on the rear panel of the unit so that all of the AUX and USB LED light and turn on the analog chain mode You can also set to the analog chain mode by repeatedly pressing the INPUT button 3 Start play on the connected audio device ...

Page 16: ...k on the first unit main unit to the CHAIN IN jack on the second unit sub unit with an analog audio cable 2 Turn on the power of the main unit and the sub unit 3 Press the CHAIN button on the sub unit so that all of the AUX and USB LED light and turn on the analog chain mode You can also set to the analog chain mode by repeatedly pressing the INPUT button 4 Play the music files on the main unit Wh...

Page 17: ...ange the input source to BLUETOOTH 2 Press and hold the STEREO PAIR button on the main unit for 1 second The INPUT button blinks twice 3 Press and hold the STEREO PAIR button on the sub unit for 1 second Pairing is complete when the INPUT buttons on the main unit and the sub unit change to being lit 4 Play the BLUETOOTH wireless technology enabled device after connecting it to the main unit via BL...

Page 18: ... emits the ringtone p28 Change the playback mode This feature is available after firmware update and on devices with new firmware installed during manufacture If operation is not possible refer to Firmware Update p31 to update the firmware 1 Change the audio output mode The front illumination LED lights for about 2 seconds when you press the STEREO PAIR button to enable you to see the setting stat...

Page 19: ...ill Off Rave Rave Compared to chill the blinking is faster and color transitions are also faster Illumination also modifies if kick BassDrum is detected in the track Kick may not be detected depending on the connected audio device and track being played Chill Compared to rave the blinking is slower and color transitions are also slower The illumination does not change when kick is detected if you ...

Page 20: ...t When the LIGHT button is pressed and held for about 5 seconds the LIGHT button blinks and the operations are locked for the buttons and VOLUME knob of the unit To unlock press and hold the LIGHT button again for about 5 seconds Even if you lock this unit the BASS knob and TREBLE knob p23 are not locked 5 ...

Page 21: ...he INPUT button until the AUX LED lights and change the input source to AUX 2 Press and hold the INPUT button for about 3 seconds to cancel the setting When the setting is canceled the front panel illumination LED blinks red twice When you press and hold the INPUT button again for about 3 seconds the front panel illumination LED blinks blue twice and the Volume Limit is enabled The volume setting ...

Page 22: ...ntents Preparations Playback Voice Functions Setup Emphasizing the low range When you press the S BASS button the S BASS button LED lights and the unit switches to the mode for emphasizing the bass To turn off press the S BASS button again ...

Page 23: ...parations Playback Voice Functions Setup Adjusting the bass and treble Turn the BASS knob or TREBLE knob to adjust the sound quality BASS Adjust the volume of the bass between 6 dB and 6 dB TREBLE Adjust the volume of the treble between 6 dB and 6 dB ...

Page 24: ...er firmware update and on devices with new firmware installed during manufacture If operation is not possible refer to Firmware Update p31 to update the firmware Perform the following procedure when this unit is on 1 Download the Pioneer Club Sound App from the App Store or Google Play Store 2 Connect this unit to a mobile device via BLUETOOTH p10 3 Start the Pioneer Club Sound App 4 Tap this unit...

Page 25: ...register presets using the sharing features of music distribution services The Preset screen is displayed by swiping the screen left or right Tap the preset number you want to register A list of music distribution service apps is displayed when you tap the number Select the content you want to register and share to the Pioneer Club Sound App The method for sharing depends on the music distribution...

Page 26: ...26 Top Panel Front Panel Rear Panel Contents Preparations Playback Voice Functions Setup Voice Functions Voice Assistant 27 Hands Free Calling 28 ...

Page 27: ...when this unit is on 1 Connect this unit to a smartphone that has a voice assistant feature via BLUETOOTH p10 2 Press the VOICE button on this unit The voice assistant feature on the smartphone starts up 3 Speak into the microphone on this unit The voice assistant recognizes the question and the answer comes from the speaker of this unit This may not be supported in some cases due to the smartphon...

Page 28: ...o the microphone on this unit Adjust the volume during the call with the VOLUME knob By pressing and holding the VOICE button for about 2 seconds during a call you can switch the audio output to the speaker of the mobile phone 4 Press the VOICE button to hang up Make a call 1 Operate the mobile phone connected via BLUETOOTH to make the call 2 When the phone is in a call the front illumination LED ...

Page 29: ...29 Top Panel Front Panel Rear Panel Contents Preparations Playback Voice Functions Setup Setup Various settings 30 Firmware Update 31 ...

Page 30: ...t on standby by connecting a BLUETOOTH enabled device With the input selector at AUX press and hold the S BASS button for about 1 second and confirm the setting status You can turn on or off by pressing and holding the S BASS button for about 3 seconds On When this function is used The front panel illumination LED lights or blinks blue Off When this function is not used The front panel illuminatio...

Page 31: ... malfunctions Updating can take up to a maximum of 5 minutes Existing settings are maintained even after updating Disclaimer The program and accompanying online documentation are furnished to you for use at your own risk Our company will not be liable and you will have no remedy for damages for any claim of any kind whatsoever concerning your use of the program or the accompanying online documenta...

Page 32: ...n advance Update 1 Connect the USB memory device to your PC 2 Download the firmware file from our company s website to your PC and unzip Firmware files are named as below SCS1001_ zip Unzip the file on your PC 3 Copy all unzipped files and folders to the root folder of the USB memory device Make sure to copy the unzipped files 4 Repeatedly press the INPUT button until the USB LED starts to blink a...

Page 33: ...g turn off and on the unit and the connected device The unit contains a microPC for signal processing and control functions In very rare situations severe interference noise from an external source or static electricity may cause it to lockup In the unlikely event that this happens unplug the power cord from the wall outlet wait at least 5 seconds and then plug it back in When the unit is operatin...

Page 34: ...rn the unit on The settings on this unit are kept If the issue is not fixed by restarting try unplugging this unit s power cord and then plugging it in again Resetting the unit this resets the unit settings to the default If the restart of the unit does not solve the problem reset the unit and restore all the settings to the factory default at the time of purchase This may solve the problem If the...

Page 35: ...al noise is produced by the unit unplug the power cord from the outlet immediately and contact the dealer or our company s support p30 Audio No sound from a connected player Change the input selector on this unit to the position of the terminal to which the player is connected BLUETOOTH function Unplug and plug the power cord of the unit or turn off and on the BLUETOOTH enabled device Restart of t...

Page 36: ...h a BLUETOOTH enabled device The BLUETOOTH reception is poor Move the BLUETOOTH enabled device closer to the unit or remove any obstacle between the BLUETOOTH enabled device and this unit USB Memory Device USB memory device not recognized Check if the USB memory device is securely inserted to the USB port of the unit Disconnect the USB memory device once from the unit and then reconnect it Dependi...

Page 37: ...Maximum radio frequency power transmitted in the frequency band s 2400 MHz 2483 5 MHz 10 dBm Maximum communication range Line of sight approx 15 m The actual range will vary depending on factors such as obstacles between devices magnetic fields arround a microwave oven static electricity cordless phone reception sensitivity antenna s performance operating system software application etc Supported ...

Page 38: ... off Bass 0 Treble 0 Average sound pressure 20 dB at 300 400 500 600 Hz Dimensions W H D SX70 327 682 341 mm 12 7 8 26 6 7 13 3 7 SX50 262 592 281 mm 10 1 3 23 1 3 11 Weight without package SX70 18 kg 39 7 lbs SX50 12 kg 26 5 lbs Others CHAIN IN 1 RCA Jack Rear AUX IN 1 ø3 5 mm Stereo mini jack Top CHAIN OUT 1 RCA Jack Rear USB 1 Ver 2 0 5 V 1 A Rear Specifications and features are subject to chan...

Page 39: ... 2018 Onkyo Pioneer Corporation All rights reserved 2018 Onkyo Pioneer Corporation Tous droits de reproduction et de traduction réservés Pioneer is a trademark of Pioneer Corporation and is used under license F1810 1 ...

Reviews: