03
Controls and displays
8
En
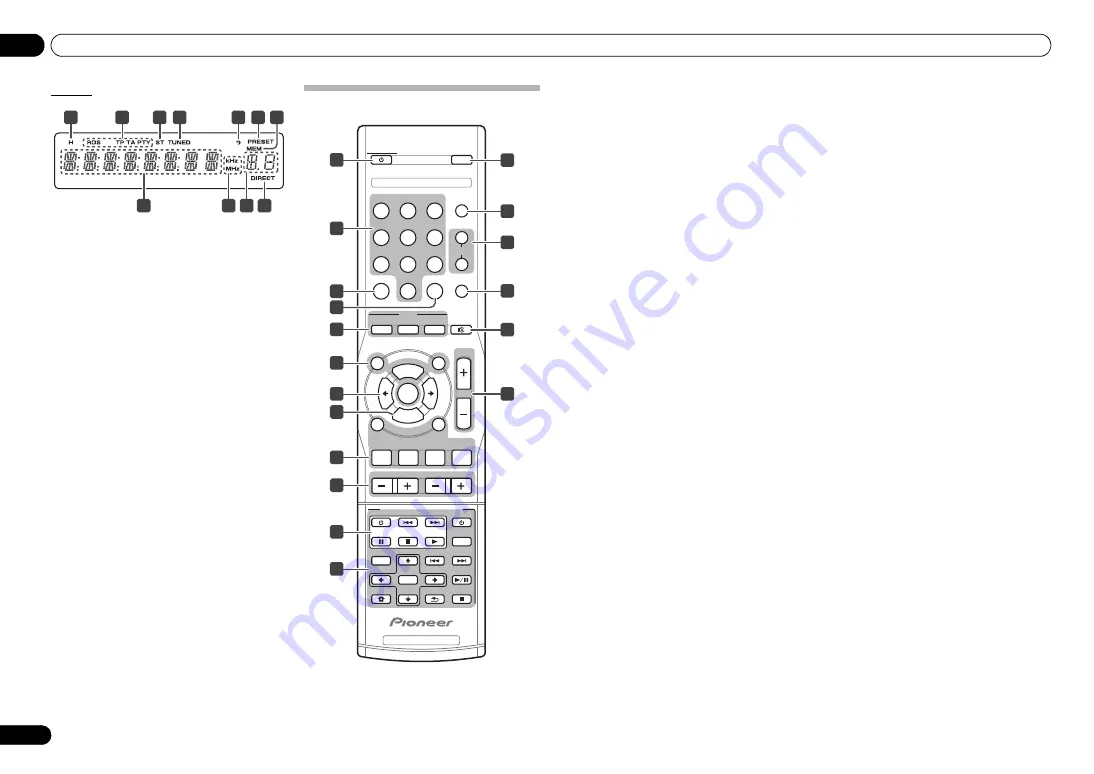
Display
1
H (Headphones)
Lights when both speakers
A
and
B
are switched off.
2
RDS indicators
Lights when an RDS broadcast is received.
3
ST
Lights when a stereo FM broadcast is being received in
stereo mode.
4
TUNED
Lights when a normal broadcast channel.
5
Sleep timer indicator
Lights when the receiver is in sleep mode.
6
PRESET
Lights when the tuner preset mode is selected.
7
MEM
Blinks when a radio station is registered.
8
Character display
Displays various system information.
9
kHz/MHz
Lights when the character display is showing the
currently received AM/FM broadcast frequency.
10 Preset information
Shows the preset number of the tuner.
11 DIRECT
Lights when the
TONE DIRECT
mode is switched on.
Remote control
5
2
1
3 4
7
11
10
6
8
9
SLEEP
APD
SPEAKERS
RDS
PTY
MUTE
VOLUME
MEM
P.SCAN
INPUT
FM/AM
SACD/CD
BASS
NETWORK AUDIO PLAYER
SACD PLAYER
RETURN
HOME MENU
FUNC
SETUP
ENTER
TREBLE
PHONO
NETWORK
RECORDER
FM MODE
SEARCH
DISPLAY
DIMMER
TONE DIRECT
SURROUND
1
2
3
4
5
6
A
B
7
8
9
0
STANDBY/ON
STEREO RECEIVER
BALANCE
T/P MODE
1
2
13
14
15
16
17
18
3
4
5
6
7
9
10
11
12
8
1
STANDBY/ON
Switches the receiver between standby and on.
2
Numeric buttons (0 ~ 9)
Press to select or to store preset.
3
TONE DIRECT
Press to select the TONE DIRECT mode (page 12).
4
SURROUND
Press to select the surround sound options (page 12).
5
RDS control buttons
SEARCH
– Use to select the search mode (page 11).
PTY
– Use to search for RDS program types
(page 11).
DISPLAY
– Use to display the RDS information
(page 11).
6
Tuner control buttons
FM MODE
– Press to select the desired FM mode
(Stereo or monaural) (page 10).
P.SCAN
– Press to scan the stations in the preset
sequence (page 10).
T/P MODE
– Press to select the tuning mode or the
preset mode (page 10).
MEM
– Press to store preset stations (page 10).
7
/
At the tuning mode, use to find radio frequencies.
At the preset mode, use to select preset radio stations.
Also used when setting up the receiver.
8
BALANCE
When adjusting the sound volume balance, press to
enter the balance mode (page 11).
9
Input function buttons
Press to select an input source. These select the
component connected to the corresponding input on the
rear panel.
INPUT
– Press repeatedly to select desired input
function. Use to change the input source. The
source changes as below.
SACD/CD
NETWORK
PHONO
RECORDER
FM/AM
Return to the beginning.
10 Tone control buttons
BASS +/–
– Use to adjust Bass (page 11).
/–
– Use to adjust Treble (page 11).
11 SACD PLAYER control buttons
Use to control Pioneer SACD/CD player.
12 NETWORK AUDIO PLAYER control
buttons
Use to control Pioneer network audio player.
13 SLEEP
Press to change the amount of time before the receiver
switches into standby (10 min – 20 min – 30 min – 60 min
– 90 min – Off). You can check the remaining sleep time
at any time by pressing
SLEEP
once.
14 APD
Use to change the Auto Power Down function setting
(page 12).
15 SPEAKERS A/B buttons
These buttons allow you to select various combinations
of speakers as follows:
• To drive
A
speakers, press
SPEAKERS A
button
(
SPK A
is displayed).
• To drive
B
speakers, press
SPEAKERS B
button
(
SPK B
is displayed).
• To drive both
A
and
B
speakers, press
SPEAKERS A
and
B
buttons in order (
SPK A B
is displayed).
• When using headphones for private listening, press
these buttons in order to switch off the speakers
A
and
B
(
SPK OFF
is displayed, and
H
indicator
lights).
16 DIMMER
Dims or brightens the display. The brightness can be
controlled in four steps.
17 MUTE
Mutes/unmutes the sound.
18 /–
Use to set the listening volume.


