AVH-P5200BT/XNUC
95
5
6
7
8
5
6
7
8
C
D
F
A
B
E
Fig.
8
-
-
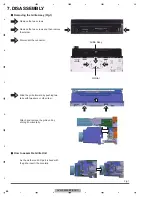
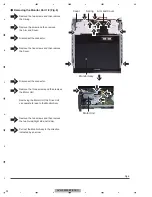
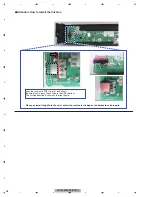
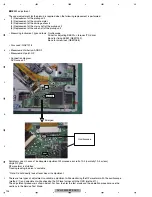
Removing
the
BT P
C
B
and
BT
A
NT P
C
B
(Fig.
8
)
O
nly
BT
model
Straighten
the
tabs
at
two
locations
indicated
and
then
remove
the
BT P
C
B
.
Disconnect
the
Cord
Assy
using
GGF1
539
.
Remove
the
screw
and
then
remove
the
BT
A
NT P
C
B
.
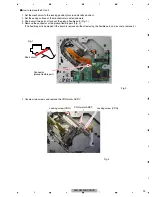
1
1
2
3
1
2
3
BT
A
NT P
C
B
BT P
C
B
Connector
Coaxial
J
umper
GGF1
539
W
hen
unplugging
the
Coaxial
J
umper,
ma
k
e
sure
to
use
j
ig
GGF1
539
.
I
f
the
antenna
cable
is
directly
unplugged
without
using
j
ig
GGF1
539
,
you
might
damage
your
fingertip
or
fingernail.
-
-
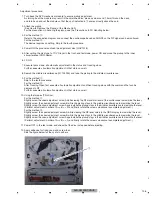
How
to
Remove
the
Coa
x
ial
Ju
mper
-
-
W
hen
unplugging
Coaxial
J
umper,
hoo
k
the
point
of
j
ig
GGF1
539
on
the
lid
of
Coaxial
J
umper
-
-
and
vertically
draw
out
along
with
the
engagement
axis
of
connector.
-
-
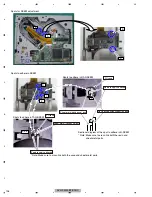
How
to
Atta
c
h
the
Coa
x
ial
Ju
mper
-
-
For
inserting
Coaxial
J
umper,
ad
j
ust
cord
assy
with
the
engagement
axis
of
connector
and
insert
it
as
vertically
-
-
as
possible.
-
-
Do
not
insert
the
Coaxial
J
umper
in
extreme
slant,
as
the
connector
might
suffer
damage.
Summary of Contents for Super Tuner IIID AVH-P5200BT
Page 29: ...AVH P5200BT XNUC 29 5 6 7 8 5 6 7 8 C D F A B E ...
Page 64: ...AVH P5200BT XNUC 64 1 2 3 4 1 2 3 4 C D F A B E ...
Page 65: ...AVH P5200BT XNUC 65 5 6 7 8 5 6 7 8 C D F A B E ...
Page 102: ...AVH P5200BT XNUC 102 1 2 3 4 1 2 3 4 C D F A B E ...
Page 157: ...AVH P5200BT XNUC 157 5 6 7 8 5 6 7 8 C D F A B E ...
Page 161: ...AVH P5200BT XNUC 161 5 6 7 8 5 6 7 8 C D F A B E ...
Page 171: ...AVH P5200BT XNUC 171 5 6 7 8 5 6 7 8 C D F A B E ...
Page 187: ...AVH P5200BT XNUC 187 5 6 7 8 5 6 7 8 C D F A B E ...

