background image

Troubleshooting

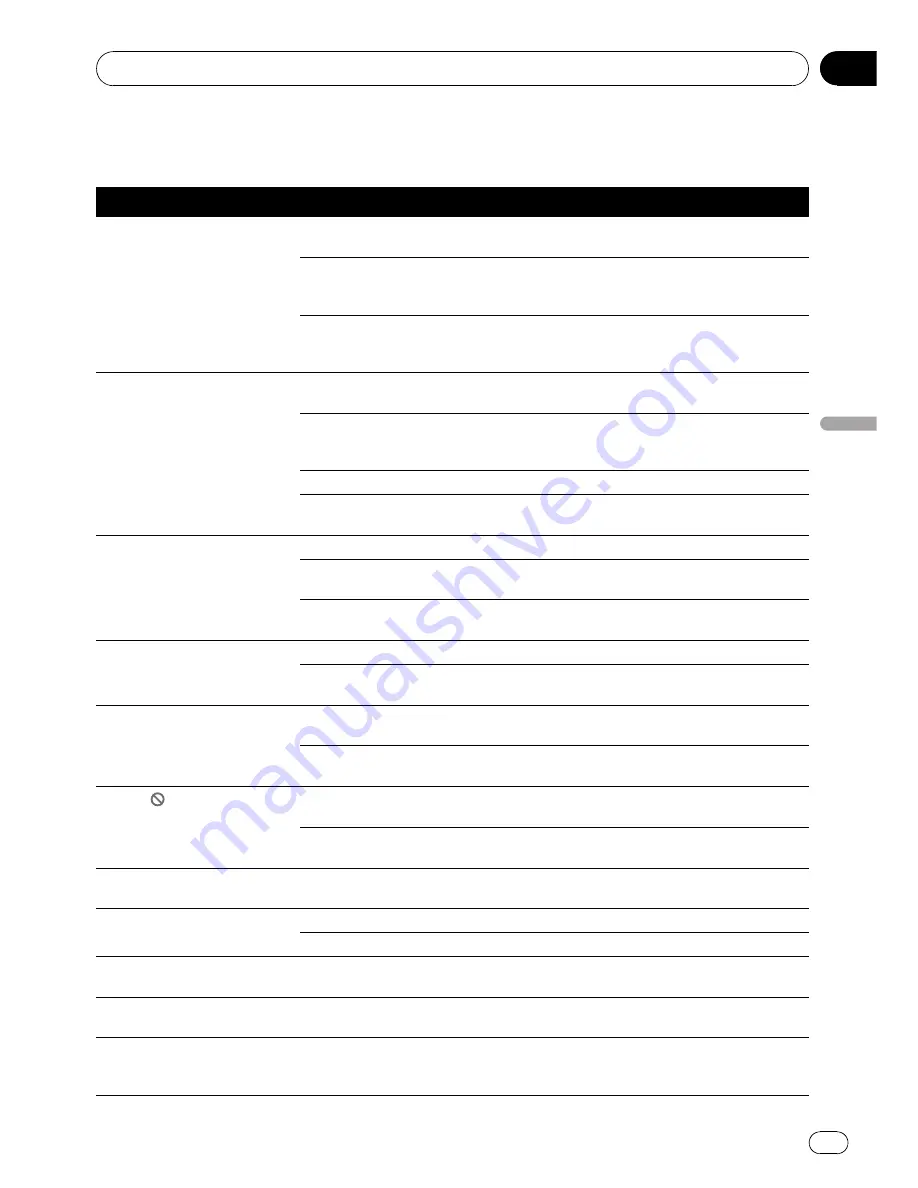
Common

Symptom

Cause

Action (See)

Power doesn

t turn on.

The unit doesn

t operate.

Leads and connectors are incor-
rectly connected.

Confirm once more that all connections are
correct.

The fuse is blown.

Rectify the reason for the fuse blowing, then
replace the fuse. Be very sure to install a fuse
with the same rating.

Noise and other factors are causing
the built-in microprocessor to oper-
ate incorrectly.

Press

RESET

. (Page 10)

Operation with the remote con-
trol isn

t possible.

The unit does not operate cor-
rectly even when the appropriate
remote control buttons are
pressed.

The remote control operation mode
is incorrect.

Switch to the correct remote control mode.

The remote control code is incor-
rect.

Make sure the remote control selection
switch setting and code type setting are the
same.

Battery power is low.

Load new battery.

Some operations are prohibited
with certain discs.

Check by using another disc.

Playback is not possible.

The disc is dirty.

Clean disc. (Page 99)

The loaded disc is a type this unit
cannot play.

Check what type the disc is.

Non compatible video system disc
is loaded.

Change to a disc compatible to your video
system.

No sounds are heard.
The volume level will not rise.

Cables are not connected correctly.

Connect the cables correctly.

The unit is performing still, slow mo-
tion or frame-by-frame playback.

There is no sound during still, slow motion or
frame-by-frame playback.

There is no picture.

The parking brake cord is not con-
nected.

Connect a parking brake cord, and apply the
parking brake.

The parking brake is not applied.

Connect a parking brake cord, and apply the
parking brake.

The icon

is displayed, and op-

eration is not possible.

The operation is prohibited for the
disc.

This operation is not possible.

The operation is not compatible
with the disc

s organization.

This operation is not possible.

The picture stops (pauses) and
the unit cannot be operated.

Reading of data has become impos-
sible during playback.

After stopping playback once, start playback
once more.

There is no sound.
Volume level is low.

The volume level is low.

Adjust the volume level.

The attenuator is on.

Turn the attenuator off.

There is audio and video skip-
ping.

The unit is not firmly secured.

Secure the unit firmly.

The picture is stretched, the as-
pect is incorrect.

The aspect setting is incorrect for
the display.

Select the appropriate setting for your display.
(Page 46)

When the ignition switch is
turned ON (or turned to ACC),
the motor sounds.

The unit is confirming whether a
disc is loaded or not.

This is a normal operation.

Additional Information

En

93

Appendix

Additional

Information

Summary of Contents for Super Tuner IIID AVH-P4100DVD

Page 1: ...Operation Manual DVD AV RECEIVER AVH P4100DVD English ...

Page 2: ...ing to the radio 17 Storing and recalling broadcast frequencies 17 Introduction of advanced tuner operation 18 Storing the strongest broadcast frequencies 18 Tuning in strong signals 18 Playing DVD discs Watching a DVD 19 Skipping back or forward to another title 20 Operating the DVD menu 20 Resume playback Bookmark 20 CM skip CM back 20 Frame by frame playback 21 Slow motion playback 21 Pausing p...

Page 3: ...peration 35 Repeating play 35 Playing files in random order 35 Playing songs in a USB storage device Basic Operations 36 Selecting files from the file name list 36 Pausing compressed audio playback 37 Switching the media file type 37 Using advanced sound retriever 37 Introduction to advanced operations 37 Using iPod Basic Operations 38 Playing video 39 Browsing for a song video 39 Displaying text ...

Page 4: ...55 Selecting the background display 55 Selecting the illumination color 55 Selecting the OSD color 56 Other Functions Adjusting the response positions of the touch panels Touch Panel Calibration 57 Using the AUX source 57 Using the external unit 58 Available accessories Multi CD Player 60 XM tuner 62 SIRIUS Satellite Radio tuner 65 HD Radio tuner 69 Bluetooth Audio 71 Bluetooth Telephone 73 TV tun...

Page 5: ...is on and the vehicle is not in motion 10 Never set the volume of your display so high that you cannot hear outside traffic and emergency vehicles WARNING Do not attempt to install or service your display by yourself Installation or servi cing of the display by persons without training and experience in electronic equipment and automotive accessories may be dangerous and could expose you to the ri...

Page 6: ...ng When using a rear view camera With an optional rear view camera you are able to use this unit as an aid to keep an eye on trailers or backing into a tight parking spot WARNING SCREEN IMAGE MAY APPEAR RE VERSED USE INPUT ONLY FOR REVERSE OR MIRROR IMAGE REAR VIEW CAMERA OTHER USE MAY RESULT IN INJURY OR DAMAGE CAUTION The rear view camera function is to be used as an aid to keep an eye on traile...

Page 7: ...a reference for op erating procedures and precautions Always keep the volume low enough so that you can hear sounds from outside the vehicle Protect this unit from moisture If the battery is disconnected or discharged the preset memory will be erased and must be reprogrammed Important Serial number The serial number is located on the bottom of this unit For your own security and convenience be sur...

Page 8: ...ceive updates on the latest products and technologies 3 Download owner s manuals order product catalogues research new products and much more 4 Your feedback is important in our continual ef fort to design and build the most advanced cunsumer focused product in the industry Serial number Features Touch panel key operation It is possible to operate this unit by using touch panel key Also scroll bar...

Page 9: ...D BTB200 you can control Bluetooth audio player featur ing Bluetooth wireless technology About DivX DivX is a compressed digital video format cre ated by the DivX video codec from DivX Inc This unit can play DivX video files recorded on CD R RW ROM and DVD R RW ROM discs Keeping the same terminology as DVD video individual DivX video files are called Titles When naming files titles on a CD R RW or...

Page 10: ...s RESET with a pen tip or other pointed instrument RESET button Note After completing connections or when you want to erase all memorized settings or return the unit to its initial factory settings switch your engine ON or set the ignition switch to ACC ON before pressing RESET Feature demo mode The feature demo automatically starts when you select the source Off The demo continues while the ignit...

Page 11: ...n Press to cycle through all the available sources Press and hold to turn the source off 5 VOLUME buttons Press to increase or decrease the volume 6 MUTE button Press to turn off the sound To turn on the sound press again 7 h eject button Press to eject a disc from this unit Optional remote control The remote control CD R55 is sold separately For details concerning operations see the re mote contr...

Page 12: ... 2 AUX 1 AUX 1 AUX 2 AUX 2 USB iPod USB iPod Telephone Bluetooth telephone BT AUDIO Bluetooth audio player XM XM tuner SIRIUS SIRIUS tuner HD Radio HD Radio tuner Rear View Rear view camera Off Turn the unit off When the source icon is not displayed you can display it by touching the screen While operating the menu you cannot select a source by touching the source icon To close source select menu ...

Page 13: ...t 2 by this unit When this unit s blue white lead is connected to the vehicle s auto antenna relay control terminal the vehicle s antenna extends when this unit s source is turned on To retract the antenna turn the source off Adjusting the volume Press or to adjust the sound level Touch panel key basic operation Activating the touch panel keys 1 2 1 Information area Shows the various information d...

Page 14: ...ble ones are highlighted When AV Menu is not displayed you can dis play it by touching the screen 2 Touch the desired key to display the function names you want to operate 3 Touch ESC to return to the display of each source Operating the scroll bar and the scrubber bar 1 1 1 2 1 Scroll bar 2 Scrubber bar This unit features touch operation of scroll bar and scrubber bar If the menu has multiple pag...

Page 15: ... 2 Touch to open the LCD panel Disc loading slot appears When a DVD R RW CD R RW is loaded in this unit touch the source icon and then touch Disc to select Disc 3 Insert a DVD R RW CD R RW into the disc loading slot LCD panel is closed automatically and play back will start Disc loading slot Be sure to turn up the label side of a DVD R RW CD R RW After a DVD R RW CD R RW has been inserted use touc...

Page 16: ...layback pauses a disc that s playing or restarts a paused disc g Stops playback o Skips to the start of the current track chapter or file then to previous tracks chapters files Performs fast reverse by touching and holding o p Skips to the next track chapter or file Performs fast forward by touching and holding p Note You may find with some DVD or Video CD discs that some playback controls do not ...

Page 17: ...hing c or d for about one second and release The tuner will scan the frequencies until a broadcast strong enough for good reception is found You can cancel seek tuning by briefly touching either c or d If you keep touching c or d you can skip sta tions Seek tuning starts as soon as you release the key You can also perform seek tuning by pressing and holding c or d TRACK Note Listening AM radio whi...

Page 18: ...P6 Touch BSM on the function menu to turn BSM on BSM begins to flash While BSM is flashing the six strongest broadcast frequencies will be stored under preset tuning keys P1 to P6 in order of their signal strength When finished BSM stops flashing To cancel the storage process touch BSM again Tuning in strong signals Local seek tuning lets you tune in only those radio stations with sufficiently str...

Page 19: ... select the DVD player If no disc is loaded in the unit you cannot se lect Disc DVD player Insert a disc in the unit Refer to page 15 With some discs a menu may be displayed Refer to Operating the DVD menu on the next page 2 Touch the screen to display the touch panel keys Touch Hide to hide the touch panel keys 3 To skip back or forward to another chapter touch o or p Touching p skips to the star...

Page 20: ...to select the desired menu item 3 Touch Playback starts from the selected menu item The way to display the menu differs depending on the disc Resume playback Bookmark The Bookmark function lets you resume play back from a selected scene the next time the disc is loaded During playback touch Bookmark at the point you want to resume playback next time The selected scene will be bookmarked so that pl...

Page 21: ...r chapter Time time or 10key numeric keypad Chapter search and time search are not possible when disc playback has been stopped 1 Touch Search 2 Touch the desired search option e g Chapter 3 Touch 0 to 9 to input the desired num ber To cancel the inputted numbers touch C In the time search function to select 1 hour 11 minutes convert the time into 071 minutes 00 seconds and touch 0 7 1 0 and 0 in ...

Page 22: ...th DVDs featuring multi angle scenes shot from multiple angles recordings you can switch among viewing angles during play back During playback of a scene shot from mul tiple angles the angle icon is dis played Turn angle icon display on or off using Setup For details refer to Setting the angle icon display on page 46 Touch Angle during playback of a scene shot from multiple angles Note Touching An...

Page 23: ...lay range changes to Disc Selecting audio output When playing DVD video discs recorded with LPCM audio you can switch the audio output This function is not possible when disc playback has been stopped If you select Linear PCM when playing a disc recorded on a dual mono mode you can operate this function Refer to Setting for digital output on page 48 Touch L R Select on the function menu to select ...

Page 24: ...rm these operations You can also skip back or forward to another track by pressing c or d TRACK 4 To perform fast forward or reverse keep touching o or p If you keep touching o or p for five sec onds the icon m or n is highlighted When this happens fast reverse fast forward continues even if you release o or p To resume playback at a desired point touch f Fast forward fast reverse may not be possi...

Page 25: ...layback To resume playback at the same point that you turned pause on touch f again Searching for a desired scene starting playback from a specified time You can use the search function to search for a desired scene by specifying a track and the time search function to specify the time on a disc at which play starts During playback of Video CDs featuring PBC playback control this function can not ...

Page 26: ...peat the current track If you perform track search or fast forward re verse the repeat play range changes to Disc Selecting audio output You can switch between stereo and monaural audio output This function is not possible when disc playback has been stopped Touch L R Select on the function menu to select the audio output Touch L R Select repeatedly until the desired audio output appears in the di...

Page 27: ... disc is loaded in the unit you cannot se lect Disc DVD player Insert a disc in the unit Refer to page 15 2 To skip back or forward to another track briefly touch o or p Touching p skips to the start of the next track Touching o once skips to the start of the current track Touching it again will skip to the previous track You can also skip back or forward to another track by pressing c or d TRACK ...

Page 28: ...displayed and oper able ones are highlighted 2 Touch ESC to return to the playback dis play To return to the previous display touch Back Repeating play There are two repeat play ranges for the CD playback Track track repeat and Disc disc repeat Touch Repeat on the function menu to select the repeat range Disc Repeat the current disc Track Repeat the current track If you perform track search or fas...

Page 29: ... a disc in the unit Refer to page 15 2 Touch a or b to select a folder You cannot select a folder that does not have a compressed audio file recorded in it 3 To skip back or forward to another file touch o or p Touching p skips to the start of the next file Touching o once skips to the start of the current file Touching it again will skip to the previous file You can also skip back or forward to a...

Page 30: ...use on touch f again Switching the media file type If a disc contains a mixture of various media file types such as DivX and MP3 you can switch between media file types to play Refer to Switching the media file type on page 16 Touch Media to switch between media file types Using advanced sound retriever Advanced sound retriever function automati cally enhances compressed audio and re stores rich s...

Page 31: ...ying tracks in random order Random play lets you play back tracks in a random order within the repeat range Folder and Disc Touch Random on the function menu to turn random play on Tracks will play in a random order within the previously selected Folder or Disc ranges To turn random play off touch Random again Scanning folders and tracks While you are using Folder the beginning of each track in th...

Page 32: ...skips to the start of the current file Touching it again will skip to the previous file You can also skip back or forward to another file by pressing c or d TRACK 5 To perform fast forward or reverse keep touching o or p When DivX disc is playing if you keep touch ing o or p for five seconds the icon m or n is highlighted When this happens fast reverse fast forward continues even if you re lease o...

Page 33: ... will be displayed Playable number of times is displayed with Remaining Views Important In order to play DivX VOD content on this unit you first need to register the unit with your DivX VOD content provider About your regis tration code refer to Displaying your DivX VOD registration code on page 48 DivX VOD content is protected by a DRM Di gital Rights Management system This re stricts playback of...

Page 34: ...s touch C To select 1 hour 11 minutes convert the time into 071 minutes 00 seconds and touch 0 7 1 0 and 0 in that order 3 Touch This starts playback from the selected part Changing audio language during playback Multi audio You can switch audio language during play back when playing a file recorded with dialog in two or more languages This function is available for DivX disc Touch Audio during pl...

Page 35: ...le file repeat and Disc repeat all files For JPEG picture file playback there are two repeat play ranges Folder folder repeat and Disc repeat all files Touch Repeat on the function menu to select the repeat range Disc Repeat all files Folder Repeat the current folder File Repeat just the current file If you select another folder during repeat play the repeat play range changes to Disc If you perfo...

Page 36: ...start of the current file Touching it again will skip to the previous file You can also perform fast reverse fast forward by pressing and holding c or d TRACK 4 To perform fast forward or reverse keep touching o or p You can also skip back or forward to another file by pressing c or d TRACK Notes Optimum performance of this unit may not be obtained depending on the connected USB portable audio pla...

Page 37: ... 1 Touch AV Menu and then touch Function Menu to display the function names The function names are displayed and oper able ones are highlighted 2 Touch ESC to return to the playback dis play To return to the previous display touch Back Function and operation Repeat Random and Scan operations are ba sically the same as that of the built in DVD player Function name Operation Repeat Refer to Repeatin...

Page 38: ...the data size in the iPod there may be a delay to start play ing after connection After the iPod has been connected to this unit use touch panel keys to select the iPod When removing the iPod from this unit this unit is turned off 2 To skip back or forward to another song touch o or p You can also skip back or forward to another song video by pressing c or d TRACK 3 To perform fast forward or reve...

Page 39: ...ith this unit is designed to be as close to the iPod as possible to make operation and song video search easy If the characters recorded on the iPod are not compatible with this unit those charac ters are not displayed Searching songs videos by category 1 Touch MENU to display iPod menus 2 Touch one of the categories in which you want to search for a song video When browsing for a song Playlists p...

Page 40: ...ctive than ASR1 Note When you use this unit with a multi channel pro cessor DEQ P8000 and switch the advanced sound retriever function to ASR1 or ASR2 the vo lume will become slightly lower The volume will become much lower for ASR2 than it will for ASR1 Take care when you increase the volume for ASR2 and then switch to Off because the vo lume will suddenly seem much louder Repeating play For play...

Page 41: ...fol lowing lists Album list of currently playing artist Song list of currently playing album Album list of currently playing genre Depending on the number of files in the iPod there may be a delay when displaying a list 1 Touch Link Play Link play selection screen is displayed 2 Touch a desired mode Artists Plays songs related to the cur rently playing artist Albums Plays songs related to the cur ...

Page 42: ...a or b to adjust front rear speaker balance Front 15 to Rear 15 is displayed as the front rear speaker balance moves from front to rear FR 0 LR 0 is the proper setting when only two speakers are used When the rear output setting is Subwoofer you cannot adjust front rear speaker balance Refer to Setting the rear output and subwoofer controller on page 49 3 Touch c or d to adjust left right speak er...

Page 43: ...ouch c 3 Touch c or d to select a desired level Low low Mid mid High high Using subwoofer output This unit is equipped with a subwoofer output which can be turned on or off When the subwoofer output is on you can adjust the cut off frequency and the output level of the subwoofer 1 Touch Subwoofer on the audio function menu 2 Touch d next to Subwoofer to turn sub woofer output on To turn subwoofer ...

Page 44: ...e level adjustment lets you adjust the volume level of each source to prevent ra dical changes in volume when switching be tween sources Settings are based on the FM volume level which remains unchanged 1 Compare the FM volume level with the level of the source you wish to adjust 2 Touch Source Level Adjuster on the audio function menu 3 Touch c or d to adjust the source vo lume Each time you touc...

Page 45: ...isc is displayed You can also switch the subtitle language by touching Subtitle during playback Refer to Changing the subtitle language during play back Multi subtitle on page 22 Even if you use Subtitle during playback to switch the subtitle language this does not af fect the settings here When you select Others When you select Others a language code input display is shown Please see the follow i...

Page 46: ...for the display connected to V OUT When using a regular display select either Letter Box or Pan Scan Selecting 16 9 may result in an unnatural picture If you select the TV aspect the unit s dis play changes to the same setting Touch TV Aspect on the DVD setup menu to select the TV aspect Touch TV Aspect repeatedly until the desired TV aspect appears in the display 16 9 Wide screen picture 16 9 is ...

Page 47: ...terature or on the disc it self Parental lock of this unit is not possible if a parental lock level is not recorded in the disc With some discs the parental lock may be ac tive only on the scenes with certain levels The playback of those scenes will be skipped For details refer to the instruction manual that came with the discs Changing the level You can change the set parental lock level 1 Touch ...

Page 48: ... the DVD setup menu Your 8 digit registration code is displayed Make a note of the code as you will need it when you register with a DivX VOD provider Setting for digital output Audio which is outputted from digital output of this unit can be selected Normally set to Stream If this unit s digital output is not used there is no need to change settings Selecting Linear PCM enables you to switch the ...

Page 49: ...od an iPod with video capabilities con nected with CD IU200V Off No auxiliary device is connected Switching the auxiliary 2 setting Touch AUX2 on the initial menu to turn auxiliary 2 setting on To turn auxiliary 2 setting off touch AUX2 again Setting the rear output and subwoofer controller This unit s rear output rear speaker leads out put and RCA rear output can be used for full range speaker Fu...

Page 50: ...owing order English English Español Spanish Français French Switching the sound muting attenuation Sound from this system is muted or attenu ated automatically when the signal from the equipment with mute function is received Sound from this system returns to normal when the muting or attenuation is can celed Touch TEL on the initial menu to select the setting Touch TEL until the desired setting a...

Page 51: ...e display High High quality sound Low Minimize distortion sound Auto TA and EQ auto time alignment and auto equalizing The auto time alignment is automatically ad justed for the distance between each speaker and the listening position The auto equalizer automatically measures the car interior acoustic characteristics and then creates the auto equalizer curve based on that information Only when the...

Page 52: ...en on a wide screen Cinema cinema The picture is enlarged by the same proportion as Full or Zoom in the horizontal direction and by an intermediate proportion between Full and Zoom in the vertical direction ideal for a cinema sized picture wide screen picture where cap tions lie outside Zoom zoom A 4 3 picture is enlarged in the same proportion both vertically and horizontally ideal for a cine ma ...

Page 53: ...e adjust ment may not be possible 3 Touch c or d to adjust the selected item Each time you touch c or d it increases or de creases the level of selected item 24 to 24 is displayed as the level is increased or de creased Temperature can be adjusted from 3 to 3 Black Level can be set on or off Adjusting the dimmer To prevent the display from being too bright at night the display is automatically dim...

Page 54: ...era video V IN jack when a rear view camera is installed on your vehicle When the gear shift is in RE VERSE R position the video automatically switches to a rear view camera video For more details consult your dealer After you set up the rear view camera set ting move the gear shift in REVERSE R and confirm if a rear view camera video can be shown on the display If the display should be switched t...

Page 55: ... video unit that is connected to this unit When the AV AV input is not set to Video AV Input cannot be selected Refer to page 53 If no JPEG image has been stored in this unit you cannot select Photo To store JPEG image in this unit see the following section Refer to Cap ture an image in JPEG files on page 34 Selecting the illumination color This unit is equipped with multiple color illu mination D...

Page 56: ...sounds The customized color has been stored in mem ory The next time you touch the same preset key the color is recalled from memory Selecting the OSD color You can change the OSD color 1 Touch Screen Color on the entertain ment menu 2 Touch one of the color list You can select one from the following list Blue blue Red red Amber amber Green green White white Entertainment settings En 56 Section 17...

Page 57: ...le saving the ad justed position data 5 Press DISP OFF to proceed to the 16 point adjustment The 16 point touch panel adjustment screen appears To cancel the adjustment press and hold MUTE 6 Gently touch the center of the mark displayed on the screen with the touch panel adjustment pen After you touch all the marks the adjusted po sition data is saved Do not turn off the engine while saving the ad...

Page 58: ...ch between the following character types Alphabet upper case Alphabet lower case You can select to input numbers and symbols by touching 123 3 Touch a or b to select a letter of the al phabet 4 Touch c or d to move the cursor 5 Touch OK to store the entered title in memory 6 Touch ESC to return to the ordinary dis play Using the external unit External unit refers to a Pioneer product such as ones ...

Page 59: ...ction Menu to display the function names The function names are displayed and oper able ones are highlighted Function1 function 1 Function2 function 2 Function3 function 3 Function4 function 4 Auto Manual auto manual 2 Touch ESC to return to the ordinary dis play To return to the previous display touch Back Other Functions En 59 Section 18 Other Functions ...

Page 60: ... another track briefly touch o or p Touching p skips to the start of the next track Touching o once skips to the start of the current track Touching it again will skip to the previous track You can also skip back or forward to another track by pressing c or d TRACK 4 To perform fast forward or reverse keep touching o or p You can also perform fast reverse fast forward by pressing and holding c or ...

Page 61: ...re using Disc the be ginning of each track on the se lected disc plays for about 10 seconds When you are using Multi CD the beginning of the first track of each disc is played for about 10 seconds Notes If you select other discs during repeat play the repeat play range changes to Multi CD If you perform track search or fast forward re verse during Track the repeat play range changes to Disc After ...

Page 62: ...atedly until the desired XM band is displayed XM1 XM2 or XM3 3 Touch c or d to select a desired channel The channels move up or down step by step Channels that cannot currently be selected are skipped and the next channel is selected If you touch and hold c or d you can in crease or decrease the channel number con tinuously You can also select a channel by pressing c or d TRACK You can also perfor...

Page 63: ...s follows Channel name Song title Artist name 2 Touch the desired channel that you want to listen to When the CATEGORY mode is selected touch a or b to switch to another category Selecting an XM channel directly You can select an XM channel directly by en tering the desired channel number 1 Touch DIRECT 2 Touch 0 to 9 to input the desired chan nel number To cancel the input numbers touch C 3 Touch...

Page 64: ...roadcast or set it up to off to stop the alert for that song 1 Touch MEMO EDIT The MyMix playlist is displayed 2 Touch the song title that you want to set up the alert to off The check mark is removed and the alert for that song is off Deleting the song from the MyMix playlist You can delete each song in the MyMix playlist 1 Touch MEMO EDIT The MyMix playlist is displayed 2 Touch DELETE next to th...

Page 65: ...s displayed SR1 SR2 or SR3 3 Touch c or d to select a desired channel The channels move up or down step by step Channels that cannot currently be selected are skipped and the next channel is selected If you touch and hold c or d you can in crease or decrease the channel number con tinuously You can also select a channel by pressing c or d TRACK You can also perform tuning from a desired channel ca...

Page 66: ...l number To cancel the input numbers touch C 3 Touch The SIRIUS channel of entered number is selected Using the MyMix function The MyMix function allows you to make the MyMix song playlist When the song in the MyMix playlist is being broadcast on a station other than the one you are listening to you will be alerted and you can tune to the station to listen to that song This function is available f...

Page 67: ...turn the alert off The alert for the song is turned off Deleting the song from the MyMix playlist You can delete each song in the MyMix playlist 1 Touch MEMO EDIT The song title in the MyMix playlist is dis played 2 Touch c or d to select the song title that you want to delete 3 Touch DELETE 4 A message will appear asking you to confirm to delete it Touch Yes The selected song is deleted To cancel...

Page 68: ...de any team selections NOT SET is displayed When games involving your favorite teams are not currently playing NO GAME is displayed Displaying the Radio ID If you select CH000 the ID code is displayed Touch c or d to select CH000 To select CH000 set the channel select setting to ALL CH About the channel select setting refer to Selecting the SIRIUS channel select mode on page 66 Switching the SIRIU...

Page 69: ...h the source icon and then touch HD Radio to select the HD Radio 2 Touch Band to select a band Touch Band until the desired band FM1 FM2 FM3 for FM or AM is displayed 3 To perform manual tuning briefly touch c or d You can also perform manual tuning by press ing c or d TRACK 4 To perform seek tuning keep touching c or d for about one second and release The tuner will scan the frequencies until a b...

Page 70: ... reception of only the strongest stations while lower settings let you receive progressively weaker stations Switching the seek mode There are two method of seek tuning settings one is HD Digital broadcasting stations seek and the other is ALL normal seek Touch SEEK MODE on the function menu to select your favorite setting ALL HD Switching the reception mode If a digital broadcast reception condit...

Page 71: ...e talking on a cellular phone con nected to this unit via Bluetooth wireless tech nology song playback from your Bluetooth audio player connected to this unit is muted Even if you are listening to a song on your Bluetooth audio player and you switch to an other source song playback continues For details concerning operation refer to the Bluetooth adapter s operation manual This section provides br...

Page 72: ...aiting is displayed This unit is now on standby for connection from Bluetooth audio player If your Bluetooth audio player is set ready for Bluetooth wireless connection connection to this unit is automatically established Note Before you can use audio players you may need to enter the PIN code into this unit If your player requires a PIN code to establish a connection look for the code on the play...

Page 73: ...n for more details refer to Setting automatic rejecting on page 79 5 Voice recognition indicator Shows when the voice recognition function is on for more details refer to Voice recogni tion on the next page 6 Signal level indicator Shows the signal strength of cellular phone The level shown on the indicator may dif fer form the actual signal level Depending on the cellular phones featur ing Blueto...

Page 74: ...arily con nected However to make best use of the technol ogy we recommend you register the phone to this unit 2 Registration To register your temporarily connected phone refer to Registering a connected cellular phone on page 76 3 Volume adjustment Adjust the earpiece volume on your cellular phone for comfort When adjusted the volume level is recorded in this unit as the default set ting Caller s ...

Page 75: ...ooth wireless technology are found device name or Name Not Found if names cannot be ob tained is displayed If this unit fails to find any available cellular phones Not Found is displayed You can display the BD address by touching BD ADDR To return to the device name touch Phone Name 3 Touch the device name you want to connect While connecting Connecting flashes To complete the connection check the...

Page 76: ...elete A confirmation display appears Touch OK to delete the phone To cancel deleting a registered phone touch Cancel Connecting to a registered cellular phone Connecting to a registered phone manually 1 Touch Phone Connect on the function menu 2 Touch Direct Connect 3 Touch the device name you want to connect While connecting Connecting is flashing If connection fails Connection Error is dis playe...

Page 77: ...Book entry you want to call The display is switched to the Phone Book de tail display 5 Touch phone number of the Phone Book entry you want to call If several phone numbers are entered to an entry touch one you want to call The display returns to the normal display and the Phone Book entry you selected is dis played on the information bar 6 Touch to make a call For an international call touch Add ...

Page 78: ...For an international call touch Add to add to the phone number 4 To end the call touch Using preset numbers Important Be sure to park your vehicle and apply the park ing brake when performing this operation Assigning preset numbers Numbers that you dial frequently can be as signed to presets for quick recall You can assign up to 6 frequently called phone numbers to number presets 1 Select a desire...

Page 79: ...ed call history Dial Preset preset phone numbers After selecting a desired item a confirmation display appears Touch OK to delete the mem ory If you do not want to clear memory that you have selected touch Cancel If you want to clear all the Phone Book dia led received missed call history list and preset phone number touch Clear All Setting automatic answering Touch Auto Answer on the function men...

Page 80: ...ides information on TV operations with this unit which differs from that described in the TV tuner s operation manual 1 Source icon Shows which source has been selected 2 Band indicator Shows which band the TV tuner is tuned to 3 Preset number indicator Shows which preset has been selected 4 Channel indicator Shows which channel the TV tuner is tuned 1 Touch the source icon and then touch TV to se...

Page 81: ...ted broadcast station has been stored in memory The next time you touch the same preset tun ing key the station is recalled from memory When P01 to P06 and P07 to P12 are not dis played you can display them by touching List You can also use a and b to recall stations assigned to preset tuning keys P01 to P12 Storing the strongest broadcast stations sequentially 1 Touch AV Menu and then touch Funct...

Page 82: ...putted from front speakers only When selecting FM as the source you cannot switch to Source Level Adjuster When playing other than the DVD disc you cannot switch to Dynamic Range Control When neither Front L nor Front R is selected in Position you cannot switch to Time Alignment When both the center speaker and the rear speaker are set to OFF in the speaker setting you cannot switch to Dolby Pro L...

Page 83: ...ound field control The SFC function creates the sensation of a live performance The acoustics of different performance en vironments are not the same and depend on the extent and contour of space through which sound waves move and on how sounds bounce off the stage walls floors and ceilings At a live performance you hear music in three stages direct sound early reflections and late reflections or ...

Page 84: ...ffective only on Dolby Digital sounds When playing other than the DVD disc you cannot switch to Dynamic Range Control 1 Touch Dynamic Range Control on the DSP function menu 2 Touch d to turn the dynamic range con trol on To turn dynamic range control off touch c Using the down mix function The down mix function allows you to play back multi channel audio in 2 channels 1 Touch Down Mix on the DSP f...

Page 85: ... To turn the panorama control off touch c 5 Touch b to select Dimension and then touch c or d to adjust front rear speaker balance Each time you touch c or d it moves the sound towards the front or the surrounds 3 to 3 is displayed as the front rear speaker balance moves from front to rear 6 Touch b to select Center Width and then touch c or d to adjust the center image Each time you touch c or d ...

Page 86: ...ct the phase of subwoofer output Touch d to select normal phase and Normal appears in the display Touch c to select re verse phase and Reverse appears in the dis play Note When playing a 2 channel mono source with Dolby Pro Logic II turned on there may be occa sions when the following will occur No audio is outputted if the center speaker setting is Small or Large and no center speak er is install...

Page 87: ...ence at intervals of about two seconds The current settings for the speaker over which you hear the test tone are shown in the display Front L front speaker left Center center speaker Front R front speaker right Rear R rear speaker right Rear L rear speaker left Subwoofer subwoofer Check each speaker output level If no adjust ments are needed perform step 4 to stop the test tone The settings do no...

Page 88: ...e distance be tween the selected speaker and the listen ing position Each time you touch c or d increases or de creases the distance 0 0inch to 200 0inch is displayed as the distance is increased or de creased Using the equalizer The equalizer lets you adjust the equalization to match the car s interior acoustic character istics as desired Recalling equalizer curves There are seven stored equalize...

Page 89: ...he desired speaker ap pears in the display Rear rear speakers Center center speaker Front front speakers You cannot select speakers whose size is set to Off Refer to Setting the speaker setting on page 85 5 Touch b and then touch c or d to se lect the equalizer band to be adjusted Each time you touch c or d selects equalizer bands in the following order Low low Mid mid High high 6 Touch b and then...

Page 90: ...ng time resulting in a drain on battery power Be sure to place the microphone in the specified loca tion Before operating the auto TA and EQ function Carry out auto TA and EQ in as quiet a place as possible with the car engine and air conditioning switched off Also cut power to car phones or portable telephones in the car or remove them from the car be fore carrying out auto TA and EQ Sounds other...

Page 91: ...lace the microphone If desired place the microphone on the front passenger seat to carry out auto TA and EQ 3 Turn the ignition switch to ON or ACC If the car s air conditioner or heater is turned on turn it off Noise from the fan in the air conditioner or heater may prevent correct auto TA and EQ Press SRC OFF to turn the source on if this unit is turned off 4 Select the position for the seat on ...

Page 92: ...s completed Complete is displayed When correct measurement of car interior acoustic characteristics is not possible an error message is displayed Refer to Under standing auto TA and EQ error messages on page 97 13 Touch ESC to cancel the auto TA and EQ mode 14 Store the microphone carefully in the glove compartment Store the microphone carefully in the glove compartment or any other safe place If ...

Page 93: ...t rise Cables are not connected correctly Connect the cables correctly The unit is performing still slow mo tion or frame by frame playback There is no sound during still slow motion or frame by frame playback There is no picture The parking brake cord is not con nected Connect a parking brake cord and apply the parking brake The parking brake is not applied Connect a parking brake cord and apply ...

Page 94: ...g the disc menu Playback is not with the audio language and subtitle language settings selected in Setup The DVD playing does not feature dialog or subtitles in the language selected in Setup Switching to a selected language is not possi ble if the language selected in Setup is not recorded on the disc Switching the viewing angle is not possible The DVD playing does not feature scenes shot from mu...

Page 95: ...r as this unit Replace the DVD video with one bearing the correct region number Error 02 XX FF FF Dirty disc Clean disc Scratched disc Replace disc The disc is loaded upside down Check that the disc is loaded correctly Electrical or mechanical Press RESET Unplayable Disc This type of disc cannot be played by this unit Replace the disc with one this unit can play The inserted disc does not contain ...

Page 96: ...io player USB memory are protected by Windows Media DRM 9 10 Transfer audio files not protected by Windows Media DRM 9 10 to the USB portable audio player USB memory and connect N A USB The USB device connected to is not supported by this unit Connect a USB portable audio player or USB memory that is USB Mass Storage Class compliant USB device is not formatted with FAT16 or FAT32 USB device should...

Page 97: ...he suggested method of correcting the problem After checking try again Message Cause Action Error Please check MIC Microphone is not connected Plug the supplied microphone securely into the jack Error Please check Front speaker Error Please check Front L speaker Error Please check Front R speaker Error Please check Center speaker Error Please check Rear speaker Error Please check Rear L speaker Er...

Page 98: ...s Messages Translation CAUTION Screen image may appear re versed Pioneer recommends the use of a camera which outputs mirror reversed images otherwise screen image may appear re versed Additional Information En 98 Appendix ...

Page 99: ...tures Do not attach labels write on or apply che micals to the surface of the discs To clean a disc wipe the disc with a soft cloth outward from the center If the heater is used in cold weather con densation may form on components inside the DVD player Condensation may cause the DVD player to not operate properly If you think that condensation is a problem turn off the DVD player for an hour or so...

Page 100: ...gs and the environ ment Please record with the correct for mat For details contact the manufacturer of the application Playback of CD R CD RW discs may be come impossible in case of direct exposure to sunlight high temperatures or the sto rage conditions in the vehicle Titles and other text information recorded on a CD R CD RW disc may not be dis played by this unit in the case of audio data CD DA...

Page 101: ...ory USB portable audio player even if that data is lost while using this unit This unit can play back files in the USB por table audio player USB memory that is USB Mass Storage Class However copy right protected files that are stored in above mentioned USB devices cannot be played back You cannot connect a USB portable audio player USB memory to this unit via a USB hub Partitioned USB memory is n...

Page 102: ...d is recommended 1 Create the file name including numbers that specify the playback sequence e g 001xxx mp3 and 099yyy mp3 2 Put those files into a folder 3 Record the folder containing files into the USB device However depending on the system environ ment you cannot specify the file playback sequence Up to 65 535 files on a USB portable audio player USB memory can be played back Up to 6 000 folde...

Page 103: ...rsonal computer may not be played back There is no progressive JPEG compatibility Important When naming a JPEG picture file add the cor responding filename extension jpg jpeg jpe or jfif This unit plays back files with the filename ex tension jpg jpeg jpe or jfif as a JPEG pic ture file To prevent malfunctions do not use these extensions for files other than JPEG pic ture files DivX video files De...

Page 104: ...ct sunlight can result in LCD screen malfunction due to the resulting high temperatures Never touch the screen with anything be sides your finger when operating the touch panel function The screen can scratch ea sily When the display is subjected to direct sun light for a long period of time it will be come very hot resulting in possible damage to the LCD screen You should avoid exposing the displ...

Page 105: ...er istics of the LCD screen Image quality will improve with an increase in temperature To protect the LED backlight display will darken in the following environment In the direct sunlight Near the heater vent The product lifetime of the LED backlight is more than 10 000 hours However it may decrease if used in high temperatures If the LED backlight reaches the end of its product lifetime the scree...

Page 106: ...at low temperatures reduces the service life of the fluorescent tube When the fluorescent tube reaches the end of its useful life the screen will be dark and the image will no longer be projected If this happens consult your dealer or the nearest authorized PIONEER Service Station Additional Information En 106 Appendix ...

Page 107: ...14 Sesotho st 1920 Azerbaijani az 0126 Kashmiri ks 1119 Sundanese su 1921 Bashkir ba 0201 Kurdish ku 1121 Swahili sw 1923 Byelorussian be 0205 Kirghiz ky 1125 Tamil ta 2001 Bulgarian bg 0207 Latin la 1201 Telugu te 2005 Bihari bh 0208 Lingala ln 1214 Tajik tg 2007 Bislama bi 0209 Laothian lo 1215 Thai th 2008 Bengali bn 0214 Lithuanian lt 1220 Tigrinya ti 2009 Tibetan bo 0215 Latvian lv 1222 Turkm...

Page 108: ...product includes technology owned by Microsoft Corporation and cannot be used or distributed without a license from Microsoft Licensing Inc MP3 Supply of this product only conveys a license for private non commercial use and does not convey a license nor imply any right to use this product in any commercial i e revenue generating real time broadcasting terrestrial satellite cable and or any other ...

Page 109: ...s Reserved DivX DivX DivX Certified and associated logos are trademarks of DivX Inc and are used under li cense SAT Radio The system will use direct satellite to recei ver broadcasting technology to provide lis teners in their cars and at home with crystal clear sound seamlessly from coast to coast Satellite radio will create and package over 100 channels of digital quality music news sports talk ...

Page 110: ...al Dolby Digital provides multi channel audio from up to 5 1 independent channels This is the same as the Dolby Digital surround sound system used in theaters Dolby Pro Logic II Dolby Pro Logic II can create five full band width output channels from two channel sources This new technology enables a dis crete 5 channel playback with 2 front chan nels 1 center channel and 2 rear channels A music mod...

Page 111: ...pling frequency and bit rate than CDs Therefore DVDs can provide higher sound quality m3u Playlists created using the WINAMP soft ware have a playlist file extension m3u MP3 MP3 is short for MPEG Audio Layer 3 It is an audio compression standard set by a working group MPEG of the ISO International Stan dards Organization MP3 is able to compress audio data to about 1 10th the level of a con vention...

Page 112: ...e and software with search functions You can also enjoy viewing high and standard resolution still images Region number DVD players and DVD discs feature region numbers indicating the area in which they were purchased Playback of a DVD is not pos sible unless it features the same region num ber as the DVD player Title DVD video discs have high data capacity en abling recording of multiple movies o...

Page 113: ... 80 100 125 Hz Slope 12 dB oct Subwoofer mono Frequency 50 63 80 100 125 Hz Slope 18 dB oct Gain 6 dB to 24 dB Phase Normal Reverse Bass boost Gain 12 dB to 0 dB DVD Player System DVD video Video CD CD WMA MP3 AAC DivX JPEG system Usable discs DVD video Video CD CD CD R RW DVD R RW RDL Region number 1 Frequency response 5 Hz to 44 000 Hz with DVD at sampling frequency 96 kHz Signal to noise ratio ...

Page 114: ...ity 25 µV S N 20 dB Signal to noise ratio 62 dB IHF A network CEA2006 Specifications Power output 14 W RMS 4 Channels 4 W and 1 THD N S N ratio 91 dBA reference 1 W into 4 W Note Specifications and the design are subject to mod ifications without notice due to improvements Additional Information En 114 Appendix ...

Page 115: ... 110 DTS 9 110 DTS Neo 6 110 Dynamic range control 110 E EXIF 110 H Hue 53 J JPEG 111 L Language code chart 107 Linear PCM LPCM 111 M Menu language 46 MPEG 111 Multi angle 22 111 Multi audio 21 34 111 Multi subtitle 22 34 112 P Parental lock 47 112 PBC playback control 24 Playback control PBC 112 R Region number 7 112 S Subtitle language 22 34 45 T Title 112 TV aspect 46 V Video CD 99 W Wide scree...

Page 116: ...LIA PTY LTD 178 184 Boundary Road Braeside Victoria 3195 Australia TEL 03 9586 6300 PIONEER ELECTRONICS OF CANADA INC 300 Allstate Parkway Markham Ontario L3R 0P2 Canada TEL 1 877 283 5901 TEL 905 479 4411 PIONEER ELECTRONICS DE MEXICO S A de C V Blvd Manuel Avila Camacho 138 10 piso Col Lomas de Chapultepec Mexico D F 11000 TEL 55 9178 4270 先鋒股份有限公司 總公司 台北市中山北路二段44號13樓 電話 02 2521 3588 先鋒電子 香港 有限公...

Reviews: