background image

STEP-5e User Manual 


Page 10 

4 Installation and Usage 

4.1 Unpacking 

Upon receipt of the package, check if any items are missing or damaged according to the packing 
list, if so, contact the local dealer or manufacturer. 
 

4.2


Installation Site and Direction of Printer 

1)


It’s recommend printer is installed at a level table surface. Wallmount not recommended. 

2)


The printer should install at a flat and steady place. It’s recommend that install the printer at    
horizontal line. The angle of inclination should not exceed ± 10°(paper feed direction) if tilt 
install printer,  it does not allow to tilt by other direction. 

3)


Keep printer away from source of water 

4)


Avoid the printer on place where it is vibration and shock  

5)


Ensure printer ground connect is safe 

6)


  When the printer is at operation and maintenance, it is recommended to retain the enough 
space to ensure the printer can work in reliability and ease of operation. 


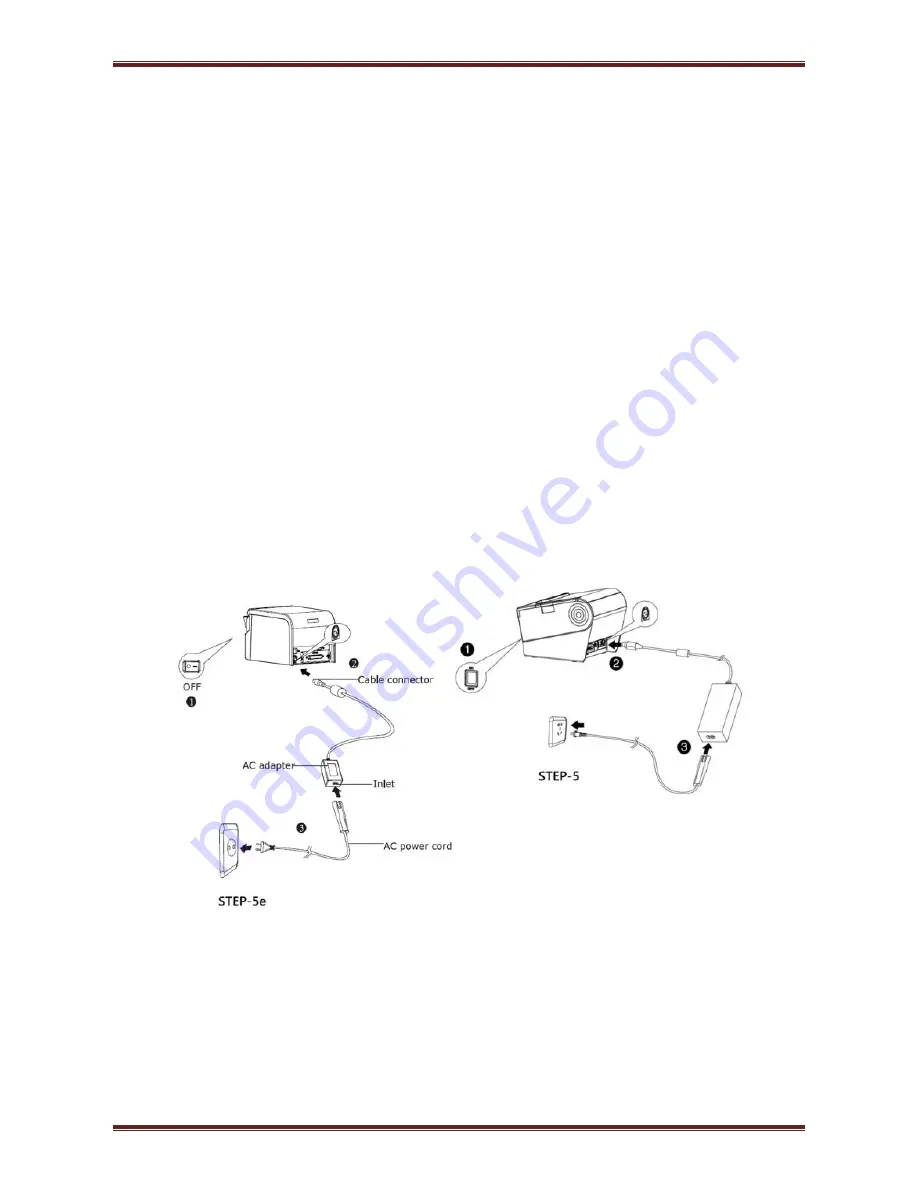
4.3 Power Adapter Connection 

1)


Make sure the printer's power switch is turned off; 

2)


Put the cable plug of power adapter facing up at flat side, insert the rear of the printer power 
connector; 

3)


Turn the power adapter input power; 

4)


Pay attention about disconnecting or connect the AC adapter at right method, or likely to 
cause damage. 


The plug of power adapter is designed in a switch type, when accessing power adapter and uttered 
the voice "click", it means the connected socket switch is locked the adapter connect well, otherwise 
please connect again. 
 
When pulling out the adapter, please pinch the shell of power adapter and pull the switch up, when 
the switch is fully opened then pull out the power adapter. 
Don’t put forth your strength to pull the plug by squeeze at any of place of power adapter. Because, it 
is more difficult to pull it out and may damage the cable. 

Summary of Contents for STEP-5e

Page 1: ...STEP 5e User Manual STEP 5e If you need further assistance use one of the following options Driver http www pioneerposftp com Email support pioneersolution com Call 1 909 468 9757 option 2 ...

Page 2: ...Jim C 1 1 2016 01 27 Updated DIP Switch 2 8 info 4 7 1 Color of LED indicator Johnson T 1 2 2016 02 03 Added 7 Bluetooth Connection Instructions 7 1 Precautions 7 2 General Sequence for Bluetooth Connections 7 3 Bluetooth Dongle 7 4 Bluetooth Dongle BlueSoleil IVT Stack Puma C ...

Page 3: ...tion 10 4 4 Interface Cable Connection 11 4 5 Cash Drawer Connection 11 4 6 Media Loading 11 4 6 1 Paper Confirmation 12 4 6 2 Procedure of Loading 12 4 7 Specification of LED Indication and Beeper 15 4 7 1 Specification of LED Indication 15 4 7 2 Beeper 15 4 7 3 Multi color Status LED 15 4 8 Setting DIP switch 16 4 8 1 Serial interface RS 232C 16 4 8 2 Interfaces of parallel USB Bluetooth and Eth...

Page 4: ...m 23 6 3 Troubles Occur During Printing 23 6 4 Problems Emerge During the Paper Cutting Processes 24 6 5 Remove Jammed Paper 24 7 Bluetooth Connection Instructions 25 7 1 Precautions 25 7 2 General Sequence for Bluetooth Connections 25 7 3 Bluetooth Dongle 25 7 4 Bluetooth Dongle BlueSoleil IVT Stack 27 ...

Page 5: ...er 4 Do not place the printer on or near a heat source 5 Do not use the printer near water Never spill liquid into the printer 6 Do not expose the printer to high temperatures direct sunlight or dust 7 Protect the printer from shock impact and vibration 8 Be certain the power source is within the voltage rating and frequency listed for the printer 9 Switch off the printer power supply when won t u...

Page 6: ...e field print receipts STEP 5e can connect with other equipment through parallel serial USB and Ethernet Wi Fi interfaces And the printer drivers are available for the WINDOWS 7 WINDOWS 8 Linux operating system 1 2 The Main Features 1 Patent design of unique vertical double auto cutter 2 Low noise 3 High print speed 4 Easy paper loading 5 Support page mode printing 6 Compatible with various width ...

Page 7: ...box and the printer for possible damage 2 Check whether you have received the following accessories together with the printer if there is any items that s missing please contact your local dealer Standard Accessories Printer Power Adapter Power Cord Quick Start Guide Optional Accessories USB Cable Serial Cable Note The power cord and power adapter may vary by region ...

Page 8: ...STEP 5e User Manual Page 4 2 2 Appearance and Components 2 2 1 STEP 5e ...

Page 9: ...d the long distance 3 Power LED It indicates the power status 4 Paper LED It detects the status of paper such as paper near end and paper end See more details in 3 2 Specification of Indicated light and beeper 5 Error LED If there is abnormal phenomenon and error LED flashing it means the printer is in the wrong status Please turn off the power immediately 6 Paper guide In paper storehouse paper g...

Page 10: ... Multilingual WPC1251 Cyrillic PC860 Portuguese WPC1253 PC863 Canadian French WPC1254 PC865 Nordic WPC1255 PC857 Turkish WPC1256 PC737 Greek WPC1257 ISO8859 7 Greek WPC1258 WPC1252 MIK Cyrillic Bulgarian PC866 Cyrillic 2 CP755 EastEurope Latvian 2 PC852 Latin 2 Iran PC858 Euro Iran II KU42 Latvian TIS11 Thai ISO 8859 1 West Europe TIS18 Thai ISO 8859 3 Latin3 PC720 ISO 8859 4 Baltic WPC775 ISO 885...

Page 11: ...Paper type Specified Thermal Paper Paper width mm mm Paper thickness 0 065 0 090mm Roll paper diameter Max OD ф83mm Paper load Forward cover open and Easy paper loading Paper cut Manual tear or Auto cutter Command ESC POS Physical Spec Operating condition 0 40 20 85 RH Storage condition 20 70 5 95 RH Dimensions L W H 190 127 126mm Weight 1 63kg Reliability TPH lifetime 150km Cutter lifetime 2 000 ...

Page 12: ...ermal paper or same level of quality paper otherwise it will affect print quality and reduce thermal printer head life If the thermal paper is polluted by chemical or oil the thermal paper heat sensibility decreases which will influence the print quality Don t use finger nail or hard foreign object to touch the surface of thermal paper otherwise it will cause color fading Store paper roll in room ...

Page 13: ...STEP 5e User Manual Page 9 3 3 2 Cutting Position Fig 2 3 2 Type Paper Cutting Position L1 STEP 5e 14 5mm ...

Page 14: ...intenance it is recommended to retain the enough space to ensure the printer can work in reliability and ease of operation 4 3 Power Adapter Connection 1 Make sure the printer s power switch is turned off 2 Put the cable plug of power adapter facing up at flat side insert the rear of the printer power connector 3 Turn the power adapter input power 4 Pay attention about disconnecting or connect the...

Page 15: ...wer switch is turned off 2 Put the interface cable into the matched interface and fixed with screws or spring on the plug 3 Connect the other end of the interface cable to the host 4 5 Cash Drawer Connection 1 Make sure the printer s power switch is turned off 2 Connect the cash drawer cable into the cash drawer interface on the rear side of the printer Warning Cash drawer interface can only be co...

Page 16: ...aper guide then lift the paper guide 2 Install paper guide based on required print width 4 6 2 Procedure of Loading 1 Turn off printer 2 Pressing the open button open front cover of STEP 5e Figure 4 6 1 3 Put the paper into printer Pay attention to the direction of the paper figure 4 6 2 Figure 4 6 2 ...

Page 17: ...STEP 5e User Manual Page 13 4 Close the front cover of STEP 5e Like figure 4 6 3 Figure 4 6 3 ...

Page 18: ...STEP 5e User Manual Page 14 5 Tear the redundant paper figure 4 6 4 Figure 4 6 4 Notes Install paper guide according to required print out width ...

Page 19: ...STEP 5e STATUS LED Specification White Printer power on Blue Printer is ready and in idle condition Red Wrong status out of paper cover open and so on Red Paper near end and printer is in normal Blue Printer is busy Notes The printer use a thermistor to detect the temperature of the print head If the temperature of print head is more than 65 C printer will send a warning If the temperature of prin...

Page 20: ...to cutter Disable Enable OFF 2 4 Busy conditions Receive buffer full Printer off line Receive buffer full OFF 2 5 Printer density Reference form 1 2 OFF 2 6 OFF 2 7 OFF 2 8 Print Width dots 512 576 OFF 4 8 2 Interfaces of parallel USB Bluetooth and Ethernet DIP Switch 1 Switches Function ON OFF Default 1 1 Auto line feed Enable Disable OFF 1 2 1 8 Reserved OFF DIP Switch 2 Switches Functions ON OF...

Page 21: ...serve 2 ON OFF Reserve 3 OFF ON Reserve 4 dense 4 8 3 Auto Cutter Enable Disable Selection DIP Switch setting 2 Switch2 3 ON Auto cutter disable OFF Auto cutter enable Application program Ignore auto cutter error for continuous printing 4 9 Print Self Testing 1 Make sure the printer has been installed roll paper and turn off the top cover 2 Make sure the printer has linked power 3 Make sure the pr...

Page 22: ...t the Self test page 4 11 Bluetooth Take STEP 5e for example PDA with Bluetooth interface laptop and other information terminals can drive the mobile thermal printer STEP 5e Instructions as follows 1 Power on the printer 2 Primary device search for outer Bluetooth devices 3 If there are some outer Bluetooth devices choose STEP 5e 4 Connected to STEP 5e 5 Finish pairing Notes In pairing the printer...

Page 23: ... communication board with the default USB interface and cash drawer interface and the other communication boards with the Ethernet interface parallel interface RS232 interface are optional 5 1 USB Figure 5 1 PIN NO Signal Name 1 VBUS 2 D 3 D 4 GND 5 2 Cash Drawer Figure 5 2 PIN NO Signal Name 1 FG 2 Drawer 1 3 DRSW 4 VDR 5 Drawer 2 6 GND Electrical characteristics Driving voltage DC 24 V Driving c...

Page 24: ... the printer is power on When arranging the line of communication you have to avoid paralleling with the strong current You have to use the shielded communication line 5 4 Other Optional Interface Serial Interface Serial interface is compatible with RS 232 standard with 9 pin socket Figure 5 4 1a PIN Out Signal Name 1 2 TXD 3 RXD 4 5 GND 6 RTS 7 CTS 8 RTS 9 ...

Page 25: ...inting configuration sample the default setting of serial interface is as follow 9600bps baud rates 8 bit data bit 1 bit stop bit no parity support RTS CTS handshaking protocol Figure 5 4 1b PIN No Signal Definition PIN1 Frame Ground PIN2 TXD PIN 3 RXD PIN 4 RTS PIN 5 Unconnected PIN 6 DSR PIN 7 GND PIN 8 19 Unconnected PIN 20 DTR PIN 21 25 Unconnected ...

Page 26: ...STEP 5e User Manual Page 22 Ethernet Interface 5 4 3 PIN NO Signal Name 1 TX 2 TX 3 RX 4 5 6 RX 7 8 ...

Page 27: ... Error LED always on and beeper alarms Paper end Reload the roll paper Error LED blinks and beeper alarms Thermal print head overheated Turn the printer off and resume when it cools overvoltage Print with specified voltage Low voltage Print with specified voltage 6 3 Troubles Occur During Printing Problem description Probable reason Solution Colored stripe in the paper Paper near end Reinstall the...

Page 28: ...asion paper too thick Replace the cutter Paper jam Thermal printer head over heat Reduce the density of printing Driving too fast Reduce the printer speed to the limit of thermal printer head Wrong paper feeding position Put the paper parallel with the paper mount and insert into the space between platen roller and the thermal printer head 6 5 Remove Jammed Paper Warning Do not touch the thermal p...

Page 29: ...general sequence for Bluetooth connections provided for reference purposes 1 Turn on power of each device PDAs PCs Bluetooth Dongle Printers etc 2 Run a Bluetooth connection program on the PDA or PC 3 Search for the peripheral with which to establish the connection Search for the printer 4 Register this Printer form the search results If a security setting is enabled register after entering the PI...

Page 30: ...5e User Manual Page 26 6 Choose Bluetooth name of you printer click Next 7 Refer to the Bluetooth section of you documentation that came with you device If the documentation specifies a passkey use that one ...

Page 31: ...t 7 4 Bluetooth Dongle BlueSoleil IVT Stack 1 After purchasing Bluetooth Dongle insert the CD in the PC and install BlueSoleil 2 Connect Bluetooth Dongle to the USB port of the PC 3 Click the BlueSoleil icon on the PC screen top 4 Click the red sphere at the center of the BlueSoleil main screen ...

Page 32: ... The program initiates a search for Bluetooth devices in the proximity 6 Click right button of the mouse above the Printer Icon and select the Pair Device 7 Enter the PIN Code in the Bluetooth Pass Key window Default Pass Key 0000 ...

Page 33: ...eted a check symbol appears next to the printer icon 9 Click right button of the mouse above the printer icon and select Connect Bluetooth Serial Port Service 10 When the connection is established the icon turns green and a dotted line appears as shown in the image below End of document ...

Reviews: