background image


Connecting up

02


10


En


Chapter 2


Connecting up


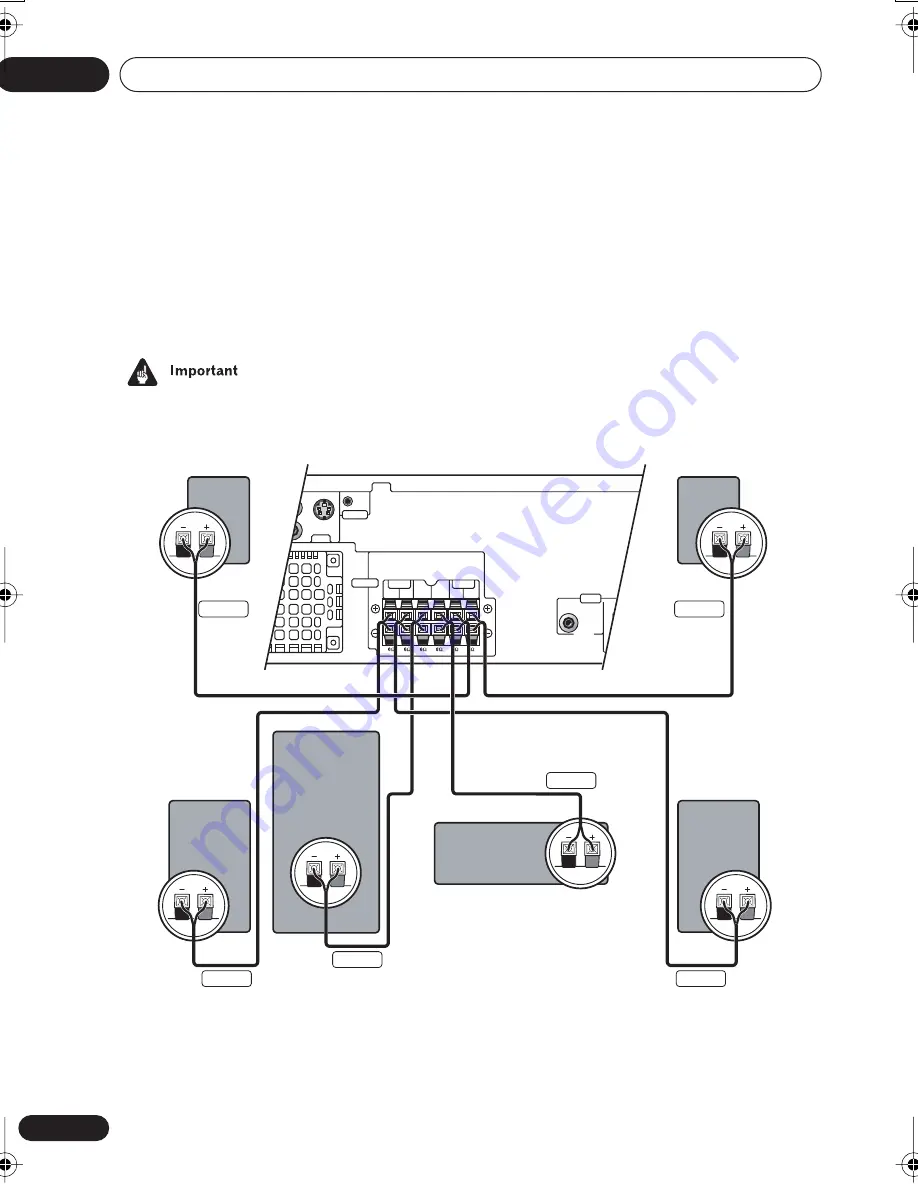
Connecting the speakers


• Before making or changing any rear panel connections, make sure that all the components 

are switched off and unplugged from the power supply.

Connect each speaker using the color-coded speaker cable. Match them to the colored labels 
above the speaker terminals.

AUDIO

VIDEO

CONTROL

Y

LINE 1

LINE 2

OUT

IN

L

R

COAXIAL IN

CENTER

SUB

WOOFER

L

R

L

R

FRONT

SURROUND

S-VIDEO

OUT

VIDEO

OUT

SPEAKERS

IN

Front right

Surround right

XV-HTD340

Surround left

Front left

Subwoofer

Center

Gray

Blue

White

Red

Purple

Green

XV-HTD340.book 10 ページ 2003年12月27日 土曜日 午前10時30分

Summary of Contents for S-HTD340

Page 1: ...ce claim such as loss or theft Improve product development Your input helps us continue to design products that meet your needs Receive a free Pioneer newsletter Registered customers can opt in to receive a monthly newsletter Receive free tips updates and service bulletins on your new product DVD CD Receiver XV HTD340 Speaker System S HTD340 Operating Instructions ...

Page 2: ...d if not installed and used in accordance with the instructions may cause harmful interference to radio communications However there is no guarantee that interference will not occur in a particular installation If this equipment does cause harmful interference to radio or television reception which can be determined by turning the equipment off and on the user is encouraged to try to correct the i...

Page 3: ...m the product OUTDOOR ANTENNA GROUNDING If an outside antenna or cable system is connected to the product be sure the antenna or cable system is grounded so as to provide some protection against voltage surges and built up static charges Article 810 of the National Electrical Code ANSI NFPA 70 provides information with regard to proper grounding of the mast and supporting structure grounding of th...

Page 4: ... patents and other intellectual property rights owned by Macrovision Corporation and other rights owners Use of this copyright protection technology must be authorized by Macrovision Corporation and is intended for home and other limited viewing uses only unless otherwise authorized by Macrovision Corporation Reverse engineering or disassembly is prohibited This Class B digital apparatus complies ...

Page 5: ... 17 Connecting the supplied antennas 18 Assembling the loop antenna 18 AM loop antenna 18 FM wire antenna 19 Connecting the power 19 03 Controls and displays Front panel 20 Display 21 Remote control 23 04 Getting started Switching on and setting up 26 Setting the clock 27 Using the Room Setup 27 Setting up the remote to control your TV 28 Using the on screen displays 29 Playing discs 29 Basic play...

Page 6: ...ns 58 SR control options for Pioneer plasma displays 59 Setting the channel levels 60 10 Video Adjust menu Video Adjust 62 Creating your own presets 62 11 Initial Settings menu Using the Initial Settings menu 63 Video Output settings 63 Language settings 64 Display settings 64 Options 65 Parental Lock 65 12 Additional information Optional system settings 67 System Setup menu options in standby 67 ...

Page 7: ...ee JPEG file compatibility on page 9 Graphical on screen displays Setting up and using your DVD home theater system is made easy using the graphical on screen displays Energy saving design This system is designed to use 0 5 W of power when in standby What s in the box Please confirm that the following accessories are in the main system box when you open it Remote control AA R6P dry cell batteries ...

Page 8: ... to this system Replace the batteries when you notice a fall off in the operating range of the remote Disc content format playback compatibility This player is compatible with a wide range of disc types media and formats Playable discs will generally feature one of the following logos on the disc and or disc packaging Note however that some disc types such as record able CD and DVD may be in an un...

Page 9: ...also DRM in the Glossary on page 80 File extensions mp3 wma these must be used for the player to recognize MP3 and WMA files do not use for other file types File structure Up to 999 files per folder About WMA The Windows Media logo printed on the box indicates that this player can playback Windows Media Audio content WMA is an acronym for Windows Media Audio and refers to an audio compression tech...

Page 10: ...ged from the power supply Connect each speaker using the color coded speaker cable Match them to the colored labels above the speaker terminals AUDIO VIDEO CONTROL Y LINE 1 LINE 2 OUT IN L R COAXIALIN CENTER SUB WOOFER L R L R FRONT SURROUND S VIDEO OUT VIDEO OUT SPEAKERS IN Front right Surround right XV HTD340 Surround left Front left Subwoofer Center Gray Blue White Red Purple Green ...

Page 11: ...ker terminals on the rear of the system unit Match the colored wire with the color coded label above the tabs then insert the colored wire into the red tab and the other wire with the black tab 3 Connect to the speaker terminals on the rear of the speakers in the same way Remove the supplied non skid pads from the paper and stick four onto the base of each satellite speaker Actual speakers supplie...

Page 12: ...t the subwoofer or mounting them very high on a wall is not recommended For the best stereo effect place the front speakers 6 9 ft 2 3 m apart at equal distance from the TV Install the center speaker above or below the TV so that the sound of the center channel is localized at the TV screen When using a 5 spot setup install the surround speakers slightly above ear level if possible Make sure that ...

Page 13: ...s strong enough to support them Do not mount on plywood or soft surface walls Mounting screws are not supplied Use screws that are suitable for the wall material and that will support the weight of the speaker If you are unsure of the qualities and strength of the walls consult a professional for advice Pioneer is not responsible for any accidents or damage that result from improper installation C...

Page 14: ...n page 63 for more on this Connecting using the component video output If your TV has component video inputs you can use these instead of the standard video output to connect this system to your TV This should give you the best quality picture from the three types of video output available Use a component video cable not supplied to connect the COMPONENT VIDEO OUT to a set of component inputs on y...

Page 15: ...shows Mem Clr Press the front panel or button so that the display shows Interlace Press the front panel button to set to interlace and switch the system back on Compatibility of this player with progressive scan and high definition TVs This player is compatible with progressive video Macro Vision System Copy Guard Consumers should note that not all high definition television sets are fully compati...

Page 16: ... PRO 910HD PDP 5040HD PDP 4340HD you can use an SR cable see note below to connect it to this unit and take advantage of various convenient features such as automatic video input switching of the plasma display when the input is changed Use a 3 ringed miniplug SR cable to connect the CONTROL IN jack of this unit through a media receiver to the CONTROL OUT jack of your plasma display Before you can...

Page 17: ...t and the plasma display Check all connections and retry The 3 ringed SR cable from Pioneer is commercially available under the part number ADE7095 Contact the Pioneer Customer Support division for more information on obtaining an SR cable You won t be able to use the remote sensor of this unit with the CONTROL IN jack of this unit connected to the CONTROL OUT jack of your plasma display You can u...

Page 18: ...e loop onto the stand AM loop antenna 1 Pull off the protective shields of both AM antenna wires 2 Press the antenna terminal tabs to open and insert one wire into each terminal 3 Release the tabs to secure the AM antenna wires 4 Place the AM antenna on a flat surface and point in the direction giving the best reception Avoid placing near computers television sets or other electrical appliances an...

Page 19: ...t drape loosely or leave coiled up The signal ground is designed to reduce noise that occurs when an antenna is connected It is not an electrical safety ground Connecting the power Before connecting the power and switching on for the first time make sure that everything is connected properly 1 Plug one end of the supplied power cord into the AC INLET 2 Plug the other end into a household power out...

Page 20: ...ss to skip tracks chapters press and hold to scan backwards forwards When in listening to the tuner use to tune to stations or select presets 7 Press to stop playback 8 Press to start or resume playback During playback press to pause press again to restart playback 9 DISC SKIP page 30 32 During playback press to start playing the next disc in the player If the disc tray is open while no disc is pl...

Page 21: ...s mode the system only plays audio CDs and WMA MP3 discs 17 Display See Display on page 21 for detailed information 18 DISC indicators Shows which disc spaces are currently occupied 19 PHONES jack Headphone jack Display 1 Tuner indicators page 34 Lights when a broadcast is being received Lights when a stereo FM broadcast is being received in auto stereo mode Lights when FM mono reception is select...

Page 22: ... Dolby Digital source 14 Speaker indicators These show which speakers are being used to output the current source they are not placement diagrams The illustrations below show some example displays When headphones are connected none of the speaker indicators are lit 15 PRGSVE page 63 Lights when progressive scan video output is selected 16 ADV SURR page 39 Lights when one of the Advanced or Front S...

Page 23: ... to switch the Virtual Surround Back speaker effect on off FRONT SURROUND page 39 Use to select a Front Surround listening mode BASS MODE SHIFT FRONT SURROUND page 42 Use to select a Bass Mode 6 DVD buttons AUDIO page 51 Press to select an audio channel or language SUBTITLE page 51 Press to display change the subtitle display ANGLE page 51 Press to change camera angle during DVD multi angle scene ...

Page 24: ...age 58 12 DVD MENU TOP MENU Press to display a DVD Video disc menu or the Disc Navigator if a VR mode DVD RW CD Video CD WMA MP3 or JPEG disc is loaded Use with SHIFT for TOP MENU Use to display the top menu of a DVD disc in the play position this may be the same as pressing DVD MENU 13 Cursor buttons ENTER and tuning buttons Cursor buttons Use the cursor buttons to navigate on screen displays and...

Page 25: ...T 6 page 55 Press to display the clock and to access the timer menu SR SHIFT 7 page 17 Press to switch SR on or off DISPLAY SHIFT 8 page 52 Press to display change disc information shown on screen DIMMER SHIFT 9 Press to switch between normal and dimmed front panel display CLEAR Press to clear an entry ENTER Press to select menu options etc works exactly the same as the ENTER button in 13 above 18...

Page 26: ...e screen displayed 2 Press ENTER to move on to the next screen 3 Use the cursor left right buttons to select either Wide screen or Standard size screen according to the kind of TV you have then press ENTER See also Screen sizes and disc formats on page 77 if you re not sure which one to choose ENTER STANDBY ON SYSTEM SETUP SHIFT ROOM SETUP ENTER TIMER Welcome to Pioneer DVD Thank you for purchasin...

Page 27: ...right until you see it 3 Press ENTER 4 Use the cursor up down buttons to set the hour 5 Press ENTER 6 Use the cursor up down buttons to set the minute 7 Press ENTER to confirm The display flashes to indicate the clock is set Press TIMER SHIFT 6 anytime to display the clock If you unplug the system from the wall outlet or there is a power outage you will need to set the clock again Using the Room S...

Page 28: ...d remote to control your TV using the TV CONTROL buttons 1 Switch on your TV 2 Find the name of the manufacturer of your TV in the Preset Code List on page 79 Next to each manufacturer is one or more three digit codes These tell the remote what kind of TV you have If the name of the manufacturer of your TV does not appear in the table you won t be able to set up this remote to control your TV Note...

Page 29: ...R The button guide at the bottom of every OSD screen shows you which buttons you ll need to use for that screen Playing discs The basic playback controls for playing DVD CD Video CD and WMA MP3 discs are covered here Further functions are detailed in chapter 6 1 If the system isn t already on press STANDBY ON to switch on If you re playing a DVD or Video CD also turn on your TV and make sure that ...

Page 30: ...te or front panel to start playback of the disc loaded in the front most disc space Alternatively use the DVD CD or DISC buttons on the remote or the DIRECT PLAY buttons on the front panel to start playback of other discs If you re playing a DVD or Video CD a menu may appear See DVD Video disc menus on page 33 and Video CD PBC menus on page 34 for how to navigate these If you re playing an MP3 WMA...

Page 31: ...isplay shows Resume or Last Mem playback starts from the resume or last memory point see also Resume and Last Memory below Pauses a disc that s playing or restarts a paused disc Stops playback DVD and Video CD The display shows Resume Press again if you want to cancel the resume function See also Resume and Last Memory below Press to start fast reverse scanning Press play to resume normal playback...

Page 32: ...ause the disc in the play position is unaffected you can use this button to change discs even during playback 1 Press EXCHANGE to open the disc tray The EXCHANGE button only works when there is at least one disc loaded 2 Load a disc with the label side facing up using the disc tray guide to align the disc If you want to load more discs press DISC SKIP to rotate the disc tray two disc spaces Before...

Page 33: ...ovie formats are such that even when played on a widescreen TV black bars are necessary at the top and bottom of the screen This is not a malfunction I have a standard 4 3 TV and set the system to show widescreen DVDs in pan scan format so why do I still get black bars top and bottom with some discs Some discs override the display preferences of the system so even if you have 4 3 Pan Scan selected...

Page 34: ... memorize your favorite stations so you don t have to manually tune in every time you want to listen ENTER Selects the current menu option RETURN Returns to the previously displayed menu screen Numbers Highlights a numbered menu option some discs only Press ENTER to select Button What it does RETURN Displays the PBC menu Numbers Selects a numbered menu option Button What it does RETURN ENTER ENTER...

Page 35: ...poor FM reception If you re listening to an FM station in stereo but the reception is weak you can improve the sound quality by switching to mono 1 Press SYSTEM SETUP SHIFT HOME MENU 2 Use the cursor left right buttons to choose FM Mode then press ENTER 3 Use the cursor up down buttons to select FM Mono or FM Auto then press ENTER Select Auto in step 3 to switch back to auto stereo mode the stereo...

Page 36: ...system including one digital source See also Listening to TV audio through this system on page 16 and Connecting auxiliary components on page 71 1 If the system isn t already on press STANDBY ON to switch on Also make sure that the external source TV satellite receiver etc is switched on 2 Select the source you want to listen to If you re using the remote control press TV to select the TV input or...

Page 37: ...d on page 39 for the options available with this speaker setup Make sure you have completed Using the Room Setup on page 27 For a more detailed surround sound setup see Using the System Setup menu on page 58 Certain features explained in this section may not be possible depending on the source for example 88 2 96 kHz sources or a conflicting system setting See Error Messages on page 76 for more on...

Page 38: ... any two channel source see also Dolby Pro Logic II Music settings below Stereo See Listening in stereo below When listening in Dolby Digital DTS mode two channel material will automatically be played in surround sound using Dolby Pro Logic II decoding Dolby Digital DTS sources that use only the center channel cannot be played back in surround sound Dolby Pro Logic II Music settings When listening...

Page 39: ...gned to give powerful surround sound to stereo music sources Using Front Surround The Front Surround modes are effective when you are using the Front surround 3 spot speaker setup as described in Placing the speakers on page 11 The surround speakers should be placed on top of the front speakers and oriented either towards the walls or straight ahead depending on which mode you are using see below ...

Page 40: ...wn buttons to adjust the effect level The effect level can be adjusted from 10 min to 90 max 4 Press ENTER to confirm Listening in stereo You can listen to any source stereo or multichannel analog or digital in stereo When playing a multichannel source stereo sound is created by downmixing all channels to the front left right speakers and the subwoofer Press SURROUND repeatedly until Stereo shows ...

Page 41: ... more cohesive and realistic surround sound Press VIR SB SHIFT ADVANCED repeatedly to switch between Vir SB On and Vir SB Off You can t use Virtual Surround Back when using the Stereo listening mode or Auto with stereo sources If you are using the The Front surround 3 spot setup see Placing the speakers on page 11 switch the Virtual Surround Back feature off If there is no surround channel Virtual...

Page 42: ...uiet or Midnight modes are active Boosting the bass level There are three bass modes you can use to enhance the bass in a source Press BASS MODE SHIFT FRONT SURROUND repeatedly to choose an option that fits the source you re listening to Music Can be used with music to give a deeper bass sound Cinema Good for action movies or movies with lots of sound effects P Bass Can be used with music sources ...

Page 43: ...e press CD MODE SHIFT DISC SKIP again If you open the disc tray and load a DVD Video CD or JPEG disc in the front most position then press play on the front panel CD mode is canceled You can t switch on CD mode while playing a DVD or Video CD Stop playback first Although program play is not possible in CD mode it is possible to program a playlist When you start program play back however CD mode is...

Page 44: ...ying or stopped a disc must be loaded 1 Press HOME MENU and select Disc Navigator from the on screen display With most discs you can also press DVD MENU to go directly to the Disc Navigator 2 Select what you want to play Depending on the type of disc you have loaded the Disc Navigator looks slightly different The screen for DVD discs shows the titles on the left and the chapters on the right Selec...

Page 45: ...left 3 Press ENTER on A Start Point to set the loop start point 4 Press ENTER on B End Point to set the loop end point After pressing ENTER playback jumps back to the start point and plays the loop The minimum loop time is 2 seconds 5 To resume normal playback select Off from the menu Using repeat play There are various repeat play options depending on the kind of disc loaded It s also possible to...

Page 46: ...ow Random Repeat is also available Using random play With a DVD you can choose to play titles or chapters within a title in a random order With CDs Video CDs MP3 or WMA discs you can play all the discs at random or just the contents of a single disc You can set the random play option when a disc is playing or stopped However you can t use random play together with program play You can t use random...

Page 47: ...DVD disc menu is being displayed 1 Make sure that the DVD disc you want to make the program list for is in the play position Use the DISC select buttons on the remote or the DIRECT PLAY buttons on the front panel to select the disc 2 Press HOME MENU and select Play Mode Alternatively press PROGRAM SHIFT 1 and skip to step 5 3 Select Program from the list of functions on the left 4 Select Create Ed...

Page 48: ...ins active until you turn off program play see below erase the program list see below or switch off the system Creating and editing a non DVD program list This feature lets you program the play order of folders and tracks on the CDs Video CDs and WMA MP3 discs loaded If you want to program the play order of a DVD disc see Creating and editing a DVD program list on page 47 1 Make sure that a non DV...

Page 49: ...p to 24 steps To clear a step in the program list move to the Program Step column highlight the step to clear and press CLEAR To insert a step in the program list move to the Program Step column and highlight the step where you want a new step to appear After you select a folder track all the program steps will move down one to make space for the new one 8 To play the program list press play Progr...

Page 50: ...ber or time WMA MP3 discs can be searched by folder or track number 1 Press HOME MENU and select Play Mode 2 Select Search Mode from the list of functions on the left The search options that appear depend on the kind of disc loaded The screen below shows the DVD search options 3 Select a search mode The disc must be playing in order to use time search 4 Use the number buttons to enter a title chap...

Page 51: ...ying a Video CD you can switch between stereo just the left channel or just the right channel Press AUDIO repeatedly to select an audio channel option Zooming the screen Using the zoom feature you can magnify a part of the screen by a factor of 2 or 4 while watching a DVD or Video CD 1 During playback use the ZOOM button to select the zoom factor Normal 2x or 4x Since DVD and Video CD has a fixed ...

Page 52: ...pears at the top of the screen Front panel display information Limited disc information also appears in the front panel display Press DISPLAY SHIFT 8 to change the displayed information DVD DVD RW displays Disc no Chapter no Elapsed title time Disc no Title no Remaining title time Disc no Chapter no Remaining chapter time 2 2 8 4 9 2 T 1 1 0 7 0 0 2 2 0 4 2 CD and Video CD displays Disc no Track n...

Page 53: ...ee Options on page 65 Using the JPEG Disc Navigator and Photo Browser Use the JPEG Disc Navigator to find a particular folder or picture by filename on the disc in the play position use the Photo Browser to find a picture within a folder by thumbnail image 1 Press DVD MENU to display the Disc Navigator screen The left column shows the folders on the disc the right column shows the files in a folde...

Page 54: ... previous next page of thumbnails Keep the button pressed if you want to skip several pages release when you reach the page you want To return to the Disc Navigator screen press RETURN 3 Press ENTER to display the selected thumbnail full size on screen The slideshow resumes from the selected picture Zooming the screen Using the zoom feature you can magnify a part of the screen by a factor of 2 or ...

Page 55: ... Use the cursor left right buttons to select Wake Up then press ENTER 6 Use the cursor left right buttons to select Timer Edit then press ENTER 7 Set the switch on time Use the cursor up down buttons to set the hour then press ENTER Set the minute in the same way pressing ENTER when you re done 8 Set the switch off time Use the cursor up down buttons to set the hour then press ENTER Set the minute...

Page 56: ...NTER 3 Use the cursor left right buttons to select Timer On or Timer Off You must have the timer set see above to select On The wake up timer switches on and off according to your previous settings 4 Press ENTER The wake up timer will automatically be canceled if the clock is reset Setting the sleep timer The sleep timer switches off the system after a specified time so you can fall asleep without...

Page 57: ...TER Choose between the following options Sleep Auto Available only in CD mode the system switches off automatically after the currently playing disc has finished Sleep 90 System switches off after 90 minutes Sleep 60 System switches off after an hour Sleep 30 System switches off after 30 minutes Off cancels the sleep timer 4 To check how much time is left repeat steps 1 and 2 The remaining time is...

Page 58: ...tem Setup menu is exited automatically after 5 minutes of inactivity You can t make these settings with the Recording Mode page 72 switched on Surround and sound setup options The Room Setup feature page 27 is designed to give you a basic surround sound setup however you can make more detailed settings that may improve the surround sound in your listening room Note that the first setting in each s...

Page 59: ... encoded Dolby Digital or DTS soundtracks See the disc packaging for channel information LFE attenuator setting Dolby Digital and DTS audio sources include ultra low bass tones Set the LFE attenuator as needed to prevent the ultra low bass from distorting the sound LFE ATT 0 The LFE channel is played with no attenuation LFE ATT 10 LFE channel is attenuated by 10dB LFE Off LFE channel is not played...

Page 60: ...nput LINE2 OFF PDP1 5 PDPTV Matches the LINE L2 function of this unit with a numbered video input on the plasma display For example LINE2 PDP3 matches the LINE2 input with video input 3 on the plasma display Setting the channel levels You can set the relative channel levels from your main listening position for all of the listening modes independently except STEREO If you used the Room Setup featu...

Page 61: ... press ENTER to exit test tone setup The speaker volume can be adjusted while listening to any sound source you want by pressing CH LEVEL SHIFT 5 and then using the cursor up down buttons to adjust the channel levels After you re finished with one channel use the cursor left right buttons to move to the next When the AUTO listening mode is selected using the test tone method will adjust levels for...

Page 62: ...he Memory presets see above 2 Press cursor down to select Detailed Settings then press ENTER 3 Adjust the picture quality settings Use the cursor up down buttons to select a setting Use the cursor left right buttons to adjust the current setting Press DISPLAY SHIFT 8 to switch between full and single view You can switch between preset numbers in the Recall Settings menu item You can adjust any or ...

Page 63: ...y be overridden by the DVD disc Often these settings can also be made from the DVD disc menu Video Output settings Initial Settings Setting Option What it means TV Screen See also Screen sizes and disc formats on page 77 4 3 Letter Box Set if you have a conventional 4 3 TV Widescreen movies are shown with black bars top and bottom 4 3 Pan Scan Set if you have a conventional 4 3 TV Widescreen movie...

Page 64: ...language selected on the disc then it will be displayed Other Language Select to choose a language other than the ones displayed see Selecting languages using the language code list on page 77 DVD Menu Lan guage w Subtitle Lang DVD disc menus will be displayed in the same language as your selected subtitle language if possible Languages as displayed DVD disc menus will be displayed in the selected...

Page 65: ...ord before you can change the Parental Lock level or enter a Country code 1 Select Password 2 Use the number buttons to enter a 4 digit password The numbers you enter show up as asterisks on screen 3 Press ENTER to register the password You will return to the Options menu screen On Screen Display On Operation displays Play Resume Scan and so on are shown on screen Off Operation displays are not sh...

Page 66: ...discs will require the password press cursor right to unlock levels You can t lock level 1 This sets the new level and you will return to the Options menu screen Setting changing the Country code You can find the Country code list on page 78 1 Select Country Code 2 Use number buttons to enter your password then press ENTER 3 Select a Country code and press ENTER There are two ways you can do this ...

Page 67: ...r additional information about the settings Child lock setting The Child Lock feature is useful when you ve set the wake up timer and don t want the system switched on before it activates Lock On Makes the front panel buttons and controls inoperative Lock Off Restores regular use of the front panel buttons and controls Clock format setting Specifies how the clock is displayed 12 Hour Sets the cloc...

Page 68: ...t 8 seconds until the display shows Mem Clr 3 Press the front panel button All the system s settings are now reset and you should see the Let s Get Started screen Using and taking care of discs Titles chapters and tracks DVD discs are generally divided into one or more titles Titles may be further subdivided into chapters CDs and Video CDs are divided into tracks CD ROMs contain folders and files ...

Page 69: ... cloth soaked in alcohol or a commercially available CD DVD cleaning kit to clean a disc more thoroughly Never use benzine thinner or other cleaning agents including products designed for cleaning vinyl records Storing discs Although CDs and DVD discs are more durable than vinyl records you should still take care to handle and store discs correctly When you re not using a disc return it to its cas...

Page 70: ... Place on an unstable surface or one that is not large enough to support all four of the system unit s feet Cleaning the pickup lens The DVD player s lens should not become dirty in normal use but if for some reason it should malfunction due to dust or dirt consult your nearest Pioneer authorized service center Although lens cleaners are commercially available we do not recommend using them since ...

Page 71: ...ponents This system has both stereo analog inputs and outputs as well as a coaxial digital input Use these to connect external components such as your VCR MD or CD R recorder Connect the LINE 1 IN jacks to the analog outputs of an external playback component These include components such as a VCR or cassette deck Connect using RCA pin plug stereo cables Connect the LINE 1 OUT jacks to the analog i...

Page 72: ...the cursor left right buttons to select Rec Mode 3 Press ENTER 4 Use the cursor up down buttons to select R Mode On or R Mode Off R Mode On A surround compatible downmix left total right total or Lt Rt of Dolby multichannel sources is output suitable for Dolby Surround Pro Logic or other matrix decoding R Mode Off A simple stereo downmix left only right only or Lo Ro is output suitable for playbac...

Page 73: ...is connected correctly see Connecting auxiliary components on page 71 Press MUTE on the remote control to turn muting off Adjust the VOLUME No image is output when playing discs Make sure the TV is connected correctly see Connecting to your TV on page 13 Reset the video output to interlace see Watching progressive scan video from the component video outputs on page 15 No sound from surround or cen...

Page 74: ... unit the disc cannot be used see DVD Video regions on page 68 Allow time for any condensation inside the system unit to evaporate Avoid using the system near an air conditioning unit Playback is not possible If the disc is loaded upside down reload the disc with the label side face up Picture playback stops and the operation buttons cannot be used Press stop then play to start playback again Swit...

Page 75: ...t recording methods This is not a malfunction Problem Remedy Problem Remedy CD ROM disc is not recognized by the system Make sure that the CD ROM was recorded using the ISO 9660 disc format See Disc content format playback compatibility on page 8 for other disc compatibility information Files don t show up in the Disc Navigator Photo Browser The files on the disc must be named with the correct fil...

Page 76: ... attenuator setting on page 67 Problem Remedy Message Description Child Lock This message appears when the front panel buttons are pressed when the child lock feature is active See Child lock setting on page 67 for more on switching on off the child lock Rec Mode On Blinks rapidly for 2 seconds when an operation is prohibited because the Recording Mode is on see Recording mode on page 72 Phones In...

Page 77: ...dard TV the TV Screen setting page 63 of this system should be set to 4 3 Letter Box or 4 3 Pan Scan depending on which you prefer Set to 4 3 Letter Box widescreen discs are shown with black bars top and bottom Set to 4 3 Pan Scan widescreen discs are shown with the left and right sides cropped Although the picture looks larger you don t actually see the whole picture Please note that many widescr...

Page 78: ...lam ml 1312 Mongolian mn 1314 Moldavian mo 1315 Marathi mr 1318 Malay ms 1319 Maltese mt 1320 Burmese my 1325 Nauru na 1401 Nepali ne 1405 Norwegian no 1415 Occitan oc 1503 Oromo om 1513 Oriya or 1518 Panjabi pa 1601 Polish pl 1612 Pashto Pushto ps 1619 Portuguese pt 1620 Quechua qu 1721 Rhaeto Romance rm 1813 Kirundi rn 1814 Romanian ro 1815 Kinyarwanda rw 1823 Sanskrit sa 1901 Sindhi sd 1904 San...

Page 79: ...642 KENNEDY 632 642 KORPEL 607 KOYODA 644 LEYCO 607 640 646 648 LIESENK TTER 607 LOEWE 607 LUXOR 632 642 643 M ELECTRONIC 631 644 645 654 655 656 607 636 651 MAGNADYNE 632 649 MAGNAFON 649 MAGNAVOX607 610 603 612 629 MANESTH 639 646 MARANTZ 607 MARK 607 MATSUI 607 639 640 642 644 647 648 MEDIATOR 607 MEMOREX 644 METZ 631 MINERVA 631 653 MITSUBISHI 609 610 602 621 631 MULTITECH 644 649 NEC 659 NECK...

Page 80: ...arious manufacturers use this compressed file format which carries date time and thumbnail information as well as the picture data File extension A tag added to the end of a filename to indicate the type of file For example mp3 indicates an MP3 file ISO 9660 format International standard for the volume and file structure of CD ROM discs JPEG A standard file format used for still images JPEG files ...

Page 81: ...HTD340 Front speakers x2 surround speakers x2 center speaker x1 subwoofer x1 Front speakers Enclosure Closed box bookshelf type magnetically shielded System 2 way system Speakers Woofer 10 cm cone type Tweeter 3 2 cm semi dome type Nominal impedance 6 Ω Frequency range 60 Hz to 20 kHz Maximum Input Power 100 W Dimensions 155 W x 360 H x 177 D mm 6 1 8 W x 14 3 16 H x 6 15 16 D in Weight 2 4 kg 5 l...

Page 82: ...t Power 100 W Dimensions 190 W x 360 H x 327 D mm 7 1 2 W x 14 3 16 H x 12 7 8 D in Weight 5 0 kg 11 lb 0 oz Accessories Speaker system Speaker cables 6 Non skid pads 1 sheet This product includes FontAvenue fonts licensed by NEC corporation FontAvenue is a registered trademark of NEC Corporation Specifications and design subject to possible modification without notice due to improvements ...

Page 83: ......

Page 84: ...11 PIONEER EUROPE NV Haven 1087 Keetberglaan 1 B 9120 Melsele Belgium TEL 03 570 05 11 PIONEER ELECTRONICS ASIACENTRE PTE LTD 253 Alexandra Road 04 01 Singapore 159936 TEL 656 472 1111 PIONEER ELECTRONICS AUSTRALIA PTY LTD 178 184 Boundary Road Braeside Victoria 3195 Australia TEL 03 9586 6300 PIONEER ELECTRONICS DE MEXICO S A DE C V Blvd Manuel Avila Camacho 138 10 piso Col Lomas de Chapultepec M...

Reviews: