background image

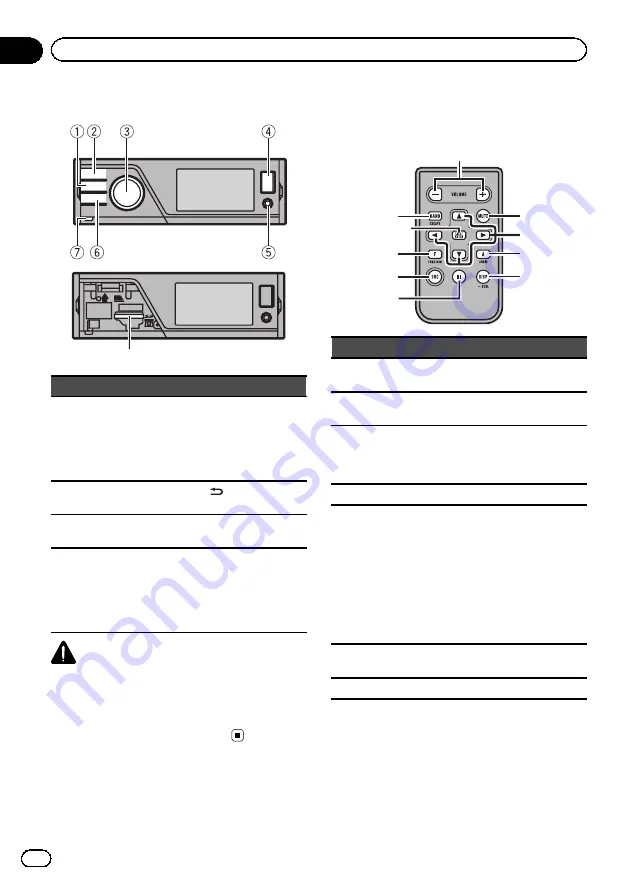
Head unit

Part

Part

1

HOME

5

AUX input jack (3.5
mm stereo/video
jack)
Microphone input
jack for auto EQ
measurement

2

SRC

/

OFF

6

(back/display

off)

3

MULTI-CONTROL

(

M.C.

)

7

Detach button

4

USB port

8

SD memory card
slot
Remove the front
panel to access the
SD memory card
slot.

CAUTION

Use an optional Pioneer USB cable (CD-U50E) to
connect the USB audio player/USB memory as
any device connected directly to the unit will pro-
trude out from the unit and may be dangerous.
Do not use unauthorized products.

Optional remote control

The remote control CD-R320 is sold separately.


Part

Operation

9

+

/

(

VO-

LUME

)

Press to increase or decrease vo-
lume.

a

MUTE

Press to mute. Press again to un-
mute.

b

a

/

b

/

c

/

d

Press to perform manual seek
tuning, fast forward, reverse and
track search controls. Also used
for controlling functions.

c

AUDIO

Press to select an audio function.

d

DISP

/

SCRL

Press to select different displays
for the audio source.
Press to select the basic screen or
image screen for the video
source.

!

If the background setting on
the entertainment menu is
turned off, you can switch be-
tween the basic screen and
image screen.

e

e

Press to pause or resume play-
back.

f

FUNCTION

Press to select functions.

En

8

Section

03

Operating this unit

Summary of Contents for MVH-8200

Page 1: ...Operation Manual RDS MEDIA CENTER RECEIVER MVH 8200BT MVH 8200 English ...

Page 2: ...calling stations 13 Function settings 13 Storing and recalling radio text 14 PTY list 14 Playing moving images 15 Basic Operations 15 Selecting and playing files from the name list 16 Browsing for a video on the iPod 16 Playing DivXâ VOD content 16 Function settings 17 Playing audio 19 Basic Operations 19 Selecting and playing files tracks from the name list 20 Browsing for a song on the iPod 20 F...

Page 3: ...dling guideline 41 Compressed audio video compatibility USB SD 42 iPod compatibility 43 Sequence of audio files 44 Using the display correctly 44 Handling the display 44 Liquid crystal display LCD screen 44 LED light emitting diode backlight 45 Fluorescent tube 45 Copyright and trademark 45 Specifications 47 En 3 Contents ...

Page 4: ...ns are disabled unless the parking brake is on and the vehicle is not in motion 10 Never set the volume of your display so high that you cannot hear outside traffic and emergency vehicles WARNING Do not attempt to install or service your display by yourself Installation or servi cing of the display by persons without training and experience in electronic equipment and automotive accessories may be...

Page 5: ...en no power is supplied to this unit such as when the vehicle battery is being replaced the microcomputer of this unit re turns to its initial condition We recom mend that you transcribe the audio adjustment data WARNING Do not use with vehicles that do not feature an ACC position En 5 Section 01 Precautions Precautions ...

Page 6: ...unction only operates in areas with broadcasting RDS signals for FM stations CAUTION Do not allow this unit to come into contact with liquids Electrical shock could result Also damage to this unit smoke and over heating could result from contact with liquids The Pioneer CarStereo Pass is for use only in Germany Always keep the volume low enough to hear outside sounds Avoid exposure to moisture If ...

Page 7: ... battery power Refer to Demonstration demo display set ting on page 31 About this manual This manual describes operations of both MVH 8200BT and MVH 8200 Only MVH 8200BT features Bluetooth functions so the explanations for those functions do not apply to MVH 8200 In the following instructions USB memories USB portable audio players and SD memory cards are collectively referred to as external stora...

Page 8: ...ote control The remote control CD R320 is sold separately Part Operation 9 VO LUME Press to increase or decrease vo lume a MUTE Press to mute Press again to un mute b a b c d Press to perform manual seek tuning fast forward reverse and track search controls Also used for controlling functions c AUDIO Press to select an audio function d DISP SCRL Press to select different displays for the audio sou...

Page 9: ...front panel 2 Grab the front panel and remove 3 Always keep the detached front panel in a protec tion device such as a protection case Re attaching the front panel 1 Slide the front panel up until it clicks The front panel and the head unit are connected on the upper side Make sure that the front panel has been properly connected to the head unit 2 Press the lower side of the front panel until it ...

Page 10: ... Refer to Entertainment settings on page 30 Custom custom menu You can choose menus within each menu Audio function menu etc and register them to this custom menu Refer to Customizing menus on this page The custom menu is displayed 1 Press M C to display the setting mode Phone phone menu The phone menu is displayed Refer to Phone menu operation on page 26 Menu operations identical for function set...

Page 11: ...he monitor using the phone book etc are prohibited while driving Park your vehicle in a safe place when using these advanced operations Setting up for hands free phoning Before you can use the hands free phoning function you must set up the unit for use with your cellular phone 1 Connection Operate the Bluetooth telephone connection menu Refer to Connection menu operation on page 25 2 Function set...

Page 12: ...ice name Band Preset number Frequency indica tor 3 Source image display Manual tuning step by step 1 Push M C left or right Seeking 1 Push and hold M C left or right and then re lease You can cancel seek tuning by pushing M C left or right While pushing and holding M C left or right you can skip stations Seek tuning starts as soon as you release M C Note This unit s AF alternative frequencies sear...

Page 13: ...evel4 MW LW Off Level1 Level2 The larger the setting number the higher the sig nal level The highest level setting allows recep tion of only the strongest stations while lower settings let you receive progressively weaker sta tions 3 Press M C to confirm the selection PTY search program type selection You can tune in to a station using PTY program type information 1 Press M C to display the settin...

Page 14: ...data from up to six radio text 1 Display the radio text you want to store in the memory Refer to Radio Text displaying radio text on this page 2 Press M C The preset screen is displayed 3 Use M C to store the selected radio text in the memory Turn to change the preset number Press and hold to store 4 Use M C to select the desired radio text Turn to change the radio text Press to select PTY list Ne...

Page 15: ...nel 2 Insert an SD memory card into the SD card slot Insert it with the contact surface facing down and press the card until it clicks and completely locks 3 Re attach the front panel Stopping playback of files on an SD memory card 1 Remove the front panel 2 Press the SD memory card until it clicks The SD memory card is ejected 3 Pull out the SD memory card 4 Re attach the front panel Playing vide...

Page 16: ...M C Viewing a list of the files or folders in the selected folder 1 When a category is selected press M C Searching the list by alphabet 1 When a list for the selected category is displayed push and hold M C left or right to switch to al phabet search mode 2 Turn M C to select a letter 3 Press M C to display the alphabetical list If alphabet search is aborted Not Found is dis played Changing the n...

Page 17: ... playback Time Search time search 1 Press M C to display the setting mode 2 Turn M C to find the part you want to play 3 Press M C to confirm the selection Wide Mode switching the wide mode 1 Press M C to display the setting mode 2 Turn M C to select the desired setting Full full Just just Cinema cinema Zoom zoom Normal normal For details about the settings refer to Changing the wide screen mode o...

Page 18: ...torage devices One Repeat the current song All Repeat all songs in the selected list Control Mode control mode This function is not compatible with the following iPod models iPod nano 1st generation iPod 5th generation This unit s iPod function allows you to conduct opera tions from your iPod and listen to it using your car s speakers 1 Press M C to select your favorite setting iPod This unit s iP...

Page 19: ...ernal storage device USB SD Folder file number indicator iPod Song number indicator 2 Indicator display area Refer to Indicator list on page 40 3 Text information area External storage device USB SD Song title artist name album title folder file name iPod Song title Artist name Album title 4 Artwork Source image display area iPod Artwork display or Source image display External storage device USB ...

Page 20: ...hile connected Disconnect headphones from the iPod before connecting to this unit While the iPod is connected to this unit the iPod cannot be turned on or off unless the control mode is set to iPod The iPod will turn off about two minutes after the ignition switch is set to OFF Selecting and playing files tracks from the name list Operations are the same as those for moving images Refer to Selecti...

Page 21: ...s Album list of the currently playing artist Song list of the currently playing album Album list of the currently playing genre 1 Press M C to display the setting mode 2 Turn M C to change the mode press to select Artists Displays the album list of currently playing artist Albums Displays a song list from the album currently being played Genres Displays an album list from the genre currently being...

Page 22: ...ach folder in alphabetical order Basic Operations Photo 16 54 2345 7890 A EQ Text Text 2 1 3 3 3 You can switch to the basic screen or the image screen Refer to Display display setting on the next page 1 Folder file number indicator 2 Indicator display area Refer to Indicator list on page 40 3 Text information area Folder name File name Playing files on a USB storage device 1 Open the USB connecto...

Page 23: ...se or resume Random random play Refer to Random random play on page 20 Play Mode repeat play 1 Refer to Play Mode repeat play on page 17 However the repeat range is different from that of moving images All Repeat all files Folder Repeat the current folder Capture capturing an image in JPEG files You can capture image data and use it as wallpaper Images can be stored and recalled easily in this uni...

Page 24: ...show 1 Press M C to end the slideshow Photo Selection selecting photos 1 Press M C to display the setting mode 2 Select a file The following operations are available The operat ing method is the same as that for the basic op erations Refer to Basic Operations on page 22 Selecting a folder Selecting a file Searching every 10 files Pause pause Refer to Pause pause on page 18 Random random play Refer...

Page 25: ...C to select Yes Turn to change the menu option Press to select To cancel select No While this function is in use do not turn off the engine Add Device connecting a new cellular phone 1 Press M C to start searching To cancel press M C while searching 2 Turn M C to select a device from the device list If the desired device is not displayed select Search Again If five devices are already paired Memor...

Page 26: ...ing from dialed calls received calls and missed calls in this menu 1 Press M C to display Missed Calls missed call history Dialled Calls dialed call history or Re ceived Calls received call history 2 Use M C to select the desired list Turn to change the menu option Press to select To return to the previous display push M C down 3 Press M C to make a call 4 When you find a phone number that you wan...

Page 27: ... adjustment 1 Press M C to display the setting mode 2 Push M C up or down to adjust the front rear speaker balance Adjustment range front rear Front 15 to Rear 15 3 Push M C left or right to adjust the left right speaker balance Adjustment range left right Left 15 to Right 15 Select F R 0 when only using two speakers When the rear output setting and preout setting are Subwoofer you cannot adjust f...

Page 28: ...subwoofer 1 Press M C to display the setting mode 2 Turn M C to select the phase of subwoofer out put Normal normal phase Reverse reverse phase 3 Push M C up or down to adjust the output level of the subwoofer Adjustment range 6 to 24 4 Push M C left or right to select the cut off fre quency 50Hz 63Hz 80Hz 100Hz 125Hz Bass Booster bass boost 1 Press M C to display the setting mode 2 Turn M C to ad...

Page 29: ...tting for DivX If the embedded language and the selected lan guage setting are not the same text information may not be displayed properly Some characters may not be displayed properly To complete this operation switch the ignition key off and on after you set this setting 1 Press M C to display the setting mode 2 Turn M C to select the desired language English English Español Spanish Portu guês P...

Page 30: ...ination color 1 Press M C to display the setting mode 2 Turn M C to change the desired screen illumina tion color Press to select Screen screen color Illumi Illumination color Color Setting customizing color For details on Color Setting customizing color refer to Customizing the illumination color on this page 3 Turn M C to change the desired illumination color Press to select The illumination col...

Page 31: ...l 1 Press M C to display the setting mode 2 Turn M C to change the setting Subwoofer subwoofer Full full range speak er Even if you change this setting there is no output unless you turn the subwoofer output on refer to Subwoofer1 subwoofer on off setting on page 28 If you change this setting subwoofer output in the audio menu will return to the factory settings 3 Press M C to confirm the selectio...

Page 32: ...urement may take a long time resulting in battery drainage Be sure to place the microphone in the specified location Before operating the auto EQ function Carry out auto EQ in as quiet a place as possible with the car engine and air condi tioning switched off Also cut power to car phones or portable telephones in the car or remove them from the car before carrying out auto EQ Sounds other than the...

Page 33: ...al setting menu Refer to Initial Settings on page 31 5 Use M C to enter the auto EQ measure ment mode Turn to change the menu option Press to se lect 6 Plug the microphone into the micro phone input jack on this unit 7 Press M C to start auto EQ 8 When the 10 second countdown starts get out of the car and close the door within 10 seconds A measurement tone noise is emitted from the speakers and au...

Page 34: ... the function menu 2 Turn M C to select the function After selecting perform the following proce dures to set the function A V Change auxiliary device signal setting 1 Press M C to display the setting mode 2 Turn M C to select the desired setting Audio auxiliary device connected with a stereo mini plug cable Video auxiliary video device connected with 4 pole mini plug cable e g CD V150M 3 Press M ...

Page 35: ...eo source When a video is viewed in a wide screen mode that does not match its original aspect ratio it may appear different Remember that using the wide mode feature of this system for commercial or public view ing purposes may constitute an infringement on the author s rights protected by the Copy right Law The video image will appear coarser when viewed in Cinema or Zoom mode Setting the DivX s...

Page 36: ...on code on page 17 2 Use M C to select Yes Turn to change the menu option Press to se lect The deactivation completed To cancel deactivation select No Changing the picture adjustment You can adjust the Brightness brightness Contrast contrast Color color Hue hue Dimmer dimmer Temperature tempera ture and Black Level black level for each source You cannot adjust Color Hue and Black Level for the aud...

Page 37: ...tom Cause Action Refer ence page The image dis played stops pauses and the unit cannot be operated The data could no longer be read during play back Stop playback once and start playback again There is no sound The volume level is low The volume level is low Adjust the volume level The attenuator is on Turn the attenuator off The sound and video skip The unit is not firmly secured Firmly secure th...

Page 38: ...our de vice and replace it with a compatible SD storage device Message Cause Action Check USB The USB connec tor or USB cable has short circuited Check that the USB connector or USB cable is not caught in some thing or damaged The connected USB portable audio player USB memory consumes more than maximum allowable cur rent Disconnect the USB storage de vice and do not use it Turn the ignition switc...

Page 39: ...ere is a delay be tween the start of playback and when you start to hear any sound Wait until the mes sage disappears and you hear sound Message Cause Action Error 02 6X 9X DX Communication failed Disconnect the cable from the iPod Once the iPod s main menu is displayed recon nect the iPod and reset it iPod failure Disconnect the cable from the iPod Once the iPod s main menu is displayed recon nec...

Page 40: ...op your car in a place that is quiet and switch off the engine air conditioner and heater Set the micro phone correctly Error Please check battery Power is not being supplied from the battery to this unit Stop your car in a place that is quiet and switch off the engine air conditioner and heater Connect the bat tery correctly Indicator list Common MVH 8200BT only Indicates that a Bluetooth tele ph...

Page 41: ...compatible with this unit Depending on the kind of USB portable audio player USB memory you use the device may not be recog nized or audio files may not be played back properly Do not leave the USB portable audio player USB memory in direct sunlight for extended amounts of time Doing so may cause the device to malfunction from the extreme rise in temperature SD memory card This unit supports only ...

Page 42: ...perations may be prohibited due to the composition of the DivX files Only DivX files downloaded from a DivX partner site are guarantee for proper operation Unauthorized DivX files may not operate properly DRM rental files cannot be operated until playback is started Recommended file size 2 Mbps or less with a trans mission rate of 2 GB or less The ID code of this unit must be registered to a DivX ...

Page 43: ...le partition can be played There may be a slight delay when starting playback of audio files on an external storage device USB SD with numerous folder hierarchies SD memory card There is no compatibility for Multi Media Cards MMC Compatibility with all SD memory cards is not guaran teed This unit is not compatible with SD Audio SD Video CAUTION Pioneer accepts no responsibility for data lost on th...

Page 44: ...ot use the unit in this condition because doing so may result in fire electric shock or other failure If you notice smoke a strange noise or smell or any other abnormal signs from the display turn off the power immediately and consult your dealer or the nearest authorized PIONEER Service Station Using this unit in this condition may result in permanent da mage to the system Do not disassemble or m...

Page 45: ...the screen will be dark and the image will no longer be projected If this happens consult your dealer or the nearest authorized PIONEER Service Station Copyright and trademark This product incorporates copyright protection technology that is protected by method claims of certain U S patents and other intellectual property rights owned by Macrovision Corporation and other rights owners Use of this ...

Page 46: ...ks with iPhone means that an electronic accessory has been designed to connect spe cifically to iPhone and has been certified by the developer to meet Apple performance standards Apple is not responsible for the operation of this device or its compliance with safety and regulatory standards DivX DivXâ is a registered trademark of DivX Inc and is used under license ABOUT DIVX VIDEO DivXâ is a digit...

Page 47: ...full speed Maximum current supply 500 mA USB Class MSC Mass Storage Class File system FAT16 FAT32 MP3 decoding format MPEG 1 2 Audio Layer 3 WMA decoding format Ver 7 7 1 8 9 10 11 2ch audio Windows Media Player AAC decoding format MPEG 4 AAC iTunes en coded only Ver 8 2 and earlier DivX decoding format Home Theater Ver 3 4 5 2 6 avi divx SD Compatible physical format Version 1 10 Maximum memory c...

Page 48: ...ICS AUSTRALIA PTY LTD 178 184 Boundary Road Braeside Victoria 3195 Australia TEL 03 9586 6300 PIONEER ELECTRONICS OF CANADA INC 300 Allstate Parkway Markham Ontario L3R 0P2 Canada TEL 1 877 283 5901 TEL 905 479 4411 PIONEER ELECTRONICS DE MEXICO S A de C V Blvd Manuel Avila Camacho 138 10 piso Col Lomas de Chapultepec Mexico D F 11000 TEL 55 9178 4270 先鋒股份有限公司 總公司 台北市中山北路二段44號13樓 電話 02 2521 3588 先...

Reviews: