background image


The Video/Audio Adjust menu

11


70


En


Chapter 11


The Video/Audio Adjust menu


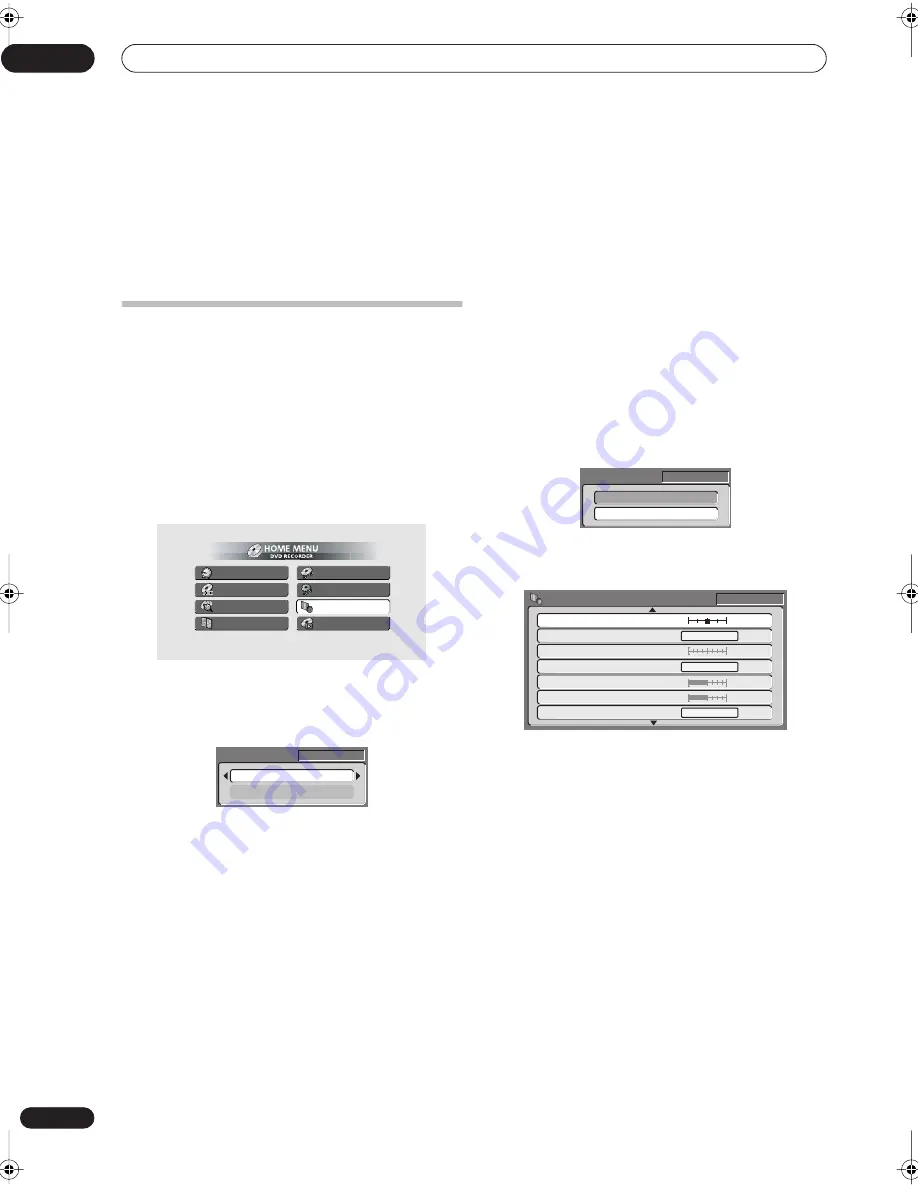
Using the Video/Audio Adjust menu you can set up the picture quality for the built-in tuner and external inputs, for disc 
playback, and for recording.


Setting the picture quality for TV and 
external inputs 


Picture Creation lets you choose a set of picture quality 
settings for the built-in TV tuner and for each external 
input. There are several preset settings that suit various 
sources, or you can create up to three of your own sets.


Choosing a preset


1

With the recorder stopped, press HOME MENU 

and select ‘Video/Audio Adjust’.

2

Select ‘Video Adjust’.

3

Use the 


/


 (cursor left/right) buttons to 

change the preset.


• Use the 


INPUT SELECT


 button to switch between the 

built-in TV tuner and the external inputs.

• Use the 


C/–


 buttons to change the 

channel of the built-in TV tuner.

There are six presets available:


Tuner


 – suitable for general TV broadcasts


VCR


 – suitable for video cassettes


LDP


 – suitable for Laserdiscs


Memory1


 – user preset 1


Memory2


 – user preset 2


Memory3


 – user preset 3

You can press 


DISPLAY


 to see the individual settings for 

the current preset (


Tuner


VCR


 or 


LDP


).


4

Press ENTER to select the preset.


Creating your own set


There are three user presets in which you can save your 
own set of picture quality settings.


1

Follow 


Choosing a preset


 above and select one of 

the user presets (Memory 1, 2 or 3).

2

Select ‘Detailed Settings’.

3

Use the 


/


 (cursor up/down) buttons to select 

the picture quality setting you want to adjust.


You can adjust the following settings:


3-D Y/C


 – Adjusts the brightness/color separation 

(NTSC video only).


VNR


 – Adjusts the amount of noise reduction applied 

to the video signal.


Detail


 – Adjusts how sharp edges appear.


White AGC


 – Turn on for automatic white level 

adjustment.


White Level


 – Adjusts the intensity of white.


Black Level 


– Adjusts the intensity of black.


Black Setup


 – Corrects the standard reference black 

level (NTSC video only).


Hue


 – Adjusts overall balance between red and 

green.


Chroma Level


 – Adjusts how rich the colors appear.

Timer Recording

Disc Navigator

Disc History

PhotoViewer

Disc Setup

Initial Setup

Video/Audio Adjust

Play Mode

Tuner

Detailed Settings

2ch

Memory1

Detailed Settings

2ch

Memory1

Off

Max

Off

On

Detail

White AGC

Motion

Still

3-D Y/C

VNR

Min

Max

Min

Max

White Level

Black Level

2ch

Black Setup

0 IRE

RD_s Mexico.book 70 ページ 2004年5月13日 木曜日 午後7時19分

Summary of Contents for DVR-320

Page 1: ...DVD Recorder DVR 320 Operating Instructions ...

Page 2: ...atus such as vase flower pot cosmetics container and medicine bottle etc D3 4 2 1 3_En CAUTION This product contains a laser diode of higher class than 1 To ensure continued safety do not remove any covers or attempt to gain access to the inside of the product Refer all servicing to qualified personnel The following caution label appears on your unit CLASS 1 LASER PRODUCT D3 4 2 1 8_En The STANDBY...

Page 3: ...s and other intellectual property rights owned by Macrovision Corporation and other rights owners Use of this copyright protection technology must be authorized by Macrovision Corporation and is intended for home and other limited viewing uses only unless otherwise authorized by Macrovision Corporation Reverse engineering or disassembly is prohibited This product is for general household purposes ...

Page 4: ...n on screen 31 05 Playback Introduction 33 Using the Disc Navigator to browse the contents of a disc 33 Using the Disc Navigator with playback only discs 33 Using the Disc Navigator with recordable discs 34 Changing the thumbnail picture for a title 34 Navigating discs 35 Scanning discs 35 Playing in slow motion 36 Frame advance frame reverse 36 The Play Mode menu 37 Search Mode 37 A B Repeat 38 R...

Page 5: ... and external inputs 70 Choosing a preset 70 Creating your own set 70 Setting the picture quality for disc playback 71 Choosing a preset 71 Creating your own set 71 Audio DRC 72 12 The Initial Setup menu Using the Initial Setup menu 73 Basic settings 73 Clock Setting 73 Input Line System 74 On Screen Display 74 Front Panel Display 74 Remote Control Set 75 Setup Navigator 75 Tuner settings 75 Auto ...

Page 6: ...ing the TV remote control buttons 86 Screen sizes and disc formats 87 Troubleshooting 88 General 88 Frequently asked questions 90 Language code list 91 Country code list 91 On screen displays and recorder displays 92 Handling discs 93 Storing discs 93 Damaged discs 93 Cleaning the pickup lens 93 Condensation 94 Hints on installation 94 Moving the recorder 94 Manual recording modes 94 Glossary 95 S...

Page 7: ...ecording screen Set the channel to record and the recording quality then graphically set the start and end times of the recording That s it Program up to 32 timer recordings You can program the recorder to record up to 32 programs up to a month in advance using the VCR Plus system for easy programming if you want As well as single programs you can specify daily or weekly recordings too VCR Plus an...

Page 8: ...ng Play Video mode recordings on a regular DVD player Discs recorded using the Video mode can be played back on regular DVD players including computer DVD drives compatible with DVD Video playback DVD Video format recording The use of the DVD Video format for recording on DVD R and DVD RW discs is referred to as recording in Video mode on Pioneer s DVD recorders Supporting playback of DVD R DVD RW...

Page 9: ...r more When disposing of used batteries please comply with governmental regulations or environmental public instruction s rules that apply in your country or area Using the remote control Please keep in mind the following when using the remote control Make sure that there are no obstacles between the remote and the remote sensor on the unit Remote operation may become unreliable if strong sunlight...

Page 10: ...nalized VR mode and Video mode discs may not play 2 Cannot read the CPRM information will show in the display when you load a disc However this will not affect playback 3 Copy once protected disc titles will not play CD R RW compatibility This recorder cannot record CD R or CD RW discs Compatible formats CD Audio Video CD Super VCD ISO 9660 CD ROM containing MP3 WMA or JPEG files ISO 9660 Level 1 ...

Page 11: ... The most important difference between DVD R and DVD RW is that DVD R is a record once medium while DVD RW is a re recordable erasable medium You can re record erase a DVD RW disc approximately 1 000 times For more information see About DVD recording on page 42 What s VR mode VR Video Recording mode is a special mode designed for home DVD recording It allows flexible editing of recorded material c...

Page 12: ...s the disc according to the Play List Throughout this manual you will often see the words Original and Play List to refer to the actual content and the edited version Original content refers to what s actually recorded on the disc Play List content refers to the edited version of the disc how the Original content is to be played Original Title1 PlayList Title2 Title1 Title3 Title2 Chapter1 Chapter...

Page 13: ...ontrol this recorder from the remote sensor of another Pioneer component with a CONTROL OUT terminal and bearing the Pioneer mark Connect the CONTROL OUT of the other component to the CONTROL IN of this recorder using a mini plug cord 6 OPTICAL DIGITAL OUT A digital audio output for connecting to an AV amp receiver Dolby Digital DTS decoder or other equipment with optical digital input 7 AC IN Con...

Page 14: ...your VCR If you are not connecting a VCR in the chain connect this recorder directly to your TV and skip the next step 3 Use an RF antenna cable to connect the antenna output on your VCR to the antenna input on your TV 4 Connect the AUDIO and VIDEO OUTPUT jacks 1 or 2 to a set of audio video inputs on your TV Use the supplied three pin audio video cable It is color coded to help you match them up ...

Page 15: ...to TVs monitors VCRs or other equipment Use an S video cable not supplied to connect an S VIDEO OUTPUT 1 or 2 to an S video input on your TV monitor or other equipment 2 Connecting using the component video output Component video carries the picture as two separate color signals plus a luminance brightness signal See also Component Video Out on page 77 for how to set up the component video output ...

Page 16: ...or AV amp receiver 1 Connect RF antenna cables as shown This enables you to watch and record TV channels 2 Connect the AUDIO and VIDEO OUTPUT jacks 1 or 2 on this recorder to a set of audio video inputs on your TV using a set of A V cables as supplied This enables you to watch the output from this recorder 3 Connect the audio video output of your cable box satellite tuner to the INPUT 1 AUTO START...

Page 17: ...UTPUT jacks 1 or 2 on this recorder to a set of audio video inputs on your TV using a set of A V cables as supplied This enables you to watch discs 3 Connect the audio video output of your cable box satellite tuner to the INPUT 1 AUTO START REC jacks on this recorder using a set of A V cables This enables you to record scrambled TV channels Note The setup on this page does not allow you to watch o...

Page 18: ...watch and record TV channels 2 Connect the AUDIO and VIDEO OUTPUT jacks 1 or 2 on this recorder to a set of audio video inputs on your AV amp receiver 3 Use an optical digital audio cable not supplied to connect the OPTICAL DIGITAL OUT jack on this recorder to an optical digital input on your AV amp receiver This enables you to listen to multichannel surround sound 4 Connect the AV amp receiver s ...

Page 19: ...make convenient connections for a camcorder input 2 Connect a set of audio and video inputs of your VCR or camcorder to a set of outputs on this recorder This enables you to record from this recorder to your VCR or camcorder You can use standard video or S video cables for the video connection Plugging in After checking all the connections plug in the recorder 1 Use the supplied power cable to con...

Page 20: ...change TV channels skip chapters tracks etc 8 REC MODE page 43 Press repeatedly to change the recording mode picture quality 9 REC Press to start recording 10 Press to stop recording 11 Press to start or restart playback 12 Press to stop playback 13 OPEN CLOSE Press to open close the disc tray 14 Front panel inputs page 13 Pull the cover down where indicated to access the front panel input jacks E...

Page 21: ...ge 44 Lights when a timer recording has been set Indicator blinks if the timer has been set but there isn t a recordable disc loaded AUTO page 51 Lights when Auto Start Recording has been set and during Auto Start Recording 12 Recording quality indicators page 42 FINE Lights when the recording mode is set to FINE best quality SP Lights when the recording mode is set to SP standard play LP Lights w...

Page 22: ...10 DISC NAVIGATOR page 33 54 TOP MENU page 29 Press to display the Disc Navigator screen or the top menu if a DVD Video disc is loaded 11 PLAY LIST page 55 60 MENU page 29 Press to switch between Original and Play List content on VR mode discs or display the disc menu if a DVD Video disc is loaded 12 cursor buttons and ENTER Used to navigate all on screen displays Press ENTER to select the current...

Page 23: ...EC MODE page 43 Press repeatedly to change the recording mode picture quality TIMER REC page 46 Press to set a timer recording from the standard Timer Recording screen EASY TIMER page 45 Press to set a timer recording from the Easy Timer Recording screen 17 DISC HISTORY page 65 Press to display summary information disc name recording time left etc from the last 30 recordable discs loaded NAVI MARK...

Page 24: ...he Setup Navigator press cursor down to select Cancel then press ENTER to exit the Setup Navigator 5 Use the cursor up down buttons to select Antenna or Cable depending on how you receive your terrestrial TV channels then press ENTER You can also select Do not set if you don t need the recorder to retune all the channels if you re using the Setup Navigator for a second time for example DVD RECORDE...

Page 25: ...ut Language Recording Playback Clock Set Input Line System On Screen Display Front Panel Display Remote Control Set Setup Navigator Setup Navigator Clock Setting Auto Manual Initial Setup Basic Tuner Video Out Audio In Audio Out Language Recording Playback Clock Set Input Line System On Screen Display Front Panel Display Remote Control Set Setup Navigator Setup Initial Setup Auto Clock Setting Dat...

Page 26: ...ts Manual channel setting This setting lets you skip channels where there is no station as well as manually tune to stations See Manual CH Setting on page 75 VCR plus channel setting This setting lets you assign guide channels to ensure that the VCR plus programming system works correctly See VCR Plus CH Setting on page 76 Setting up the remote to control your TV You can set up the supplied remote...

Page 27: ...be in SP standard play mode which will give you around two hours of recording from a blank DVD disc You can pause recording by pressing PAUSE Press REC or PAUSE again to restart recording 6 When you want to stop recording press STOP REC Playing back your recording The TV program you just recorded should be on the DVD disc as a single title with one or more chapters Press PLAY to start playback If ...

Page 28: ...he disc This is not a malfunction 1 Press STANDBY ON to switch on Also turn on your TV and make sure that it is set to the correct video input 2 Press OPEN CLOSE to open the disc tray 3 Load a disc Load a disc with the label side facing up using the disc tray guide to align the disc if you re loading a double sided DVD Video disc load it with the side you want to play face down If you want to play...

Page 29: ...n also use the num ber buttons to select numbered items in the disc menu VR mode only During playback enter a title number then press ENTER All Press CLEAR to clear a number entry and start again Commercial back skip Each press skips backward forward progressively up to a maximum of 10 minutes forward or three minutes back During playback press to start slow motion playback Press repeatedly to cha...

Page 30: ...start scanning Press repeatedly to increase the scanning speed Press to skip to previous next track You can also use the front panel buttons to do this during playback When a PBC menu is displayed press to display the previous next page During playback enter a track number then press ENTER to skip directly to that track Press CLEAR to clear a number entry and start again While a PBC menu screen is...

Page 31: ...yback can be resumed from the last place stopped 5 Recording time remaining Shows the approximate recording time left on the disc in the current recording mode 6 TV channel Shows the TV channel preset for the built in TV tuner 7 Audio mode Shows the broadcast audio mode for the current channel preset Mono Stereo etc 8 Copy control information Shows recording restrictions of the current channel pro...

Page 32: ...SP LP etc and the total recording time of the disc Note When using the simultaneous play and record feature the display shows information for playback only Data transfer rate shows the amount of video and audio information recorded on the disc It is not an indication of picture audio quality The Video mode disc displays become the same as a DVD Video disc once the disc is finalized The total recor...

Page 33: ...ints in the disc This is not a malfunction When playing Video CDs some functions such as making a program list are not available in PBC mode Stop the disc first then start playback by pressing For discs that contain JPEG picture files see The PhotoViewer on page 66 Using the Disc Navigator to browse the contents of a disc Use the Disc Navigator to browse the contents of a disc and start playback U...

Page 34: ...e the cursor buttons to select a title to play 4 Press ENTER to start playback Tip You can also use the front panel controls Press DISC NAVIGATOR then use the buttons to select a title Press PLAY to start playback Note The Disc Navigator is only accessible when there is a disc loaded It s not possible to use the Disc Navigator when playing a Video CD in PBC mode Another way to find a particular pl...

Page 35: ...d start again press CLEAR 2 Optionally Press ENTER Alternatively just wait a few seconds and playback will jump to the new title 1 During playback use the number buttons to input a track number For example for track 6 press 6 for track 24 press 2 then 4 To clear and start again press CLEAR 2 Optionally Press ENTER Alternatively just wait a few seconds and playback will jump to the new track Scanni...

Page 36: ... PLAY Note The picture quality during slow motion playback is not as good as during normal playback and depends on the disc being played Reverse slow motion playback may not be as smooth as forward and may be better with some discs than others Depending on the disc normal playback may automatically resume when a new chapter is reached on a DVD disc No sound is output during slow motion playback Fr...

Page 37: ... the number buttons to enter a title chapter folder track number or the search time in hours minutes seconds Time Search DVD For example for 25 minutes into the current title press 2 5 0 0 For 1 hour and 15 minutes and 20 seconds into the title press 1 1 5 2 0 Time Search Video CD For example for 45 minutes into the disc press 4 5 0 0 Title Chapter Folder Track Search For example for track 6 press...

Page 38: ...are various repeat play options depending on the kind of disc loaded It s also possible to use repeat play together with program play to repeat the tracks chapters in the program list see Program play below 1 Select Repeat from the Play Mode menu 2 Select a repeat play mode For VR mode DVD discs select Repeat Disc Repeat Title or Repeat Chapter or Repeat Off For DVD Video and Video mode DVD discs ...

Page 39: ...can contain up to 24 titles chapters folders tracks 5 To play the program list press PLAY Program play remains active until you turn off program play see below erase the program list see below eject the disc or switch off the recorder Tip To save your program list and exit the program edit screen without starting playback press HOME MENU or PLAY MODE You can change the program list by selecting In...

Page 40: ...AR Note Some discs only allow you to change subtitle language from the disc menu Press TOP MENU to access To set subtitle preferences see Subtitle Language on page 80 Switching DVD soundtracks When playing a DVD disc recorded with two or more soundtracks often in different languages you can switch the soundtrack during playback Check the disc packaging for details of the soundtrack options Press A...

Page 41: ... When playing a Dual Mono recording on a VR mode disc if you are listening to the Dolby Digital soundtrack via the digital output you cannot switch the audio channel Set Dolby Digital Out to Dolby Digital PCM see Dolby Digital Out on page 78 or listen via the analog outputs if you need to switch the audio channel Switching camera angles Some DVD Video discs feature scenes shot from two or more ang...

Page 42: ...er models are compatible with VR mode DVD RW discs Check the operating instructions for your player for VR mode compatibility information The maximum number of titles that can be recorded on a DVD R RW disc is 99 The maximum number of chapters recordable on a DVD R RW disc is 999 No more recording is possible on a disc that already contains the maximum number of chapters titles Recording time and ...

Page 43: ...l exception or consented to by the rightowners This product incorporates copyright protection technology that is protected by method claims of certain U S patents and other intellectual property rights owned by Macrovision Corporation and other rights owners Use of this copyright protection technology must be authorized by Macrovision Corporation and is intended for home and other limited viewing ...

Page 44: ...ant to set a recording end time press the REC button repeatedly The recording time increases in 30 minute increments up to a maximum of six hours The time the recording will end is shown on screen and in the front panel display When the recording ends the recorder automatically switches into standby if no other operation is being performed To cancel the set recording time press REC If you want to ...

Page 45: ...tion see Automatic recording from a satellite tuner on page 51 A timer recording will interrupt an Auto Start Recording Auto Start Recording will resume after the timer recording has finished Approximately two minutes before a timer recording is set to start the recorder will go into timer recording standby assuming that a recordable disc is loaded In timer recording standby you cannot use some fu...

Page 46: ...ing details you just set from the main timer recording screen see Standard timer recording below Standard timer recording The timer recording screen you can see all the timer programs already set clear programs and set up new ones 1 Press TIMER REC to display the Timer Recording screen You can also access the Timer Recording screen from the Home Menu press HOME MENU select Timer Recording then Tim...

Page 47: ...r program overlaps another in the list the message Overlap appears If no recordable disc is loaded the message Can t Rec appears Standby is displayed when the recorder is in timer recording standby Recording is displayed when a timer recording is in progress 5 To exit the timer recording screen press HOME MENU Note The rightmost column in the timer recording screen Confirm shows whether there s en...

Page 48: ... the timer recording screen VCR Plus programming with the power off You can enter a PlusCode number when the recorder is in standby Important You can t use this feature until you have set up the guide channels See VCR Plus CH Setting on page 76 You can t change the recording mode You can t program daily or weekly timer recordings 1 Press VCR Plus The front panel display shows the current recording...

Page 49: ...ng and stopping a timer recording in progress After a timer recording has started you can cancel the program but continue recording or stop recording completely if you need to 1 During timer recording press and hold REC for three seconds Only the program is canceled the timer indicator disappears recording continues so that you can manually stop recording whenever you like 2 When you want to stop ...

Page 50: ...ture called Chase Play makes it possible to watch a recording in progress from the start of the recording as in playback is chasing the recording For example perhaps you have to miss the first 30 minutes of a movie on TV you can start recording then start watching the movie from the beginning while the recorder is still recording 30 minutes ahead of you In fact you re not just limited to watching ...

Page 51: ...t top box connected to the L1 input you can have the recorder start and stop recording automatically with the timer settings of the connected component If the other component doesn t have a built in timer you ll need to use it with an external timer unit After setting up for Auto Start Recording this recorder starts recording when it detects a signal from the other component When the signal ceases...

Page 52: ...gular DVD players can play finalized discs recorded in Video mode A number of players including many Pioneer models can also play DVD RW discs recorded in VR mode finalized or not Check the manual that came with the player to check what kinds of discs it will play When you finalize a Video mode disc a title menu is created from which you can select titles when you play the disc There are a number ...

Page 53: ... not be able to finalize the disc See Input Line System on page 74 for how to change the recorder s setting Initializing a DVD RW disc When you first load a blank disc the recorder will initialize it automatically for recording You can also manually initialize DVD RW discs You can initialize a disc for either Video mode recording or VR mode recording Important Initializing a disc will erase everyt...

Page 54: ...The Play List doesn t actually change any of the content on the disc but just controls how the content is played back rather like the program play feature found on CD players The Disc Navigator screen 1 Press DISC NAVIGATOR to display the Disc Navigator screen Playback will automatically stop when you do this Video Mode 1 1 12 30 Wed 4 11 2ch LP Recording Time 0h30m40s Undo DVD 1 2 3 4 5 6 Disc Na...

Page 55: ...eo mode discs are shown below Play Play a title page 56 Title Name Ttl Name Name or rename a title page 56 Lock Unlock Lock or unlock a title to prevent accidental changes being made page 59 Erase Erase a title page 56 Erase All Erase all titles page 59 Undo Undo the last change page 59 Original Play Play a title page 56 Title Name Ttl Name Name or rename a title page 56 Lock Unlock Lock or unlock...

Page 56: ...nu options 2 Use the cursor buttons to select the title you want to erase then press ENTER 3 Highlight Yes to confirm or No to cancel then press ENTER 4 Press RETURN to go back to the Disc Navigator menu options or select another title to erase Tip You can erase a title quickly by pressing CLEAR when the title is highlighted Confirm the edit by pressing ENTER You can also use this method to erase ...

Page 57: ...mands for erasing combining and dividing You can also play individual chapters to check their content 1 Select Chpt Edit from the Disc Navigator menu options 2 Use the cursor buttons to select the title that contains the chapters you want to edit then press ENTER After selecting a title thumbnails of each chapter appear and you ll see that the Disc Navigator menu items change to the chapter editin...

Page 58: ... where you want a new chapter to begin A chapter marker icon appears on screen briefly to confirm a new chapter mark has been inserted For greater control over the exact position of chapter markers it can be useful to use the PAUSE button and or the slow motion and frame advance reverse controls Note You cannot insert chapter markers during Auto Start Recording If you pause a recording in VR mode ...

Page 59: ... can t undo any edits made before changing the lock status You also can t undo a lock unlock command using the Undo option from the Disc Navigator menu 1 Select Lock from the Disc Navigator menu options 2 Use the cursor buttons to select the title you want to lock or unlock then press ENTER An unlocked title will become locked a locked title will be unlocked Locked titles are shown in the Disc Nav...

Page 60: ...ilable recording time does not increase 1 Select Erase from the Disc Navigator Play List menu options 2 Select the title you want to erase then press ENTER 3 Highlight Yes to confirm or No to cancel then press ENTER 4 Press RETURN to go back to the Disc Navigator menu options or select another title to erase Note The remaining recording time doesn t change when you erase something from the Play Li...

Page 61: ...bnails of each chapter appear and you ll see that the Disc Navigator menu items change to the chapter editing commands Erase Erase chapters Select the chapter you want to erase and press ENTER Divide Divide a chapter into two or more parts Select the chapter you want to divide From the following screen use the playback controls etc to find the point at which you want to divide the chapter With Div...

Page 62: ...nother section from the same title or press RETURN to get back to the main Disc Navigator screen Create Use this function to add an Original title to the Play List When you do this the whole title is put into the Play List you can erase bits you don t need later see Chapter Edit Chpt Edit on page 61 The title appears in the Play List complete with the chapter markers that appear in the Original Ho...

Page 63: ...Disc Navigator Play List menu options 2 Select the title that you want to divide then press ENTER 3 Use the playback controls to find the place you want to divide the title You can use all the usual playback controls including PLAY PAUSE scan and slow motion 4 With Divide highlighted press ENTER to divide the title at the current playback position 5 To return to the Disc Navigator menu options sel...

Page 64: ...ns 2 Select Yes to confirm or No to cancel then press ENTER Undo If you make a mistake while editing you can generally undo it There are three levels of undo in other words you can undo the last three edits you made Select Undo from the Disc Navigator Play List menu options You can t undo a Lock command You can t undo anything after exiting the Disc Navigator screen VR mode Play List 1 1 Undo DVD ...

Page 65: ... the buttons to move up and down the list Note When you initialize a DVD RW disc or record a DVD R disc for the first time the recorder automatically names the disc DISC where is a number from 1 to 99 You can rename the disc if you want to see Input Disc Name on page 68 When you change the display for the available recording time using the REC MODE button only the display is changed the actual rec...

Page 66: ...te Up to 999 files or 99 folders are viewable but if there are more files folders than this on the disc it is still possible to view them all using the Reload function see below The time it takes for the recorder to load a file increases with large file sizes Pictures with an aspect ratio different to your TV screen will appear with black bars top and bottom or either side depending on the picture...

Page 67: ...d 1 During a slideshow use the CHANNEL button to zoom the picture Repeated presses cycle between zoom off 2x zoom and 4x zoom The zoom factor is displayed on screen 2 Use the cursor buttons to move the zoomed area within the picture Rotating the screen You can rotate the displayed picture during a slideshow so you can always view pictures the right way up whichever way they were taken During a sli...

Page 68: ... buttons You can also use the CLEAR button to delete characters directly press and hold for two seconds to delete the whole name For other remote control key shortcuts see Using the remote key shortcuts to input a name on page 57 For discs formatted on a different DVD recorder you will see only a limited character set Note You cannot input a name for a disc if the TV line system of the disc is dif...

Page 69: ...es the recordings in place so that the disc can be played on a regular DVD player or computer equipped with a suitable DVD ROM drive See Playing your recordings on other DVD players on page 52 for detailed instructions Undo Finalize You can undo the finalization on DVD RW discs recorded on this recorder in Video mode You need to do this if you want to record more material or edit material already ...

Page 70: ...press DISPLAY to see the individual settings for the current preset Tuner VCR or LDP 4 Press ENTER to select the preset Creating your own set There are three user presets in which you can save your own set of picture quality settings 1 Follow Choosing a preset above and select one of the user presets Memory 1 2 or 3 2 Select Detailed Settings 3 Use the cursor up down buttons to select the picture ...

Page 71: ...user presets in which you can save your own set of picture quality settings for disc playback 1 Follow Choosing a preset above and select one of the user presets Memory 1 2 or 3 2 Move the cursor down and select Detailed Settings 3 Select the picture quality setting you want to adjust You can adjust the following settings Pure Cinema When watching DVD movies Pure Cinema optimizes the picture quali...

Page 72: ...asy to lose low level sounds completely including some of the dialog Switching on Audio DRC Dynamic Range Control can help by bringing up the low level sounds while controlling high level peaks 1 During playback or when paused press HOME MENU and select Video Audio Adjust 2 Select Audio Adjust 3 Use the cursor left right buttons to adjust DRC from Off to Max Exactly how much difference you can hea...

Page 73: ...et Clock Set CH to the channel that broadcasts a clock signal then move the cursor down to Start and press ENTER If the time could not be set automatically press RETURN to go back to the previous screen and select Manual Manual clock setting If no stations in your area are broadcasting time signals you can set the clock manually Use the cursor left right buttons to set your time zone then press EN...

Page 74: ...ys Play Stop and so on Change to Off to hide these displays Front Panel Display Default setting On On the default setting the time is shown in the front panel display when the recorder is in standby Switch to Off to have the front panel display switch off completely when in standby Note When set to Off the display still lights dimly in standby when setting a timer recording or during Auto Start Re...

Page 75: ...ect Antenna or Cable depending on how you receive your TV channels then wait for the automatic tuning to finish After automatic tuning a summary channel mapping screen is displayed Press ENTER to return to the main menu screen Note If you want to cancel before tuning has finished press ENTER You can manually tune and skip blank channels using the Manual CH Setting below Manual CH Setting Default s...

Page 76: ... return to the Initial Setup menu press ENTER Video In Out settings Input Colour System Default setting Auto On the default setting the recorder automatically detects whether the video signal from the built in tuner or from one of the external inputs is PAL N 3 58 NTSC or PAL M You may however occasionally need to set it manually if the picture is not displayed properly 1 Select Input Colour Syste...

Page 77: ...le below Input Line System Built in tuner External input 625 System PAL N PAL N 525 System Auto Auto 3 58 NTSC 3 58 NTSC PAL M PAL M Basic Tuner Video In Out Audio In Audio Out Language Recording Playback Input Colour System Component Video Out Interlace Progressive Initial Setup Compatibility of this unit with progressive scan TVs Consumers should note that not all high definition television sets...

Page 78: ...ime you need to switch off the digital audio output set this to Off otherwise leave it On Note When set to Off all the other Audio Out settings are grayed out and can t be set Dolby Digital Out You only need to make this setting if you connected this recorder to an AV amp receiver or other component using the digital output Default setting Dolby Digital Basic Tuner Video Out Audio In Audio Out Lan...

Page 79: ...e set to 96kHz 48kHz Check the manual that came with the connected component if you re unsure whether it is compatible with high sampling rate audio MPEG Out You only need to make this setting if you connected this recorder to an AV amp receiver or other component using the digital output Default setting MPEG PCM If your AV amp receiver or other connected component is MPEG audio compatible set to ...

Page 80: ...es will be shown with subtitles Set to Off to have the recorder play discs strictly according to your Audio Language and Subtitle Language settings For Auto Language to work the Audio Language and Subtitle Language settings must be the same see Audio Language on page 79 and Subtitle Language on page 80 Note Even when set to On Auto Language may not work with some discs In this case set the audio a...

Page 81: ... can select your Manual Recording setting using the REC MODE button 1 Select On go to setup to display the manual recording setting screen 2 Use the cursor left right buttons to change the manual recording level You can also use the and buttons to cycle between levels MN1 MN9 MN21 and MN32 To preview the recording quality press cursor down and select Preview To return to the level adjust screen pr...

Page 82: ...r switch off automatic chapter marking altogether with the No Separation setting DVD RW Auto Init Default setting VR Mode When you load a new blank DVD RW disc the recorder automatically initializes it for recording You can set it to initialize the disc for VR mode or Video mode recording Playback settings TV Screen Size Default setting 4 3 Letter Box If you have a widescreen TV select the 16 9 se...

Page 83: ... play certain scenes on these discs depending on the Country code you set Before you can set the Parental Lock level or the Country code you must set a password As the password owner you can change the Parental Lock level or Country code whenever you like You can also change the password Note Not all discs that you may consider inappropriate for your children use the Parental Lock feature These di...

Page 84: ... Initial Setup TV Screen Size Still Picture Seamless Playback Parental Lock Angle Indicator Parental Lock Basic Tuner Video In Out Audio In Audio Out Language Recording Playback Change Password Current Password New Password 1 2 3 4 5 6 7 8 Initial Setup Basic Tuner Video In Out Audio In Audio Out Language Recording Playback TV Screen Size Still Picture Seamless Playback Parental Lock Angle Indicat...

Page 85: ...ng the parts of the disc where angle switching is available Change to Off to hide the on screen indicator TV Screen Size Still Picture Seamless Playback Parental Lock Angle Indicator Parental Lock Basic Tuner Video In Out Audio In Audio Out Language Recording Playback Parental Lock Country Code Password Code Number 1 2 3 4 Initial Setup us 2 1 1 9 TV Screen Size Still Picture Seamless Playback Par...

Page 86: ... the maker s name of your TV doesn t appear in the table below you will not be able to use this remote to control your TV 2 Press TV to check that the remote works with your TV If the remote is set up correctly the TV should switch on off If it doesn t and there is another code given for your maker repeat step 1 with a new code Using the TV remote control buttons The table below shows how to use t...

Page 87: ...f the program are cropped so that the picture fills the whole screen 4 3 16 9 The program appears squashed Set to either 4 3 Letter Box or 4 3 Pan Scan 4 3 Letter Box 4 3 Pan Scan The program is presented correctly on either setting When viewing on a widescreen TV or monitor Screen format of disc Setting Appearance 16 9 16 9 The program is presented in widescreen 4 3 16 9 Your TV will determine ho...

Page 88: ...e recorder for an hour or so for the condensation to evaporate All settings are reset If the recorder is unplugged or there is a power failure while the recorder is on all the settings will be lost Make sure that you switch the recorder into standby before unplugging the power cord Screen goes blank and controls are inoperative Press STOP then restart playback Remote control does not work If you c...

Page 89: ...e control code list Can t record or does not record suc cessfully Check that there is some remaining blank space on the DVD For a Video mode disc check that the disc isn t already finalized A DVD disc may contain up to 99 Original titles and 999 chapters Check that these limits have not been reached Check that the source you are trying to record is not copy protected For a VR formatted disc check ...

Page 90: ...lized for recording in VR mode See also Editing on page 54 Can I play a VR mode DVD RW disc in another DVD player Look for the RW Compatible mark on the other DVD player to see if it will play VR mode DVD RW discs If the player does not recognize the disc when you load it try finalizing it in the recorder then try again See also Playing your recordings on other DVD players on page 52 Can I record ...

Page 91: ... 1307 Maori mi 1309 Macedonian mk 1311 Malayalam ml 1312 Mongolian mn 1314 Moldavian mo 1315 Marathi mr 1318 Malay ms 1319 Maltese mt 1320 Burmese my 1325 Nauru na 1401 Nepali ne 1405 Norwegian no 1415 Occitan oc 1503 Oromo om 1513 Oriya or 1518 Panjabi pa 1601 Polish pl 1612 Pashto Pushto ps 1619 Quechua qu 1721 Rhaeto Romance rm 1813 Kirundi rn 1814 Romanian ro 1815 Kinyarwanda rw 1823 Sanskrit ...

Page 92: ...lease consult a Pioneer Service Center Incompatible or unreadable disc The disc loaded is a DVD RAM DVD R RW or some other incompatible disc type This display may also appear if the disc is dirty or damaged Cannot record to a disc that is not CPRM com patible Cannot record this content using Video mode recording The video source is copy once protected Use a VR mode DVD RW disc with CPRM for record...

Page 93: ...led care information see the instructions that come with discs Do not load more than one disc into the recorder Damaged discs Discs spin at high speed inside the recorder If you can see that a disc is cracked chipped warped or otherwise damaged don t risk using it you could end up damaging the recorder This recorder is designed for use with conventional fully circular discs only Use of shaped disc...

Page 94: ...to move the recorder first remove the disc if there s one loaded and close the disc tray Next press STANDBY ON to switch the power to standby checking that the POWER OFF indication in the display goes off Lastly disconnect the power cord Never lift or move the unit during playback or recording discs rotate at a high speed and may be damaged Manual recording modes The table below shows the approxim...

Page 95: ... for Digital Theater System DTS is a surround system different from Dolby Digital that has become a popular surround sound format for movies DTS and DTS Digital Out are registered trademarks of Digital Theater Systems Inc Dynamic range The difference between the quietest and loudest sounds possible in an audio signal without distorting or getting lost in noise Dolby Digital and DTS soundtracks are...

Page 96: ...ure quality of a cinema screen You can see whether video on a DVD disc is film or video material by displaying the transfer rate If a appears above the transfer rate display it is film material Regions DVD only example region code marks Regions associate discs and players with particular areas of the world This unit will only play discs that have compatible region codes You can find the region cod...

Page 97: ...ams Clock Quartz lock 12 hour 24 hour digital display Power off memory Approx 5 years after manufacture Input Output VHF UHF antenna input output terminal VHF UHF set 75 Ω F shape connector Video input Input 1 rear 3 rear 2 front Input level 1 Vp p 75 Ω Jacks RCA jack Video output Output 1 2 Output level 1 Vp p 75 Ω Jacks RCA jack S Video input Input 1 3 rear 2 front Y luminance Input level 1 Vp p...

Page 98: ...lstate Parkway Markham Ontario L3R OP2 Canada TEL 1 877 283 5901 PIONEER EUROPE NV Haven 1087 Keetberglaan 1 B 9120 Melsele Belgium TEL 03 570 05 11 PIONEER ELECTRONICS ASIACENTRE PTE LTD 253 Alexandra Road 04 01 Singapore 159936 TEL 65 6472 7555 PIONEER ELECTRONICS AUSTRALIA PTY LTD 178 184 Boundary Road Braeside Victoria 3195 Australia TEL 03 9586 6300 PIONEER ELECTRONICS DE MEXICO S A DE C V Bl...

Reviews: