background image


Recording

05


32


En


• If power to the recorder is cut (due to a 

power outage, the plug being pulled 
from the power outlet, etc.) during 
recording, editing, initializing, finalizing 
or other operation, some recorded 
material on the disc, or the disc itself, 
may become unusable. In this case, try 
re-initializing the disc (DVD-RW only), or 
use a new disc. Pioneer is not 
responsible for lost recordings, 
damaged discs or other losses in these 
cases.

• Fingerprints, dirt and small scratches on 

a disc can affect playback and/or 
recording performance. Please take 
proper care of your discs.

• See also 


Disc / content format playback 

compatibility


 on page 7 for detailed disc 

compatibility information.


Recording to DVD-R DL/DVD+R DL 
discs


Recording to DVD-R DL/DVD+R DL discs is 
generally the same as recording to regular 
single-layer discs; however, please note the 
following points:

• When the recorder switches from the 

first layer to the second during recording 
a DVD-R DL (Video mode) disc, a new 
title is automatically started on the new 
layer.

• Up to 99 titles can be recorded on a DVD-

R DL (Video mode) disc. If the 99th title is 
being recorded when the layer is 
switched, recording will stop.

• Up to 49 titles can be recorded on a 

DVD+R DL disc.

• You cannot play, record additional 

material to, edit or finalize a DVD-R DL or 
DVD+R DL disc that has been recorded 
on but not yet finalized on another DVD 
recorder.


About HDD recording


Recording to the internal hard disk drive 
(HDD) is very flexible; you have the full 
choice of recording quality options, 
including manual mode, and of course you 
can record, erase and re-record as many 
times as you like.

The capacity of the hard disk drive means 
that you can store many hours of video on it, 
even using the higher quality recording 
modes.


 Important


• The maximum number of titles/chapters 

per title that can be recorded on the 
HDD is 999 and 99 respectively. No more 
recording is possible on the HDD after 
the maximum number of titles has been 
reached.

• The maximum continuous recording 

time for one title is 12 hours.

• It is possible to record both PAL and 

NTSC titles on the HDD. Before 
recording, you need to make sure that 
the Input Line System setting (page 119) 
matches the TV line system of the source 
you’re recording.


HDD Video mode compatibility


When recording to the HDD you can choose 
to record in one of two formats. Set the 
format from the HDD Recording Format 
item in the Initial Setup menu (see 
page 117).

When set to Video Mode On, high-speed 
copying from HDD to Video mode DVD-R/-
RW or DVD+R/+RW is possible. When 
recording a bilingual broadcast, set which 
channel you want to record from the Initial 
Setup menu (see  


Bilingual Recording


 on 

page 113).

DVR640H_RLT_EN.book 32 ページ 2006年4月11日 火曜日 午後12時26分

Summary of Contents for DVR-310

Page 1: ...TM ...

Page 2: ...the power supply voltage of the area where this unit will be used meets the required voltage e g 230 V or 120 V written on the rear panel D3 4 2 1 4_A_En Before plugging in for the first time read the following section carefully CAUTION This product is a class 1 laser product but this product contains a laser diode higher than Class 1 To ensure continued safety do not remove any covers or attempt ...

Page 3: ...ent on thick carpet or a bed D3 4 2 1 7b_A_En If the AC plug of this unit does not match the AC outlet you want to use the plug must be removed and appropriate one fitted Replacement and mounting of an AC plug on the power supply cord of this unit should be performed only by qualified service personnel If connected to an AC outlet the cut off plug can cause severe electrical shock Make sure it is ...

Page 4: ...up 28 05 Recording About DVD recording 31 About HDD recording 32 Recorded audio 33 Restrictions on video recording 33 Using the built in TV tuner 34 Setting the picture quality recording time 35 Basic recording from the TV 35 Setting a timer recording 37 Timer recording FAQ 45 Simultaneous recording and playback Chase Play 45 Recording from an external component 46 Automatic recording from a satel...

Page 5: ...ng a slideshow 101 12 The Disc Setup menu Basic settings 103 Initialize settings 104 Finalize settings 104 Optimize HDD 105 Initialize HDD 105 13 The Video Adjust menu Setting the picture quality for TV and external inputs 106 Setting the picture quality for disc playback 108 14 The Initial Setup menu Using the Initial Setup menu 110 Selecting other languages for language options 120 15 Additional...

Page 6: ... match the indications in the battery compartment Remove batteries from equipment that isn t going to be used for a month or more When disposing of used batteries please comply with governmental regulations or environmental public instruction s rules that apply in your country area Using the remote control Please keep in mind the following when using the remote control Make sure that there are no ...

Page 7: ...5x ver 2 2 2x 2x to 3x 2x to 5x DVD R DL ver 3 0 2x to 4x DVD R DL 2 4x 2 4x to 8x Note that older models of DVD recorders and DVD writers may reject DVD RW ver 1 2 discs and or corrupt the data on the disc If you want to share DVD RW discs between this recorder and an older recorder writer we recommend using ver 1 1 discs The following table shows older Pioneer DVD recorders limited compatibility...

Page 8: ...Maxell discs have been tested to work reliably with this recorder Discs from other makers may become unusable when recorded or edited 14 Erasing a title does not increase the available recording time nor increase the number of recordable titles left 15 Must be compatible with DVD R playback 16 Depending on the disc it may have to be initialized before it can be recorded page 104 In this case initi...

Page 9: ...ains DVD content video audio etc while the other side contains non DVD content such as digital audio material The non DVD audio side of the disc is not compliant with the CD Audio specification and therefore may not play It is possible that when loading or ejecting a DualDisc the opposite side to that being played will be scratched Scratched discs may not be playable The DVD side of a DualDisc pla...

Page 10: ... that this recorder can playback Windows Media Audio content WMA is an acronym for Windows Media Audio and refers to an audio compression technology developed by Microsoft Corporation WMA content can be encoded by using Windows Media Player for Windows XP Windows Media Player 9 or Windows Media Player 10 series Microsoft Windows Media and the Windows logo are trademarks or registered trademarks of...

Page 11: ... disc that contains expired DivX VOD content for example content that has zero remaining plays the message Rental Expired is displayed If your DivX VOD content allows an unlimited number of plays then you may load the disc into your recorder and play the content as often as you like and no message will be displayed Important DivX VOD content is protected by a DRM Digital Rights Management system T...

Page 12: ...it is possible that the recorded contents will be damaged or lost completely or that normal playback and recording will not be possible Please understand that in the event of repair or replacement of the HDD or related components all your HDD recordings will be lost Please use the recorder following the guidelines below to protect against possible HDD failure The HDD should not be regarded as a pl...

Page 13: ...ails no playback of recorded material will be possible In this case it will be necessary to replace the HDD unit Optimizing HDD performance As you record and edit material on the HDD the data on the disk becomes fragmented eventually affecting the recorder s performance Before this happens the recorder will warn you that it is time to optimize the HDD which you can do from the Disc Setup menu see ...

Page 14: ... or other source component for recording 5 ANTENNA IN RF IN OUT Connect your TV antenna to the ANTENNA IN RF IN jack The signal is passed through to the ANTENNA OUT jack for connection to your TV 6 COAXIAL DIGITAL OUT A digital audio output for connecting to an AV amp receiver Dolby Digital DTS decoder or other equipment with coaxial digital input 7 CONTROL IN Use to control this recorder from the...

Page 15: ... port Type A DVR 640H S only USB port for connecting a digital camera USB memory or other USB device 10 DV IN DVR 640H S DVR 541H S only A DV input i LINK connector suitable for connecting a DV camcorder 11 INPUT2 Audio video input stereo analog audio composite and S video video especially suitable for camcorders game consoles portable audio etc S VIDEO DV IN VIDEO L AUDIO R MONO INPUT 2 USB 10 8 ...

Page 16: ...f you are not connecting a VCR in the chain connect this recorder directly to your TV and skip the next step 3 Use an RF antenna cable to connect the antenna output on your VCR to the antenna input on your TV 4 Connect the AUDIO and VIDEO OUTPUT jacks 1 or 2 to a set of audio video inputs on your TV Use the supplied three pin audio video cable It is color coded to help you match them up red white ...

Page 17: ...TVs monitors VCRs or other equipment Use an S video cable not supplied to connect an S VIDEO OUTPUT 1 or 2 to an S video input on your TV monitor or other equipment 2 Connecting using the component video output Component video carries the picture as two separate color signals plus a luminance brightness signal See also Component Video Out on page 112 for how to set up the component video output fo...

Page 18: ...p receiver 1 Connect RF antenna cables as shown This enables you to watch and record TV channels 2 Connect the AUDIO and VIDEO OUTPUT jacks 1 or 2 on this recorder to a set of audio video inputs on your TV using a set of A V cables as supplied This enables you to watch the output from this recorder 3 Connect the audio video output of your cable box satellite receiver to the INPUT jacks on this rec...

Page 19: ... on this recorder to a set of audio video inputs on your TV using a set of A V cables as supplied This enables you to watch discs 3 Connect the audio video output of your cable box satellite receiver to the INPUT jacks on this recorder using a set of A V cables This enables you to record scrambled TV channels Note 1 The setup on this page does not allow you to watch one channel and record another ...

Page 20: ...ntenna cables as shown This enables you to watch and record TV channels 2 Connect the AUDIO and VIDEO OUTPUT jacks 1 or 2 on this recorder to a set of audio video inputs on your AV amp receiver 3 Use an optical digital audio cable not supplied to connect the COAXIAL DIGITAL OUT jack on this recorder to an coaxial digital input on your AV amp receiver This enables you to listen to multichannel surr...

Page 21: ...DV camcorder DVR 640H S DVR 541H S only Using the front panel DV IN jack it is possible to connect a DV camcorder or video deck or DVD R RW recorder and digitally transfer DV tapes or DVD R RW discs to DVD R RW Important This jack is for connection to DV equipment only It is not compatible with digital satellite receivers or D VHS video decks Use a DV cable not supplied to connect the DV jack of y...

Page 22: ... Protocol PTP can be used to transfer up to about 4000 files WMA MP3 file storage devices Memory card reader any type of memory card USB memory The Mass Storage Class MSC device should be FAT compatible Note that if the device is partitioned this recorder may not recognize it Note that although multi slot card readers can be used the recorder will only recognize the first card inserted To read ano...

Page 23: ... display and IR remote sensor See Display on page 26 for details 8 REC Press to start recording Press repeatedly to set the recording time in 30 minute blocks 9 Front panel inputs page 15 See Front panel connections on page 15 for more information on these 10 Press to start or restart playback 11 Press to stop playback 12 CH Use to change channels skip chapters tracks etc 13 ONE TOUCH COPY page 81...

Page 24: ... entry and start again 9 CH page 34 Press to change the channel of the built in TV tuner 10 G Code page 39 Press then use the number buttons to enter a G Code programming number for timer recording G Code is a trademark of Gemstar Development Corporation The G Code system is manufactured under license from Gemstar Development Corporation 11 DVD playback functions AUDIO page 34 64 Changes the audio...

Page 25: ... FWD SCAN page 59 Press to start reverse or forward scanning Press again to change the speed PLAY Press to start playback PAUSE Press to pause playback or recording STOP Press to stop playback CM BACK commercial back Press repeatedly to skip progressively backward through the audio or video playing CM SKIP commercial skip Press repeatedly to skip progressively forward through the audio or video pl...

Page 26: ...age 112 Lights when the component video output is set to progressive scan 6 Recording quality indicators page 35 XP Lights when the recording mode is set to XP best quality SP Lights when the recording mode is set to SP standard play LP SLP Lights when the recording mode is set to LP long play or SLP super long play EP SEP Lights when the recording mode is set to EP extended play or SEP super exte...

Page 27: ...Controls and displays 03 27 En 2 3 page 119 Shows the remote control mode if nothing is displayed the remote control mode is 1 V Lights when an unfinalized Video mode disc is loaded ...

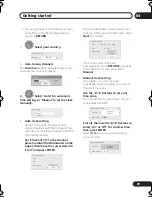
Page 28: ...Setup Navigator doesn t appear you can also access it from the Initial Setup menu see page 110 3 Choose a language then press ENTER 4 Start the Setup Navigator If you don t want to use the Setup Navigator press to select Cancel then press ENTER to exit the Setup Navigator 5 Select the Auto Scan then press ENTER Select Do not set if you want to skip channel setup because they have already been set ...

Page 29: ...g If no stations in your area are broadcasting time signals you can set the clock manually Use the buttons to set your time zone You can set this by selecting a city or a time relative to GMT Press then use the buttons to select On or Off for summer time then press ENTER Select On if you are currently using summer time ENTER k Setting Line System er Save k Setting t Line System er Save P Country S...

Page 30: ... station you can set these to skip using the manual channel setting See Manual CH Setting on page 111 k Setting Line System er Save P p Navigator p Navigator Manual Clock Setting Date Time Time Zone Summer Time On Singapore Singapore 01 01 00 00 2006 SUN 2 2 ENTER k Setting Line System er Save P p Navigator p Navigator TV Screen Size Wide 16 9 Standard 4 3 ENTER k Setting Line System er Save P p N...

Page 31: ...m number of titles recordable per disc and the maximum number of chapters per title 1 A maximum of 999 chapters are recordable per disc 2 A maximum of 254 chapters are recordable per disc This recorder cannot play or record unfinalized Video mode and DVD R discs recorded on another recorder DVD RW discs recorded on another recorder are playable on this recorder but are not recordable The maximum c...

Page 32: ... record additional material to edit or finalize a DVD R DL or DVD R DL disc that has been recorded on but not yet finalized on another DVD recorder About HDD recording Recording to the internal hard disk drive HDD is very flexible you have the full choice of recording quality options including manual mode and of course you can record erase and re record as many times as you like The capacity of th...

Page 33: ...adcast or through an external input you can display copy control information on screen see Displaying disc information on screen on page 65 CPRM CPRM is a copy protection scrambling system developed for the recording of copy once broadcast programs CPRM stands for Content Protection for Recordable Media This recorder is CPRM compatible which means that you can record copy once broadcast programs b...

Page 34: ...CAM and Regular non NICAM audio If the NICAM broadcast is bilingual you can also select the language You can also select the language for a non NICAM bilingual broadcast When watching a recording made from an external input with Bilingual recording selected see External Audio on page 113 you can switch the audio channel between left L right R or both L R Note When recording to the HDD with HDD Rec...

Page 35: ...ay Lowest video quality but gives about ten hours of recording time on a DVD disc MN1 to MN32 LPCM1 Manual Linear PCM available only when manual recording is on The setting is indicated in the front panel display and shown on screen together with the recording time for a blank recordable disc If a recordable disc is loaded the approximate remaining recording time for that disc is also shown Note t...

Page 36: ...eed to select the audio channel before recording 5 Start recording If you want to set a recording end time press the REC button repeatedly The recording time increases in 30 minute increments up to a maximum of six hours The time the recording will end is shown on screen and in the front panel display When the recording ends the recorder automatically switches into standby if no other operation is...

Page 37: ... or not You can also set the recorder so that it will adjust the recording quality to try and fit the recording on to the disc if it would not otherwise fit at the recording quality you set see Optimized Rec on page 116 for more on this Finally if you set a timer recording to record to DVD but there isn t a recordable DVD loaded at the time of the recording the Recovery Recording feature will auto...

Page 38: ...an move the cursor forward or back an hour at a time using the REV SCAN and FWD SCAN buttons Each row of the grid is one day you can set the timer recording for up to a month in advance Each column is a 15 minute interval The darker area represents time that has already passed and can t therefore be selected The lighter area is time that s available 6 Set the start time The start date and time is ...

Page 39: ...corder the recording mode and whether it s a once only recording or a regular recording Note that if the country setting is incorrect set in the Setup Navigator timer recordings made using the G Code programming system may not work as expected 1 Press G Code to display the G Code program screen You can also access this screen from the Home Menu press HOME MENU select Timer Recording then G Code sy...

Page 40: ...r when the recorder is in standby Note that the recording is always made to the HDD If you want to record to a DVD disc you ll need to switch on the power and use the full G Code program screen Important You can t use this feature until you have set up the guide channels See G Code CH Setting on page 112 You can t change the recording mode You can t program daily or weekly timer recordings 1 Press...

Page 41: ...ing a timer program on page 43 2 Select New Input to set a new timer program then press ENTER 3 Enter the timer recording settings Use the buttons to select a field use the buttons to change the value CH Choose a channel Pr 1 to Pr 99 excluding skip channels or one of the external inputs from which to record Date Choose a date up to one month in advance or select a daily or weekly program Start Se...

Page 42: ...t enough space on the HDD the recording won t finish Over 12h Recording time of over 12 hours set when recording to the HDD the recording will be split into two titles Overlap Two timer programs partially or completely overlap The one starting earlier will take priority Until eg Until 13 8 For a regular recording the last program that could be recorded is shown Data Over Can t record because the d...

Page 43: ... the command menu panel Alternatively press ENTER The Timer Program Set screen appears from which you can edit the settings 4 Edit the timer recording settings as necessary 5 Select Store Program to finish Confirm the settings you made from the following screen Deleting a timer program You can delete timer programs you no longer need 1 Press TIMER REC 2 Highlight the timer program you want to eras...

Page 44: ...d time parameter 5 Select Store Program 6 Press to exit the Timer Recording screen Stopping a timer recording 1 Press during a timer recording 2 Select Yes to confirm Preventing use of the recorder before a timer recording child lock You can make all the front panel and remote control buttons inoperative using the child lock feature This is useful when you set a timer recording and want to make su...

Page 45: ... DVD if you re recording to the HDD by selecting it from the Disc Navigator screen see Using the Disc Navigator with recordable discs and the HDD on page 58 DVR 640H S DVR 541H S Chase Play is not possible when DV is the recording input Imprtant You can t use this feature during Auto Start Recording or in Auto Start Recording standby the AUTO indicator is lit in the front panel display Press durin...

Page 46: ...ly start recording from the DV IN jack if there is a valid signal Recording will also pause if the signal is interrupted during recording If your source is copy protected using Copy Guard you will not be able to record it See Restrictions on video recording on page 33 for more details Automatic recording from a satellite tuner If you have a satellite tuner or some other kind of set top box connect...

Page 47: ... Setting the picture quality recording time on page 35 for detailed information 4 Press HOME MENU and select Timer Recording then Auto Start Recording 5 Select Yes to switch Auto Start Recording on or No to switch off If you choose Yes the recorder automatically goes into standby The AUTO indicator in the front panel display lights The recorder will automatically switch on and start recording when...

Page 48: ... and the camcorder should stop depending on the camcorder For best results when recording from a DV camcorder to this recorder we recommend cueing the camcorder to the place you want to start recording from and setting the camcorder to play pause 1 Make sure your digital camcorder is connected to the front panel DV IN jack Also set the camcorder to VTR mode 2 Set the recording quality See Setting ...

Page 49: ...ed for example While recording you cannot exit the DV recording screen using the HOME MENU or RETURN button Frequently Asked Questions I can t get my DV camcorder to work with the recorder Check that the DV cable is properly connected Also make sure that what you re trying to record is not copy protected If it still doesn t work try switching off the camcorder then switch back on There s a picture...

Page 50: ... drive 1 Note that the disc name will appear in the title menu after you finalize a disc Make sure the disc name is as you want it before you finalize the disc as it can t be changed afterwards If you want to rename the disc see Input Disc Name on page 103 before starting the steps below DVD RW discs don t generally need finalizing However if you want a title menu to appear when you play the disc ...

Page 51: ...y on the Pioneer DVR 7000 DVD recorder do not support this feature These discs will have only a text title menu when finalized on this recorder 5 The recorder will now start finalizing the disc During finalization If the finalization process of a DVD RW or DVD R RW disc is going to take more than around four minutes you can press ENTER to cancel Around four minutes before completion the option to ...

Page 52: ...RW or DVD RAM disc will erase everything recorded on it Make sure there is nothing on the disc that you want to keep You may not be able to re initialize a DVD RW disc in a different format if it was originally initialized on an older DVD recorder Once initialized for VR mode recording you can t re initialize a DVD R back to Video mode 1 Select Disc Setup from the Home Menu 2 Select Initialize Vid...

Page 53: ...re files see The PhotoViewer DVR 640H S on page 93 and The PhotoViewer DVR 541H S DVR 340H S on page 101 Basic playback This section shows you how to use your recorder for playback of discs DVD CD etc and for playback of video from the HDD Important Throughout this manual the term DVD means any kind of playable or recordable DVD If a function is specific to a particular kind of DVD disc it is spec...

Page 54: ... start playback If RESUME is displayed on screen playback starts from the place last stopped Press to stop playback You can resume playback from the same point by pressing PLAY Press STOP again to cancel the resume function Pauses playback or restarts playback when paused Press to start scanning Press repeatedly to increase the scan ning speed Press to skip to previous next chapter title During pl...

Page 55: ...Play back automatically stops after the end of a title is reached Press to stop playback You can resume playback from the same point by pressing PLAY Press STOP again to cancel the resume function CM BACK SKIP STEP SLOW TOP MENU DISC NAVIGATOR MENU ENTER RETURN PLAY STOP Pauses playback or restarts playback when paused Press to start scanning Press repeatedly to increase the scan ning speed Press ...

Page 56: ... folder for WMA MP3 disc During playback you can also use the front panel CH buttons During playback enter a track number then press ENTER to skip directly to that track Press CLEAR to clear a number entry and start again PLAY STOP PAUSE REV SCAN FWD SCAN PREV NEXT ABC DEF GHI JKL MNO PQRS TUV WXYZ CLEAR CLEAR ENTER Press to start playback Video CD only If RESUME is dis played on screen playback s...

Page 57: ...art playback If RESUME is displayed on screen playback starts from the place last stopped Play back of titles DivX files pro ceeds in alphabetical order Press to stop playback You can resume playback from the same point by pressing PLAY Press STOP again to cancel the resume function ABC DEF GHI JKL MNO PQRS TUV WXYZ CLEAR CLEAR ENTER CM BACK SKIP STEP SLOW RETURN PLAY STOP Pauses playback or resta...

Page 58: ...he Disc Navigator in various different ways sorted alphabetically by recording date by genre and so on You can also choose whether to display four or eight titles on the screen at the same time 1 Display the View Options panel 2 Choose Style Sort order or Genre then press ENTER to see the available view options Style Select four or eight titles per screen view DVD R DVD RW DVD R DVD RW DVD RAM HDD...

Page 59: ... tracks or DivX titles you can switch the playback area between CD WMA MP3 and DivX This can only be done while the disc is stopped Scanning discs except WMA You can scan discs at various speeds forwards or backwards 1 ENTER DVD Video CD Video CD SuperVCD WMA MP3 DivX HOME MENU ENTER Note 1 Only analog audio is output when scanning audio CDs No subtitles are displayed when scanning DVDs and DivX t...

Page 60: ...w motion 1 Press to start slow motion reverse or forward play 2 Press repeatedly to change the slow motion speed The current playback speed is indicated on screen 3 Resume normal playback Frame advance frame reverse You can advance or back up video on a DVD disc2 or the HDD frame by frame With Video CDs Super VCDs and DivX titles you can only use frame advance 1 Pause playback 2 Back up or advance...

Page 61: ...e Search Video CD For example for 2 minutes and 30 seconds into the current track press 2 3 0 Title Chapter Folder Track Search For example for track 6 press 6 3 Start playback A B Repeat The A B Repeat function allows you to specify two points A and B within a track or title that form a loop which is played over and over 2 1 During playback select A B Repeat from the Play Mode menu Note 1 When us...

Page 62: ... Select Repeat from the Play Mode menu then choose a repeat play mode To resume normal playback select Repeat Off from the Repeat Play menu or press CLEAR if no menu OSD such as the Play Mode menu is displayed Program play This feature lets you program the play order of titles chapters2 folders tracks on a disc or the HDD 1 Select Program from the Play Mode menu then Input Edit Program The Input E...

Page 63: ...rogram step To repeat play the program list select Program Repeat from the Repeat Play Mode menu see Repeat play on page 62 Press CLEAR during playback to switch off program play if no menu OSD such as the Disc Navigator is displayed Press while stopped to erase the program list From the Program menu you can also Start Program Play Starts playback of a saved program list Cancel Program Play Turns ...

Page 64: ...details Switching audio channels For HDD2 and VR mode content recorded with bilingual audio you can switch between left L channel right R channel or both L R 3 When playing Video CDs and audio CDs you can switch between stereo just the left channel or just the right channel Some Super VCDs have two soundtracks With these discs you can switch between the two soundtracks as well as individual channe...

Page 65: ... switched off if you prefer see Angle Indicator on page 118 Switch the camera angle The angle number is displayed on screen If the disc was paused playback starts again with the new angle Displaying disc information on screen You can display various on screen information about the disc loaded or the HDD Display change the on screen information Press once to show the HDD and removable disc DVD etc ...

Page 66: ...ly different frame rates of TV broadcasts versus DVD The frame number is shown next to the elapsed time display when the disc is paused Copy Once or Can t Record messages may appear in the stop or recording displays These indicate that the broadcast TV program contains copy control information Rec Mode SP 2h00m DVD HDD Remain 10h35m Stop Remain h m Stop DVD RW Video Hi Speed Copy HDD DVD 0h08m lef...

Page 67: ...W Video mode DVD R RW DVD R RW DVD RAM VR mode Original Play List Create page 69 Play page 70 Erase page 70 Edit Title Name page 71 Edit Set Thumbnail page 72 Edit Erase Section page 73 Edit Divide page 74 Edit Chapter Edit page 74 Edit Set Genre page 76 Edit Lock page 76 Edit Move page 77 Edit Combine page 77 Genre Name page 78 Multi Mode page 78 Undo page 79 1 1 ...

Page 68: ...the previous next page if there are more titles than can be displayed Press to change the title information displayed in the title list Press to switch between the HDD and DVD Disc Navigator screens If you are editing a VR mode DVD R RW or DVD RAM disc you can display the Play List by selecting Play List from the view options panel press then select Play List from the view options then Play List T...

Page 69: ...preserved if you use high speed copy to make a Video mode DVD or DVD R RW HDD genres The large capacity of the HDD means that there may be many hours of video in the recorder To help you organize your HDD video content you can assign different genres to titles There are 14 genres in total including ten user definable ones that you can name as you like Create Play List only Use this function to cre...

Page 70: ...sc 1 Highlight the title you want to erase 2 Select Erase from the command menu panel 3 Select Yes to confirm or No to cancel Tip You can erase a title quickly by pressing CLEAR when the title is highlighted Confirm the edit by pressing ENTER DVD Video DVD VR DVD R DVD RW DVD RAM HDD ENTER Disc Navigator HDD 4 Titles Remain All Genres 10Titles 30h30m HDD SP Recent first 11 29 MON 7 00PM 11 29Mon 7...

Page 71: ...saving changes to the title name press RETURN Using the remote key shortcuts to input a name The table below shows the remote control key shortcuts that you can use to input characters in the name input screen Pressing a button repeatedly cycles through the characters shown If you want to enter two characters in succession that are both on the same button for example a P and an R press FWD SCAN to...

Page 72: ... m n o 6 ö ô ò ó ø ñ 2 a b c 2 ä à á â ã æ ç 7 p q r s 7 ÿ ß 1 3 d e f 3 è é ë ê 8 t u v 8 ü ù û ú 4 g h i 4 î ï ì í 9 w x y z 9 5 j k l 5 0 0 cursor back cursor for ward change case CLEAR clear charac ter space finish name input _ HDD DVD Video DVD VR DVD R DVD RW DVD RAM ENTER Disc Navigator HDD 4 Titles Remain All Genres 10Titles 30h30m Recent first HDD SP 11 29 MON 7 00PM 11 29Mon 7 00PM 2ch S...

Page 73: ...he start of the section 5 Highlight To then in the same way find the end of the section to erase then press ENTER After pressing ENTER another marker indicates the end of the section with the section itself marked in red 6 Select Yes to confirm or No to cancel In the thumbnail viewer you can see a few seconds of video either side of the marked section to see how the edit will look When editing VR ...

Page 74: ... commands for erasing combining and dividing 1 Highlight the title that contains the chapters you want to edit 2 Select Edit Chapter Edit from the command menu panel 3 HDD only Select the type of edit For more information about these options see Editing accuracy on page 69 HDD DVD VR DVD RAM ENTER Video Mode Compatible Editing Frame Accurate Editing DVD RECORDER Please select the type of editing V...

Page 75: ...rs and press ENTER 5 Select Exit to get back to the main Disc Navigator screen Note 1 When editing VR mode Original content it may not be possible to erase chapters less than five seconds long 2 VR mode Play List only Chapter Edit DVD VR mode Play List Rec time 1 1 Play 0 00 00 19 00 Wed 29 11 Pr 2 SP 1h00m Chapters 5 Exit Erase Move Combine Divide Chapter Edit DVD VR mode Play List 002 003 005 00...

Page 76: ...1 Pr 2 SP 1h00m 1 0G 23 00 SUN 3 12 23 00 Sun 3 12 Pr 4 SP 2h00m 1 0G Play Erase Edit Multi Mode Genre Name Cancel Title name Erase Section Divide Cancel Set Thumbnail Set Genre Lock Chapter Edit ENTER Disc Navigator HDD 11 29 MON 7 00PM 11 29Mon 7 00PM 2ch SP 2h00m 1 0G 1 4 Titles Remain All Genres 10Titles 30h30m Recent first HDD SP 9 8 7 10 20 00 SUN 3 12 20 00 Sun 3 12 Pr 9 SP 2h00m 1 0G 22 00...

Page 77: ...17 00 MON 4 12 20 00 Sun3 12 Pr 9 SP 1h00m 2 0G 17 00 MON 4 12 23 00 Sun3 12 Pr 4 SP 0h30m 1 0G Play Erase Edit Multi Mode Genre Name Cancel Title name Erase Section Divide Cancel Set Thumbnail Move Combine Chapter Edit ENTER Disc Navigator DVD 4 Titles Remain 2 Titles 0h30m Play List 11 29 MON 7 00PM 11 29Mon 7 00PM 2ch SP 2h00m 1 0G 1 2 1 MENU DVD VR Mode 17 00 MON 4 12 20 00 Sun3 12 Pr 9 SP 1h0...

Page 78: ...nres 10Titles 30h30m HDD SP Recent first 11 29 MON 7 00PM 11 29Mon 7 00PM 2ch SP 2h00m 1 0G 1 9 8 7 10 20 00 SUN 3 12 20 00 Sun 3 12 Pr 9 SP 2h00m 1 0G 22 00 SAT 2 12 22 00 Sat 2 12 Pr 7 SP 1h00m 1 0G 19 00 WED 29 11 19 00 Wed 29 11 Pr 2 SP 1h00m 1 0G 23 00 SUN 3 12 23 00 Sun 3 12 Pr 4 SP 2h00m 1 0G Play Erase Edit Genre Name Multi Mode ENTER Disc Navigator HDD 4 Titles Remain All Genres 10Titles ...

Page 79: ...possible This is because information about your edits requires a certain amount of disc space As you edit this information builds up eventually preventing you from editing further Disc Navigator HDD 4 Titles Remain All Genres 10Titles 30h30m Recent first HDD SP 11 29 MON 7 00PM 11 29Mon 7 00PM 2ch SP 2h00m 1 0G 1 9 8 7 10 20 00 SUN 3 12 20 00 Sun 3 12 Pr 9 SP 2h00m 1 0G 22 00 SAT 2 12 22 00 Sat 2 ...

Page 80: ...uality for example an XP recording on the HDD copied to SP on a DVD Copying in this way is always done in real time When real time copying from the HDD to a Video mode DVD R RW or DVD R RW the chapter markers in the original material are not copied Chapter markers are put into the copy at intervals according to the Auto Chapter settings see also Auto Chapter Video and Auto Chapter DVD R RW on page...

Page 81: ... front panel display indicates that the title is being copied High speed copying is used when copying from the HDD to DVD Playback continues while copying Real time copying is used when copying from DVD to the HDD Playback restarts from the beginning of the title Canceling One Touch Copy You can cancel a One Touch Copy once it s started Press and hold for more than a second Copying is canceled and...

Page 82: ...ll start but the copy protected portions will not be copied Using Copy Lists See also Copyright on page 81 At its simplest a Copy List is just a list of HDD or DVD titles that you want to copy When copying HDD titles to DVD you can however edit the titles in your copy list erasing chapters you don t need or re naming titles for example Edits you make to titles in the Copy List do not affect the ac...

Page 83: ...nt aspect ratio will be added as a separate title if high speed copying is possible Depending on the title1 high speed copying may not be possible to a Video mode disc HOME MENU ENTER HDD DVD Disc Back up DV Record DVD CD HDD Continue Using Previous Copy List Create New Copy List Note 1 Widescreen titles recorded at low resolution SEP through LP MN1 to MN15 Video Mode Off or MN1 to MN8 Video Mode ...

Page 84: ...cording Mode on page 87 Bilingual Set how bilingual audio should be copied when copying from HDD to Video mode DVD see Bilingual on page 87 Cancel Exit the menu Repeat this step for as many titles you have that need editing Copy Select Title Recent first All Genres 8 Title Copy List Total Current DVD Remain 8 7 6 5 4 3 2 1 WED 29 03 20 00 Wed29 03 Pr 2 SP Pr 2 MON 27 03 21 00 Mon27 03 Pr 4 SP Pr 4...

Page 85: ...e DVD or DVD R after copying 2 Select a title menu style from the following screen 11 Select Start Copy to start copying Note 1 Titles recorded in MN1 to MN6 SEP SLP or EP mode cannot be copied to DVD R RW using high speed copy 2 If a timer recording is scheduled to start during copying the disc will not be finalized ENTER Copy Title Edit 2 Title Copy List Total Current DVD Remain 1 2 20 00 Wed29 ...

Page 86: ...he Home Menu 2 Select DVD CD HDD 3 Select a Copy List type Selecting Create New Copy List will erase any Copy List already stored in the recorder 4 Add titles to the Copy List highlight a title and press ENTER to add Titles you ve added to the Copy List are highlighted in pink 5 Select Next from the command menu panel to proceed to the title edit screen 6 Select a title to edit A menu appears of C...

Page 87: ...require If this is more than is available it shows up in red and you won t be able to start copying In this case either change the recording quality or press RETURN to go back to the Copy List screen and erase one or more titles from the Copy List Bilingual 1 Select the title containing the audio you want to change 2 Select Bilingual from the command menu panel 3 Select a bilingual audio option No...

Page 88: ...discs finalized DVD R or DVD RW discs excluding DVD R DL DVD R DL discs 4 Select Start To see the progress of the backup press DISPLAY You can cancel the backup process by pressing ONE TOUCH COPY for more than one second 5 When the data has been copied take out the disc and load a blank recordable DVD If you re using a DVD RW or DVD RW the disc doesn t have to be blank although the previous conten...

Page 89: ...e initialize it in order to make it usable again see Initializing recordable DVD discs on page 52 7 After the recorder has finished recording the backup disc you can select whether to make another backup of the same data or exit Select Start to make another backup copy or Cancel to finish If you want to make another backup copy return to step 6 above 8 If you don t need to keep the backup data on ...

Page 90: ... other order using the program play mode See Program play on page 62 for how to do this Note that once copied to the HDD audio tracks cannot be copied to a recordable DVD disc Important While copying CD audio no other recorder operation is possible When copying CD audio scheduled timer recordings will not start until copying is complete Copy protected CDs may not copy successfully 1 Load the CD yo...

Page 91: ...r MP3 files that have been stored on the HDD Listen to Music from USB Device Listen to music from an external USB device 3 Select what you want to play The screen below shows CD albums stored on the HDD If you select a whole album to play all tracks that are not set to Jump will play If you want to start playback from a selected track in an album or play a track that is set to Jump press to enter ...

Page 92: ... the album Edit Jump Set1 Set a track to jump so that it doesn t play choose this command again to cancel the Jump setting Play Mode Change the playback order for albums and tracks Genre Name Enter a name of up to 12 characters for a genre See page Title Name on page 71 for how to enter names ENTER 12 1 1 HDD New First 10Albums Album1 The Planets Mars Venus Mercury Jup iter Saturn Uranus Nep class...

Page 93: ...view copy or edit If you encounter a disc that will not play check that the disc and file formats are compatible with this recorder see JPEG file compatibility on page 11 and PC created disc compatibility on page 12 Note 1 Up to 999 files or 99 folders are viewable but if there are more files folders than this on the disc or connected USB camera it is still possible to view them all using the Relo...

Page 94: ...show Use PREV NEXT to display the previous next picture or PAUSE to pause the slideshow Depending on the aspect ratio some pictures may be displayed with black bars top and bottom or left and right Large picture files may take a few seconds to display This is normal During playback of the slideshow you can listen to WMA MP3 files in the Slideshow genre see Editing Jukebox albums on page 92 5 Press...

Page 95: ...e HDD You can import files and save them on to the HDD1 from a CD DVD or a connected USB camera Once on the HDD you can edit and organize your pictures and print them out if you ve connected a PictBridge compatible printer 1 Select the location of folders files you want to import To import a whole folder press ENTER here and skip to step 4 below To import multiple folders use the Multi Mode see Se...

Page 96: ...nu 4 Display the command menu 5 Select the command you want to apply to all the selected items ENTER PhotoViewer 1 2 1 3 001 12 12 TUE 002 12 13 WED 003 12 14 THU 004 12 15 FRI 005 12 16 SAT 006 12 17 SUN 007 12 18 MON 008 12 19 TUE 1 4 7 2 5 8 3 6 9 File Date Time Chair No 2 10 00 24 01 2006 1920 x 1440 CD DVD Size Press ENTER to display the menu Press RETURN to go back to folder selection Start ...

Page 97: ...ers that may not be compatible with JPEG file playback Note however that you may need to finalize the disc before it will play on another DVD player copying selected files doesn t automatically finalize the disc Important A maximum of 99 titles can be recorded Slideshows can contain up to 99 files If there are more files than this in the slideshow multiple slideshows are created on the disc If you...

Page 98: ...r Options 3 Select Erase or Erase Folder ENTER ENTER PhotoViewer 1 2 1 3 001 12 12 TUE 002 12 13 WED 003 12 14 THU 004 12 15 FRI 005 12 16 SAT 006 12 17 SUN 007 12 18 MON 008 12 19 TUE 1 4 7 2 5 8 3 6 9 Folder 12 13 WED HDD Use to select then press to select file Press ENTER to display menu File selection Start Slideshow New Folder Folder Options Copy to DVD Multi Mode Cancel ENTER ENTER PhotoView...

Page 99: ...ernames can be up to 64 characters long See Using the remote key shortcuts to input a name on page 71 for how to enter a name Locking Unlocking files Locking files will protect them from accidental erasure and prevent them from being renamed Use the same process to both lock and unlock files Locked files are displayed in the PhotoViewer with a padlock icon ENTER ENTER ENTER ENTER PhotoViewer 1 2 1...

Page 100: ... pressing ENTER Tip Paper size and layout can be set the options available depend on your printer check the printer manual for details If the message Searching for printer Please wait a moment continues to be displayed try disconnecting then reconnecting the USB cable This recorder may not work correctly with all printers Note 1 Picture files should be standard DCF format Non standard files may no...

Page 101: ...2 Select a thumbnail from which to start the sideshow Use the PREV and NEXT buttons to display the previous next page of thumbnails You can also select a file or folder then press PLAY to start playing the slideshow Use PREV NEXT to display the previous next picture or PAUSE to pause the slideshow Depending on the aspect ratio some pictures may be displayed with black bars top and bottom or left a...

Page 102: ... image During a slideshow you can zoom in to enlarge a portion of the picture by a factor of two or four You can also move the area of the picture displayed 1 Press during the slideshow to zoom the picture Repeated presses cycle between zoom off 2x zoom and 4x zoom The zoom factor is displayed on screen 2 Use to move the zoomed area Rotating an image You can rotate the displayed picture during a s...

Page 103: ... 2 Select Basic Input Disc Name Next Screen 3 Input a name for the disc The disc name can be up to 64 characters long for a VR mode disc or 40 for a Video mode discs and DVD R RW See Title Name on page 71 for more on navigating the input screen Lock Disc Default setting Off Locking the disc will prevent accidental recording editing or erasing of the disc Important A locked disc can still be initia...

Page 104: ...r DVD player or computer equipped with a suitable DVD ROM drive It is also possible to finalize DVD RW discs This is only necessary if you want to a player to display a title menu for the disc See Playing your recordings on other DVD players on page 50 for detailed instructions Undo Finalize You can undo the finalization on DVD RW discs recorded on this recorder in Video mode You need to do this i...

Page 105: ...ly optimized 1 Select Disc Setup from the Home Menu 2 Select Optimize HDD then Start A progress bar indicates how long there is left to go Initialize HDD When your DVD recorder is working without a problem this option is not visible in the Disc Setup menu However if the HDD file system becomes corrupted for some reason you can initialize the HDD to fix the problem Note that initializing the HDD wi...

Page 106: ...set Use the INPUT SELECT button to switch between the built in TV tuner and the external inputs Use the PREV NEXT buttons to change the channel of the built in TV tuner There are six presets available Tuner suitable for general TV broadcasts VCR suitable for video cassettes DTV LDP suitable for digital broadcasts and Laserdiscs Memory1 user preset 1 Memory2 user preset 2 Memory3 user preset 3 You ...

Page 107: ... the C colour component White AGC Turn on for automatic white level adjustment 1 White Level Adjusts the intensity of white Black Level Adjusts the intensity of black Black Setup Corrects the standard reference black level NTSC video input only Hue Adjusts overall balance between red and green Chroma Level Adjusts how rich the colors appear 4 Adjust the currently selected setting 5 Press to exit Y...

Page 108: ... your own set of picture quality settings for disc playback 1 Follow Choosing a preset above and select one of the user presets Memory 1 2 or 3 2 Move the cursor down and select Detailed Settings 3 Select the picture quality setting you want to adjust You can adjust the following settings Prog Motion Adjusts the motion and still picture quality when video output is set to progressive PureCinema Th...

Page 109: ...ts the intensity of white Black Level Adjusts the intensity of black Black Setup Corrects the standard reference black level NTSC video playback only Gamma Correction Adjusts the brightness of darker images Hue Adjusts overall balance between red and green Chroma Level Adjusts how rich the colours appear 4 Use the buttons to adjust the currently selected picture quality setting 5 When you have all...

Page 110: ...n Basic Clock Setting Auto Set the channel that broadcasts a clock signal and the clock will be set automatically Manual If there is no channel that broadcasts a clock signal in your area you can set the time and date manually Display Set preferences for time and date display format The clock must be set in order to use timer recording Input Line System 525 System Use for NTSC or PAL 60 recording ...

Page 111: ...r country then proceed to the manual channel setting screen Change channel presets using the PREV NEXT buttons To skip the displayed channel because there is no station assigned to that channel change the Skip setting to On Set the CH SYSTEM setting to match the channel system of your country or region Set the CHANNEL setting to the channel you want to assign to the current channel preset To manua...

Page 112: ...nformation on this setting Component Video Out Interlace Select if your monitor TV is not compatible with pro gressive scan video Progressive Select if your monitor TV is progressive scan compat ible Check the operating instructions that came with your monitor TV if you re not sure NTSC on PAL TV On NTSC discs will play correctly on PAL only TVs Off Use if your TV is already NTSC compatible Many r...

Page 113: ... Recording Format set to Video Mode Off except in LPCM mode both audio channels are recorded and you can switch to the one you want on playback DV Input DVR 640H S DVR 541H S only Stereo 1 Select to use the live audio track recorded during the video shoot from a camcorder that supports two stereo audio tracks Stereo 2 Select to use the overdubbed audio track from a camcorder that supports two ster...

Page 114: ...cted equipment doesn t have an MPEG audio decoder Audio DRC On Switches on Audio DRC Dynamic Range Control Use when listening to Dolby Digital material at low volume Off Switches off Audio DRC Audio DRC is not effective when listening via the digital output when the Dolby Digital Out setting is set to Dolby Digital Language OSD Language English Sets the language of the on screen displays to Englis...

Page 115: ...l play using that language with out subtitles Discs whose main audio track is not in your default language but that have a subtitle track in your default language will play the original audio track with subti tles Off Select to play DVD Video discs according to your audio and subtitle language preferences For Auto Language to be effective the Audio Language and Subtitle Language options must be se...

Page 116: ... The recording quality of timer recordings is automati cally adjusted to fit on to the selected media if it will not fit at the selected quality setting If the recording will not fit even at MN1 MN4 for DVD R RW then the recording will start at MN1 and stop when all the available space is used up Off When a timer recording is set that won t fit on to the selected media the recording starts but is ...

Page 117: ...don t need to transfer the recording later to a Video mode DVD Video Mode On Recordings made to the HDD are compatible with Video mode recordings This setting is convenient if you want to transfer the recording to a Video mode DVD as high speed copy can be used When Video Mode On is used you must select the audio channel you want to record when recording a bilingual broadcast On the Video Mode Off...

Page 118: ...password first enter your existing password and then a new one from the fol lowing screen Change Level From the following screen first enter your password and then set a parental lock level Country Area Code From the following screen first enter your password and then set a country area code See Country Area code list on page 134 Only certain discs have parental lock and country area code features...

Page 119: ...of different TV line systems on the same disc When you change this setting the Input Color System setting also changes page 120 Front Panel Display On The time is shown in the front panel display when the recorder is in standby Off The front panel display is switched off in standby although it still lights dimly when setting a timer recording Remote Control Mode Recorder 1 3 default Recorder 1 If ...

Page 120: ...terlace Selecting other languages for language options 1 Select Other from the language list This option appears in the settings for DVD Menu Language Audio Language and Subtitle Language 2 Select the language you want Select by language name Use the buttons to change the language Select by code number Press then use the number buttons to enter the four digit language code See Language code list o...

Page 121: ...opied Note 1 Depending on the disc the copy speed may be reduced for example although a 6x disc is used the copy may be made at 2x speed DVD disc type Rec mode DVD R 1x DVD RW 1x DVD RW 2x DVD R DL DVD RAM 2x DVD R 2 4x DVD RW 2 4x DVD R DL DVD RAM 3x DVD RAM 5x DVD R 4x DVD RW 4x DVD R 4x DVD RW 4x DVD R 8x 16x DVD RW 6x DVD R 8x 16x DVD RW 8x 1x 2x 2 4x 3x 4x 6x SEP 10 h 6 mins 3 mins 1 2 mins 1...

Page 122: ... 352 x 576 MN 8 270 mins MN 8 270 mins 480 x 480 480 x 576 MN 9 240 mins LP MN 9 240 mins 720 x 480 720 x 576 MN 10 230 mins MN 10 230 mins MN 11 220 mins MN 11 220 mins 544 x 480 544 x 576 MN 12 210 mins MN 12 210 mins MN 13 200 mins MN 13 200 mins MN 14 190 mins MN 14 190 mins MN 15 180 mins MN 15 180 mins 720 x 480 720 x 576 MN 16 170 mins MN 16 170 mins MN 17 160 mins MN 17 160 mins MN 18 150 ...

Page 123: ... after checking the points below ask your nearest Pioneer authorized service center or your dealer to carry out repair work General Problem Remedy The disc is automati cally ejected after clos ing the disc tray Check that the disc is not an incompatible format disc page 7 Check that the disc is loaded properly aligned in disc tray and label side up Take out the disc and clean it page 136 Check tha...

Page 124: ...sure that the amp receiver or TV is set to the correct input and the volume turned up There is no sound when the picture is paused or during scanning or slow motion play Press PLAY to resume regular playback DTS discs can only be played if this recorder is connected to a DTS decoder or DTS compatible amp receiver If you have connected a suitable decoder also make sure that the Initial Setup Audio ...

Page 125: ...unt of recorded material may not play on other players Finalize the disc and try again During playback the picture is dark or dis torted When a copy protected disc is played via a VCR the picture will not display correctly Connect the recorder directly to your TV Can t record or does not record successfully Check that there is some remaining blank space on the DVD HDD For a Video mode disc or DVD ...

Page 126: ...f in order to use the recorder page 44 Can t use One Touch Copy HDD to DVD Make sure that there is a recordable DVD R RW loaded with some free space for recording and fewer than 99 titles already on the disc Also make sure that for a Video mode disc or a DVD R the disc isn t finalized Make sure there is a recordable DVD R RW loaded with some free space for recording and fewer than 49 titles alread...

Page 127: ...nected to this unit digital camera USB memory memory card reader or printer Use a USB cable less than 5 m in length Check that the USB cable is inserted fully Check that the USB device is powered on Only the first digital camera USB memory or memory card reader connected is readable by this unit Unplug multiple devices and connect the device you want to use first Problem Remedy Message Explanation...

Page 128: ...nnot record this content using Video mode recording This video cannot be recorded to DVD R RW The video source is copy once protected Use a VR mode DVD R RW disc with CPRM for recording This content is copy protected The video source is copy protected and cannot be recorded Incorrect CPRM information The recorder could not read the CPRM information The recorder may be damaged please consult a Pion...

Page 129: ...rent channel is different from the TV system settings of this recorder Recording failed due to a TV system mismatch Press DISPLAY to clear mes sage The timer recording failed because the TV system of the channel set for recording was different from the setting of the recorder Playback has stopped because the TV system is different than the recording During recording or timer recording standby the ...

Page 130: ...pauses playback or plays an unrecorded section of tape or if the power fails in the source component or the DV cable is disconnected The DV IN jack is an input only There is no output functionality Searching for printer Please wait a moment This message is displayed when the recorder is scanning for a connected printer or when the printer is not yet ready for printing If there is no printer connec...

Page 131: ...The LED indicator on the remote controls lights See the table below for the list of maker codes If there is more than one code given for your make input the first one in the list If the maker s name of your TV doesn t appear in the table below you will not be able to use this remote to control your TV 2 Press TV to check that the remote works with your TV If the remote is set up correctly the TV s...

Page 132: ...he TV s video input TV VOLUME Use to adjust the TV volume TV CHANNEL Use to change TV channels Maker Code Alba 66 Bush 76 Finlux 84 Fisher 61 65 Fujitsu 77 Funai 67 Goldstar 79 Grandiente 87 Grundig 51 82 Hitachi 56 60 83 86 ITT 70 Mitsubishi 59 Nokia 53 81 Panasonic 58 72 Philips 57 85 Pioneer 50 80 RCA 68 Salora 71 Samsung 73 75 Sanyo 74 Sei 78 Sharp 52 Sony 54 Tandy 69 Telefunken 64 Thomson 62 ...

Page 133: ...iw 0923 Yiddish ji 1009 Javanese jw 1023 Georgian ka 1101 Kazakh kk 1111 Greenlandic kl 1112 Cambodian km 1113 Kannada kn 1114 Kashmiri ks 1119 Kurdish ku 1121 Kirghiz ky 1125 Latin la 1201 Lingala ln 1214 Laotian lo 1215 Lithuanian lt 1220 Latvian lv 1222 Malagasy mg 1307 Maori mi 1309 Macedonian mk 1311 Malayalam ml 1312 Mongolian mn 1314 Moldavian mo 1315 Marathi mr 1318 Malay ms 1319 Maltese m...

Page 134: ...nd 0609 fi France 0618 fr Germany 0405 de Hong Kong 0811 hk India 0914 in Indonesia 0904 id Italy 0920 it Japan 1016 jp Korea Republic of 1118 kr Malaysia 1325 my Mexico 1324 mx Netherlands 1412 nl New Zealand 1426 nz Norway 1415 no Pakistan 1611 pk Philippines 1608 ph Portugal 1620 pt Russian Federation 1821 ru Singapore 1907 sg Spain 0519 es Sweden 1905 se Switzerland 0308 ch Taiwan 2023 tw Thai...

Page 135: ...m of the screen 4 3 Pan Scan The sides of the program are cropped so that the picture fills the whole screen 4 3 4 3 Letter Box 4 3 Pan Scan The program is presented correctly on either setting When viewing on a widescreen TV or monitor Screen format of disc Setting Appearance 16 9 16 9 The program is presented in widescreen 4 3 16 9 Your TV will determine how the picture is presented check the ma...

Page 136: ...ed for cleaning vinyl records Storing discs Although CDs and DVD discs are more durable than vinyl records you should still take care to handle and store discs correctly When you re not using a disc return it to its case and store upright Avoid leaving discs in excessively cold humid or hot environments including under direct sunlight Don t glue paper or put stickers onto the disc or use a pencil ...

Page 137: ... so please bear in mind the following points when choosing a suitable location for it Do Use in a well ventilated room Place on a solid flat level surface such as a table shelf or stereo rack Don t Use in a place exposed to high temperatures or humidity including near radiators and other heat generating appliances Place on a window sill or other place where the recorder will be exposed to direct s...

Page 138: ...ing humidity 5 to 85 no condensation TV system PAL SECAM NTSC Readable discs DVD Video DVD RW DVD R DVD R DVD RW DVD RAM Video CD Super VCD CD CD R RW WMA MP3 JPEG CD DA Recording discs and formats DVD R RW VR mode and Video mode DVD R RW VR mode DVD RAM VR mode DVD R DL VR mode and Video mode DVD R DL VR mode Video recording format Sampling frequency 13 5 MHz Compression format MPEG Audio recordi...

Page 139: ...dio input Input 1 3 rear Input 2 front L R Input level During audio input 2 V rms Input impedance more than 22 kΩ Jacks RCA jacks Audio output Output 1 2 L R During audio output 2 V rms Output impedance less than 1 5 kΩ Jacks RCA jacks Control input Mini jack Digital audio output Coaxial DV input DVR 640H S DVR 541H S only 4 pin front i LINK IEEE 1394 standard USB DVR 640H S only Type A front Type...

Page 140: ......

Reviews: