background image

02

10

En

Easy connections

 Important

• Before making or changing any connections, switch off the power and disconnect the power cable from the AC outlet.

• The setup described here is a basic setup that allows you to play discs using just the cables supplied with the player. In this setup, stereo 

audio is played through the speakers in your TV.

• This player is equipped with copy protection technology. Do not connect this player to your TV via a VCR using audio/video or S-Video 

cables, as the picture from this player will not appear properly on your TV. (This player may also not be compatible with some 
combination TV/VCRs for the same reason; refer to the manufacturer for more information.)

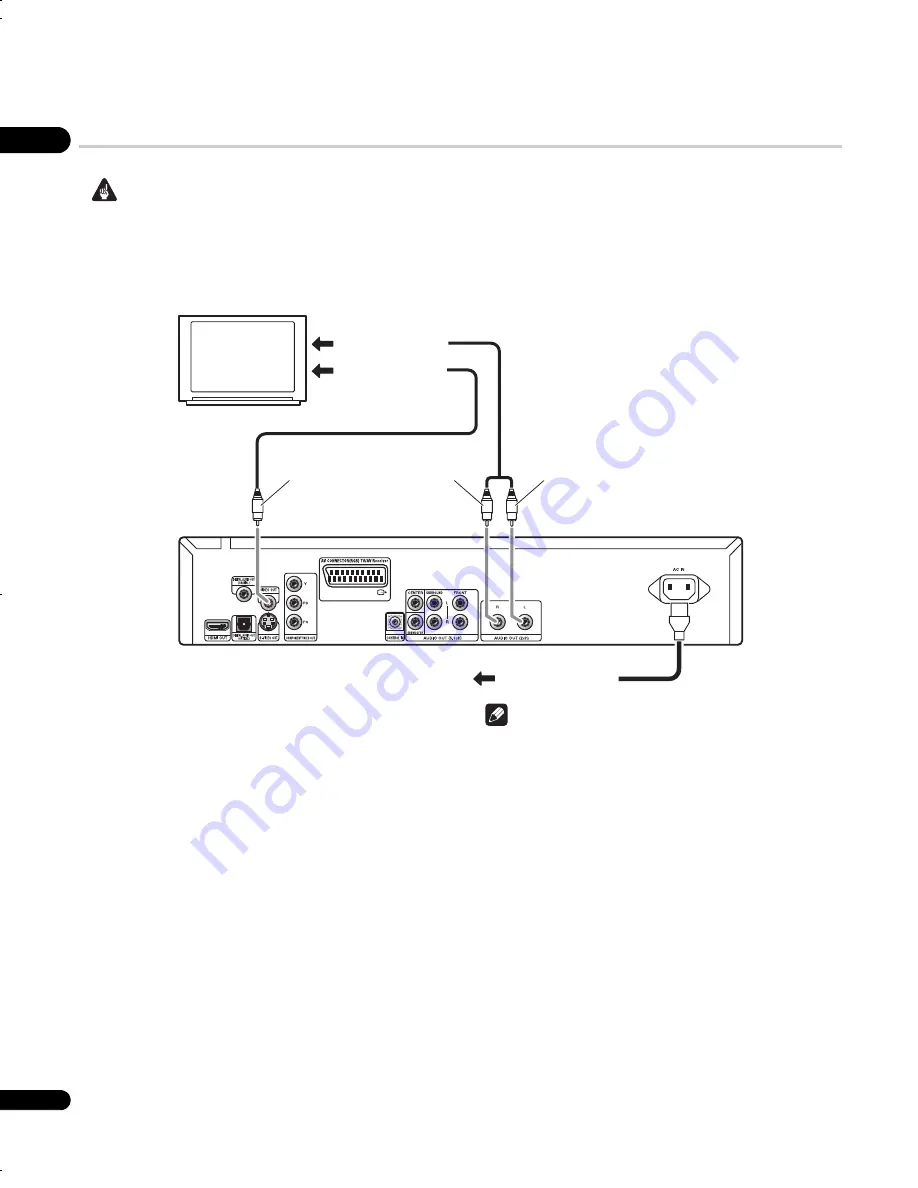
1

Connect the VIDEO OUT and AUDIO OUT (5.1ch) jacks to a 

set of A/V inputs on your TV.

Use the supplied audio/video cable, connecting the red and white 
plugs to the audio outputs and the yellow plug to the video output. 
Make sure you match up the left and right audio outputs with their 
corresponding inputs for correct stereo sound.

See page 11 if you want to use a component or S-Video or SCART 
cable for the video connection.

2

Connect the supplied AC power cable to the AC IN inlet, 

then plug into a power outlet.

 Note

• Before unplugging the player from the power outlet, make sure 

you first switch it into standby using either the front panel 

STANDBY/ON 

button, or the remote control, and wait of the 

-OFF- 

message to disappear from the player’s display.

• For the above reasons, do not plug this player into a switched 

power supply found on some amplifiers and AV receivers.

To audio inputs

To power outlet

Red

White

Yellow

TV

To video inputs

DVLX50_WY_EN.book  10 ページ  2007年8月30日 木曜日 午前11時19分

Summary of Contents for DV-LX50

Page 1: ...Operating Instructions Instruzioni per l uso DVD Player Lettore DVD ...

Page 2: ...personnel The following caution label appears on your unit Location inside of the unit CLASS 1 LASER PRODUCT D3 4 2 1 8_B_En This product complies with the Low Voltage Directive 2006 95 EC and EMC Directive 2004 108 EC D3 4 2 1 9a_A_En Thank you for buying this Pioneer product Please read through these operating instructions so you will know how to operate your model properly After you have finish...

Page 3: ...D3 4 2 1 7b_A_En If the AC plug of this unit does not match the AC outlet you want to use the plug must be removed and appropriate one fitted Replacement and mounting of an AC plug on the power supply cord of this unit should be performed only by qualified service personnel If connected to an AC outlet the cut off plug can cause severe electrical shock Make sure it is properly disposed of after re...

Page 4: ...Super VCD disc with the Disc Navigator 26 Browsing WMA MP3 MPEG 4 AAC DivX video WMV and JPEG files with the Disc Navigator 26 Looping a section of a disc 27 Using repeat play 27 Using random play 28 Creating a program list 28 Searching a disc 29 Switching subtitles 29 Switching audio language channels 29 Zooming the screen 29 Switching camera angles 30 Displaying disc information 30 06 Audio Sett...

Page 5: ...tible Experience the super high quality audio performance of DVD Audio and Super Audio CD SACD The on board 24 bit 192kHz DAC means that this player is fully compatible with high sampling rate discs capable of delivering exceptional sound quality in terms of dynamic range low level resolution and high frequency detail In addition with SACD playback you can select which part of the disc you want to...

Page 6: ... your country area Do not use or store batteries in direct sunlight or other excessively hot place such as inside a car or near a heater This can cause batteries to leak overheat explode or catch fire It can also reduce the life or performance of batteries Hints on installation We want you to enjoy using this product for years to come so please use the following guidelines when choosing a suitable...

Page 7: ...ity Compatible formats CD audio Video CD Super VCD ISO 9660 CD ROM containing MP3 WMA MPEG 4 AAC JPEG or DivX video WMV files ISO 9660 Level 1 or 2 compliant CD physical format Mode1 Mode2 XA Form1 Romeo and Joliet file systems are both compatible with this player Multi session playback No Unfinalized disc playback No File structure may differ Up to 299 folders on a disc up to 648 folders and file...

Page 8: ...ename of the movie file has to be repeated at the beginning of the filename for the external subtitle file The number of external subtitle files which can be switched for the same movie file is limited to a maximum of 10 DivX video compatibility Official DivX Ultra Certified product Plays all versions of DivX video including DivX 6 with enhanced playback of DivX media files and the DivX Media Form...

Page 9: ...that has component video inputs Connect using a commercially available three way component video cable page 11 7 AV CONNECTOR RGB TV AV Receiver Audio video output SCART type AV connector for connecting to a TV or other equipment with a SCART connector The video output is switchable between video S Video and RGB page 11 8 CONTROL IN Use to control this player from the remote sensor of another Pion...

Page 10: ... and AUDIO OUT 5 1ch jacks to a set of A V inputs on your TV Use the supplied audio video cable connecting the red and white plugs to the audio outputs and the yellow plug to the video output Make sure you match up the left and right audio outputs with their corresponding inputs for correct stereo sound See page 11 if you want to use a component or S Video or SCART cable for the video connection 2...

Page 11: ...ect this player to your TV or other equipment This should give you the best quality picture from the three types of video output available Use a component video cable not supplied to connect the COMPONENT VIDEO OUT jacks to a component video input on your TV monitor or AV receiver Watching 1080i 720p 576p 480p from the component video outputs This player can output 1080i 720p 576p 480p from the co...

Page 12: ...ct the AV receiver s video output to a video input on your TV You can also use the SCART AV connector the S Video or component video jacks to connect to the AV receiver if you prefer Tip You usually have to connect the same kind of video cable between your DVD player and AV receiver and between your AV receiver and TV Connecting the multichannel analog outputs If your AV receiver has 5 1 channel a...

Page 13: ...lied video cable to connect the DIGITAL AUDIO OUT COAXIAL jack to a coaxial input on your AV receiver Controlling this player via another Pioneer component The CONTROL IN jack allows you to control this player via the remote control sensor of another Pioneer component typically an AV receiver that has a CONTROL OUT jack Remote control signals are passed through to the player from the remote sensor...

Page 14: ...ulti channel DSD and multi channel linear PCM signals 5 1 channel signals up to 96 kHz 16 bit 20 bit 24 bit Depending on the HDMI cable being used 1080p output may not appear correctly About HDMI HDMI High Definition Multimedia Interface supports both video and audio on a single digital connection for use with DVD players DTV set top boxes and other AV devices HDMI was developed to provide the tec...

Page 15: ...HDMI connection Use the OUTPUT RESOLUTION button on the remote control to switch the player back to 576p 480p You can also switch the player to standby then using the front panel controls press STANDBY ON while pressing to switch the player back to 576p 480p Resolution Max setting 480i 576i 480p 576p 1080i 720p 1080p DVD 480i 576i 480p 576p 480p 576p 480p 576p 480p 576p DVD Audio 480i 576i 480p 57...

Page 16: ...stopped press to switch off on the front panel display and disable the video and digital outputs Use this when you want to hear audio from the analog outputs with no interference from other signals when listening to a DVD Audio disc for example The indicator lights when the Pure Audio feature is switched on This button only functions when Pure Audio Button page 34 is set to Available These include...

Page 17: ... showing a DVD Audio group number 7 TITLE Indicates that the character display is showing a DVD Video title number 8 TRK Indicates that the character display is showing a track number 9 CHP Indicates that the character display is showing a DVD chapter number 10 REMAIN Lights when the character display is showing the time or number of tracks titles chapters remaining 11 Character display 12 Lights ...

Page 18: ... 29 24 DISPLAY page 30 25 and pages 22 and 25 26 NEXT page 28 27 STOP page 22 28 TV CONTROL page 19 Using the remote control Keep in mind the following when using the remote control Make sure that there are no obstacles between the remote and the remote sensor on the unit The remote has a range of about 7 m Remote operation may become unreliable if strong sunlight or fluorescent light is shining o...

Page 19: ...k that the remote works with your TV If the remote is set up correctly the TV should switch on off If it doesn t and there is another code given for your maker repeat step 1 with a new code Using the TV remote control buttons The table below shows how to use this remote control with your TV Button What it does TV Press to switch the TV on off standby INPUT SELECT Press to change the TV s video inp...

Page 20: ...igator begins 3 Use the buttons to choose a language then press ENTER 4 Press ENTER to start setting up using the Startup Navigator If you don t want to use the Startup Navigator press to select Cancel then press ENTER to exit the Startup Navigator 5 Use the buttons to select the terminal from which the audio signals are to be output then press ENTER If you have selected Analog proceed to step 6 I...

Page 21: ...rrectly If you have a conventional 4 3 TV you can leave the player on the default setting and move on to the next section 1 Press HOME MENU and select Initial Settings 2 Select TV Screen from the Video Output settings 3 If you have a widescreen 16 9 TV select 16 9 Wide or 16 9 Compressed If you have a conventional 4 3 TV you can change the setting from 4 3 Letter Box to 4 3 Pan Scan if you prefer ...

Page 22: ...d with some DVD discs that some playback controls don t work in certain parts of the disc This is not a malfunction If a disc contains a mixture of movie DivX video WMV and other media file types MP3 for example first select whether to play the movie files DivX WMV or the other media file types MP3 WMA MPEG 4 AAC JPEG from the on screen display The media file types are selected automatically when ...

Page 23: ...back and open the disc tray DVD Video and DivX disc menus Some DivX media files and many DVD Video and DVD Audio discs feature menus from which you can select what you want to watch They may also give access to additional features such as subtitle and audio language selection or special features such as slideshows See the disc packaging for details Sometimes DivX and DVD Video menus are displayed ...

Page 24: ...cator won t light Make sure that you ve selected this player as the HDMI input in the settings for the component you re using You may need to refer to the instruction manual of the component to do this See Connecting using HDMI on page 14 for more on HDMI compatibility There s no picture from the HDMI output This player cannot display pictures from DVI compatible sources See Connecting using HDMI ...

Page 25: ...e slow motion speed 4 To resume normal playback press PLAY Depending on the disc normal playback may automatically resume when a new chapter is reached Frame advance frame reverse You can advance or back up DVD Video and DVD R RW discs frame by frame With Video CD Super VCDs and DivX video WMV file you can only use frame advance 1 During playback press PAUSE 2 Press or to reverse or advance a fram...

Page 26: ... is to use one of the search modes See Searching a disc on page 29 Browsing WMA MP3 MPEG 4 AAC DivX video WMV and JPEG files with the Disc Navigator Use the Disc Navigator to find a particular file or folder by filename Note that if there are other types of files on the same disc these will not be displayed in the Disc Navigator 1 Press HOME MENU and select Disc Navigator from the on screen menu 2...

Page 27: ...play to repeat the tracks chapters in the program list see Creating a program list on page 28 Important You can t use Repeat play with Video CD Super VCDs in PBC mode or with MP3 WMA MPEG 4 AAC discs You can t use repeat and random play at the same time 1 During playback press PLAY MODE and select Repeat from the list of functions on the left 2 Select a repeat play option If program play is active...

Page 28: ... 2 Select Create Edit from the list of program options 3 Use the cursor buttons and ENTER to select a title chapter or track for the current step in the program list For a DVD Video disc you can add a title or a chapter to the program list For a DVD Audio disc you can add a whole group or a track within a group to the program list For a CD SACD or Video CD Super VCD select a track to add to the pr...

Page 29: ...title language from the disc menu Press TOP MENU or MENU to access To set subtitle language preferences see page 33 See Displaying external subtitle files on page 8 for more on DivX subtitles Switching audio language channels When playing a DVD Video and DivX video disc recorded with dialog in two or more languages you can switch audio language during playback When playing a VR format DVD R RW dis...

Page 30: ...f you prefer see Display settings on page 34 During playback press ANGLE to switch angle Displaying disc information Various track chapter and title information such as the elapsed and remaining playing time can be displayed on screen while a disc is playing To show switch hide the information displayed press DISPLAY repeatedly When a disc is playing the information appears at the top of the scree...

Page 31: ...olby Digital DTS or MPEG bitstream audio in other words no conversion to PCM Virtual Surround has no effect on the audio from the digital output See Digital Audio Out settings on page 32 for how to set up the digital output formats How good the surround effect is varies with the disc Dialog Settings High Medium Low Off default The Dialog feature is designed to make the dialog stand out from other ...

Page 32: ...onitor or device only accepts stereo input On this setting multichannel audio is downmixed to 2 channels for stereo linear PCM output LPCM 5 1CH Set if the monitor or device you have connected using HDMI is compatible with Liner PCM multi channel formats All audio signals are output as linear PCM 5 1 format Use this setting if you want to decode all streams by a player Auto Dolby Digital DTS MPEG ...

Page 33: ...720x480p NTSC 720x576p PAL Set if your TV supports 720 x 480 pixel NTSC 720 x 576 pixel PAL progressive scan video 720x480i NTSC 720x576i PAL Set if your TV supports 720 x 480 pixel NTSC 720 x 576 pixel PAL interlace video HDMI Color Full range RGB If colors are weak this gives brighter colors and deeper black RGB Use this setting if colors appear overly rich on the Full range RGB setting Componen...

Page 34: ...multi channel SACD audio area of the disc for playback CD Area Selects the standard CD audio area of an SACD CD hybrid disc for playback DVD Playback Mode DVD Audio All material on a DVD Audio disc is playable DVD Video Only the DVD Video part of a DVD Audio disc is playable DTS Downmix STEREO Downmixes DTS for 2 channel output to regular stereo See also DTS Downmix on page 35 Lt Rt Downmixes DTS ...

Page 35: ...ursor left repeatedly to lock more levels more discs will require the password press cursor right to unlock levels You can t lock level 1 This sets the new level and you will return to the Options menu screen Setting changing the Country Area code You can find the Country Area code list on page 46 1 Select Country Code 2 Use number buttons to enter your password then press ENTER 3 Select a Country...

Page 36: ...d play the content as often as you like and no message will be displayed Audio Output Mode Default setting 2 Channel If you connected this player to your amplifier using the 5 1 channel analog outputs front surround center and subwoofer outs set this to 5 1 Channel if you connected only the stereo outs set to 2 Channel Note Even if you set Audio Output Mode to 5 1 Channel you ll only get sound fro...

Page 37: ...Dolby Digital Linear PCM 2ch 5 1ch Left Right Left Right Left Right DTS 2ch 5 1ch 2ch downmix Front L R Surround L R Center Subwoofer 2ch downmix DTS MPEG 2ch 5 1ch Left Right Front L R Surround L R Center Subwoofer Left Right MPEG DVD Audio 2ch 5 1ch 2ch downmix4 Front L R 4 Discs that prohibit downmixing will be output as 5 1 channel even if 2 Channel is selected as the Audio Output Mode setting...

Page 38: ...not output from the HDMI terminal Left Right 5 1ch2 5 1ch DSD 2 3 Audio CD MP3 WMA MPEG 4 AAC Left Right Left Right Left Right DTS CD Left Right 5 1ch2 DTS3 Video CD Super VCD Left Right Left Right Left Right Components specification Example component Disc format DVD Audio or SACD 2ch 5 1ch Component output SACD DVD Audio and 5 1 channel compatible on HDMI1 1 This unit checks the specification of ...

Page 39: ...D playback Speaker Installation Default settings L R Large C Large SL SR Large SW On You only need to make this setting if you connected this player to your amplifier using the 5 1 channel analog outputs This setting does not affect digital audio output Use the Speaker Installation screen to tell the player what kinds of speakers you have connected 1 Use the cursor up down buttons to select a spea...

Page 40: ...this happens finish with a dry cloth Cleaning the pickup lens The DVD player s lens should not become dirty in normal use but if for some reason it should malfunction due to dust or dirt consult your nearest Pioneer authorized service center We do not recommend using commercially available lens cleaners for CD players Condensation Condensation may form inside the player if it is brought into a war...

Page 41: ...TO Note You have to switch the player into standby press STANDBY ON before each change Resetting the player Use this procedure to reset all the player s settings to the factory default 1 Switch the player into standby 2 Using the front panel buttons hold down the stop button and press STANDBY ON to switch the player back on All the player s settings are now reset DVD Video regions All DVD Video di...

Page 42: ...or by unplugging the power cord settings will be canceled Press STANDBY ON on the front panel to turn the player off Wait for OFF to disappear from the display then unplug the power cord The remote control doesn t seem to work The remote control is too far from the player or the angle with the remote sensor is too wide Use the remote within its operating range page 18 The batteries are exhausted P...

Page 43: ...92 kHz or 176 4 kHz digital audio The player does not output digital audio at these sampling rates The digital output is automatically downsampled Cannot output 96 kHz or 88 2 kHz digital audio Check that Linear PCM Out page 32 is set to Down Sample Off Some discs are digital copy protected and do not output high sampling rate digital audio In this case the output is automatically downsampled DTS ...

Page 44: ...el HDMI audio Make sure that the HDMI Out page 32 is set to Auto or LPCM 5 1CH and that SACD Playback page 34 is set to Multi ch Area See also About the HDMI audio output settings and HDMI output with DVD Audio and SACD sources on page 38 A connected DVI component with HDCP doesn t work with this player This unit has been designed to be compliant with HDMI High Definition Multimedia Interface Depe...

Page 45: ...MI High Definition Multimedia Interface is a high speed digital interface which has the capability to support standard enhanced or high definition video plus standard to multi channel surround sound audio on a single digital connection HDMI features include uncompressed digital video a bandwidth of up to 5 gigabytes per second and communication between the AV source and AV devices such as DTVs ISO...

Page 46: ...1307 Maori mi 1309 Macedonian mk 1311 Malayalam ml 1312 Mongolian mn 1314 Moldavian mo 1315 Marathi mr 1318 Malay ms 1319 Maltese mt 1320 Burmese my 1325 Nauru na 1401 Nepali ne 1405 Norwegian no 1415 Occitan oc 1503 Oromo om 1513 Oriya or 1518 Panjabi pa 1601 Polish pl 1612 Pashto Pushto ps 1619 Quechua qu 1721 Rhaeto Romance rm 1813 Kirundi rn 1814 Romanian ro 1815 Kinyarwanda rw 1823 Sanskrit s...

Page 47: ...put level 286 mVp p 75 Ω Jack S Video Video output Output level 1 Vp p 75 Ω Jack RCA Audio output 1 stereo pair Output level During audio output 200 mVrms 1 kHz 20 dB Number of channels 2 Jacks RCA Audio output multi channel L R C SW SL SR Output level During audio output 200 mVrms 1 kHz 20 dB Number of channels 6 Jacks RCA Audio characteristics Frequency response 4 Hz to 44 kHz S N ratio 118 dB D...

Page 48: ...egato al prodotto Il simbolo del lampo con terminale a forma di freccia situato all interno di un triangolo equilatero serve ad avvisare l utilizzatore della presenza di una tensione pericolosa non isolata nella struttura del prodotto che potrebbe essere di un intensità tale da provocare scosse elettriche all utilizzatore IMPORTANTE ATTENZIONE PER EVITARE IL RISCHIO DI SCOSSE ELETTRICHE NON RIMUOV...

Page 49: ...ncendi inoltre il cavo di alimentazione deve essere staccato dalla presa di corrente alternata di rete se si pensa di non utilizzare l apparecchio per periodi di tempo relativamente lunghi ad esempio durante una vacanza D3 4 2 2 2a_A_It 0 Questo prodotto include caratteri FontAvenue concessi in licenza da NEC Corporation FontAvenue è un marchio registrato di NEC Corporation Questo prodotto include...

Page 50: ... MP3 MPEG 4 AAC video DivX WMV e JPEG con Disc Navigator 26 Riproduzione ripetuta di una sezione di un disco 27 Utilizzo della riproduzione ripetuta 27 Utilizzo della riproduzione casuale 28 Creazione di un elenco di programmi 28 Ricerca su disco 29 Cambio dei sottotitoli 29 Cambio della lingua del canale audio 29 Ingrandimento dello schermo 29 Per cambiare l angolazione della telecamera 30 Visual...

Page 51: ... converter HD AV DVD Audio e SACD compatibile Si vivranno prestazioni di qualità estremamente elevata del suono prodotto dai DVD Audio e dai Super Audio CD SACD Il convertitore digitale analogico a 24 bit 192 kHz integrato rende questo lettore del tutto compatibile con i dischi ad alta frequenza di campionamento e consente di ottenere una qualità audio eccezionale in termini di gamma dinamica riso...

Page 52: ... sole o in luoghi eccessivamente caldi ad esempio all interno di un automobile o in prossimità di un calorifero Le batterie potrebbero perdere liquido surriscaldarsi esplodere o prendere fuoco riducendone inoltre la durata e le prestazioni Consigli per l installazione Per poter utilizzare questo prodotto per anni senza problemi installarlo osservando le seguenti norme Sì Utilizzare il lettore in u...

Page 53: ...o Video CD Super VCD ISO 9660 CD ROM contenenti file MP3 WMA MPEG 4 AAC JPEG o video DivX WMV Conforme agli standard ISO 9660 Level 1 o 2 Formato fisico del CD Mode1 Mode2 XA Form1 I file system Romeo e Joliet sono compatibili con questo lettore Riproduzione multisessione No Riproduzione di dischi non finalizzati No Struttura file può variare Fino a 299 cartelle su un disco fino a 648 cartelle e f...

Page 54: ...ttotitoli questi file non vengono visualizzati all interno del menu di navigazione del disco srt sub ssa smi Il nome di file del film deve essere ripetuto all inizio del nome di file relativo al file dei sottotitoli esterni Il numero dei file dei sottotitoli esterni che possono essere impostati in uno stesso file di film è limitato ad un massimo di 10 Compatibilità con video DivX Prodotto DivX Ult...

Page 55: ...V dotato di ingressi video component Effettuare il collegamento utilizzando un cavo video component a tre vie pagina 11 7 AV CONNECTOR RGB TV AV Receiver Connettore AV SCART per uscita audio video per il collegamento ad un televisore o altri apparecchi dotati di connettore SCART L uscita video è commutabile tra video S Video e RGB pagina 11 8 CONTROL IN Utilizzare per controllare questo lettore da...

Page 56: ...ante 1 Collegare le prese VIDEO OUT e AUDIO OUT 5 1ch alla serie di ingressi A V del televisore Utilizzare il cavo audio video in dotazione collegando le spine rossa e bianca alle uscite audio e la spina gialla all uscita video Assicurarsi di collegare le uscite audio sinistra e destra ai corrispondenti ingressi per ottenere una riproduzione stereo ottimale Consultare pagina 11 se si desidera util...

Page 57: ...ideo standard Ciò dovrebbe garantire un immagine di qualità ottimale da una delle tre uscite video disponibili Utilizzare un cavo video component non in dotazione per collegare le prese COMPONENT VIDEO OUT all ingresso video component del televisore monitor o ricevitore AV Riproduzione di 1080i 720p 576p 480p da uscite video component Questo lettore è in grado di emettere 1080i 720p 576p 480p dall...

Page 58: ...2 Collegare l uscita video del ricevitore AV all ingresso video del televisore Se desiderato per collegarsi al ricevitore AV è inoltre possibile utilizzare il connettore AV SCART S Video o component Consiglio Di solito è necessario collegare cavi video uguali fra il lettore DVD e il ricevitore AV e fra il ricevitore AV ed il televisore Collegamento delle uscite analogiche multicanale Se il ricevit...

Page 59: ...vo coassiale simile al cavo video fornito per collegare la presa DIGITAL AUDIO OUT COAXIAL ad un ingresso coassiale del ricevitore AV Controllo di questo lettore tramite un altro componente Pioneer La presa CONTROL IN consente di controllare questo lettore tramite il sensore remoto di un altro componente di norma un ricevitore AV che dispone di presa CONTROL OUT I segnali del controllo remoto arri...

Page 60: ...igital DTS bitstream audio MPEG DSD multicanale e segnali PCM lineari multicanale segnali a 5 1 canali fino a 96 kHz 16 bit 20 bit 24 bit A seconda del cavo HDMI utilizzato l uscita 1080p potrebbe non essere corretta Informazioni su HDMI HDMI High Definition Multimedia Interface supporta video e audio su un unico collegamento digitale da utilizzare con lettori DVD DTV set top box e altri dispositi...

Page 61: ...inita con un collegamento HDMI Utilizzare il tasto OUTPUT RESOLUTION del telecomando per riportare il lettore su 576p 480p Portare il lettore sulla modalità standby quindi con i comandi del pannello anteriore premere STANDBY ON mentre si tiene premuto per riportare il lettore su 576p 480p Impostazione di risoluzione max 480i 576i 480p 576p 1080i 720p 1080p DVD 480i 576i 480p 576p 480p 576p 480p 57...

Page 62: ...la riproduzione premere per spegnere accendere il display del pannello anteriore e disattivare le uscite video e digitale Utilizzarlo quando si desidera ascoltare audio dalle uscite analogiche senza interferenze da altri segnali ad esempio quando si ascolta un disco DVD Audio L indicatore si illumina quando si attiva la funzione Pure Audio Questo tasto funziona solo quando si imposta Pure Audio Bu...

Page 63: ...i gruppo DVD Audio 7 TITLE Indica che il display dei caratteri sta visualizzando un numero di titolo DVD Video 8 TRK Indica che il display dei caratteri sta visualizzando un numero di brano 9 CHP Indica che il display dei caratteri sta visualizzando un numero di capitolo DVD 10 REMAIN Si illumina quando il display dei caratteri visualizza il tempo o il numero dei brani titoli capitoli rimanenti 11...

Page 64: ...2 e 25 26 NEXT pagina 28 27 STOP pagina 22 28 TV CONTROL pagina 19 Utilizzo del telecomando Quando si utilizza il telecomando tenere presente quanto segue Assicurarsi che tra il telecomando e il sensore remoto dell apparecchio non siano presenti ostacoli Il telecomando ha un raggio di azione di circa 7 m Il corretto funzionamento del telecomando può venire compromesso se il sensore dell apparecchi...

Page 65: ...visore Se il telecomando è impostato correttamente il televisore dovrebbe accendersi spegnersi In caso contrario se si dispone di un altro codice produttore ripetere le operazioni del passo 1 con un nuovo codice Utilizzo dei tasti del telecomando Nella tabella di seguito viene illustrato come utilizzare questo telecomando con il televisore Tasto A cosa serve TV Premere per accendere spegnere stand...

Page 66: ...izi Startup Navigator 3 Usare i tasti per selezionare una lingua quindi premere ENTER 4 Premere ENTER per avviare l impostazione tramite Startup Navigator Se non si desidera utilizzare Startup Navigator premere per selezionare Cancel quindi premere ENTER per uscire da Startup Navigator 5 Utilizzare i tasti per selezionare il terminale da cui emettere i segnali audio quindi premere ENTER Se si è se...

Page 67: ...gine di tali dimensioni Se si dispone di un televisore convenzionale 4 3 conservare le impostazioni predefinite e passare alla sezione successiva 1 Premere HOME MENU e selezionare Initial Settings 2 Selezionare TV Screen dalle impostazioni Video Output 3 Se si dispone di un televisore widescreen 16 9 selezionare 16 9 Wide o 16 9 Compressed Se si dispone di un televisore convenzionale 4 3 se deside...

Page 68: ...bero non funzionare Non si tratta di un problema di funzionamento Se un disco contiene sia filmati video DivX WMV sia altri tipi di file multimediali MP3 ad esempio selezionare innanzitutto se riprodurre i file video DivX WMV o gli altri tipi di file multimediali MP3 WMA MPEG 4 AAC JPEG dal display su schermo Quando viene attivata la modalità Pure Audio i tipi di file multimediali vengono selezion...

Page 69: ...el disco Menu dei DVD Video e dei dischi DivX Alcuni file multimediali DivX e vari DVD Video e DVD Audio dispongono di menu che consentono di selezionare il materiale da vedere Tali menu garantiscono l accesso a funzioni supplementari quali la selezione della lingua dell audio e dei sottotitoli oppure a funzioni speciali quali le sequenze Per ulteriori informazioni vedere la custodia del disco A v...

Page 70: ...e compatibile con HDMI non si ottiene alcun segnale e l indicatore HDMI del pannello anteriore non si illumina Accertarsi di aver selezionato il lettore come ingresso HDMI nelle impostazioni relative al componente in uso Per eseguire questa operazione potrebbe essere necessario consultare il manuale di istruzioni del componente Per ulteriori informazioni sulla compatibilità HDMI consultare Collega...

Page 71: ...iprendere la riproduzione normale premere PLAY A seconda del disco quando si raggiunge un nuovo capitolo potrebbe riprendere automaticamente la normale riproduzione Per avanzare indietreggiare di un fotogramma È possibile far avanzare o indietreggiare un DVD Video e un DVD R RW di un fotogramma per volta Con i Video CD Super VCD e con i file video DivX WMV è possibile utilizzare solo l avanzamento...

Page 72: ...WMV e JPEG con Disc Navigator Utilizzare Disc Navigator per trovare un determinato file o una cartella attraverso il nome del file Se nello stesso disco si trovano altri tipi di file questi non verranno visualizzati su Disc Navigator 1 Premere HOME MENU e selezionare Disc Navigator dal menu su schermo 2 Utilizzare i tasti del cursore ed ENTER per navigare Usare i tasti su giù del cursore per scorr...

Page 73: ...o dei programmi vedere Creazione di un elenco di programmi a pagina 28 Importante Non è possibile utilizzare la riproduzione ripetuta con Video CD Super VCD in modalità PBC o con dischi per file MP3 WMA MPEG 4 AAC Non è possibile utilizzare contemporaneamente la riproduzione ripetuta e quella casuale 1 Durante la riproduzione premere PLAY MODE e selezionare Repeat dall elenco di funzioni sulla sin...

Page 74: ...ioni sulla sinistra 2 Selezionare Create Edit dalle opzioni dell elenco programmi 3 Utilizzare i tasti del cursore ed ENTER per selezionare un titolo un capitolo o un brano per il passo attuale nell elenco dei programmi Per un DVD Video è possibile aggiungere anche un titolo o un capitolo all elenco dei programmi Per un DVD Audio è possibile aggiungere un intero gruppo o un brano di un gruppo all ...

Page 75: ...totitoli solo dal menu del disco Premere TOP MENU o MENU per accedere Per impostare le preferenze linguistiche dei sottotitoli consultare pagina 33 Per ulteriori informazioni sui sottotitoli DivX consultare Visualizzazione dei file dei sottotitoli esterni a pagina 8 Cambio della lingua del canale audio Durante la riproduzione di un DVD Video e video DivX registrati con dialoghi in due o più lingue...

Page 76: ...ioni Display a pagina 34 Durante la riproduzione premere ANGLE per cambiare angolazione Visualizzazione delle informazioni del disco Sullo schermo durante la riproduzione di dischi è possibile visualizzare varie informazioni su brani capitoli e titoli ad esempio i tempi di riproduzione trascorsi e rimanenti Per visualizzare cambiare nascondere le informazioni visualizzate premere più volte DISPLAY...

Page 77: ...dio bitstream Dolby Digital DTS o MPEG ovvero l audio non viene convertito in formato PCM la funzione Virtual Surround non ha effetto sull audio proveniente dall uscita digitale Per l impostazione dei formati delle uscite digitali consultare Impostazioni Digital Audio Out a pagina 32 L effetto surround varia a seconda del disco riprodotto Dialog Impostazioni High Medium Low Off predefinito La funz...

Page 78: ...esso Con questa impostazione l audio multicanale viene sottoposto a downmix a 2 canali per l uscita stereo PCM lineare LPCM 5 1CH Impostare questa opzione se il monitor o dispositivo collegato tramite terminale HDMI è compatibile con i formati PCM lineare multicanale Tutti i segnali audio vengono emessi nel formato PCM 5 1 Utilizzare questa impostazione se si desidera decodificare tutti gli stream...

Page 79: ...visore supporta video a scansione progressiva da 1280 x 720 pixel 720x480p NTSC 720x576p PAL Impostare questa opzione se il televisore supporta video a scansione progressiva da 720 x 480 pixel NTSC 720 x 576 pixel PAL 720x480i NTSC 720x576i PAL Impostare questa opzione se il televisore supporta video interlacciato da 720 x 480 pixel NTSC 720 x 576 pixel PAL HDMI Color Full range RGB Se i colori so...

Page 80: ...di un SACD per la riproduzione CD Area Seleziona l area CD audio standard di un disco ibrido SACD CD per la riproduzione DVD Playback Mode DVD Audio Si può riprodurre tutto il materiale dei dischi DVD Audio DVD Video Si può riprodurre solo la parte DVD Video dei dischi DVD Audio DTS Downmix STEREO Downmix del segnale DTS per l uscita a 2 canali su stereo Vedere anche DTS Downmix a pagina 35 Lt Rt ...

Page 81: ... premere ENTER Premere più volte cursore sinistro per bloccare più livelli la maggior parte dei dischi richiedono una password premere cursore destro per sbloccare i livelli Non è possibile bloccare il livello 1 In questo modo si imposta il nuovo livello e si torna alla schermata del menu Options Impostazione modifica del codice Paese area Si troverà un Elenco codici Paese area a pagina 46 1 Selez...

Page 82: ...e riprodurre il contenuto tutte le volte che si desidera senza che appaia alcun messaggio Audio Output Mode Impostazione predefinita 2 Channel Se si è collegato questo lettore all amplificatore tramite le uscite analogiche a 5 1 canali canali anteriori surround centrale e del subwoofer impostare questo parametro su 5 1 Channel Se si sono collegate solo le uscite stereo impostarlo su 2 Channel Nota...

Page 83: ...M lineare 2ch 5 1ch Sinistra destra Sinistra destra Sinistra destra DTS 2ch 5 1ch 2ch downmix Anteriore L R Surround L R centrale subwoofer 2ch downmix DTS MPEG 2ch 5 1ch Sinistra destra Anteriore L R Surround L R centrale subwoofer Sinistra destra MPEG DVD Audio 2ch 5 1ch 2ch downmix4 Anteriore L R 4 I dischi che impediscono il downmix vengono riprodotti a 5 1 canali anche se si seleziona 2 Chann...

Page 84: ...n viene emesso dal terminale HDMI Sinistra destra 5 1ch2 5 1ch DSD 2 3 CD audio MP3 WMA MPEG 4 AAC Sinistra destra Sinistra destra Sinistra destra CD DTS Sinistra destra 5 1ch2 DTS3 Video CD Super VCD Sinistra destra Sinistra destra Sinistra destra Specifiche componente Componente esempio Formato disco DVD Audio o SACD 2ch 5 1ch Componente uscita Compatibile con SACD DVD Audio e 5 1 canali su HDMI...

Page 85: ...tro destro Le impostazioni Speaker Distance non influiscono sulla riproduzione dei SACD Speaker Installation Impostazioni predefinite L R Large C Large SL SR Large SW On Questa impostazione è necessaria solo se questo lettore è stato collegato ad un amplificatore usando le uscite analogiche a 5 1 canali Questa impostazione non influisce sulle uscite audio digitali Utilizzare la schermata Speaker I...

Page 86: ...o Tali panni potrebbero lasciare delle sbavature sulle superfici lucide in tal caso rimuoverle con un panno asciutto Pulizia della lente del lettore La lente del lettore DVD non dovrebbe sporcarsi se utilizzata normalmente Se non funziona correttamente a causa di polvere o sporcizia consultare il più vicino centro di assistenza autorizzato Pioneer Non si consiglia l uso dei prodotti per lenti di l...

Page 87: ...ndby 2 Utilizzando i comandi del pannello anteriore tenere premuto quindi premere STANDBY ON per cambiare sistema televisivo Il sistema televisivo cambia nel modo seguente AUTO NTSC NTSC PAL PAL AUTO Nota È necessario portare il lettore in standby premere STANDBY ON prima di ogni modifica Ripristino delle impostazioni predefinite del lettore Utilizzare questa procedura per ripristinare tutte le im...

Page 88: ... le impostazioni vengono cancellate Premere STANDBY ON sul pannello anteriore per spegnere l apparecchio Attendere che la scritta OFF scompaia dal display quindi scollegare il cavo di alimentazione Il telecomando non funziona Il telecomando è troppo lontano dal lettore o l angolo del sensore remoto è eccessivo Utilizzare il telecomando entro il suo campo di azione pagina 18 Batterie scariche Inser...

Page 89: ...ttore non emette audio digitale a queste frequenze di campionamento Il segnale digitale viene automaticamente ricampionato Impossibile emettere audio digitale a 96 kHz o 88 2 kHz Controllare che Linear PCM Out pagina 32 sia impostato su Down Sample Off Alcuni dischi sono protetti da copia digitale e non emettono audio digitale ad alte frequenze di campionamento In tal caso il segnale in uscita vie...

Page 90: ...cita Controllare che l indicatore PURE AUDIO non sia acceso In tal caso premere il tasto PURE AUDIO consultare anche Pannello anteriore a pagina 16 A seconda del cavo HDMI utilizzato l uscita 1080p potrebbe non essere corretta Non viene emesso alcun audio multicanale HDMI Accertarsi che HDMI Out pagina 32 sia impostato su Auto o LPCM 5 1CH e che la riproduzione SACD Playback pagina 34 sia impostat...

Page 91: ...ità in grado di trasferire segnali video non compressi in formato standard avanzato o ad alta definizione e segnali audio standard surround multicanale tramite un unico collegamento digitale Le caratteristiche di HDMI comprendono segnale video digitale non compresso ampiezza di banda fino a 5 gigabyte al secondo e capacità di comunicazione tra la fonte AV e i dispositivi AV quali i DTV Formato ISO...

Page 92: ...307 Maori mi 1309 Macedonian mk 1311 Malayalam ml 1312 Mongolian mn 1314 Moldavian mo 1315 Marathi mr 1318 Malay ms 1319 Maltese mt 1320 Burmese my 1325 Nauru na 1401 Nepali ne 1405 Norwegian no 1415 Occitan oc 1503 Oromo om 1513 Oriya or 1518 Panjabi pa 1601 Polish pl 1612 Pashto Pushto ps 1619 Quechua qu 1721 Rhaeto Romance rm 1813 Kirundi rn 1814 Romanian ro 1815 Kinyarwanda rw 1823 Sanskrit sa...

Page 93: ...re Livello di uscita 286 mVp p 75 Ω Presa S Video Uscita video Livello di uscita 1 Vp p 75 Ω Presa RCA Uscita audio 1 coppia stereo Livello di uscita Durante l uscita audio 200 mVrms 1 kHz 20 dB Numero di canali 2 Prese RCA Uscita audio multicanale L R C SW SL SR Livello di uscita Durante l uscita audio 200 mVrms 1 kHz 20 dB Numero di canali 6 Prese RCA Caratteristiche audio Risposta in frequenza ...

Page 94: ...CS USA INC P O BOX 1540 Long Beach California 90801 1540 U S A TEL 800 421 1404 PIONEER ELECTRONICS OF CANADA INC 300 Allstate Parkway Markham Ontario L3R 0P2 Canada TEL 1 877 283 5901 905 479 4411 PIONEER EUROPE NV Haven 1087 Keetberglaan 1 B 9120 Melsele Belgium TEL 03 570 05 11 PIONEER ELECTRONICS ASIACENTRE PTE LTD 253 Alexandra Road 04 01 Singapore 159936 TEL 65 6472 7555 PIONEER ELECTRONICS ...

Reviews: