background image

31

Karaoke
Operation

Karaoke Entertainment

– DVD/Super VCD/Video CD/CD

This DVD player goes beyond being a simple karaoke
machine for sing-alongs, and includes many functions
that are designed to enhance your enjoyment of karaoke.
Before we explain those functions, however, let’s first
learn how to perform the basic operations.

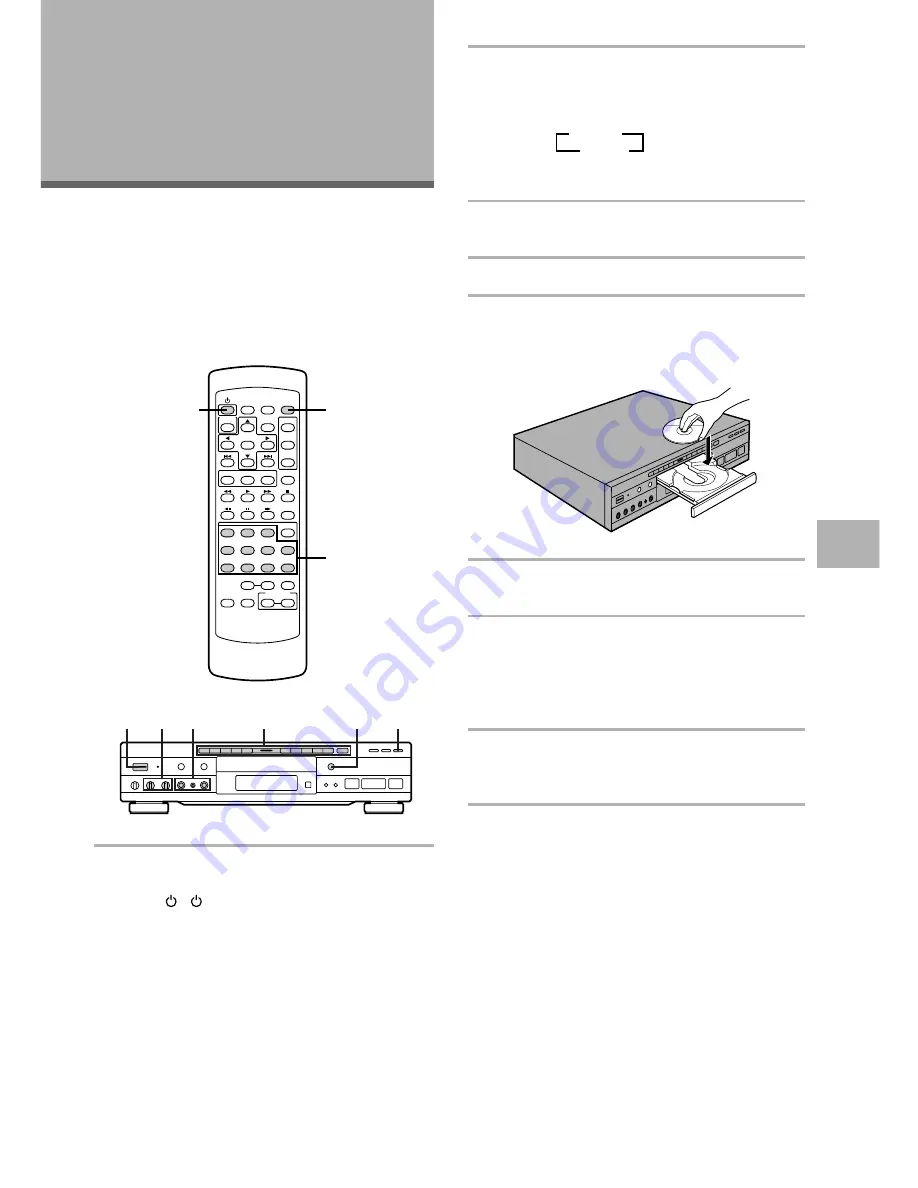
2

Press 

KARAOKE MODE

 to switch the

karaoke mode on.

• Each time you press the button, the setting

changes as follows:

When the KARAOKE MODE indicator lights, skip
this step.

3

Set 

MIC 1

 and 

MIC 2

 volume level knobs to

“MIN”.

4

Connect the mics, and switch on.

5

Press 

OPEN/CLOSE 

0

.

The disc tray comes out. Load a disc with the label
side facing up, using the disc tray guide to align the
disc.

6

Press 

OPEN/CLOSE 

0

.

The disc tray goes back in.

7

Press the number button(s) to select desired
song(s).

• To select number 3, press 3.
• To select number 21, press +10 twice then 1.
Playback begins.

8

Turn the mic volume level knobs to adjust
volume level.

Adjust overall volume level with the TV or amp.

Howling

If sound from the speakers is picked up by a mic and
output again through the speakers, the result is a
screeching sound known as “howling”. Perform the
following steps to eliminate howling.

(1) Move the mic away from speakers.
(2) Turn the mic volume knob counterclockwise to

lower the volume level.

(3) Turn the Digital Echo level knob (page 32)

counterclockwise to lower the echo level.

Single Play Function

When the KARAOKE MODE is selected (the KARAOKE
MODE indicator lights), play pauses after a selected
song finishes. This is single play.

The single play function cannot be used when in the
Normal mode.

=

Karaoke

Normal

+

1

[Models having a STANDBY/ON button on the
main unit]
Press


(


STANDBY/ON

 on the front

panel).

[Models having a POWER switch on the main
unit]
Press 

POWER

 on the front panel.

• When the STANDBY indicator lights, you can

power on with the remote control.

ADJUSTING AUDIO AND VIDEO SETTINGS/

KARAOKE OPERA

TION

1

5,6

7

3,8

5,6

4

7

1

2

Summary of Contents for DV-K102

Page 1: ...DV K102 DVD V550 Operating Instructions DVD PLAYER ...

Page 2: ... only fit into a grounding type power outlet This is a safety feature If you are unable to insert the plug into the outlet contact your electrician to replace your obsolete outlet Do not defeat the safety purpose of the grounding type plug POWER CORD PROTECTION Power supply cords should be routed so that they are not likely to be walked on or pinched by items placed upon or against them paying par...

Page 3: ...with electric appliances such as radios and televisions use shielded cables and connectors for connections This equipment has been tested and found to comply with the limits for a Class B digital device pursuant to Part 15 of the FCC Rules These limits are designed to provide reasonable protection against harmful interference in a residential installation This equipment generates uses and can radi...

Page 4: ...played back on this DVD player For more information on discs compatible with this player refer to the table below Answer a few questions and have all the necessary audio video and on screen language adjustments set automatically by the player using the Setup Navigator page 19 Setup Navigator Audio1 General Language Video 2 Move Exit SETUP Select ENTER Setting up using the Setup Navigator Setup Nav...

Page 5: ...cenes from different camera angles when watching movies or other media with multiple angle playback available This mark indicates this may not be possible with certain discs HELLO HOLA Subtitle 1 English Subtitle 2 Spanish Audio 1 English Dolby Digital 5 1CH Audio 2 Spanish HELLO HOLA Dolby Digital 5 1CH ANGLE 3 4 ANGLE 2 4 This product incorporates copyright protection technology that is protecte...

Page 6: ...ng this player much easier and more enjoyable Play a disc When all the connections and setups have been made you are ready to play a DVD Super VCD Video CD or CD with the player The section Getting Started Using Your DVD Player starting on page 22 outlines the basic player operations Enjoy the many features available Once you are comfortable using the basic player functions you are ready to take a...

Page 7: ... to Create the Desired Sound 32 One Touch Karaoke 33 Reserving a Desired Song 33 Making Settings on the Karaoke Setup Menu 34 Setting the Language Options 37 Selecting a Subtitle Language Multi Language Subtitles 37 Changing the Audio Language Multi Language Function 38 Setting Language and Subtitle Preferences in the Setup Screen Menus 39 Advanced Functions 42 Adjusting the Dynamic Range of the A...

Page 8: ...3 Close the cover Notes Do not mix old and new batteries When replacing batteries use all new batteries When not using the remote control for a long period of time over 1 month remove the batteries to avoid possible damage from battery corrosion If battery leakage occurs wipe the battery liquid from the battery component then insert new batteries Before Using Checking Accessories Please confirm th...

Page 9: ...nd within a 30 angle on each side of the sensor Notes Exposing the remote sensor to direct sunlight or strong light may cause faulty operation If the CONTROL IN jack on the player s rear panel is connected to the CONTROL OUT jack of another component point the remote control at the other component to operate the player Operation will not be possible when pointed at this player page 18 30 30 23ft 7...

Page 10: ...5 Disc illumination Lights when a DVD is loaded and when no disc is loaded Turns off when a disc format other than DVD is loaded in the player 6 PLAYBACK CONTROL button and indicator Use to switch the playback control for the Super VCD Video CD on or off page 23 7 ONE TOUCH KARAOKE button and indicator Use to switch One Touch Karaoke mode on or off page 33 8 KARAOKE MODE button and indicator Use t...

Page 11: ...se button Press to go back to previous chapters tracks Press and hold to perform reverse playback scanning page 24 Remote sensor Point the remote control toward the remote sensor to operate the player page 9 Display window Displays system information page 12 Disc tray When loading a disc place a disc in the disc tray with the label side facing up pages 22 and 25 MIC1 MIC2 and MIC CONTROL jacks Use...

Page 12: ... location is recorded in memory for the currently loaded DVD or Video CD page 49 7 REMAIN indicator Indicates that the remaining playback time of a title or chapter track is being displayed 8 CONDITION indicator Indicates that Condition Memory settings are memorized for the currently loaded DVD page 50 9 TOTAL indicator Indicates that the disc in the player is stopped and DISPLAY has been pressed ...

Page 13: ...control at the component that the player is connected to page 18 5 AUDIO OUT jacks Use to output two channel audio analog to the audio stereo inputs on a TV or stereo amplifier If you are connecting to a receiver that has both digital and analog input jacks for DVD player connection it may be beneficial to make both connections page 17 6 ATTENUATOR switch Usually set to OFF Switch it ON if the sou...

Page 14: ...ettings pages 19 23 26 27 47 and 48 5 ENTER button Use to implement settings selected with the cursor buttons or to set items highlighted in a menu pages 19 23 and 27 6 4 previous next buttons During playback press 4 to go back to a previous chapter track and to advance to the next chapter track page 24 7 AUDIO button Press repeatedly to select one of the audio languages and or audio formats progr...

Page 15: ...26 MENU button Use to display or close the DVD menu screen page 23 TOP MENU button Press to call up the top menu programmed on the DVD Depending on the DVD the top menu may be identical to the DVD menu page 23 ANGLE button Some DVDs are recorded with various camera angle playback options Press ANGLE repeatedly to display different camera angles page 45 RETURN button Use to go one menu back current...

Page 16: ...ck on DVDs from being copied If you connect the player to a TV via a VCR or record and play back the contents of a disc with a VCR the playback picture may not be normal Connecting Your DVD Player Unlike any other audiovisual media format DVD offers a wide array of audio and video output options which allows playback to be enjoyed in any number of system configurations from a standard TV with ster...

Page 17: ... an AV amplifier or receiver with built in Dolby Digital DTS or MPEG decoder Use a fiber optic cable not supplied to connect the digital optical output on the player to the digital optical input on an AV amplifier or receiver DIGITAL OUT Coaxial The digital signal is transmitted electronically through a coaxial cable Use to connect to an AV amplifier or receiver with built in Dolby Digital DTS or ...

Page 18: ...ut format will be selected About MOD Modulation PAL SHRINK Most models of the newly developed countdown PAL TV system detect 50 Hz PAL 60 Hz NTSC and automatically switch vertical amplitude resulting in a display without vertical shrinkage If your PAL TV does not have a V Hold control you may not be able to view NTSC disc because the picture may roll If the TV has a V Hold control adjust it until ...

Page 19: ...appears the first time SETUP is pressed 3 Use the cursor buttons 5 to make a selection If you are going to use the Setup Navigator it is not necessary to change the setting on the first screen Please proceed to the next step If you want to set up the player without using the Setup Navigator use the cursor button to select Not Used at this time The Setup Navigator function may still be used at a la...

Page 20: ...size or more appropriately the width to height ratio of your television or monitor The width to height ratio of conventional TVs is 4 3 while the width to height ratio of wide screen and high definition TVs is 16 9 This width to height ratio is called the aspect ratio Settings Widescreen 16 9 Standard 4 3 Factory setting Note There are two screen formats that can be used to display wide screen for...

Page 21: ...ctions select Not Connected Settings Dolby Digital Dolby Digital DTS Dolby Digital MPEG Dolby D DTS MPEG PCM Not Connected Factory setting Note The Karaoke function cannot be used with the DIGITAL OUT jack Setting compatibility with 96 kHz output The 96 kHz PCM Audio screen establishes whether or not the AV component the player is connected to is capable of processing an audio signal with a sampli...

Page 22: ...on the disc a menu may be displayed If a menu is displayed proceed to step 6 6 Select the item you want to view When a DVD is loaded Use the cursor buttons 2 3 5 to select the item then press ENTER You may also be able to use the number buttons for direct selection Depending on the disc you may not be able to use the number buttons When a Super VCD Video CD is loaded Use the number buttons to sele...

Page 23: ...creens Super VCDs Video CDs with Playback Control PBC display a menu screen when play is started It is possible however to playback Super VCDs Video CDs without displaying menu screens When a Super VCD Video CD with PBC is loaded press PLAYBACK CONTROL and then the number button of the track you want to play Improving Picture Quality If the video picture of a DVD or Super VCD Video CD displays a l...

Page 24: ...umber appears in the display Chapter Track Skip Forward Skip Back DVD Super VCD Video CD CD Forward and Reverse Scanning DVD Super VCD Video CD CD Fast forward scanning Press and hold on the front panel during playback Release when you reach the desired location Normal playback resumes When the Scan indicator on the screen changes from flashing to lit fast forward scanning will continue even if th...

Page 25: ... STOP 7 is pressed RESUME appears in the display for as long as resume playback is possible If the function is canceled RESUME disappears and the disc format appears in the display Notes Resume play is only possible when the disc is loaded and STOP 7 has not be pressed twice in succession RESUME appears in the display If you want to continue viewing a DVD at a later time or date it is recommended ...

Page 26: ...options available for each setting appear to the right when the setting is selected The current setting appears with the setting indicator lit 6 Press the cursor button 3 to enter the setting options Not all menu options can be changed while a disc is playing In these cases the options appear grayed out on the screen and cannot be adjusted To change these settings press STOP 7 first before pressin...

Page 27: ... setting in memory Press RETURN or the cursor button 2 to exit the options without making any changes 8 Press RETURN or the cursor button 2 to go back to the main menu bar to select another menu 9 Press SETUP to close the Setup screen The Setup screen closes How to interpret the setting indicator colors in the Setup screen menus When setting up the system or when making adjustments it is convenien...

Page 28: ...re to select Off If a DTS signal is output to an AV component without decoding capabilities the output is digital noise that could potentially cause damage to your speakers 96 kHz PCM Out This player is capable of outputting digital signals with a sampling frequency of 96 kHz If you have made connections to a component capable of processing this signal rate select 96 kHz for the signal to be outpu...

Page 29: ...lected in the TV Screen setting the disc will be shown in Pan Scan format When viewing a wide screen TV or monitor Standard screen format DVD Super VCD When viewing a standard screen format DVD or Super VCD on a wide screen TV black bars may be automatically placed at the side of the screen to adjust to the DVD or Super VCD format Wide setting Wide screen format DVD Super VCD Please note that ther...

Page 30: ...enu mode page 27 Settings On Off Factory Setting Setting the position of the on screen display Expert When watching conventional software on a wide screen TV the operation display is at the very top of the screen and may be difficult to see When this occurs selecting Wide changes the position of the display and lets you see operation indicators clearly even on a wide screen TV Otherwise select Nor...

Page 31: ...wice then 1 Playback begins 8 Turn the mic volume level knobs to adjust volume level Adjust overall volume level with the TV or amp Howling If sound from the speakers is picked up by a mic and output again through the speakers the result is a screeching sound known as howling Perform the following steps to eliminate howling 1 Move the mic away from speakers 2 Turn the mic volume knob counterclockw...

Page 32: ...adjustment Adjust with the digital echo level knob Note Depending on the room there may be howling if the echo level is too high page 31 Changing performance key Press KEY CONTROL Each button can be used to raise or lower the key in 5 steps High The key is raised Low The key is lowered Note Adjustments can also be made at Key Control in the Karaoke Setup menu Operation is possible with the mic You...

Page 33: ...her the disc should be played by titles or by chapters the user is unable to select whether playback is performed according to titles or chapters 4 Repeat steps 2 through 3 to reserve other songs After the currently playing song is finished playback of the selected title chapter or track starts Notes Up to 24 songs can be reserved Reserved songs play one after the other without SINGLE PLAY page 31...

Page 34: ...ing the Karaoke Setup menu Depending on the type of disc that is being played back the Karaoke Setup menus that might be displayed are listed below Dolby Digital multiplex compatible DVD karaoke Disc The menu display varies depending on whether a guide melody is available and on the vocal select 1 or 2 Other DVD Disc Audio is displayed for discs having two or more audio Super VCD Video CD Audio Mu...

Page 35: ...at is selected through the Vocal Select menu item Refer to Selecting the vocal Selecting the vocal Dolby Digital multiplex compatible DVD karaoke Discs If a track has two vocals this item appears in the Karaoke Setup menu allowing you to select the desired vocal 1 Use the cursor button 2 3 to select Vocal Select in the Karaoke Setup menu 2 Use the cursor button 5 to select the desired vocal Settin...

Page 36: ... button 2 3 to select Audio in the Karaoke Setup menu 2 Use the cursor button 5 to set the desired settings Settings 1 Settings Settings 8 Maximum The values that are actually displayed depend on the disc in question You can also be switched by the AUDIO button on the remote control The above display will then disappear Setting multiplexed or stereo Super VCD Video CD CD Some types of discs are re...

Page 37: ...f and even opt to select assist subtitles for viewers who are hard of hearing page 41 Select the language of subtitles that appear even when the subtitles are turned off page 41 Note DVDs differ in content and do not all contain multiple language or subtitle information Therefore making settings in this section may have no effect on some DVDs Selecting a Subtitle Language Multi Language Subtitles ...

Page 38: ...it is possible to select stereo audio or either right or left channel mono depending on the requirements of the source Video CD CD Press AUDIO repeatedly during playback to switch the audio type Audio output changes from 1 L Left channel to 2 R Right channel to Stereo This function is possible only in Normal mode Audio 1 English Dolby Digital 5 1CH Audio 2 Spanish HELLO HOLA Dolby Digital 5 1CH AU...

Page 39: ...s selected on the following page Factory setting Note The menu settings may be different from those shown above SETTING THE LANGUAGE OPTIONS Selecting a subtitle language preference The subtitle language that you will normally display can be selected from the subtitles programmed on a disc Even when the subtitle language is changed during playback by pressing SUBTITLE the language selected at this...

Page 40: ...efault when DVDs with menu information in that language are encountered Selecting w Subtitle Language automatically assigns the language selected in the Subtitle Language setting Make changes to the DVD Language setting in the Setup screen Language menu in the Expert menu mode page 27 Settings w Subtitle Language English Other Factory setting Notes The menu settings may look different from the one...

Page 41: ...ubtitles on or off Additionally some DVDs provide assist subtitles that provide additional explanations of scenes in addition to the standard subtitles for viewers who are hard of hearing Select Assist Subtitle to display these subtitles on DVDs where this function is offered Make changes to the Subtitle Display setting in the Setup screen Language menu in the Expert menu mode page 27 Settings On ...

Page 42: ...ame information Therefore some functions in this section may not work or have no effect on some DVDs Adjusting the Dynamic Range of the Audio Soundtrack DVD Audio DRC stands for Audio Dynamic Range Compression When Audio DRC is on soft sounds such as dialog can be heard more clearly without making loud sounds even louder Select from three levels of compression depending on how much effect you want...

Page 43: ...ack can be adjusted from 1 2 normal playback speed to 1 16 normal playback speed in four steps using STEP e and E 1 16 1 8 1 4 1 2 Press and hold STEP e during DVD playback Slow playback in the reverse direction is engaged In the reverse direction the playback speed cannot be adjusted This function is not possible with Super VCD and Video CD To return to normal playback When viewing still frames o...

Page 44: ... Setup screen General manu in the Expert menu mode page 27 Settings Auto The player evaluates the disc s composition and selects the appropriate type of search according to the number of titles and maximum number of chapters on the disc Title Title search is performed when direct search is selected Chapter Chapter search is performed when direct search is selected Factory setting Note The Title an...

Page 45: ...setting lets you see clearly whether the playback picture is recorded in multiple angles or not Turn the indicator on or off in the Angle Indicator setting in the Setup screen Video menu in the Expert menu mode page 27 Settings On is displayed Off Not Displayed Factory setting Note Even when the Angle Indicator setting is set to Off the ANGLE indicator in the display panel of the player lights dur...

Page 46: ...ssed first and plays the selected section repeatedly You can only perform A B repeat within the same title chapter or track This function is not possible with Super VCD To cancel A B repeat play Press CLEAR Playback continues but the repeat function is canceled Note A B repeat play is not possible with Super VCDs Return to a specified location on a disc 1 Press A B at the desired location 2 When y...

Page 47: ...r the number buttons on the remote control to select a number between 0 and 9 You can also use the number buttons to enter the numbers directly When entering your password for the first time or changing it you will be asked to reenter your password When using the number buttons to confirm the password the numbers appear as asterisks and the cursor advances automatically to the next position 2 Use ...

Page 48: ...ying documentation If you use the Condition Memory function to save the settings for a particular disc the Parental Lock level is saved as well Because it is saved in memory Parental Lock levels can be set for individual discs according to their content rather than a set level for all DVDs 1 Select Level Change in the Parental Lock setting and press ENTER The screen changes to the password input s...

Page 49: ...n the screen The LAST MEMO indicator disappears from the display window Continuing Playback from a Specified Location Last Memory DVD Video CD The Last Memory function is convenient when you want to continue viewing a disc from the point where you were watching before Unlike the resume function the Last Memory function is effective even if the DVD is removed from the player With Video CDs the LAST...

Page 50: ...d in Condition Memory press CONDITION MEMORY during playback to memorize new settings Switching of the multi language mode etc is automatic on some discs Memorizing Settings for Often Viewed DVDs Condition Memory DVD You can store in memory settings for DVDs you often watch Settings remain in memory even if you remove the disc from the player or switch power to the player to standby If you load a ...

Page 51: ...rent title Bottom Row time in current chapter total time of current chapter Display off Viewing Disc Information DVD Super VCD Video CD CD Use DISPLAY to get current information about the disc currently loaded You can get information about the titles and chapters on a DVD or tracks on a Super VCD Video CD or CD When viewing DVDs you can also check the digital bitstream transmission rate Press DISP...

Page 52: ...e of Video CD Bottom Row track time total time of current track Track information Top Row current track number total elapsed time of Video CD Bottom Row remaining time of track total time of current track Note Information for Super VCD is not displayed Changing the Background Color of the Screen Expert You can select a blue or black background to appear when the player is in the stop mode Make cha...

Page 53: ...at they have a diameter of at least 15 cm 6 in When connecting push all the way into the terminal Do not use cords with a length of over 3 m If moisture or dust has collected on the plug wipe it with a soft cloth before connecting Disc Care HOW TO HOLD DISCS When loading or removing discs try not to touch their playing surfaces CLEANING Fingerprints or other dirt on the disc may affect sound and p...

Page 54: ...mplifier to avoid the heat generated by the amplifier or other audio equipment CONDENSATION Moisture may form in the operating section of the player if the player is brought from cool surroundings into a warm room or if the temperature of the room rises suddenly When this happens the player s performance will be impaired To prevent this let the player stand in its new surroundings for about an hou...

Page 55: ...ian km Kannada kn Kashmiri ks Kurdish ku Kirghiz ky Latin la Lingala ln Laothian lo Lithuanian lt Latvian lv Malagasy mg Maori mi Macedonian mk Malayalam ml Mongolian mn Moldavian mo Marathi mr Malay ms Maltese mt Burmese my Nauru na Nepali ne Norwegian no Occitan oc Oromo om Oriya or Panjabi pa Polish pl Pashto Pushto ps Portuguese pt Quechua qu Rhaeto Romance rm 0809 0818 0821 0825 0901 0905 091...

Page 56: ...on When making changes in the Setup screen menus is displayed There is a Super VCD Video CD or CD loaded in the player and the setting that was changed only applies to DVD performance The setting will be effective the next time a DVD is loaded Settings are canceled When the power is turned off by power failure by switching the power off or by unplugging the power cord settings will be canceled Bef...

Page 57: ...audio recorded on the disc is not output properly Adjust the Audio Out settings according to the connection used If the audio is switched to 2 when playing a Super VCD that contains only one stereo soundtrack there may be no sound at all To restore the sound return the AUDIO switch back to its original position page 38 Digital output is not possible for audio There is no digital output during Kara...

Page 58: ...olby Digital discs this unit s digital output jack either coaxial or optical must be connected to the digital input jack of an AV amplifier with Dolby Digital decoding capability or to a Dolby Digital decoder DTS DTS stands for Digital Theater System DTS is a surround system different from Dolby Digital that has become a popular surround sound format for movies as well as CDs In order to enjoy the...

Page 59: ...uilt in to DVD players and DVD discs for each sales region If the regional code of the DVD player does not match one of the regional codes of the DVD disc playback is not possible The region number can be found on the rear panel of the DVD player The illustration below shows the regions and corresponding region numbers Sampling Frequency When a sound wave is converted to a digital signal the sound...

Page 60: ...igital output Optical digital jack Coaxial digital output RCA jack Other terminals CONTROL IN Minijack 3 5 ø Accessories Remote control unit 1 AA R6P dry cell batteries 2 Audio cord 1 Video cord 1 Power cord 1 Operating Instructions 1 Note The specifications and design of this product are subject to change without notice due to improvement Printed in Japan VRB1232 A 99G00JF0D00 Published by Pionee...

Reviews: