21
1
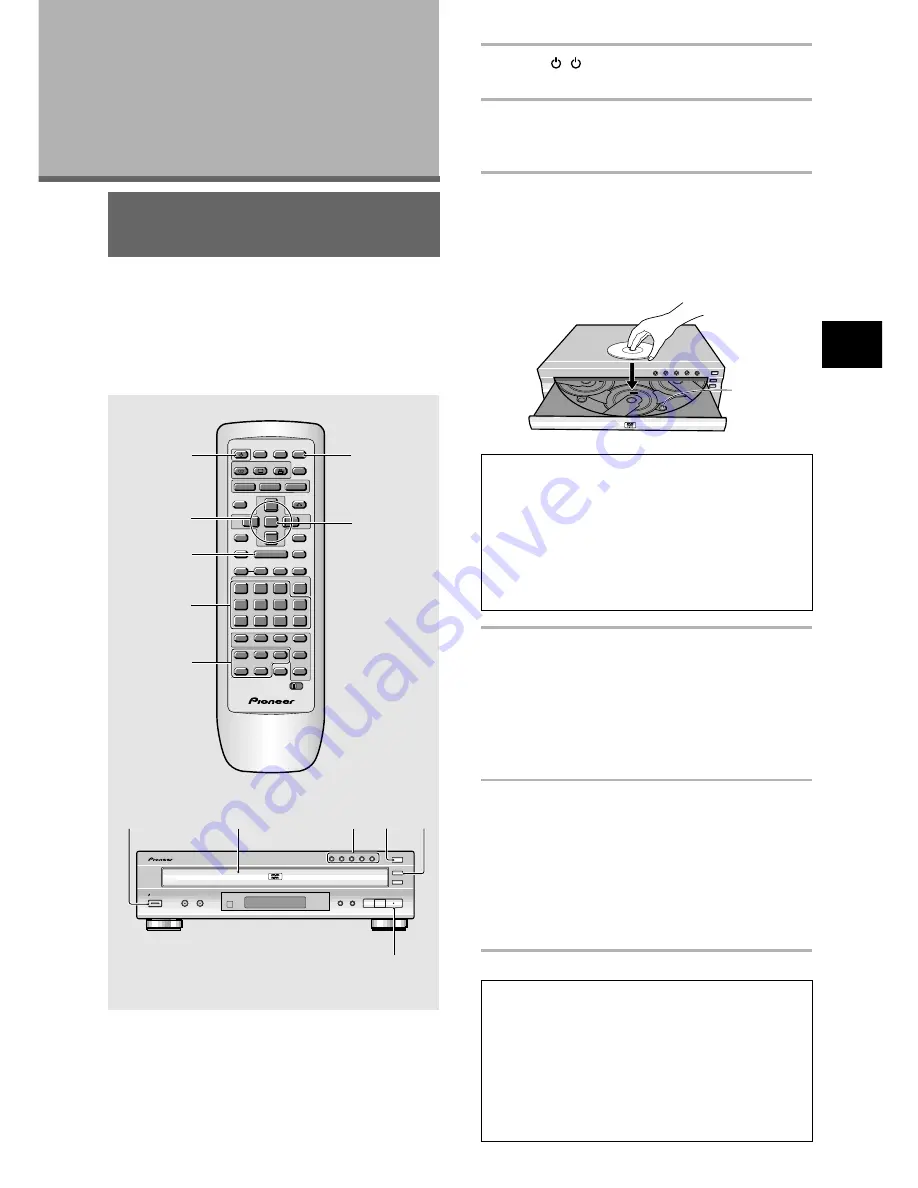
Press ( STANDBY/ON on the front
panel) to turn on the player.
2
Press OPEN/CLOSE
0
(
0
OPEN/CLOSE on
the front panel).
The disc tray comes out.
3
Load a disc.
• Load a disc with the label side facing up, using
the disc tray guide to align the disc.
• If you want to load more discs, press
DISC SKIP
to rotate the disc tray. You can load up to five
discs at once.
Notes
• Do not place discs in the two partially accessible disc
spaces, as it easy to misalign them. Use only the front-
most space.
• When using the
DISC SKIP
button, wait until the disc tray
has come to a complete stop before loading a disc; the
player may malfunction if a disc is caught in the disc tray
mechanism.
• Do not rotate the disc tray by hand. Always use the
DISC
SKIP
button.
4
Press PLAY
3
(
3
on the front panel).
• The disc located in the front of the disc table is
played.
• Press one of the
DISC
buttons (1 through 5) to
begin playback of the selected disc.
•
Depending on the disc, a menu may be
displayed. If a menu is displayed, proceed to
step 5.
5
Select the item you want to view.
•
When a DVD is loaded:
Use the
cursor buttons
(
2
/
3
/
5
/
∞
) to select the
item, then press
ENTER
. You may also be able to
use the number buttons for direct selection
(Depending on the disc, you may not be able to
use the
number buttons
).
•
When a Video CD is loaded:
Use the
number buttons
to select the item.
Notes
• Noise maybe output if you make digital audio connections
to a receiver or amplifier that does not have a built-in
decoder. Check that the digital audio output format
selected in the
Audio 1
menu corresponds to the audio
components you have made connections to (
page 28-29
).
• The TV screen size is factory set to present the wide
screen format (16:9 aspect ratio). If you have a standard TV
screen (4:3 aspect ratio), this setting can be changed to
match your TV screen size in the
Video
menu (
page 30
).
Getting Started
Using Your DVD
Player
Playing DVDs, Video CDs and
CDs
– DVD/Video CD/CD
Before you can start to enjoy the digital audio and video
on DVDs, be sure that you have either performed the
Setup Navigator procedure described in the previous
section or made the necessary settings in the Setup
screen menus as outlined in the next section to set up
the player to correspond to your home system. Having
made these settings, you are now ready to start using
the player to enjoy DVDs, Video CDs, and CDs.
Disc number
SETTING UP THE PLA
YER/
GETTING ST
ARTED USING YOUR DVD PLA
YER
1
5
4
2
5
A-B
DISC
0
TOP MENU
MENU
STOP
STEP/SLOW
ENTER
5
5
5
5
4
¢
1
8
7
e
E
¡
3
REV
FWD
PREV
NEXT
RETURN
VNR
CLEAR
C
1
2
3
4
5
6
7
8
9
0
+
10
SETUP
OPEN/
CLOSE
AUDIO
SUBTITLE
ANGLE
PLAY
PAUSE
PROGRAM
REPEAT
RANDOM
Î
SEARCH MODE
A-B
CHANNEL
VOLUME
DISC
1
4
2
5
3
TV
FUNC
TV
CD
CD MODE
Vol –
Vol +
CH –
CH +
CONDITION
MEMORY
LAST
MEMORY
LAST
COND.
DISPLAY
DISP
DVD
TV
5
4
1
3
4
2
DVD PLAYER
STANDBY/ON
CD MODE
VNR
4
1
¡
¢
7
3
8
DISC SKIP
0
OPEN/CLOSE
EXCHANGE
DISC
1
2
3
4
5
3
4


