background image

31

En

English

ADJUSTING AUDIO AND VIDEO SETTINGS

Viewing from a Desired
Camera Angle (Multi-Angle)

– DVD

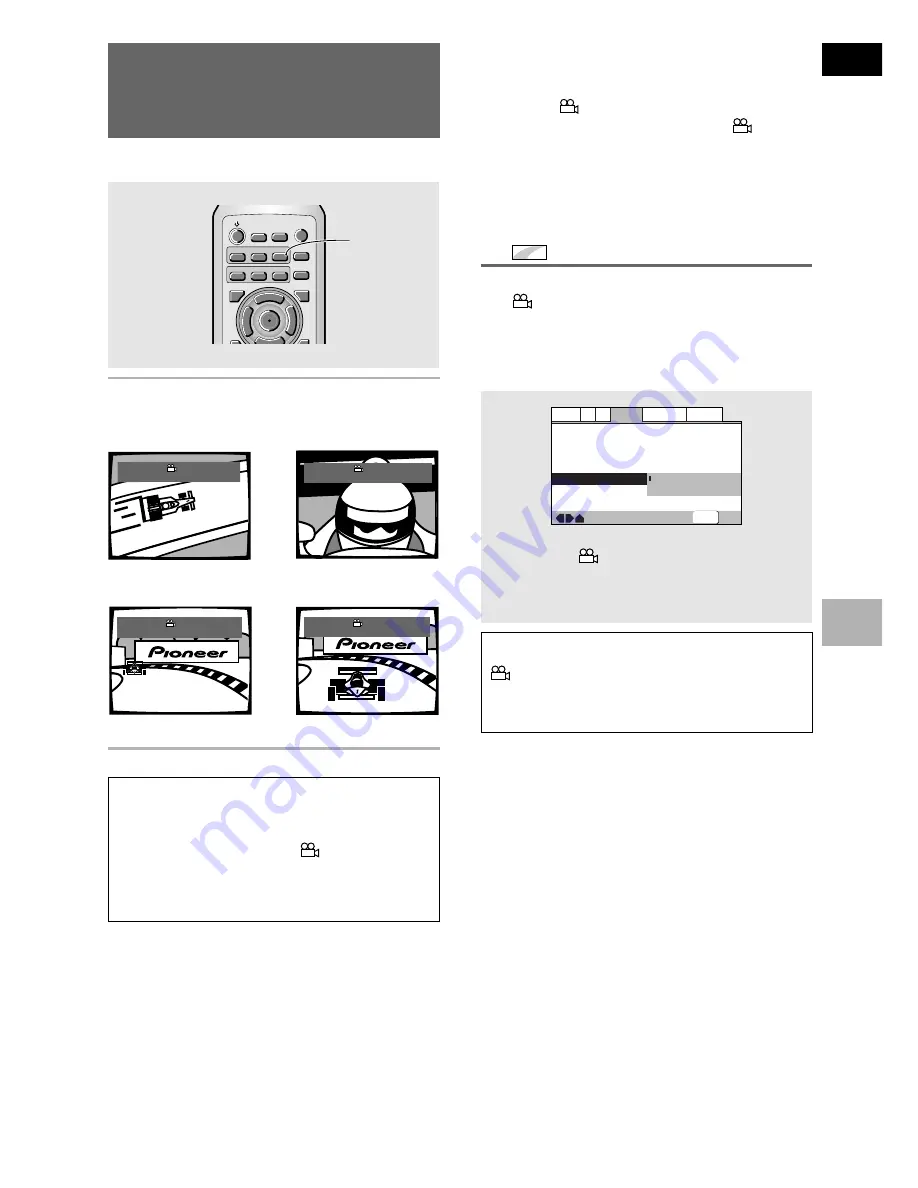
You can select a camera angle when viewing DVDs with
the multi-angle option.

Press ANGLE during playback.

The camera angle changes each time you press the
button.

To check whether or not a disc is recorded
with angles

The jacket of discs that are recorded with angles will be

marked with 

. When locations on discs that are

recorded with angles are played back, the 

 indicator

can be displayed.
To cancel the angle mark, set 

[Angle Indicator]

 to

[Off]

 in the Setup screen 

Video 2

 menu described in

the section below.

Turning the angle indicator on and
off 

Expert

When a picture recorded in different angles is played

back 

 is displayed on the screen. This setting lets

you see clearly whether the playback picture is
recorded in multiple angles or not.
Turn the angle indicator on or off in the 

[Angle

Indicator]

 setting in the Setup screen 

Video 2 

menu in

the 

[Expert]

 menu mode (

page 23

).

Note

Even when the 

[Angle Indicator]

 setting is set to 

[Off]

, the

 indicator in the display panel of the player lights during

multi-angle playback. Therefore, it is possible to know when
the multi-angle function can be used without having to
display the icon on the screen.

— 
— 
—  

Video2

A2

Language General

Audio1

V1

Exit

Move

Background

Video Adjust

Still Picture

On Screen Display

Angle Indicator

Pioneer Logo

Auto
Position-Normal
On
Off

SETUP

Settings:

On*

 (

 is displayed)

Off

 (Not Displayed)

*Factory setting

\

«

»

|

Angle          : 1/4

Angle          : 2/4

Angle          : 3/4

Angle          : 4/4

Notes

• You can use the Multi-Angle function only with discs

featuring recordings of images shot from different camera
angles.

• During Multi-Angle playback, the 

 indicator in the

display lights.

• For some discs, selection can be made using the DVD

menu. In this case, press 

MENU

 to display the DVD menu

screen and then make your selection.

 NEXT

¢

 PREV

4

RETURN

REPEAT

CONDITION

MEMORY

LAST

MEMORY

ANGLE

SUB TITLE

AUDIO

SETUP

MENU

TOP MENU

DISPLAY

5

3

2

OPEN/
CLOSE

REPEAT

A-B

5

5

5

EN

TER

ANGLE

Summary of Contents for DV-444-K

Page 1: ...DV 444 K DV 444 S Operating Instructions Istruzioni per l uso DVD PLAYER LETTORE PER DVD ...

Page 2: ...table cloths curtains etc Also do not put the appara tus on the thick carpet bed sofa or fabric having a thick pile H040 En Operating Environment Operating environment temperature and humidity 5ºC 35ºC 41ºF 95ºF less than 85 RH cooling vents not blocked Do not install in the following locations Location exposed to direct sunlight or strong artifi cial light Location exposed to high humidity or poo...

Page 3: ...tti come giornali tovaglie tende ecc Inoltre non posizionare l apparecchio su tappetti spessi letti divani o mobili aventi una spessa imbottitura H040 It Condizioni ambientali di funzionamento Umidità e temperatura di funzionamento 5ºC 35ºC 41ºF 95ºF inferiore a 85 RH feritoie di raffreddamento non ostruite Non posizionare nei seguenti luoghi luoghi esposti alla luce diretta del sole o a forti sor...

Page 4: ...g more than 250 folders or tracks will play but only the first 250 folders tracks Caution CD R RW discs recorded using a personal computer or a CD recorder may not play if the disc is damaged or dirty or if there is dirt or condensation on the player s lens If you record a disc using a personal computer even if it is recorded in a compatible format there are cases in which it may not play because ...

Page 5: ...igital 5 1CH Audio 2 Spanish HELLO HOLA Dolby Digital 5 1CH Angle 2 4 Angle 3 4 24 bit 192kHz compatible DAC delivers higher than CD quality audio The DAC used to convert digital audio to analog in this player is fully 24 bit 192kHz compatible Multiple video output formats that can be selected to best suit your TV or monitor This player features composite S video jacks and AV CONNECTOR RGB TV jack...

Page 6: ...e The Setup screen menus described in the section starting on page 22 are also used in a number of other functions Learning the procedure for operating these menus will make using this player much easier and more enjoyable Play a disc When all the connections and setups have been made you are ready to play a DVD Video CD CD or MP3 with the player The section Getting Started Using Your DVD Player s...

Page 7: ...ereo Speakers 26 Setting the TV Screen Size 27 Setting the Video Output Format for the AV CONNECTOR RGB TV 28 Switching the S Video Output 28 Selecting the Type of Paused Image to Display 28 Setting the Position of the On screen Display 28 Adjusting the Video Quality 29 Viewing from a Desired Camera Angle Multi Angle 31 Setting the Language Options 32 Setting the On screen Display OSD Language 32 ...

Page 8: ...W E NEXT PREV 4 RETURN REPEAT CONDITION MEMORY LAST MEMORY ANGLE SUB TITLE AUDIO SETUP MENU TOP MENU DISPLAY 5 3 2 Î OPEN CLOSE REPEAT A B 5 5 5 5 E N T E R 30 30 7m Notes Do not mix old and new batteries When replacing batteries use all new batteries When not using the remote control for a long period of time over 1 month remove the batteries to avoid possible damage from battery corrosion If bat...

Page 9: ... chapters tracks Press and hold to perform reverse playback scanning pages 20 7 forward button Press to advance to chapters tracks Press and hold to perform fast forward scanning page 20 8 7 stop button Press to stop playback Pressing once enables playback to resume from a point shortly before the location where it stopped Pressing twice causes the disc to return to the beginning of the disc if pl...

Page 10: ...s recorded in memory for the currently loaded DVD or Video CD page 46 TRK GUI DTS D CHP LAST TITLE COND TOT AL REMAIN 2 1 2 3 4 5 6 7 8 9 0 9 COND indicator Indicates that Condition Memory settings are memorized for the currently loaded DVD page 47 0 TOTAL indicator Indicates that the disc in the player is stopped and DISPLAY has been pressed page 52 REMAIN indicator Indicates that the remaining p...

Page 11: ...13 4 AC IN power cord connection terminal Use to connect the power cord to the wall outlet page 12 5 S VIDEO OUT jack If your TV or monitor has an S video input clear picture reproduction is possible by connecting the player to your TV or monitor via the S Video jack page 14 You can switch between S1 and S2 S video output from the Setup menu page 28 6 VIDEO OUT jack Connect to the video input on a...

Page 12: ...programmed on a DVD pages 32 33 For Video CD CD and MP3 each press changes the audio output as follows 4 SUBTITLE button Press repeatedly to select one of the subtitle languages programmed on a DVD or to turn the subtitles off page 34 5 SETUP button Press when the player is in either play or stop mode to open and close the Setup screen pages 16 22 6 MENU button Use to display or close the DVD menu...

Page 13: ...perform direct title and chapter track searches and to input numerical values RANDOM button Press to play titles chapters tracks in random order page 41 PROGRAM button You can program titles chapters or tracks to play back in a desired order Programs can be a maximum of 24 steps Additionally DVD programs for up to 24 discs can be stored in the player s memory for future use pages 42 45 CONDITION M...

Page 14: ...hen changing connections check that the unit is off by pressing STANDBY ON and unplug the power cord from the power outlet The video output on this player uses copy protect circuitry to prevent the video playback on DVDs from being copied If you connect the player to a TV via a VCR or record and play back the contents of a disc with a VCR the playback picture may not be normal Connecting Your DVD ...

Page 15: ...l is transmitted as light pulses through a fiber optic cable Use to connect to an AV amplifier or receiver with built in Dolby Digital DTS or MPEG decoder Use a fiber optic cable not supplied to connect the DIGITAL OUT OPTICAL digital optical output on the player to the digital optical input on an AV amplifier or receiver DIGITAL OUT COAXIAL The digital signal is transmitted electronically through...

Page 16: ...s though it were a component in a system system control If you connect for system control you cannot operate the player directly Point the remote control unit at the component AV amplifier etc connected to the CONTROL OUT jack to operate When controlling as a system be sure to make a connection to the amplifier using an audio or video cord even when using only digital components For details refer ...

Page 17: ...ault setting of this player is AUTO and unless you notice that the picture is distorted when playing some discs you should leave it set to AUTO If you experience picture distortion with some discs set the TV system to match your country or region s system Doing this however may restrict the kinds of disc you can watch The table below shows what kinds of disc are compatible with each setting AUTO P...

Page 18: ...xit the Setup Navigator Press SETUP while on any of the screens to exit the Setup Navigator Please note that if the Setup Navigator is exited before all the questions are answered no settings are changed General A2 V2 Language Audio1 Video1 Exit Move Select Setup using the Setup Navigator Setup Navigator Setup Navigator Start Auto Start Off SETUP ENTER Settings English français Deutsch Italiano Es...

Page 19: ...onnection Dolby Digital Dolby Digital DTS Dolby Digital MPEG Dolby D DTS MPEG PCM Not Connected SETUP ENTER Settings No Select if the connected AV component cannot process an audio signal with a sampling rate of 96 kHz Yes Select if the connected AV component can process an audio signal with a sampling rate of 96 kHz Don t Know Select if you are uncertain whether the connected AV component can pro...

Page 20: ...h the cursor buttons 2 3 5 or the number buttons then press ENTER When a Video CD is loaded Use the number buttons to select the item Notes Noise is output if you make digital audio connections to a receiver or amplifier that does not have a built in decoder Check that the digital audio output format selected in the Audio 1 menu corresponds to the audio components you have made connections to page...

Page 21: ...during DVD playback or RETURN during Video CD playback displays the menu screen Refer to the DVD or Video CD disc jacket and accompanying documentation for more information To play Video CDs without displaying menu screens Video CDs with Playback Control PBC display a menu screen when play is started It is possible however to play back Video CDs without displaying menu screens When a Video CD with...

Page 22: ... on screen blinking release the button to resume normal playback Variable speed scanning 1 Press but don t hold FWD or REV 1 during playback to start scanning 1 or 1 1 appears on screen 2 Depending on the type of disc playing you can increase the scanning speed by pressing FWD or REV 1 The scan speed is shown on screen DVD discs have three scanning speeds 1 2 and 3 CD and Video CDs have two scanni...

Page 23: ...he resume position Notes The actual restart position may be slightly before or after the resume position If you want to remove the disc but still want to resume playback from the last stopped position use the LAST MEMORY feature instead page 46 Stopping Playback and Switching Power Off DVD Video CD CD MP3 1 Press STOP 7 7 on the front panel Playback stops 2 Press OPEN CLOSE 0 on the front panel Th...

Page 24: ...ing 4 Use the cursor buttons to enter the menu The top item within the menu becomes highlighted 5 Use the cursor buttons 5 to select the setting you want to change The options available for each setting appear to the right when the setting is selected The current setting appears with the setting indicator lit 6 Use the cursor buttons 3 to enter the setting options Not all menu options can be chang...

Page 25: ...t time How to interpret the setting indicator colors in the Setup screen menus When setting up the system or when making adjustments it is convenient to know what settings are applicable to the different disc formats When the settings appear for each menu option the currently selected setting appears with the setting indicator highlighted in one of three colors blue green or yellow These colors co...

Page 26: ...r with a Dolby Pro Logic decoder or a Digital Analog Converter DAC Settings Dolby Digital Dolby Digital 3 PCM Factory setting V2 Video1 General A2 Language Exit Move Audio DRC Dolby Digital Out DTS Out 96kHz PCM Out MPEG Out Audio1 Off Dolby Digital Dolby Digital 3 PCM 96kHz 3 48kHz MPEG 3 PCM Change Dolby Digital output mode SETUP Adjusting the Dynamic Range of the Audio Soundtrack DVD Audio DRC ...

Page 27: ... kHz If you have made connections to a component capable of processing this signal rate select 96 kHz for the signal to be output as is As some components are incapable of processing digital signal input with sampling rates of 96 kHz selecting 96 kHz 3 48 kHz compresses the signal to a standard signal with a sampling rate of 48 kHz Settings Off DTS Factory setting Note If you have made digital aud...

Page 28: ...r during CD or MP3 playback The digital audio output level is reduced when playing 2 channel Dolby Digital DVDs or Video CDs with TruSurround selected If you play a multichannel Dolby Digital DVD with Dolby Digital to PCM conversion see page 24 and TruSurround selected there is no digital output How good the surround effect is varies with the disc Audio2 Video1 Language General A1 V2 Exit Move Vir...

Page 29: ...n be switched or not depends on the disc Please refer to the information written on the disc jacket etc Some discs may not include the screen format selected in the TV Screen setting When this occurs the standard TV screen format available on the disc is automatically selected Differences in screen sizes and DVD formats The number of screen size formats currently available can be somewhat confusin...

Page 30: ... see operation indicators clearly even on a wide screen TV Alternatively you can choose to turn them off completely with the Off setting Make changes in the On Screen Display in the Setup screen Video 2 menu in the Expert menu mode page 23 Note This setting is only effective with DVDs that contain a 4 3 aspect ratio video presentation Settings Position Wide Position Normal Off Factory setting Vide...

Page 31: ...tup 2 Press ENTER Standard Presents the video with no effect added Cinema Delivers a cinema like picture Animation Provides images with bright clear colors Memory1 Memory2 and Memory3 These are user programmable settings See Adjusting the picture quality settings on page 30 for more information Factory Setting 3 Use the cursor buttons 2 3 5 to select one of the preprogrammed picture quality settin...

Page 32: ... cursor button to select Video Setup and press ENTER 3 Press DISPLAY DISPLAY ENTER Fine Focus On Off Move Select Check Video Memory Select Video Setup 4 Use the cursor buttons 5 to select the setting to adjust You can adjust any or all of the following picture quality factors Fine Focus Switch on to reveal greater detail higher resolution in the picture Contrast Adjusts the contrast of the element...

Page 33: ...icator setting in the Setup screen Video 2 menu in the Expert menu mode page 23 Note Even when the Angle Indicator setting is set to Off the indicator in the display panel of the player lights during multi angle playback Therefore it is possible to know when the multi angle function can be used without having to display the icon on the screen Video2 A2 Language General Audio1 V1 Exit Move Backgrou...

Page 34: ...yed it is not necessary to adjust this setting Changing the Audio Language Multi Language Function DVD Dolby Digital PCM and other audio data can be recorded on DVDs in a number of languages or audio tracks letting you choose the desired language or audio Press AUDIO repeatedly to select the desired language Pressing AUDIO once displays the currently selected language Subsequent presses rotates th...

Page 35: ... during playback by pressing AUDIO the language selected at this setting will be selected as the default when the DVD is changed Make changes to the Audio Language setting in the Setup screen Language menu You cannot make this setting with a disc playing Settings English French German Italian Spanish Other For details on how to select other languages see When Other is selected on page 35 Factory s...

Page 36: ...once displays the currently selected subtitle language Subsequent presses rotates through the subtitle languages available on the DVD Notes The subtitle language cannot be switched if the subtitle language is not recorded or if only one language is recorded Switching the subtitle language may not be possible with some discs In this case the mark will be displayed To clear subtitles during playback...

Page 37: ...creen appears 2 Use the cursor buttons 2 3 to select either List of Languages or Code 3 If you select List of Languages use the cursor buttons 5 to select the language For languages which are only shown as a code please refer to Language Code List on page 55 C EAR 3 2 1 1REV FWD PLAY 3 PAUSE 8 STOP 7 eSTEP SLOWE NEXT PREV 4 RETURN REPEAT ANGLE SUB TITLE AUDIO SETUP MENU TOP MENU DISPLAY 5 3 2 REPE...

Page 38: ...st subtitles that provide additional explanations of scenes in addition to the standard subtitles for viewers who are hard of hearing Select Assist Subtitle to display these subtitles on DVDs where this function is offered Make changes to the Subtitle Display setting in the Setup screen Language menu in the Expert menu mode page 23 You cannot make this setting with a disc playing Notes If there is...

Page 39: ...AR 3 2 1 1REV FWD PLAY 3 PAUSE 8 STOP 7 eSTEP SLOWE NEXT PREV 4 RETURN REPEAT CONDITION MEMORY LAST MEMORY ANGLE SUB TITLE AUDIO SETUP MENU TOP MENU DISPLAY 5 3 2 Î OPEN CLOSE REPEAT A B 5 5 5 5 ENTER PLAY 3 PAUSE 8 STEP SLOW e E 3 1 16 3 1 8 1 2 2 1 4 2 There are two reverse slow motion play speeds Slow 1 Ô Slow 2 To return to normal playback When viewing slow playback pressing PLAY 3 restores no...

Page 40: ...87 press 8 and 7 When performing a time search To select 21 minutes 43 seconds press 2 1 4 and 3 To select 1 hour 14 minutes press 7 4 0 and 0 3 Press PLAY 3 Playback of the selected title folder chapter or track starts When a time search is performed playback begins at the appointed time Notes For some discs selection can be made using the top menu on the DVD In this case press TOP MENU to displa...

Page 41: ... 3 4 FOLDER 4 5 FOLDER 5 6 FOLDER 6 MENU ENTER Total number of Track Total number of Folder On the right side is a list of MP3 tracks from the first title in the list Navigate using the following controls Cursor buttons 2 3 Select folder and tracks from the current screen Cursor buttons 5 Select the previous next of folders and tracks To move rapidly up or down a long list of folders or tracks pre...

Page 42: ...m A B repeat within the same title chapter or track To cancel A B repeat play Press CLEAR Playback continues but the repeat function is canceled Return to a specified location on a disc DVD Video CD CD 1 Press REPEAT A B at the desired location 2 When you want to return to the specified location press PLAY 3 To clear the specified location Press CLEAR to cancel repeat play or to clear the specifie...

Page 43: ...s CLEAR This returns you to normal playback of chapters tracks in order from the chapter track currently playing Notes With Video CDs random play is not possible during playback when the menu is displayed PBC playback To perform random play start playback without displaying a menu by pressing a track number button while in the stop mode and then press RANDOM Random play of programmed chapters trac...

Page 44: ...to be placed after the new number and then press the number button s of the number to be inserted The new number is inserted before the previously selected number To stop program play Press STOP 7 Notes When programming chapters chapters not programmed may appear on the screen This is not a malfunction Programming may not be possible with certain DVD discs On these types of discs the mark will app...

Page 45: ...o exit the program screen To delete a program 1 Press PROGRAM 2 Select the program with the cursor buttons 2 3 then press CLEAR 3 Press PROGRAM to exit the program screen Notes The complete program will be deleted even if the disc tray is open or power off standby Pressing CLEAR when the disc is stopped will clear all programs Programming Video CDs CDs A program with a maximum of 24 steps can be m...

Page 46: ... PREV RETURN REPEAT CONDITION MEMORY LAST MEMORY ANGLE SUB TITLE AUDIO SETUP MENU TOP MENU DISPLAY 5 3 2 Î OPEN CLOSE REPEAT A B 5 5 5 5 ENTER 4 1 2 3 Cursor buttons CLEAR ENTER ENTER PROGRAM MP3 Program Exit Play Move Folder 001 25 Total number of folder and track Folder name Track name 3 Use the number buttons to enter a three digit track number The number of tracks in the current folder is disp...

Page 47: ...our program and recall it the next time you use the same DVD When the program memory exceeds 24 programs will be erased in chronological order from the oldest program in memory 1 Use the cursor button to highlight Program Memory and use the cursor button 3 to select On 2 Press ENTER The program is saved in memory Note When a DVD with a program stored in memory is loaded program playback may start ...

Page 48: ... that has a Last Memory point memorized Some DVDs will start playback automatically when loaded In this case press STOP 7 to stop playback 2 Press LAST MEMORY while in the stop mode The disc begins playback at the memorized point Last Memory mode may not function for some DVDs You can use Last Memory for up to five discs after that the one used least recently is deleted to make space for a new one...

Page 49: ...0 9 8 7 10 6 5 4 CLEAR 3 2 1 1REV FWD PLAY 3 PAUSE 8 STOP 7 eSTEP SLOWE NEXT PREV 4 RETURN REPEAT CONDITION MEMORY LAST MEMORY ANGLE SUB TITLE AUDIO SETUP MENU TOP MENU DISPLAY 5 3 2 Î OPEN CLOSE REPEAT A B 5 5 5 5 ENTER CONDITION MEMORY When a disc that has memorized settings is loaded Condition Memory will appear on the screen and the previously memorized settings will be selected Erasing the re...

Page 50: ...sword Level Country Code Setup viewing restrictions SETUP Entering the Password When you select either Level or Country Code it is necessary to register the password 4 digit code number You ll be asked to confirm your existing password before registering a new one Use the following steps at any time you are asked to enter or confirm your password 1 Select Password in the Parental Lock setting and ...

Page 51: ...t 1 Select Password Change in the Parental Lock setting and press ENTER The screen changes to the password input screen To enter the password refer to Entering the Password on the previous page 2 Use the cursor buttons 2 3 5 or the number buttons to enter the new password 3 When the new password has been entered press ENTER The new password is set and the screen returns to the General menu screen ...

Page 52: ...on All program memory saved settings from functions such as Video Memory Last Memory and Condition Memory are cleared TV System is reset to AUTO and all Setup screen menus are returned to factory settings Audio1 Video1 Language General A2 V2 Exit Move TV Screen Video Out S Video Out Screen Saver 16 9 Wide Video S2 On Off SETUP SETUP Video2 A2 Language General Audio1 V1 Exit Move Background Video A...

Page 53: ... format and type of disc being used not all screens may be displayed When playing Video CDs in PBC mode or unfinalized CD Rs not all the above information is displayed Play Chapter 3 32 54 53 1 51 0 21 Play Chapter 3 32 54 53 1 51 1 30 Play Tr Rate 3 32 54 53 6 3 Play Title 3 29 49 58 101 04 51 06 current title chapter number elapsed time of current title remaining time of current title remaining ...

Page 54: ...ack 1 9 1 11 1 3 1 22 1 15 1 2 Information MP3 DISPLAY MP3 CD Track 3 0 03 3 32 3 29 Play All 1 10 1 13 66 32 66 20 remaining total time of current tracks current track number Display off CD s total time elapsed time of current track current track number current total time of tracks remaining time of current track CD s remaining time Play Track 1 7 0 07 TRACK1 1 Play Folder 2 3 0 07 FOLDER 1 Play ...

Page 55: ...hen press STANDBY ON and switch the power to standby Check that the OFF indication on the display goes off then disconnect the power cord Moving this unit with the disc loaded may result in damage to this unit Installation Select a stable place to the side of a TV set or stereo system to be connected to the unit When using the unit with a stereo system install the speakers a little bit away from t...

Page 56: ...o standby Power cord caution Handle the power cord by the plug Do not pull out the plug by tugging the cord and never touch the power cord when your hands are wet as this could cause a short circuit or electric shock Do not place the unit a piece of furniture etc on the power cord or pinch the cord Never make a knot in the cord or tie it with other cords The power cords should be routed in such a ...

Page 57: ...akh kk Greenlandic kl Cambodian km Kannada kn Kashmiri ks Kurdish ku Kirghiz ky Latin la Lingala ln Laothian lo Lithuanian lt Latvian lv Malagasy mg Maori mi Macedonian mk Malayalam ml Mongolian mn Moldavian mo Marathi mr Malay ms Maltese mt Burmese my Nauru na Nepali ne Norwegian no Occitan oc Oromo om Oriya or Panjabi pa Polish pl Pashto Pushto ps Quechua qu 0721 0801 0809 0818 0821 0825 0901 09...

Page 58: ...nus is displayed There is a Video CD CD or MP3 loaded in the player and the setting that was changed only applies to DVD performance The setting will be effective the next time a DVD is loaded Settings are canceled When the power is turned off by power failure or by unplugging the power cord settings will be canceled Before unplugging the power cord press STANDBY ON and check that OFF disappears i...

Page 59: ...er or a DTS decoder From the disc menu screen or using the AUDIO button select a non DTS setting pages 19 32 If this unit is connected to a non DTS compaible amplifier or decoder using a digital audio cable set DTS Out to Off in the Setup menu If you do not do this noise will be output if you try and play a DTS disc page 25 If this unit is connected to a DTS compatible amplifier or decoder using a...

Page 60: ...ins two or more sessions Each session is a complete recording process so each session is read as a complete disc 1 Dolby Digital Using a maximum of 5 1 channels of audio this high quality surround system is used in many of the finer movie theaters around the world DTS DTS stands for Digital Theater System DTS is a surround system different from Dolby Digital that has become a popular surround soun...

Page 61: ...onverts Dolby Digital and MPEG digital bitstreams into PCM to enable you to listen to quality digital sound even without a special decoder Playback Control PBC This refers to signals recorded on a Video CD Version 2 0 enabling playback control You can use menus recorded on discs with PBC for easy interactive search for desired scenes and playback You can also enjoy viewing high resolution standard...

Page 62: ...udio 1 L out 15 R or C out 4 GND 17 GND 7 B out 19 Video out or Y out 8 Status 21 GND Audio output Output level During audio output 200 mVrms 1 kHz 20 dB Number of channels 2 Jacks RCA jacks Digital audio characteristics Frequency response 4 Hz to 44 kHz DVD fs 96 kHz S N ratio 118 dB Dynamic range 103 dB Total harmonic distortion 0 0016 Wow and flutter Limit of measurement 0 001 W PEAK or lower D...

Page 63: ...61 En ADDITIONAL INFORMATION English ...

Page 64: ...enza l estensione mp3 Questo sistema può riconoscere al massimo 250 cartelle e 250 brani Con dischi che ne contengono di più vengono riprodotti solo i primi 250 Attenzione I dischi CD R RW registrati usando un personal computer o un registratore CD possono non venire riprodotti correttamente se sono danneggiati o sporchi oppure se c è sporco o condensa sulla lente del lettore Se si registra un dis...

Page 65: ... della SRS Labs Inc TruSurround è utilizzata sotto licenza della SRS Labs Inc Convertitore DA 24 bit 192 kHz compatibile che produce suoni di qualità superiore a quella dei CD Il convertitore DA usato per convertire segnale audio digitale in segnale analogico è del tutto compatibile col formato a 24 bit 192 kHz Più formati di uscita video selezionabili a seconda del televisore o monitor posseduto ...

Page 66: ...ete non solo semplificare l uso del lettore ma renderlo anche più proficuo Riprodurre un disco Quando tutti i collegamenti e impostazioni sono terminati siete pronti per la riproduzione di DVD Video CD CD o MP3 con quest apparecchio La sezione Per iniziare ad usare il lettore DVD che inizia a pagina 18 descrive per sommi capi le funzioni del lettore Godetevi le numerose funzioni del vostro lettore...

Page 67: ...azione delle dimensioni del televisore 27 Impostazione del formato di uscita del segnale per il connettore AV CONNECTOR RGB TV 28 Commutazione dell ingresso S Video 28 Scelta del tipo di immagine ferma da visualizzare 28 Impostazione della posizione delle indicazioni OSD 28 Regolazione della qualità video 29 Visione da un angolazione desiderata funzione angolazioni multiple 31 Impostazione delle o...

Page 68: ... comandi impartiti Se la presa CONTROL IN del pannello posteriore del telecomando viene collegata alla presa CONTROL OUT di un altro componente per controllare il lettore per DVD si deve puntare il telecomando sul sensore dell altro componente L operazione col telecomando può risultare impossibile se questo viene puntato sul sensore del lettore per DVD pagina 14 RANDOM PROGRAM SEARCH MODE 0 9 8 7 ...

Page 69: ...emuto per eseguire la scansione ad alta velocità all indietro pagina 20 7 Pulsante di avanzamento rapido Premerlo per avanzare di un capitolo o brano Mantenerlo premuto per eseguire la scansione ad alta velocità in avanti pagina 20 8 Pulsante di arresto 7 Premerlo per far cessare la riproduzione Premerlo una volta per poter riprendere la riproduzione dal punto di interruzione Premendolo due volte ...

Page 70: ...o CD al momento in uso sono stati registrati in memoria pagina 46 9 Indicatore COND Indica che le impostazioni Condition Memory del disco DVD attualmente in uso sono state memorizzate pagina 47 0 Indicatore TOTAL Indica che il disco nel lettore è fermo e che DISPLAY è stato premuto pagina 52 Indicatore REMAIN Indica che il tempo di riproduzione rimanente di un titolo o capitolo brano è al momento ...

Page 71: ...mento dei cavi di alimentazione AC IN Usarli per collegare il cavo di alimentazione diretto ad una presa a muro pagina 12 5 Presa S VIDEO OUT Se il vostro televisore o monitor possiede un ingresso S Video una riproduzione video chiara è possibile collegando un lettore al proprio televisore o monitor attraverso la presa S Video pagine 14 Si può passare dall uscita S Video S1 a quella S2 servendosi ...

Page 72: ... disattivare i sottotitoli stessi pagina 34 5 Pulsante SETUP Premere questo pulsante quando il lettore si trova nel modo di riproduzione o è fermo per aprire e chiudere la schermata Setup pagine 16 e 22 6 Pulsante MENU Usare questo pulsante per visualizzare il menu del DVD o la schermata di MP3 Navigator pagina 19 7 Pulsante DISPLAY Premere questo pulsante durante la riproduzione per visualizzare ...

Page 73: ...azioni Premere il pulsante ANGLE più volte per visualizzare ciascuna differente angolazione pagina 31 Pulsante REPEAT Usare questo pulsante per impostare la modalità di ripetizione pagina 40 Pulsante REPEAT A B Premere questo pulsante all inizio ed alla fine di un passaggio del disco che si vuole ripetere o per contrassegnare una posizione cui si desidera poter tornare pagina 40 Pulsante TOP MENU ...

Page 74: ...uest unità sia spenta premendo il pulsante STANDBY ON e scollegare poi il cavo di alimentazione dalla presa Le uscite video analogiche di questo lettore usano circuiti di protezione dei diritti d autore che impediscono la duplicazione di DVD Se si collega il lettore ad un televisore attraverso un videoregistratore o si registra e riproduce il contenuto di un disco con un videoregistratore la ripro...

Page 75: ...vitore AV COLLEGAMENTI Collegamento analogico audio Collegare le uscite audio analogiche agli ingressi di un amplificatore o sintoamplificatore stereo I collegamenti audio analogici possono venire fatti anche con un televisore o monitor dotato di ingressi stereo Usare il cavo audio in dotazione per collegare le uscite AUDIO OUT del lettore all ingresso audio dell amplificatore o sintoamplificatore...

Page 76: ...comando del sistema Servirsi di un cavo a mini spinotto da 3 5 mm di diametro senza resistenza del tipo comunemente in commercio per collegare la presa CONTROL IN alla presa CONTROL OUT di un altro componente PIONEER che porti il marchio Î si può controllare il lettore come se fosse un componente asservito del sistema Se si collega il sistema in questo modo il lettore non può più venire controllat...

Page 77: ...l immagine continua a girare verticalmente Se invece lo possiede girare il controllo di sintonia verticale sino a che l immagine non smette di ruotare In alcuni televisori l immagine può contrarsi verticalmente lasciando due fasce nere in alto ed in basso sullo schermo Questo non è un guasto ma una conseguenza inevitabile della conversione NTSC PAL Uso di Setup Navigator Setup Navigator è stato pr...

Page 78: ...io rispondere di nuovo a tutte le domande dopo la schermata cui si era tornati Per abbandonare Setup Navigator Premere SETUP in qualsiasi schermata e si esce da Setup Navigator Tenere presente che se si esce da Setup Navigator prima di rispondere a tutte le domande non viene fatta alcuna impostazione General A2 V2 Language Audio1 Video1 Exit Move Select Setup using the Setup Navigator Setup Naviga...

Page 79: ...odifica delle impostazioni dei menu della schermata Setup viene descritta a pagina 22 General A2 V2 Language Audio1 Video1 Exit Move Select Compatible with Dolby Digital Setup Navigator Digital Jack Amp Connection Dolby Digital Dolby Digital DTS Dolby Digital MPEG Dolby D DTS MPEG PCM Not Connected SETUP ENTER SETUP ENTER General A2 V2 Language Audio1 Video1 Exit Move Select Changes are saved Setu...

Page 80: ...ere la voce che si desidera vedere Se si è caricato un DVD Scegliere la voce desiderata con i pulsanti del cursore 2 3 5 o quelli numerici quindi premere il pulsante ENTER Se si è caricato un Video CD Usare i pulsanti numerici per scegliere la voce desiderata Note Se si collega questo lettore ad un amplificatore o sintoamplificatore che non possiede un decodificatore la riproduzione consiste solo ...

Page 81: ...stante questo dettaglio differisca da disco a disco di solito premendo MENU TOP MENU o RETURN nel caso di un DVD o RETURN in quello di un Video CD si fa comparire la schermata del menu Per maggiori dettagli in proposito consultare la custodia del disco DVD o Video CD e la loro documentazione Per riprodurre Video CD senza visualizzare schermate di menu I Video CD dotati di sistema PBC Playback Cont...

Page 82: ...oni 1 e 1 1 lampeggiano sullo schermo lasciare andare il pulsante e la riproduzione normale riprenderà Scansione a velocità variabile 1 Per dare inizio alla riproduzione premere brevemente il pulsante FWD o REV 1 durante la scansione Le indicazioni 1 e 1 1 appaiono sullo schermo 2 A seconda del tipo di disco riprodotto potete aumentare la velocità di scansione premendo FWD o REV 1 La velocità di s...

Page 83: ...duzione viene memorizzata La posizione di ripresa rimane in memoria sintanto che il disco caricato non cambia ed anche se il lettore viene spento Premendo il pulsante STOP 7 due volte si fa sì che il disco torni all inizio quando il pulsante PLAY 3 viene premuto di nuovo Il display mostra il tipo di disco DVD o Video CD Premere PLAY 3 La riproduzione riprende dalla posizione da cui era stata inter...

Page 84: ...te sono descritte nel corso di tutto questo manuale La procedura descritta in questa pagina fornisce una descrizione sommaria dell uso della schermata Setup Quando si imposta il lettore per la prima volte Si raccomanda di impostare il lettore per l uso con Setup Navigator pagina 15 Se si sceglie Auto Start Off quando Setup Navigator appare si può ancora fare l impostazione via Setup Navigator attr...

Page 85: ...URN o quello del cursore 2 per abbandonare le opzioni senza fare alcun cambiamento 8 Premere il pulsante RETURN o quello del cursore 2 per tornare alla barra del menu principale e scegliere un altro menu 9 Premere il pulsante SETUP per far scomparire la schermata Setup La schermata Setup si chiude Nota La prossima volta che il pulsante SETUP viene premuto vedrete il menu che avete editato l ultima...

Page 86: ...e SETUP V2 Video1 General A2 Language Exit Move Audio DRC Dolby Digital Out DTS Out 96kHz PCM Out MPEG Out Audio1 Off Dolby Digital Dolby Digital 3 PCM 96kHz 3 48kHz MPEG 3 PCM Change Dolby Digital output mode SETUP Compatibilità fra uscita digitale audio e componente AV DVD Questo lettore può emettere segnali digitali audio dei formati Dolby Digital DTS MPEG e segnali con frequenza di campionamen...

Page 87: ...ff DTS Impostazione di fabbrica Nota Se si è collegato il lettore a componenti non in grado di decodificarli scegliere sempre l impostazione Off Se un segnale DTS viene emesso senza venire decodificato il rumore digitale che ne risulta può danneggiarvi l udito ed i diffusori Uscita 96 kHz PCM Out Questo lettore è in grado di emettere segnali digitali con una frequenza di campionamento pari a 96 kH...

Page 88: ... file MP3 Il livello di uscita digitale audio viene ridotto quando si riproducono DVD Dolby Digital a due canali o Video CD con la modalità TruSurround impostata Se si riproduce un DVD Dolby Digital multicanale con la conversione Dolby Digital in PCM attivata vedi pagina 24 e TruSurround impostato non viene emesso segnale digitale La qualità dell effetto di circondamento varia a seconda del disco ...

Page 89: ...un televisore Wide scegliere il modo 16 9 Wide appunto Se si usa un televisore o monitor di tipo Wide DVD di formato standard Se si vede un DVD di formato standard su di un televisore Wide data la larghezza insufficiente dell immagine sui suoi due lati possono apparire due fasce nere Impostazione Wide DVD di formato Wide Tenere presente che vi sono alcuni formati di questo tipo che fanno comparire...

Page 90: ...deo Out nel menu Video 1 della schermata Setup del menu Expert pagina 23 Nota Questa impostazione vale solo con DVD che contengono materiale video di proporzioni 4 3 Impostazioni Position Wide Position Normal Off Impostazione di fabbrica Impostazioni S1 S2 Impostazione di fabbrica Impostazione del formato di uscita del segnale per il connettore AV CONNECTOR RGB TV Quando i collegamenti vengono fat...

Page 91: ...to Cinema Produce un immagine simile a quella vista al cinema Animation Produce immagini dai colori vivaci Memory1 Memory2 e Memory3 Queste sono impostazioni memorizzabili da parte dell utente Per maggiori dettagli vedere la sezione Regolazione della qualità delle immagini a pagina 30 Impostazione di fabbrica 3 Usare uno dei pulsanti del cursore 2 3 5 per scegliere una delle impostazioni predefini...

Page 92: ...DISPLAY ENTER Fine Focus On Off Move Select Check Video Memory Select Video Setup 4 Usare i pulsanti del cursore 5 per scegliere l impostazione da fare Si possono regolare singolarmente tutti i seguenti parametri Fine Focus Attivare questa modalità per rivelare più dettagli cioè dare maggiore risoluzione dell immagine Contrast Permette di regolare il contrasto degli elementi dell immagine Sharpnes...

Page 93: ...ssiede le informazioni necessarie per la funzione di angolazioni multiple Le custodie di dischi che possiedono angolazioni differenti di una stessa scena riportano l icona Quando le locazioni su dischi che possiedono varie angolazioni vengono riprodotte viene visualizzato l indicatore Per cancellare tale indicazione impostare Angle Indicator su Off nel menu Video 2 della schermata Setup nel modo d...

Page 94: ...o sulla riproduzione di un DVD particolare RANDOM PROGRAM SEARCH MODE 0 9 8 7 10 6 5 4 CLEAR 3 2 1 1REV FWD PLAY 3 PAUSE 8 STOP 7 eSTEP SLOWE NEXT PREV 4 RETURN REPEAT CONDITION MEMORY LAST MEMORY ANGLE SUB TITLE AUDIO SETUP MENU TOP MENU DISPLAY 5 3 2 Î OPEN CLOSE REPEAT A B 5 5 5 5 ENTER AUDIO Cambio della lingua audio funzione multi lingue DVD Il DVD può contenere segnale audio Dolby Digital PC...

Page 95: ...eo Scelta di una lingua audio nelle preferenze La lingua audio che preferite ascoltare normalmente può venire scelta automaticamente attraverso le preferenze Anche quando la lingua audio viene cambiata durante la riproduzione premendo il pulsante AUDIO la lingua scelta con questa regolazione rimane come default anche quando si cambia DVD Portare cambiamenti nella finestra Audio Language del menu L...

Page 96: ...per i sottotitoli Le pressioni seguenti permettono di passare da una all altra delle lingue disponibili Note Tenere presente che la lingua dei sottotitoli non può venire cambiata se nel disco ne è registrata una sola Alcuni dischi possono non permettere il cambiamento della lingua dei sottotitoli In tal caso viene visualizzata l indicazione Per cancellare i sottotitoli durante la riproduzione prem...

Page 97: ...e 2 3 per scegliere o List of Languages o Code 3 Se si sceglie List of Languages usare i pulsanti del cursore 5 per scegliere la lingua Per lingue che sono mostrate solo sotto forma di codici consultare la lista Lista codici di lingua a pagina 55 Se si sceglie Code usare i pulsanti del cursore 5 per digitare le cifre della lingua Usare i pulsanti del cursore 2 3 per cambiare la posizione del curso...

Page 98: ...a Setup pagina 23 Questa impostazione non può venire scelta durante la riproduzione Impostazioni With Audio Selected Subtitle Impostazione di fabbrica Scelta di una lingua per i menu dei DVD Expert Oltre a contenere varie lingue per l audio ed i sottotitoli un DVD può contenere differenti lingue per i menu Impostando una certa lingua come default essa viene usata ogni volta che essa viene incontra...

Page 99: ...oduzione di immagine ferma premendo il pulsante PAUSE 8 o PLAY 3 si riporta la riproduzione alla normalità Riproduzione al rallentatore La riproduzione in direzione inversa non è utilizzabile con Video CD 1 Durante la riproduzione di immagine ferma mantenere premuto STEP SLOW e o E sino a che il rallentatore non ha inizio 2 Per cambiare la velocità del rallentatore premere STEP SLOW e o E più volt...

Page 100: ...le e fermarsi immediatamente In tal caso viene visualizzato il marchio La ricerca a tempo non è possibile con CD e dischi contenenti file MP3 Durante la ricerca a tempo con DVD la riproduzione può iniziare da un punto leggermente differente da quello indicato La ricerca a tempo non è possibile a disco fermo La ricerca a tempo non è possibile durante la riproduzione PBC di Video CD Per eseguire la ...

Page 101: ...gliere il brano o cartella precedente Per scorrere rapidamente verso l alto o verso il basso una lunga lista di cartelle e brani mantenere premuti i pulsanti del cursore 5 ENTER riprodurre la cartella o il brano attualmente scelti I brani MP3 che non sono riproducibili con questo sistema vengono automaticamente saltati e sul display appare l indicazione UNPLAYABLE MP3 FORMAT MENU permette di uscir...

Page 102: ...nizio di lì La ripetizione A B può venire fatta solo all interno di uno stesso titolo capitolo o brano Per cancellare la riproduzione ripetuta A B Premere il pulsante CLEAR La riproduzione continua ma la funzione di ripetizione viene cancellata Ritorno ad una posizione specificata DVD Video CD CD 1 Premere il pulsante REPEAT A B nella posizione desiderata 2 Quando si vuole tornare alla posizione i...

Page 103: ...e la riproduzione del titolo capitolo o brano attuale riprende dall inizio Per abbandonare la riproduzione casuale Premere il pulsante CLEAR Ciò vi riporta alla riproduzione normale di capitoli in ordine dal capitolo o brano attualmente in riproduzione Note Nel caso dei dischi Video CD la riproduzione casuale non è possibile durante la riproduzione se il menu è visualizzato riproduzione PBC Per es...

Page 104: ...a e non si possono programmare due o più fasi consecutive Per cancellare un numero Usare i pulsanti del cursore 5 2 3 per evidenziare il numero da cancellare e quindi premere il pulsante CLEAR Il numero viene cancellato Se dopo di esso si trovavano altri numeri essi vengono aggiornati automaticamente Per inserire un numero Usare i pulsanti del cursore 5 2 3 per evidenziare il numero da far seguire...

Page 105: ...D o CD premere il pulsante PROGRAM per poter controllare il contenuto di un programma La schermata di programmazione visualizza quindi il programma attuale Con un DVD scegliere il tipo di programma titolo o capitolo con i pulsanti del cursore 2 3 Il titolo o capitolo programmato del DVD può quindi venire confermato sulla schermata di programmazione Per aggiungere un programma 1 Premere il pulsante...

Page 106: ...alizzato in alto a sinistra sullo schermo Una volta che si è impostato un numero valido di brano il nome del relativo brano appare sul display ENTER PROGRAM MP3 Program Exit Play Move Track 001 10 001 FOLDER1 La navigazione viene fatta attraverso i seguenti comandi Pulsanti del cursore permettono di scorrere il programma CLEAR cancella la voce al momento scelta dalla lista dei programmi ENTER dà i...

Page 107: ...ory il lettore salva il programma e lo richiama ogni volta che viene caricato quel disco Se il numero di programmi in memoria supera i 24 i programmi più vecchi vengono cancellati per far posto a quelli nuovi 1 Usare il pulsante del cursore per evidenziare Program Memory ed usare i pulsanti 3 del cursore per scegliere On 2 Premere il pulsante ENTER Il programma viene memorizzato Nota Se si carica ...

Page 108: ...EXT PREV 4 RETURN REPEAT CONDITION MEMORY LAST MEMORY ANGLE SUB TITLE AUDIO SETUP MENU TOP MENU DISPLAY 5 3 2 Î OPEN CLOSE REPEAT A B 5 5 5 5 ENTER LAST MEMORY STOP 7 PLAY 3 CLEAR Ripresa della riproduzione dal punto di pressione di LAST MEMORY 1 Caricare il disco per il quale si era memorizzato il punto Last Memory Alcuni DVD iniziato la riproduzione automaticamente quando vengono caricati In tal...

Page 109: ...o nuovo Se si portano cambiamenti alle impostazioni in memoria premere il pulsante CONDITION MEMORY durante la riproduzione per memorizzare le nuove impostazioni La commutazione del modo multi lingue e di altri modi è automatica nel caso di alcuni dischi Memorizzazione di impostazioni per DVD visti spesso Condition Memory DVD Si possono memorizzare nel lettore le impostazioni desiderate per DVD us...

Page 110: ...egistrare una password vale a dire un numero a quattro cifre Prima di impostare la nuova password vi verrà chiesto di confermare quella attuale Ogni volta che vi viene chiesto di impostare o confermare la password fare quanto segue 1 Scegliere Password dall impostazione Parental Lock e quindi premere il pulsante ENTER 2 Usare i pulsanti del cursore 5 o quelli numerici per scegliere un numero fra 0...

Page 111: ...o al livello scelto ad indicare che l accesso è possibile 3 Premere il pulsante ENTER per impostare il nuovo livello Il nuovo livello di blocco viene così impostato e la schermata torna a visualizzare il menu General Per tornare alla schermata General senza portare alcun cambiamento premere il pulsante RETURN Impostazione del codice del paese È possibile cambiare il codice del paese ogni volta che...

Page 112: ...Attivazione e disattivazione dello screen saver Expert Per proteggere lo schermo da possibili danni dopo la visualizzazione di una stessa immagine ferma per molto tempo è possibile fare uso di una funzione chiamata screen saver che si attiva automaticamente al momento opportuno Con l impostazione predefinita lo screen saver è attivo Tuttavia esso può venire attivato e disattivato a piacere Portare...

Page 113: ...a RANDOM PROGRAM SEARCH MODE 0 9 8 7 10 6 5 4 CLEAR 3 2 1 1REV FWD PLAY 3 PAUSE 8 STOP 7 eSTEP SLOWE NEXT PREV 4 RETURN REPEAT CONDITION MEMORY LAST MEMORY ANGLE SUB TITLE AUDIO SETUP MENU TOP MENU DISPLAY 5 3 2 Î OPEN CLOSE REPEAT A B 5 5 5 5 ENTER DISPLAY Play Track 3 10 53 5 23 3 56 Play Track 3 10 53 5 23 1 27 Play All 3 12 10 53 70 19 59 26 numero brano attuale numero totale brani tempo trasc...

Page 114: ...older 001 002 003 004 005 Track 1 10 1 13 1 5 1 4 1 8 Track 1 9 1 11 1 3 1 22 1 15 1 2 Information MP3 DISPLAY MP3 Track 3 0 03 3 32 3 29 Play All 1 10 1 13 66 32 66 20 numero brano attuale tempo trascorso brano attuale tempo rimanente brano attuale tempo totale rimanente brani attuali numero brano attuale Display spento durata totale brani attuali tempo rimanente CD durata totale CD Play Track 1 ...

Page 115: ...luoghi esposti a luce solare diretta o calore ad esempio un automobile parcheggiata al sole Non applicare adesivi o etichette ai dischi Essi potrebbero altrimenti non poter venire riprodotti normalmente Non caricare più di un disco alla volta nel lettore AVVERTENZE PER L USO DEI DISCHI Tutti i diritti riservati La riproduzione in pubblico la trasmissione e la duplicazione non autorizzate sono cont...

Page 116: ... fibre lunghe su di un letto o sofà e non coprirlo con panni Ciò impedirebbe la dispersione del calore che genera e potrebbe causare danni seri EVITARE IL CALORE INTENSO NON installare l unità vicino a apparecchi che generino molto calore ad esempio un amplificatore Se la si installa in uno scaffale porla più in basso possibile ma senza che sia esposta a polvere e separarla dall amplificatore per ...

Page 117: ...nlandic kl Cambodian km Kannada kn Kashmiri ks Kurdish ku Kirghiz ky Latin la Lingala ln Laothian lo Lithuanian lt Latvian lv Malagasy mg Maori mi Macedonian mk Malayalam ml Mongolian mn Moldavian mo Marathi mr Malay ms Maltese mt Burmese my Nauru na Nepali ne Norwegian no Occitan oc Oromo om Oriya or Panjabi pa Polish pl Pashto Pushto ps Quechua qu 0721 0801 0809 0818 0821 0825 0901 0905 0911 091...

Page 118: ...e l impostazione fatta vale solo per i DVD Le impostazioni entrano in funzione la prossima volta che si carica un DVD Le impostazioni fatte sono state cancellate Quando l unità viene spenta da una caduta di tensione o scollegando il cavo di alimentazione tutte le impostazioni fatte vengono perse Prima di scollegare il cavo di alimentazione premere STANDBY ON e controllare che OFF scompaia dallo sc...

Page 119: ...ecodificatore DTS compatibile Dalla schermata del menu del disco o facendo uso del pulsante AUDIO scegliere un impostazione non DTS pagine 19 e 32 Se quest unità viene collegata con un amplificatore o decodificatore non DTS compatibile con un cavo audio digitale impostare DTS Out su Off nel menu Setup Se ciò non viene fatto la riproduzione di un disco DTS produce solo rumore pagina 25 Se quest uni...

Page 120: ...una seduta è un processo di registrazione completo e può venire considerata un disco a sé stante Sistema Dolby Digital Usando un massimo di 5 1 canali audio questo sistema di circondamento di alta qualità viene usato in molti dei migliori teatri del mondo Sistema DTS L acronimo DTS sta per Digital Theater System DTS è un sistema di circondamento differente da quello Dolby Digital ed è diventato po...

Page 121: ...mo Un DVD può contenere sottotitoli in sino a 32 lingue La funzione di sottotitolazione può venire usata per scegliere la lingua desiderata Terminale S Video Collegando un uscita S Video del lettore ad un televisore o monitor dotato di ingresso S Video attraverso un cavo S Video si riproduce l immagine in modo più chiaro perché le varie componenti di luminanza e colore vengono trasmesse separatame...

Page 122: ...scita R rosso o C Crominanza 4 Terra 17 Terra 7 Uscita B blu 19 Uscita video o Y luminanza 8 Stato 21 Terra Uscita audio Livello di uscita Audio 200 mVrms 1 kHz 20 dB Numero di canali 2 Prese RCA Caratteristiche audio digitale Risposta in frequenza da 4 Hz a 44 kHz freq campionamento DVD 96 kHz Rapporto S R 118 dB Gamma dinamica 103 dB Distorsione armonica complessiva 0 0016 Wow e flutter Non misu...

Page 123: ...Italiano 61 It INFORMAZIONI ADDIZIONALI ...

Page 124: ...40 Long Beach California 90801 1540 U S A PIONEER ELECTRONICS OF CANADA INC 300 Allstate Parkway Markham Ontario L3R OP2 Canada PIONEER EUROPE NV Haven 1087 Keetberglaan 1 B 9120 Melsele Belgium TEL 03 570 05 11 PIONEER ELECTRONICS AUSTRALIA PTY LTD 178 184 Boundary Road Braeside Victoria 3195 Australia TEL 03 9586 6300 PIONEER ELECTRONICS DE MEXICO S A DE C V San Lorenzo 1009 3er Piso Desp 302 Co...

Reviews: