background image

2

www.pinter-gmbh.com

Any given information and/or technical data in this document have been prepared very carefully and reflect the state 

of the art when printed. Information and/or technical data may change without prior notice.

All given information and/or technical data in this document are not binding and for information purposes only. Bin-

ding information and/or technical data can be obtained from our quotations and/or order confirmations.

Please understand that we cannot be held responsible for the correctness of any given information and/or technical 

data in this document.

All mentioned product names, product designations, product descriptions and logos are trademarks and property of 

their respective owners. MANOCOMB

®

, MINICOMB

®

, INTELLICOMB

®

, INDUSENS

®

, INDUSWITCH

®

 und CHEM-

SEAL

®

 are trademarks and/or registered trademarks of the PINTER Mess- und Regeltechnik GmbH and/or their 

affiliated companies in Germany, the European Union, Switzerland and/or other countries. 

Reproduction and / or duplication of this manual or any portion of this manual is prohibited without permission.

Sample configurations are shown on the title page, hence the delivered product may differ from the depicted pro-

ducts. 

This document was originally issued in German language.

Product Description

The product is an electronic pressure switch for measuring the pressure and / or vacuum in pressure lines of - de-

pending on model configuration - compressed air, neutral gases, corrosive gases and liquids.  The pressure switch 

has - depending on the version - 1 or 2 digital outputs (PNP) or 1 digital output and 1 analogue output (4-20 mA).

About these instructions

This instruction contains important information, in order to safely and properly install, operate and maintain the MINI-

COMB-EDS pressure switch and also information you on how to fix simple failures youself.

Before working with the MINICOMB-EDS pressure switch, make sure that you have read and understand these 

instructions completely.

Further documents

The MINICOMB-EDS pressure switch is a component. Please also read the instructions for the rest of your system. 

This includes: 

• 

system documentation of the manufacturer

Intended use

• 

Only use the product in industrial applications.

• 

Only use the product with media, that is - depending on model configuration - compatible with aluminium / Al

2

O

/ FKM or stainless steel 1.4404 (AISI 316L) / Al

2

O

/ FKM.

• 

Only use the product within the specified operating conditions and performance limits. 

• 

Please also note operating instructions of other system components, including the system documentation of 

the manufacturer.

• 

Please also note generally applicable statutory and other binding regulations of the European and national 

legislation and regulations in your country for accident prevention and environmental protection.

• 

Prevent mechanical loads on the device under any circumstances. Never use the device as a handle or shoul-

der. Do not place objects on it.

• 

You must not make alterations or modifications to the device!

• 

All activities with the product may only be performed by a specialist or by a trained person under the supervi-

sion of a specialist. A specialist is someone who based on their technical training, knowledge and experience 

and his knowledge of the relevant provisions of his assigned job is able to identify potential hazards and take 

appropriate safety measures. A specialist must comply with the relevant subject-specific rules. Note that there 

may be additional requirements in the country of use.

• 

Always turn off pressure and power of the relevant part of the facility before mounting the unit or unplug or 

plug. Secure the part from re-powering or re-pressuring. During installation hang out warning signs that warn 

from re-powering or re-pressuring.

The intended use also includes that you have read and understood these instructions.

Summary of Contents for MINICOMB-EDS

Page 1: ...Operating Instructions MINICOMB EDS Electronic Pressure Switch for Pressure and Vacuum ...

Page 2: ... fix simple failures youself Before working with the MINICOMB EDS pressure switch make sure that you have read and understand these instructions completely Further documents The MINICOMB EDS pressure switch is a component Please also read the instructions for the rest of your system This includes system documentation of the manufacturer Intended use Only use the product in industrial applications ...

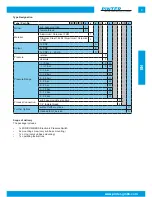
Page 3: ... absolute 5 Pressure Range 1 0 bar 0 06 1 1 bar 0 09 0 1 bar 20 0 1 6 bar 22 0 2 5 bar 23 0 4 bar 24 0 6 bar 25 0 10 bar 26 0 16 bar 27 0 25 bar 28 Process Connection sub base mounting standard P 1 4 female thread 4 Further Options without further options O cleaned for O2 service A Scope of delivery The package includes 1x MINICOMB EDS Electronic Pressure Switch 2x mounting screw only sub base mou...

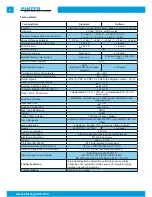
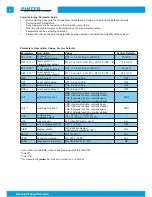
Page 4: ...Reset Point adjustable 0 5 FS 100 FS adjustable 0 5 FS from switch point Switching Function adjustable normally open normally closed hysteresis mode window mode Response Time 10ms Switching Current DC max 0 5 A Max Load Resistance 600 Ω Display OLED Switch State Indicator 1 LED per channel yellow Menu Navigation oriented to VDMA standard sheet 24574 1 with addition plain text menu Menu Language ad...

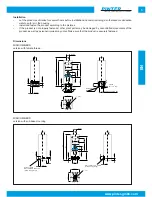
Page 5: ...perly fastened other plant parts may be damaged by uncontrolled movements of the product as well as personal injuries may occur Make sure that the product is securely fastened Dimensions MINICOMB EDS version with female thread S Sealing Surface R 2 4 µm a Torque M 12 Nm A 1 1 4 female thread ISO 228 A coded MINICOMB EDS version with sub base mounting S O Ring Seal 5x1 5 NBR within supply range A c...

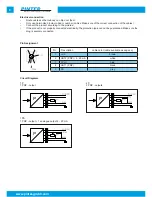
Page 6: ...duct accurding to the pictures If the product is not properly connected electrically the protection type can not be guaranteed Make sure the plug is securely connected Pin Assignment Pin Description cable color cable available as sep acc 1 Ub brown 2 OUT2 PNP 4 20 mA white 3 0 Volt blue 4 OUT1 PNP black 5 FE grey 1P 1 PNP output 1PA 1 PNP output 1 analogue output 4 20 mA 2P 2 PNP outputs Circuit D...

Page 7: ...www pinter gmbh com 7 EN ...

Page 8: ... 50 s OFF DR1 re set switch delay 1 OFF 0 2 up to 50 s OFF DS2 2 switch delay 2 OFF 0 2 up to 50 s OFF DR2 2 re set switch delay 2 OFF 0 2 up to 50 s OFF OU1 switching function 1 HNO hystersis function normally open HNC hystersis function normally closed FNO hystersis function normally open FNC hystersis function normally closed HNO OU2 2 switching function 2 HNO hystersis function normally open H...

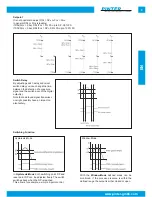
Page 9: ...ss pressure is within the defined range the output is either closed or open Setpoint It is not possible to adjust RPx SPx or FLx FHx In general SPx or FHx is leading if SPx FHx 0 bar RPx FLx 0 FS up to SP 0 5 FS if SPx FHx 0 bar RPx FLx SP 0 5 FS up to 100 FS Switch Delay By adjusting switch delay and re set switch delay you can change the time between the detection of a pressure signal and the sw...

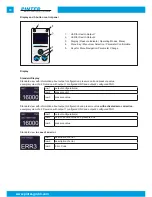
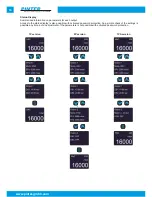
Page 10: ...ure unit row 3 pressure value row 1 description of error row 2 description of error row 3 Error Code Standard view with information about output configuration and pressure value with activated zero correction exemplary view of a 2P version with output 1 configured HNC and output 2 configured FNO Standard view in case of an error 1 LED for Switch Output 1 2 LED for Switch Output 2 3 Display Pressur...

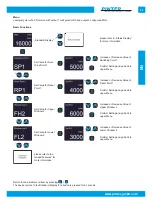
Page 11: ... of Reset Point 1 Confirm Setting and go back to upper Menu Increase or Decrease Value of Upper Window 2 Confirm Setting and go back to upper Menu Standard Display Set Value for Lower Window 2 Increase or Decrease Value of Lower Window 2 Confirm Setting and go back to upper Menu please refer to Ex tended Features for more information Basic Functions Return to the parent menu item by pressing The d...

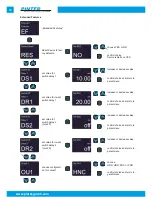
Page 12: ...on YES increase or decrease value confirm choice and return to parent menu increase or decrease value confirm choice and return to parent menu increase or decrease value confirm choice and return to parent menu Extended Features set value for re set switch delay 1 increase or decrease value confirm choice and return to parent menu choose configurati on for output 1 choose HNC HNO FNC or FNO confir...

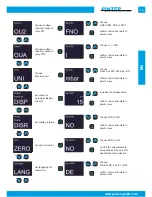
Page 13: ...e for automatic display shut off set zero correction set language for text menu choose mbar bar kPa MPa psi or confirm choice and return to parent menu choose YES or NO on YES the actual pressure value will be set as zero NO deactivates zero correction increase or decrease value confirm choice and return to parent menu choose DE EN ES FR IT or OFF confirm choice and return to parent menu set displ...

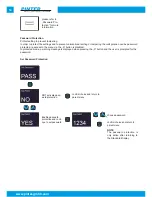
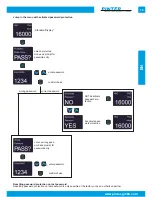
Page 14: ... ie access to the menu via the S button is disabled In protected mode a warning message is displayed when pressing the S button and the user is prompted for the password Set Password Protection NOT activate pass word protection Enable password protection and conti nue to set password choose password confirm choice and return to parent menu confirm choice and return to parent menu NOTE The password...

Page 15: ...ice Standard Display note on wrong pass word and prompt for password entry enter password confirm choice NOT deactivate password pro tection deactivate pass word protection Resetting password protection on lost password Resetting password protection on lost password is only possible at the factory or by an authorized partner correct password wrong password ...

Page 16: ...s for each output Access to the status display is also possible with activated password protection So a simple check of the settings is possible any time but an adjustment of the parameters is not possible with activated password protection 1P version 2P version 1PA version ...

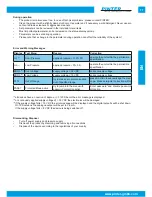
Page 17: ...2 VDC correct supply voltage ERR3 3 Low Voltage supply voltage 15 VDC correct supply voltage ATT2 Out of Range try to make zero point correction out of specified range press S button to acknowledge the mes sage Make zero point correction within the specified range PASS Protected Mode active try to jump into the menu with password protection active Enter password and disable password protection 1 a...

Page 18: ...18 www pinter gmbh com ...

Page 19: ...www pinter gmbh com 19 EN ...

Page 20: ...Regeltechnik GmbH Kraichgaublick 17 Technologiepark Neckartal Odenwald 74847 Obrigheim Germany Phone 49 6262 92670 0 Fax 49 6262 92670 99 E Mail info pinter gmbh de Internet www pinter gmbh com BA MINICOMB EDS 14R1 EN ...

Reviews: