


2
CAMERA
CONNECTING
B
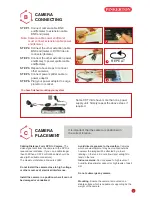
STEP 1. Connect camera cable BNC
end(female) to extension cable
BNC end(male).
Note: Camera cable power end(male)
must connect extension cable power
end(female).
STEP 2. Connect the other extention cable
BNC end(male) to DVR Video in
connector(female).
STEP 3. Connect the other extention power
end(male) to power splitter cable
end(female).
STEP 4. Repeat above steps to connect
other cameras
STEP 5. Connect power splitter cable to
power adaptor
STEP 6. Plug your power adaptor to surge
protector or socket.
1
2
3
REPEAT
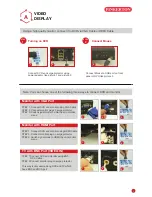
You have finished mounting your system
4
5
6
CAMERA
PLACEMENT
C
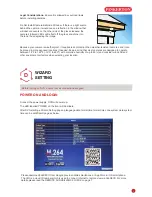
It is important that the camera is positioned in
the correct location.
Cabling Distance Form DVR to Camera. The
video signal sent from the camera to the DVR is
reduced over distance. If you use a cable longer
than 30M then a CAT5 or RG59 cable should be
used (with suitable connectors).
The maximum distance allowed is 200M.
Do not install the camera close to high voltage
or other sources of electrical interference.
Install the camera in a position where it can not
be damaged or vandalised.
Avoid direct exposure to the weather. Cameras
which are weatherproof may be mounted outside
however the image will be affected by rain etc
landing on the lens. Do not allow direct sunlight to
land on the lens.
Indoor cameras. Do not expose to high levels of
humidity (steam/water vapour) or high levels of dust/
dirt.
Do not submerge any camera
Mounting. Ensure the camera is mounted on a
stable surface which is capable of supporting 5x the
weight of the camera.
Some CCTV kits have more than one power
supply unit. Simply repeat the above steps if
required.